


使用Cocos2D和Box2D制作《Jetpack Joyride》(2)
作者:Bogdan Vladu
前面我们已经制作出带有背景美工元素的可行关卡(第1部分详见此处)。
在第2部分中,我们将着眼于添加游戏活动元素,包括激光、硬币、飞行角色及初始触碰活动等。
要继续本教程,你需持有我们第1部分谈到的RocketMouse项目内容。
Jetpack Joyride from raywenderlich.com
入门指南
制作《Jetpack Joyride》游戏的下一步是,添加可供玩家直接互动的游戏元素:激光和硬币。添加这些元素也是学习如何基于LevelHelper落实动画和激光的绝佳方式。
由于我们希望激光间断运作,所以我们需要将其制作成动画效果。至于硬币,我们希望把握玩家同其互动的时间点,但我们不希望玩家弹开它们。要做到这点,我们需要赋予其传感能力。
把握动画和触碰反应基本要素后,我们会将话题转移至游戏的其他元素,包括游戏玩家。我们将学习如何创造标签,追踪触碰活动,然后将其同若干真实代码整合。
在开始内容前,请打开你的当前LevelHelper项目,将关卡状态设置成level03。在进行此过程时,将这一新关卡添加至Xcode项目中,按照下列操作更新代码,将关卡状态设置成level 3:
lh = [[LevelHelperLoader alloc] initWithContentOfFile:@”level03″];
着手动画元素:添加激光
我们对于玩法动画元素的运用相当简单。当玩家同激光接触时,我们只需测试动画帧所处位置。若动画帧处于激光关闭状态,玩家就不会有性命之忧,如果处于激光开启状态,玩家就会死亡。
要创造激光动画,我们需要查看LevelHelper右侧的图像列表,右击其中的一个激光图像。然后在菜单中选择“Open SpriteHelper scene”。
openSHSceneFromSpritesList
SpriteHelper会呈现正确场景。转换至Animation版块,点击Add Frame。这一操作将给动画添加两个精灵。
通过点击上下箭头,以正确顺利安排游戏画面。将速度设定成3,选中Start At Launch和Loop Forever选项。

SHFirstAnimation
完成这些后,点击Command-S保存画面。
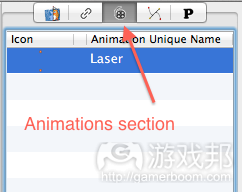
现在我们回到LevelHelper,着手处理我们刚刚创建的动画。此时你会发现Animations版块已被添加至LevelHelper中,如下图所示。
animationsInLH
激活动画有两种方式。我将逐一进行陈述。
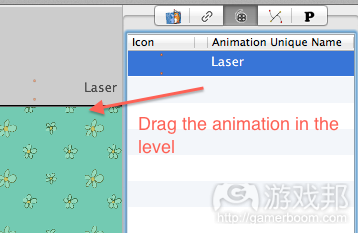
第一种方式就是将动画拖到关卡(游戏邦注:这和操作精灵的方式类似)。
dragAnimationInLevel
第二种方式是,将动画同已存在于关卡中的精灵连接起来。在这种情况下,我会将动画添加至激光画面中。
spriteSectionAnimExample
现在进入精灵版块。我们还没有将激光精灵添加至关卡中,所以现在要将列表中的一个精灵拖到关卡中,要选定此精灵。然后跳到General Properties版块,从列表中选择激光动画。
spriteSectionAnimExample 2
继续在关卡中添加激光,直到达到满意的危险系数。你可以基于选择精灵时出现的控键旋转和调节laser。
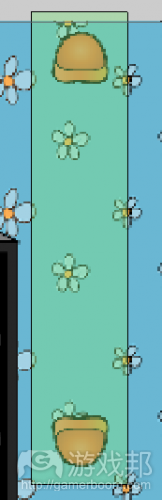
我的关卡现在呈现如下样式:

levelWithLasers
若查看laser形状,你会发现精灵现在呈现四方形模式。
laserShapeFull
就我们的游戏来说,我们希望老鼠只在击中真正的激光时死去,所以我们不妨缩小模型的尺寸。
要做到这点,我们可以采用定义小猫和小狗形状的方式,或者我们可以通过预定义的数值修改Physics菜单下的Shape Border属性。现在你已知道如何通过位点创造物件形状,下面就来尝试第二种方式。
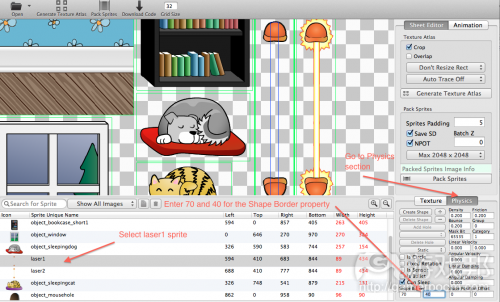
在LevelHelper的Images版块中选择laser1图像,然后右击,选择Open SpriteHelper Scene。
当呈现SpriteHelper scene时,点击“laser1”精灵。由于激光是个动画,我们需要修改动画首个帧数的物理属性——在此就是指“laser1”精灵。动画包含第一个帧数的物理属性。
选中laser1后,进入Physics菜单,在Shape Border数值中输入70和40。精灵的最终模型大小是原本尺寸减去你所输入的数值。你可以在画面上看到视觉表征。
laserShapeDefine
回到LevelHelper,我们会看到所有laser都被更新为正确形状。
现在选中所有laser,将它们添加到我们的parallax(游戏邦注:影视编辑软件)。按比例输入1和0。
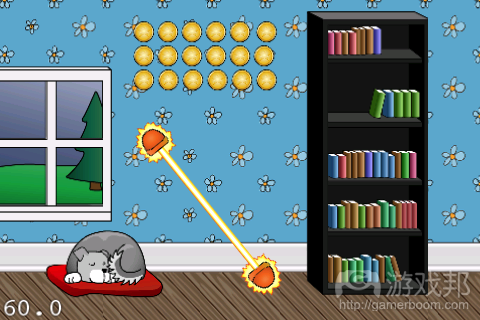
保存关卡,若创建和运行游戏后你会发现,它现在具备动态laser。

AnimatingLasers
处理传感设置:添加硬币
现在就轮到硬币。记住,我们想要创建硬币传感器,这样老鼠就能够直接穿过它们,不会弹开,但我们依然能够察觉到触碰活动的发生。
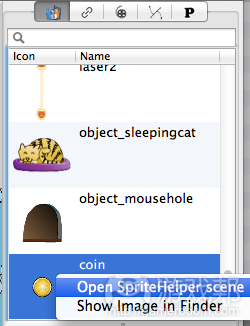
要创造硬币传感器,从LevelHelper中的精灵列表中选择硬币精灵,右击,然后选择Open SpriteHelper Scene。
openCoinSHScene
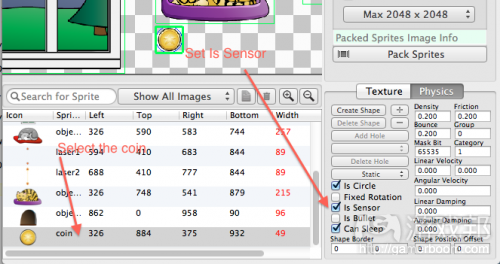
开放SpriteHelper scene后,选择硬币精灵,选中Physics菜单中的Is Sensor、Is Circle和Can Sleep选项。然后保存画面。
* Is Sensor:让身体触发触碰活动,但不呈现触碰反应
* Is Circle:让身体的形状呈现圆形模式
* Can Sleep:加速物理元素的模拟过程
setCoinSensor
现在将硬币精灵添加到关卡,将其放在你认为合适的位置。通过Clone Tool复制硬币,基于你青睐的位移方向。
cloneToolDirection
现在我的关卡呈现如下模式:

levelWithCoins
将硬币添加至parallax,将比例调成1和0,然后保存关卡。编辑和运行你的项目,现在你拥有硬币元素。
AddingCoins
添加玩家元素
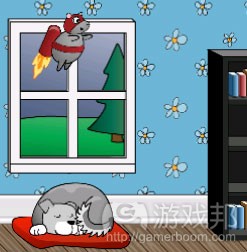
现在我们拥有包含基本要素的不错关卡,下面就来创建玩家角色及其相应的动画内容。
打开SpriteHelper,进入File\New创建空的精灵工作表。然后在Finder中点击目录(游戏邦注:这里保存游戏的美工元素)。在此你需要将所有老鼠精灵和火箭火焰拖到SpriteHelper窗口。

mouseAnimationDrag
现在我们需要通过刚输入的美工元素创建单个画面。这是创建动画前的必要步骤。LevelHelper和SpriteHelper支持的所有引擎都将动画帧数视作图像文件的组成元素。
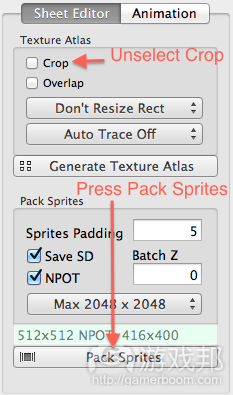
现在切换到Sheet Editor菜单,取消选定Crop,因为我们不希望改变老鼠动画的帧数。点击Pack Sprites,将所有精灵都分配到精灵表单中。
packMouseFrames
然后,切换到SpriteHelper的Animation版块。我们将在此创建所有必要的动画内容,和我创建laser的过程一样。
运用你先前学到的技巧,创建包含下述属性的5个动画内容。
若你忘记如何创建动画,点击+按键,双击进行重命名。然后选定动画的规定帧数,设定速度,记得给需要进行循环的动画选定Loop Forever。
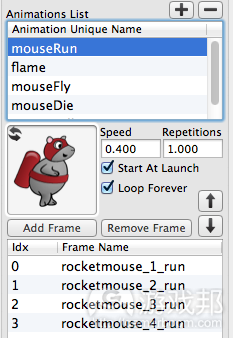
1)动画名称:mouseRun
Loop Forever: YES
Speed: 0.400(默认)
Repetition: 1.000(默认)
Frames: rocketmouse_1_run, rocketmouse_2_run, rocketmouse_3_run, rocketmouse_4_run
mouseRun
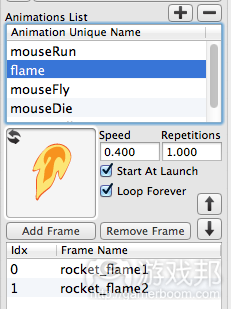
2)动画名称:flame
Start At Launch: YES
Loop Forever: YES
Speed: 0.400(默认)
Repetition: 1.000(默认)
Frames: rocket_flame1, rocket_flame2
rocketFlame
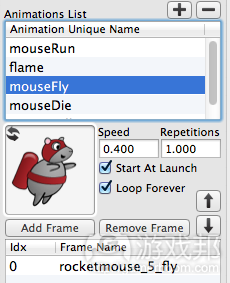
3)动画名称:mouseFly
Start At Launch: YES
Loop Forever: YES
Speed: 0.400(默认)
Repetition: 1.000(默认)
Frames: rocketmouse_5_fly
mouseFly
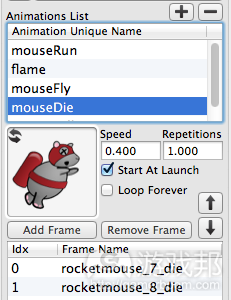
4)动画名称:mouseDie
Start At Launch: YES
Loop Forever: NO
Speed: 0.400(默认)
Repetition: 1.000(默认)
Frames: rocketmouse_7_die, rocketmouse_8_die
mouseDie
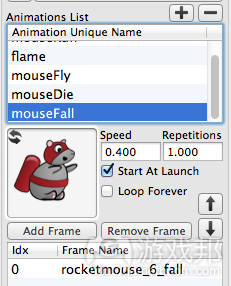
5)动画名称:mouseFall
Start At Launch: YES
Loop Forever: NO
Speed: 0.400(默认)
Repetition: 1.000(默认)
Frames: rocketmouse_6_fall
mouseFall
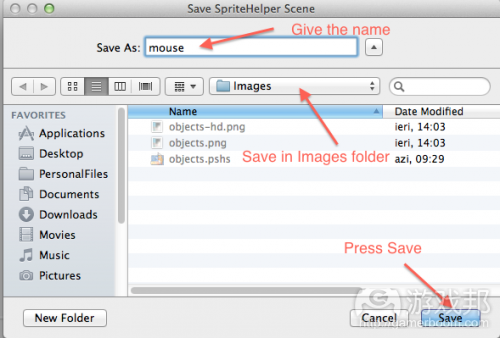
完成这些操作后,点击Command-S,保存画面。在Save对话框中,点击Xcode项目Resources文件夹中的Images文件,将画面保存为“mouse”。
saveMouseImage
回到LevelHelper,我们将在Animation区块中找到所有新创建的动画内容。
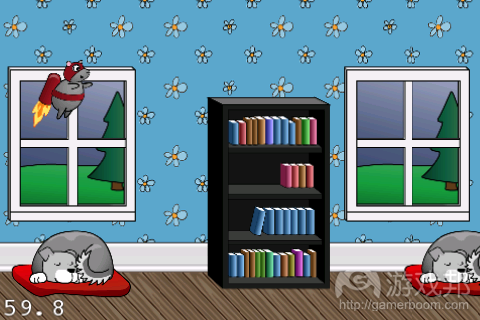
将mouseRun动画拖到主页面(有红色边界的页面),然后置于页面左侧。
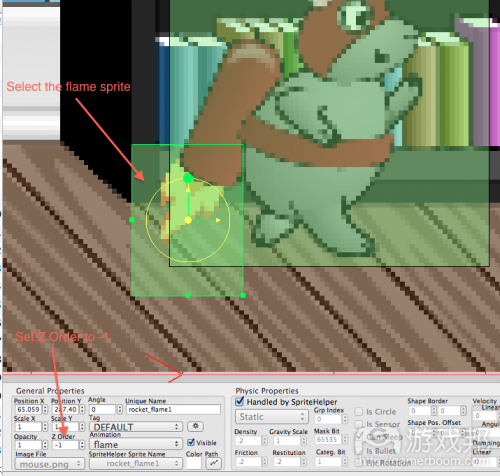
然后拖动火焰精灵,将其放置在老鼠背后的红色坦克下。
最终画面如下:
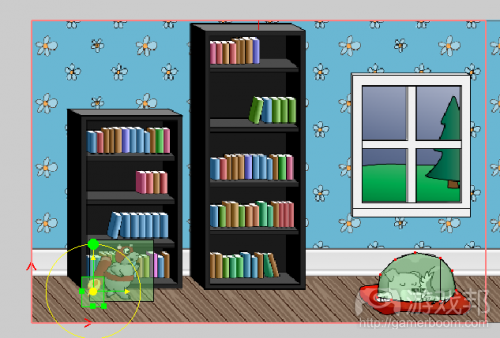
mousePlacement
仔细观察你会发现,火焰精灵位于红色坦克之上。不妨将其放在坦克之后,这样火焰看起来会更像是由坦克产生的。完成这一操作后,选择火焰精灵,然后在General Properties中将Z Order调成-1。
zOrderOnFlame
若你此时通过Scene Tester运行关卡,你可能会看到老鼠,但也可能没看到。
这是因为精灵是通过成批节点进行渲染。要将老鼠放在关卡其他精灵顶部,我们需要改变成批节点的Z Order。
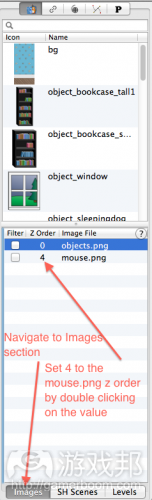
切换到LevelHelper的Images区块,双击mouse.png的Z Order字段。输入数值4。
我们希望玩家把握所有内容,我们很快将添加更多图片。这就是为什么我们要在这里设置一个更大的数值。
batchZOrder
现在运行关卡,你会看到老鼠在画面中奔跑,但没有发生任何触碰活动。
它其实有何小狗和小猫发生触碰,但由于老鼠和其他物件都处于静止状态,所以什么也没有发生。
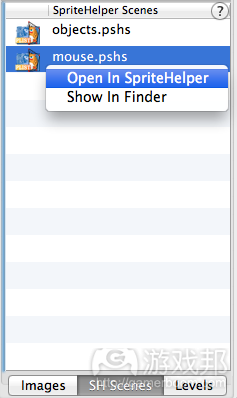
现在是时候把老鼠和火焰精灵设置成动态模式。打开老鼠的SpriteHelper情境:
openMouseSH
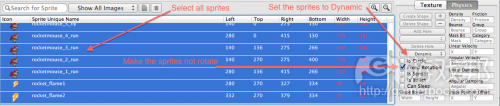
然后选择所有精灵,将其设置成动态模式。我们不希望老鼠在和其他精灵触碰时发生旋转,所以还要选择Fixed Rotation option。
makeMouseDynamic
至于两个火箭火焰精灵,我们还需要勾选Is Sensor选项。这是因为随后我们将把火焰和火箭坦克结合起来。
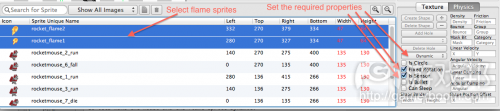
flameProperties
完成操作后保存火箭坦克。
再次运行Scene Tester,我们将会看到老鼠在画面中掉落。这是老鼠对地心引力所做出的反应。不妨让它继续停留在屏幕上。
点击Physic Boundaries按键。
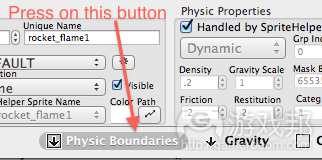
pressOnPBoundary
在Physic Boundaries窗口点击Create。
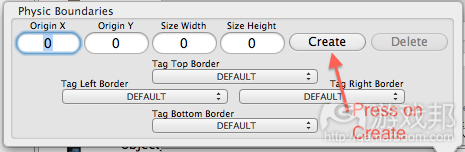
createPBoundary 1
我们现已创建边界,但想要对其进行编辑,使其出现在地板中间的老鼠的下方,老鼠会在这块区域中行走。点击Physic Boundaries窗口中的Edit。
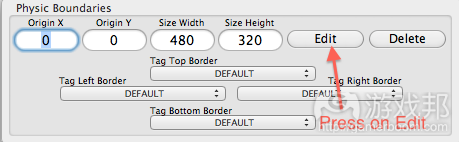
pressOnEditBoundary
现在你会在物理边界的拐角处看到4个红色控键。你可以拖曳任何底部控键移动边界,确保边界始终处在老鼠的脚下。

dragPBoundaryHandle
你将看到类似的画面:

correctHandleBoundary
若你对物理边界没有什么意见,点击Editing按键,中断编辑过程。
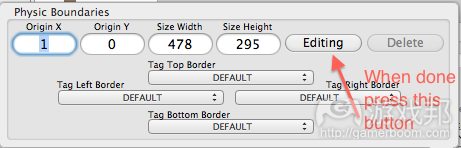
stopEditingPBoundary
在Scene Tester中运行关卡,你将看到老鼠和小猫&小狗发生触碰,然后继续停留在屏幕中,但这里还存在另一问题。
这次,火焰在屏幕中落下,它有传感设置,所以不会和任何物体触碰,不会附着于老鼠的身体。但我们可以通过创建远距离接合点,将火焰和老鼠联系起来。
现在切换到LevelHelper中的Joints版块,选择列表中的Distance Joint,点击绿色+按键。
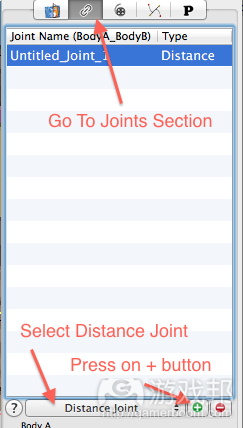
createDJoint
现在我们可以选择接合点要连接的精灵。
选择列表中的接合点,然后是Body A的属性,点击圆形图标。然后将老鼠拖至火焰精灵。当文本显示rocket_flame_1时,放开老鼠。
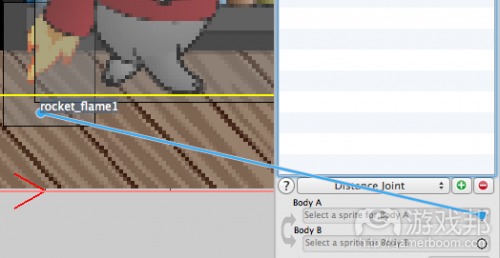
connectJointFlame
现在在Body B中重复相同操作,但这次要选择老鼠。
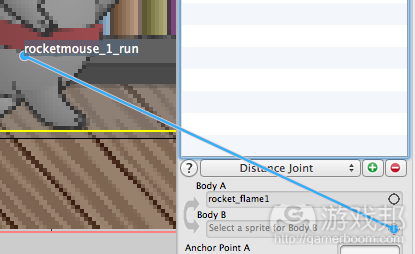
connectJointMouse
现在将接合点的定位点拉得更近些。
在接合点属性中选择A,拖曳显示火焰精灵的手柄,将锚点置于坦克之上。
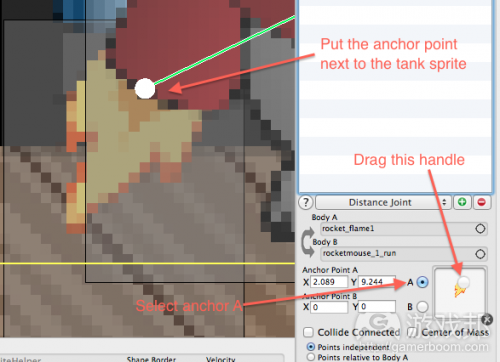
jointAnchorA
在其他定位点中重复这一操作。选择锚点B,拖曳把手,将此锚点置于其他定位点的旁边。
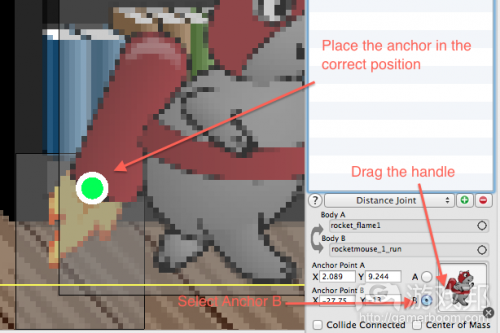
jointAnchorB
若你在Scene Tester中运作关卡,你会看到火焰现在附着于老鼠身上。
现在我们已完成进入编码工作前所需的所有内容。
创建标签,执行触碰活动
要执行精灵间的触碰活动,我们需要记录同类精灵与其他类型精灵的触碰活动。
我们需要通过标签将精灵分类。所以所有有关小狗的精灵都会被标上“DOG” ,而所有涉及小猫的精灵都会被标上“CAT”。
要创建这些标签,需在LevelHelper中点击Define Tags按键。
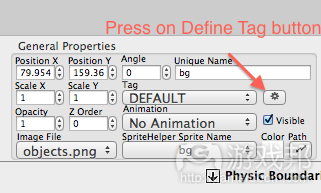
defineTagsButton
在Define Tags窗口中,给新标签设定名称,点击Add按键创建新标签。需要创建如下标签:DOG、CAT、LASE、COIN和PLAYER。
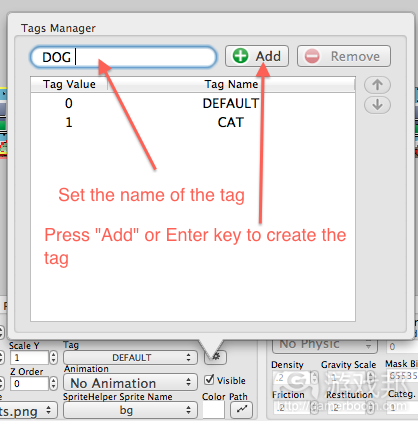
pressAddTag
明确定义标签后,我们需要将这些标签分配到各个精灵中。
选择左边精灵列表中的所有小狗精灵。然后在General Properties中将这些DOG标签分配到上述精灵。
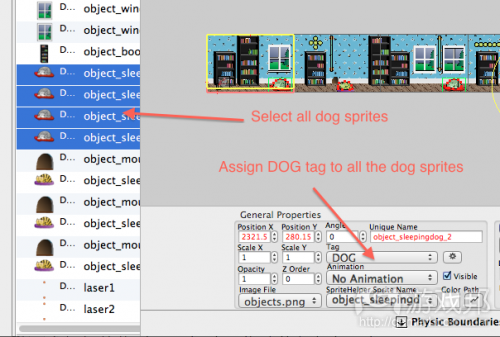
assignDogTag
然后在所有精灵中重复这一操作:将PLAYER标签分配至老鼠精灵中,CAT分配至各小猫精灵,LASER分配到各种激光精灵,COIN分配到硬币精灵中。
完成这些操作后,以Command-S保存关卡。
编写游戏逻辑的代码
我们现在准备着手编写游戏代码。所以我们重新回到Xcode,打开我们的项目,开始真正的趣味之旅。
首先,确保将新的美工元素(游戏邦注:即mouse.png)纳入其中。此时的资源文件夹将呈如下模式:
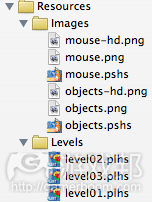
newArtAndLevels
为控制parallax的运作,让玩家能够进行跳跃,我们需要设定若干指示LevelHelper物件的变量。将HelloWorldScene.h的这些代码添加至类别定义中。
LHParallaxNode* paralaxNode;
LHSprite* player;
b2Body* playerBody;LHSprite* rocketFlame;
随后在类别定义之外,即@end和+(id)scene之间,添加下列方法标记(method signature):
-(void) retrieveRequiredObjects;
在HelloWorldScene.mm中定义新方法(可以选择任何适当位置,但要确保其处在类别定义之中)。我将其放置于初始方法之后。
-(void) retrieveRequiredObjects
{
//Retrieve pointers to parallax node and player sprite.
paralaxNode = [lh paralaxNodeWithUniqueName:@"Parallax_1"];
NSAssert(paralaxNode!=nil, @”Couldn’t find the parallax!”);player = [lh spriteWithUniqueName:@"player"];
NSAssert(player!=nil, @”Couldn’t find the player!”);playerBody = [player body];
NSAssert(playerBody!=nil, @”Error taking the body from the player LHSprite.”);rocketFlame = [lh spriteWithUniqueName:@"flame"];
NSAssert(rocketFlame!=nil, @”Couldn’t find flame sprite!”);[rocketFlame setVisible:NO]; //You can do it in LH, but I do it here so you guys can see it in LH
}
这里我们将把目光转至parallax,赋予LevelHelper parallax标识名称。
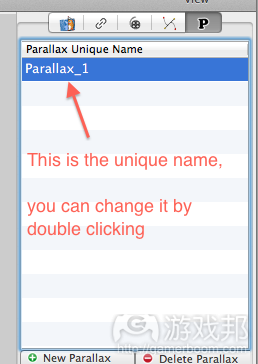
parallaxName
再来就是玩家精灵,也是赋予它们标识名称。若标识名称原先没有修改,要将其改成“player”,如下面的截图所示。
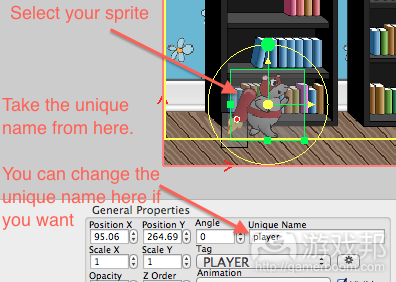
playerName
同样,你得把火焰的标识名称改成“flame”,以同代码相匹配。
若你通过spriteWithUniqueName查看精灵,你将得到一个LHSprite*实例,这是源自CCSprite的一个类别。通过此LHSprite*实例,我们将指示器转移到玩家的Box2d身体,因为我们随后要这一身体进行跳跃。
现在我们转移到火焰精灵,将此画面隐藏起来。只有当玩家飞起来的时候,我们才会看到此火焰。
现在我们已完整定义此新方法,不妨将其称作:
lh = [[LevelHelperLoader alloc] initWithContentOfFile:@”level03″]; // or level02 if you never changed it
[lh addObjectsToWorld:world cocos2dLayer:self];
if([lh hasPhysicBoundaries])
[lh createPhysicBoundaries:world];if(![lh isGravityZero])
[lh createGravity:world];// Add this
[self retrieveRequiredObjects]; // Retrieve all objects after we’ve loaded the level.
编辑和运行代码,若火焰运行时无法为我们所见,那么操作就圆满完成。

MouseInvisibleFlame
让玩家在空中飞行
现在我们重新取回加载关卡中的玩家,让其在空中飞行。
在HelloWorldScene.h类别定义中添加如下内容:
float playerVelocity;
bool playerWasFlying;
bool playerShouldFly;
通过这一操作,我们让老鼠在用户触摸屏幕时飞入空中。
在HelloWorldScene.mm中将触控功能替换成如下内容:
- (void)ccTouchesBegan:(NSSet *)touches withEvent:(UIEvent *)event
{playerVelocity = 0.5f;
playerShouldFly = true;
[rocketFlame setVisible:YES];
[player startAnimationNamed:@"mouseFly"];
}
////////////////////////////////////////////////////////////////////////////////
- (void)ccTouchesMoved:(NSSet *)touches withEvent:(UIEvent *)event
{}
////////////////////////////////////////////////////////////////////////////////
-(void) cancelPlayerFly
{
playerShouldFly = false;
[rocketFlame setVisible:NO];
playerWasFlying = true;
playerVelocity = 0.0f;
}
- (void)ccTouchesEnded:(NSSet *)touches withEvent:(UIEvent *)event
{
[self cancelPlayerFly];
}
- (void)ccTouchesCancelled:(NSSet *)touches withEvent:(UIEvent *)event
{
[self cancelPlayerFly];
}
在ccTouchesBegan方法中,当用户触控屏幕时,玩家就会开始飞翔,火箭的火焰就会进入我们的视野,飞翔动画就会出现在玩家精灵中。
接着我们就会在玩家的LHSprite*实例(游戏邦注:这由我们通过retrieveRequiredObjects方法取回)中启动“mouseFly” 动画。
当玩家停止触控屏幕,或取消触控时,我们就会通过调用“cancelPlayerFly”新方法让玩家停止飞翔。然后我们会继续隐藏火焰,因为玩家已不在空中飞翔。
但这远远不够。我们设定呈现玩家飞翔的时间,但我们没有落实真实的飞行操作。这需要我们在“tick”方法末尾添加如下内容:
if(playerShouldFly)
{
playerBody->ApplyLinearImpulse(b2Vec2(0, playerVelocity), playerBody->GetWorldCenter());playerVelocity += 0.01f;
if(playerVelocity > 1.5f)
playerVelocity = 1.5f;
}
这里,我们会判断玩家是否应该飞翔,及测试操作是否正确,我们在老鼠的box2d身体中施加水平线性冲量。
然后我们会将速率变得越来越快,这样玩家就仿佛真的飞离地面,而且速度越来越快。
若玩家的速度到达一定程度(1.5),我们会停止加速。
编辑和运行游戏,现在你可以通过触控屏幕让老鼠在空中飞翔。
FlyingMouse
(本文为游戏邦/gamerboom.com编译,拒绝任何不保留版权的转载,如需转载请联系:游戏邦)
How to Make a Game Like Jetpack Joyride using LevelHelper and SpriteHelper [Cocos2D Edition] – Part 2
by Bogdan Vladu
This is a post by special contributor Bogdan Vladu, an iOS application developer and aspiring game developer living in Bucharest, Romania.
Welcome back to our Jetpack Joyride tutorial series! In this tutorial series, we are making a game similar to Jetpack Joyride using Cocos2D and Box2D, and the LevelHelper and SpriteHelper tools.
So far, we’ve got a working level with background art that scrolls continuously. Check out how we did it in part one.
By now, you should be pretty comfortable working with LevelHelper and SpriteHelper, at least when it comes to the basics like adding objects to the levels.
In this second part of the tutorial, we’ll focus on adding some movement and activity to the game. Lasers, coins, a flying player-character, the beginnings of collisions… it’s all coming up!
To follow along with this tutorial, you’ll need to have the RocketMouse project where we left off in part one. If you don’t have this already, you can grab a copy of the project so far here.
So let’s get that mouse flying!
Getting Started
The next step in creating our Jetpack Joyride game is to add some elements that the player will directly interact with: lasers and coins. Adding these elements is also a good way to begin learning how to implement animations and sensors using LevelHelper.
Since we want the lasers to go on and off, we need to make them animations. As for the coins, we want to know when the player collides with them, but we don’t want the player to bounce off them. To do this, we need to make them sensors.
Having grappled with the basics of animation and collision response, we’ll expand the concepts to other elements of our game, including the player. We’ll learn how to create tags to track collisions, then put it all together with some actual code!
Before we get started, you might want to open your current LevelHelper project and save the level as level03 (this way you’ll have the old level to look back on). If you do this, be sure to add the new Level into your Xcode project, and update the line that selects the level to choose level 3 like so:
Working With Animations: Adding Lasers
How we’ll use the animations in gameplay is fairly simple. When the player makes contact with a laser, we’ll just test what frame the animation is on. If it’s the frame with the laser-off sprite, we’ll leave the player alone. If it’s the frame with the laser-on sprite, then we’ll kill the player.
To create an animation for our lasers, go to the available sprites list on the right panel in LevelHelper, and Control-Click (or right-click) on one of the laser sprites. Then choose “Open SpriteHelper scene” from the menu.
SpriteHelper will open with the correct scene. Navigate to the Animation section, click the + button to create a new animation, then double click on the animation name and call it “Laser.”
Now go in the sprites list and select the vertical laser. Go back to the animation section and click Add Frame. This will add the two sprites to the animation.
Arrange the frames in the correct order (off and then on, or laser1 and then laser2) by clicking the up and down arrows. Set the speed to 3 and make sure the Start At Launch and Loop Forever options are checked.
When you’re done, hit Command-S to save the scene.
Now let’s switch back to LevelHelper and work with the animation we just created. You’ll see that an Animations section has already been added for you in LevelHelper, as in the image below.
There are two ways to activate the animation. I will demonstrate both.
The first way is to drag the animation into the level just as we did with the sprites.
The second way is to attach the animation to a sprite that’s already in the level. In this case, I’m adding the animation to the laser sprite.
Go to the sprites section. We haven’t added the laser sprites to the level yet, so drag one of them (doesn’t matter which) from the list into the level, and make sure that sprite is selected. Then go to the General Properties section and select the Laser animation from the list.
Continue adding lasers to the level, until a satisfying amount of danger has been achieved. You can rotate and scale the lasers by using the handles that appear when you select a sprite.
My level now looks like this:
If you look at the laser shape you can see that the sprite is a full quad.
In our game we want the mouse to die only when it hits the actual laser in the sprite (the yellow part), so let’s make the shape smaller.
To do this we can define a shape like we did for the dog and cat, or we can modify the Shape Border property under the Physics menu using predefined values. Since you already know how to create a shape with points, let’s try it the second way.
Select the laser1 image from inside the Images section of LevelHelper. Right click on it and select Open SpriteHelper Scene.
Once the SpriteHelper scene is open, click on the “laser1” sprite. Because the laser is an animation, we need to modify the physics properties of the first frame of the animation – in this case the “laser1″ sprite. Animations have the physics properties of the first frame.
With laser1 selected, go to the Physics menu and enter 70 and 40 for the Shape Border values. This will make the shape of the sprite be equal to the sprite size, minus the values you enter here. You can see the visual representation in the view.
Back in LevelHelper, we can see that all lasers have been updated with the correct shape.
Now select all lasers and add them to our parallax. Enter 1 and 0 for the ratio.
Save the level, and if you build and run your game it will now have animating lasers!
Working With Sensors: Adding Coins
Now for the coins. Remember, we want to make the coins sensors so that the mouse can pass straight through them without bouncing off, but still allow us to detect when there is a collision.
To make the coins sensors, select the coin sprite from the sprites list inside LevelHelper, right click (or Control-Click) and choose Open SpriteHelper Scene.
With the SpriteHelper scene opened, select the coin sprite and check the Is Sensor, Is Circle and Can Sleep options on the Physics menu. Then save the scene.
* Is Sensor: makes the body trigger a collision, but not a collision response.
* Is Circle: makes the shape of the body circle-based.
* Can Sleep: speeds up simulation of the physics.
Now add the coin sprite to the level and place it as you see fit. Use the Clone Tool to easily clone the coin with the direction offset you prefer.
Now my level looks like this:
Add the coins to the parallax, set the ratio to 1 and 0 and save the level. Compile and run your project, and now you have coins!
The project with all of our work up to this point can be downloaded here.
Adding the Player
Now that we have a good-looking level with all the basic components, let’s create the player and its accompanying animations.
Open SpriteHelper and go to File\New to create an empty sprite sheet. Then in Finder, navigate to the directory where you saved the art for this game. Once you’re there, select and drag onto the SpriteHelper window all the mouse sprites and the rocket flames.
We now need to create one single image with the art we just imported. This is an essential step before creating the animation. All engines supported by LevelHelper and SpriteHelper expect that frames in an animation are part of the same image file.
Switch to the Sheet Editor menu if you aren’t there already and deselect Crop, because we don’t want to trim the frames of the mouse animation. Click Pack Sprites to arrange all the sprites into the sprite sheet.
Next, switch to the Animation section of SpriteHelper. We’ll we’ll create all the animations we need here, exactly as we did for the laser.
Using the same technique you learned earlier, create five animations with the properties listed below.
If you forgot how to create animations, for each animation, click the + button, and double click to name it. Then select the required frames for that particular animation, set the speed, and make sure to check the Loop Forever option for the one that needs to loop.
1) Animation Name: mouseRun
Start At Launch: YES
Loop Forever: YES
Speed: 0.400 (default)
Repetition: 1.000 (default)
Frames: rocketmouse_1_run, rocketmouse_2_run, rocketmouse_3_run, rocketmouse_4_run
2) Animation Name: flame
Start At Launch: YES
Loop Forever: YES
Speed: 0.400 (default)
Repetition: 1.000 (default)
Frames: rocket_flame1, rocket_flame2
3) Animation Name: mouseFly
Start At Launch: YES
Loop Forever: YES
Speed: 0.400 (default)
Repetition: 1.000 (default)
Frames: rocketmouse_5_fly
4) Animation Name: mouseDie
Start At Launch: YES
Loop Forever: NO
Speed: 0.400 (default)
Repetition: 1.000 (default)
Frames: rocketmouse_7_die, rocketmouse_8_die
5) Animation Name: mouseFall
Start At Launch: YES
Loop Forever: NO
Speed: 0.400 (default)
Repetition: 1.000 (default)
Frames: rocketmouse_6_fall
Once you’re done, hit Command-S to save the scene. In the Save dialogue, navigate to the Images folder inside your Xcode project Resources folder, and save the scene as “mouse.”
Back in LevelHelper, we can find all of our new animations in the Animation section.
Drag the mouseRun animation onto the main screen (the one with a red border). Place it just to the left of the screen.
Then drag the flame sprite and place it right under the red tank on the back of the mouse.
The result should look something like this:
If you look closely, you’ll see that the flame sprite is on top of the red tank. Let’s put it behind the tank, so it looks more like the flame is coming out of the tank. Do this this, select the flame sprite and under General Properties, set Z Order to -1.
If you run the level at this point using Scene Tester (press Test Level button) you might or might not be able to see the mouse.
This is because the sprites are rendered using batch nodes (all the sprites at the same time). To make the mouse be on top of all the other sprites in the level, we need to change the Z Order of the batch node (the image file).
Inside LevelHelper go to the Images section and double click on the Z Order field for mouse.png. Enter a value of 4.
We want the player to always be on top of everything, and we’re going to add more images soon. That’s why we’re putting a larger value here.
Running the level now, you can see the mouse running on the scene, but it does not perform any collisions.
It actually is performing collisions with the dogs and cats, but because the mouse and other objects are all static, nothing happens.
Time to make the mouse and the flame sprites dynamic! Open the SpriteHelper scene for the mouse:
Then select all the sprites and make them dynamic. Because we don’t want the mouse to rotate when it collides with any other sprite, select the Fixed Rotation option also.
For the two rocket flame sprites, we also need to check the Is Sensor option. This is because later we’re going to be attaching the flame to the rocket tank.
Save the scene when you’re done!
Running Scene Tester again, we will see the mouse falling out of the screen. This is because the mouse is responding to gravity. Let’s make him stay on the screen.
Click the Physic Boundaries button.
From the Physic Boundaries window, click Create.
We’ve now created the boundary, but we want to edit it so that it’s right under the mouse in the middle of the floor, where the mouse will walk. Inside the Physic Boundaries window, click Edit.
You will now see four red handles on the corners of the physic boundary. Drag any of the bottom handles to move the boundary so that it’s under the mouse’s feet.
You should have something similar to this:
When you’re satisfied with your physic boundary, press the Editing button to stop the editing process.
Running the level in Scene Tester, you will see the mouse collides with the dogs and cats and stays on the screen, but, alas, there is yet another problem!
This time, the flame is falling off the screen. That’s because it’s a sensor and so it does not collide with any object and isn’t attached to the mouse’s body. But w can connect the flame to the mouse by creating a distance joint.
Go to the Joints section inside LevelHelper, select Distance Joint from the list and click the green + button.
Now let’s select the sprites we want the joint to connect.
Select the joint from the list (if not already selected), then on the Body A property, click and hold the circle icon. Then drag your mouse over the flame sprite. When the text says rocket_flame_1, release the mouse. (This is exactly the same process as connecting an outlet inside Interface Builder in Xcode.)
Now repeat the process for Body B, only this time select the mouse.
Now let’s put the joint’s anchor points closer together.
Select A in the joint property, drag the handle that shows the flame sprite, and put the anchor right on top of the tank.
Repeat the process for the other anchor point. Select anchor B, drag the handle and put the anchor point next to the other.
If you run the level in the Scene Tester, you’ll see the flame now stays attached to the mouse. w00t!
We now have almost everything we need in order to start coding the game!
Creating Tags to Perform Collisions
In order to perform collisions between our sprites, we need to have a way to register collisions between sprites of one type with sprites of other types.
We will need to separate our sprites into types using tags. So all dog sprites will have the tag “DOG” and all cat sprites will have the tag “CAT.”
To create the tags, inside LevelHelper click the Define Tags button.
In the Define Tags window, set the name for the new tag and click the Add button to create it. Create the following tags: DOG, CAT, LASER, COIN, PLAYER.
Now that we have the tags defined, we need to assign the tags to sprites.
Select all the dog sprites from the list of sprites on the left. Then under General Properties, assign the DOG tag to all of those sprites.
Repeat the process for all the sprites. Assign PLAYER to the mouse sprite, CAT to all the cat sprites, LASER to all the laser sprites, and COIN to all the coin sprites.
When you’re done, save the level with Command-S.
A project with all of our progress so far can be downloaded here.
Coding the Game Logic
We are now (finally) ready to start coding our game. So let’s move back to Xcode, open our project and start the real fun.
First let’s be sure to include the new art (mouse.png). At this point your resources folder should look something like the following:
In order control the movement of the parallax and allow the player to jump, we need to have a few variables that will point to the objects created by LevelHelper. Add these lines in HelloWorldScene.h inside the class definition.
Then outside the class definition, right before the @end and after +(id)scene;, add the following method signature:
Inside HelloWorldScene.mm, define the new method wherever you see fit, but make sure it’s inside the class declaration. In my case, I placed it right after the init method.
Here we are taking pointers to the parallax by giving the unique name of the parallax assigned in LevelHelper.
Then we’re taking the pointer to the player sprite, also by giving the unique name. You might need to modify the unique name to read “player” as shown in the screenshot below if it isn’t set to that already.
Similarly, you should change the unique name of the flame to “flame” so it matches the code.
When you use spriteWithUniqueName to look up a sprite, you get a LHSprite* instance, which is a class derived from CCSprite. From this LHSprite* instance we take the pointer to the Box2d body of the player, because we will need to make the body jump later.
We then take the pointer to the flame sprite and make it invisible. We only need to see the flame when the player is flying. (We could also have done this inside LevelHelper by unchecking the Visible option in the General Properties section.)
Now that we have defined this new method, let’s call it (after we’ve loaded the level).
Compile and run the code, and if the flame is invisible when you run it, you know it’s working so far!
Making the Player Fly
Now that we have retrieved the player from the loaded level, let’s make him fly!
Add the following inside the HelloWorldScene.h class definition:
We will use this to make the mouse fly when the user touches the screen.
Now inside HelloWorldScene.mm, replace the touch functions with the following:
Inside the ccTouchesBegan method, we’re saying that when the user touches the screen, the player should start flying, the rocket flame should become visible and the flying animation should start on the player sprite.
Next we start the animation name “mouseFly” on the player LHSprite* instance that we retrieved in the retrieveRequiredObjects method.
When the player stops touching the screen, or the touch is canceled, we stop making the player fly by calling the new method “cancelPlayerFly.” We also hide the flame because the player is no longer flying.
But this isn’t enough. We set up when to show the player flying, but we haven’t implemented the actual flight. That requires adding the following at the end of the “tick” method:
Here, we check if the player should fly and if the test is true, we apply a linear impulse with a horizontal direction (on Y) on the mouse box2d body.
We then make the velocity bigger and bigger, so the player will look like they are taking off from the ground, gaining speed with time.
If the player’s velocity reaches a certain speed (1.5), we stop the speed from increasing further.
Compile and run the game, and now you can make the mouse fly by touching the screen!(Source:raywenderlich)

")
")
")
")


