Ryan Sumo分享逐帧绘制动画的步骤和经验
作者:Ryan Sumo
Spriter vs Photoshop
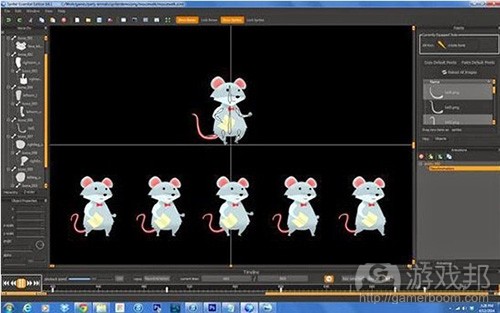
我曾在之前的博文中提到将用动画工具Spriter进行试验,看看它是否适用于我们的游戏。我发现Spriter并不适合我们的游戏。在试用Spriter头几个小时,我就清楚了,使用它来创造优秀的动画需要大量技能和时间。否则其动画成果无异于木偶。鉴于《Party Animals》只需要创造一些动画的事实,这极大降低了制作木偶动画的效率。
在Unity中用2D toolkit创造动画的方法也帮助我做出了这个决定。2D toolkit采用了完整的动画帧,然后据此创造纹理集,以便你在创造特殊动画时调用。这意味着我不能在Unity中真正操纵动画。因为我所需要的输出还是一样(例如完整帧的动画),使用我已经知道的软件和流程来操作远比掌握一门新工具更有成效。我在制作最终成品时还得更少使用软件。如果我要使用Spriter,我首先就得在PS中创造资产,然后在Spriter中安排和激活它们,最后将其输入到Unity。但现在我只需要首先执行在PS中的步骤,然后快速输入到Unity,完全跳过Spriter。
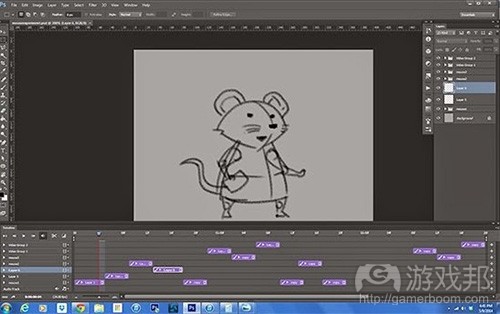
虽然PS在动画方面的功能强大,但我也再次得出结论,用PS制作简单动画的过程也太复杂了。所以在尝试这些不同的方法来制作我们角色动画之后,我决定重返自己唯一了解的动画方法,也就是逐帧绘制的动画。
以下就是我们的主角Mousey的行走动画。因为我使用了行走循环指导,所以这个任务相对简单。在之后的几幅画中,你将看到我徒手绘制胜利动画的步骤。
胜利
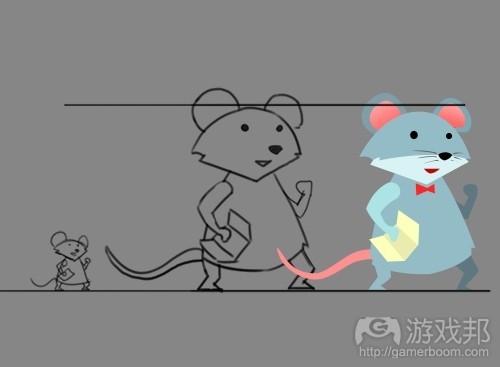
步骤1是勾勒出基本动画。我把它画得非常小,因为这样更容易捕捉到更小笔刷的移动精髓。我沿水平方向陈列这些帧,以便你查看它们的效果,但通常情况下我会在前者基础上绘制每一帧。
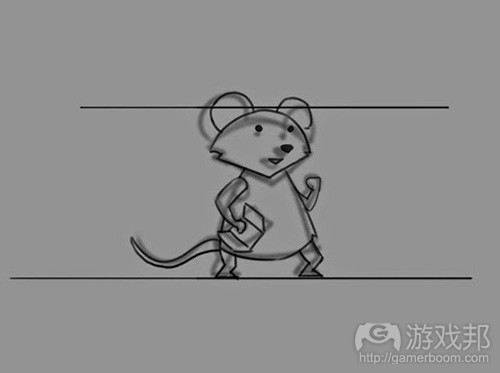
步骤2是扩大原草图动画,之后回溯它,以便得到可用于引导最终动画的更大版本。绘制更大的帧会暴露也被原来更小的动画所掩饰的瑕疵,但我可以在此修复这个问题。概念艺术的通用准则是在它们的草图阶段,更不是接近于完工的时候修复问题。这样你可以为自己省去大量的烦恼。
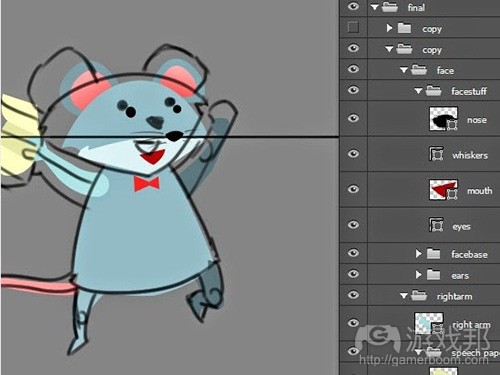
步骤3是选择预制老鼠模型,并根据动画草图进行安排。我已经将每个身体部位划分成不同图层,这样更好操作,我也用绘制了这们的矢量图,以更更有效地移动和重置。以下就是我的图层。
步骤4就是动画了!这是我的动画时间轴。它相对简单,只有5帧。我令第2帧的时间略长于其他帧(游戏邦注:除了第1,帧之外,它是静止帧),以更展示老鼠如何运用全身精力来跳跃。第4帧还不能算是完整的帧,它只是用来作为第3和第5帧的转场。第6帧作为着陆帧,重用了第2帧内容。我用PS逐帧制作动画的一个问题就在于,你控制这些动画的时间太精确了(0,0.1,0.2,0.5)所以在动画的时间设置上几乎没有什么回旋的余地。我认为2D toolkit可以让你更好地控制这一点,但我仍然得进行更深入的试验。
这就是最终成型的动画!
总结
我撰写此文并不是意在点评Spriter是糟糕的动画工具,逐帧动画理更好的方法。我并非动画专家,事实上每个项目都需要特定的动画工具。如果你已经知道如何制作木偶动画,那就更有效率了,因为你不需要花时间去掌握怎样合理制作动画。但对我来说,现在管用的方法就是逐帧动画。(本文为游戏邦/gamerboom.com编译,拒绝任何不保留版权的转载,如需转载请联系:游戏邦)
Why I chose Hand Drawn Animations over Puppet Animations for Party Animals
by Ryan Sumo
Spriter vs Photoshop
I said I would experiment with the animation tool Spriter in a previous post to see if it would be a good fit for our game. I did, and I decided that as great as Spriter is, it just doesn’t make sense for us to use it in our game. In my first few hours with Spriter it became clear to me that to create good animations with it would require a lot of skill and time. Otherwise they’d look exactly like their namesakes : puppets. Given the fact that I only really have a few animations I need to create for Party Animals the efficiency gained from doing puppet animations vastly decreases.
The way that 2D toolkit creates animations in Unity also helped to make my decision. 2Dtoolkit takes complete frames of animation then creates a texture atlas out of them that you can draw from when creating specific animations. This means that I wouldn’t be able to manipulate the animations directly in Unity. Given that the required output for me was going to be the same anyway (ie full frames of animation), it just made more sense to stick with a software and process that I knew instead of taking the time to learn a new one. I would also have to use less software to get to the final product. If I were to use Spriter I’d first have to create the assets in PS, arrange and animate them in Spriter, and finally export them to Unity. Whereas now I’d do the first to steps in PS and export to Unity immediately after, bypassing Spriter entirely.
I also experimented a little bit with Photoshop’s timeline animation courtesy of this video by Alex Grigg. While I learned a lot and am amazed at what you can do with PS in terms of animation, I once again came to the conclusion that trying to do it that way was just using a far too complicated too for a simple task. And so ironically after trying out all these different ways to animate our characters, I ended up going back to animating the only way I know how, which is frame by frame.
Here is the walk animation of our main character Mousey (yes, we still haven’t given her a real name). This was relatively easy to do since I used a walk cycle guide. In the next few images I’ll take you through the steps of how I made a hand drawn victory animation without a guide.
Victory
Step 1 is to rough out the basic animation. I do this very small, since it’s easier to capture the essence of the movement with smaller strokes. I’ve laid out the frames horizontally to show you how they look but typically I would draw each frame one on top of the other.
Step 2 is to enlarge the original rough animation then trace over it so that I have a larger version that I can use as a guide for the final animation. Drawing bigger will reveal flaws that were masked by the initial smaller animation, which I can fix here. As with concept art, the general rule is to try to fix things while they’re being sketched instead of closer to the final product. You save yourself a lot of heartache that way.
Step 3 is to take a pre made mouse model and arrange it according to the rough animation. I’ve separated each body part into layers so they’re easier to work with, and I’ve drawn them in vector to make it more efficient to move around and reposition without any artifacting. I’m showing you my layers here as a guide.
Step 4 is to animate! Here’s my animation timeline. As you can see it’s relatively simple, just 5 frames. I hold frame 2 for just a fraction longer than the rest of the frames (except frame 1, which is the at rest frame) to show that the mouse is gathering her energy to jump. Frame 4 barely comes into frame and is only really there to smooth out the transition between frames 3 and 5. Frame 6 is a reused frame 2 as a landing frame. One of my issues with PS frame by frame animation is that the times you can hold the animations are so specific (0,0.1,0.2,0.5) so there’s little leeway with timing the animations. I think that 2D toolkit gives you better control with that, but I’ve still to experiment further.
And here is the final animation!
Final Thoughts
I didn’t write this post to say that Spriter sucks and that frame by frame animation is better (I was very happy to support them by buying a Pro license, though they have demo that’s free of charge). I’m really not an animation expert, and the truth is that each project requires specific animation tools. Ultimately if you already know how to do puppet animation then it’s definitely much more efficient since no time would have to be taken to learn how to do it properly. But for me, it’s frame by frame for now. As an aside here is an argument for hand drawn animation and one for puppet/modular animation, in case anyone out there is still debating which method to use.
If anyone out there knows that I’m making a huge mistake here and can point out to me why what I’m doing is wrong, please don’t hesitate to comment! If you think my frame by frame animation sucks and I could makes some changes to make it better I’d love to hear from you too.(source:gamasutra)







 闽公网安备35020302001549号