分享《Trigger Rally》的WebGL地形渲染技巧(1)
作者:Jasmine Kent
在本系列中,我将介绍WebGL游戏《Trigger Rally》中使用的地形渲染技术。(请点击此处阅读本文第2、第3部分)
一个难题
在电脑图像和游戏中高效沉浸大面积、精细的地图是一个难题。
使用WebGL(网页图形库)却可以使这个难题变得容易。WebGL是浏览器的OpenGL(开放图形语言),允许用户使用GPU的性能,但有一些限制。更重要的是,在本地应用中用JavaScript处理CPU端的数据更慢。把数据转移到GPU,比在本地应用中要求更多的安全性检查,以保证网络用户安全。然而,一旦数据到GPU,绘制就非常快了。
最大化GPU工作和最小化CPU工作的好办法是,在启动时把静态数据(顶点、指数和纹理)载入到GPU,然后在运行时用尽量少的调用渲染它。
但仅靠静态数据是很难做出漂亮的地形的,因为镜头通常会很接近地面,而在屏幕上看,最近处和最远处的地面之间的精细度差异会很明显。
另外,在给定的GPU交互率下,能够绘制的三角形的数量是有限的。三角形数量的多少取决于应用或游戏运行的系统,但通常不可能在整个平面上大面积地、精细地渲染。
因为三角形数量有限,我们必须找出最佳的三角形分配方案。所以,在接近镜头时我们以低细节均匀分布,因为于玩家不可能欣赏到更远处的细节。
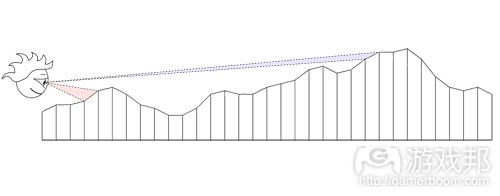
注意,近处的视线(粉红部分)表面积比远处的视线(蓝色部分)的更大。理想情况下,我们会让接近镜头的地方比远离镜头的地方有更多三角形,以平均二者。
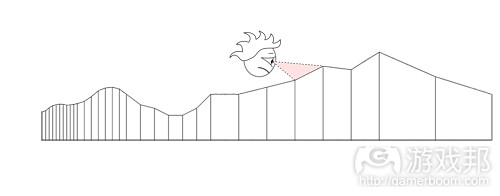
但对于移动的视点和纯静态的顶点数据,这个方法并不太管用。
如果你乐意做些CPU上的工作,那么你可以根据当前的视点,使用多种算法中的一种来调整地形的细节程度(LOD)。各个算法都以各自的方式平衡CPU的工作和GPU的工作。
解决方案:Geoclipmapping
我们如何用纯静态顶点数据达到可调节的LOD?Geoclipmapping和顶点纹理就是答案。
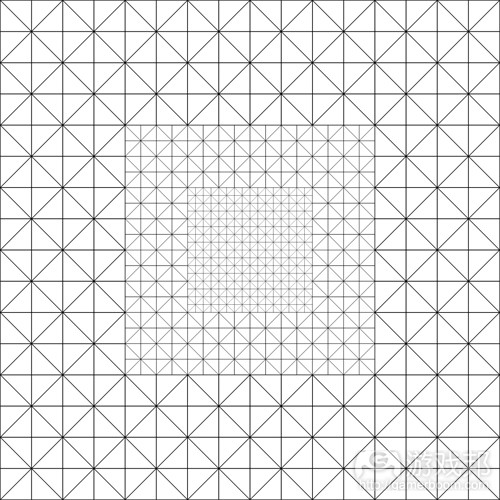
我们不是编码顶点数据中的高度信息,而是把它留在单独的纹理里。这样,我们的顶点数据可以用中央更高的分辨率和从源头开始的递减的分辨率环编码简单的网格模型。
在运行时,我们把这个网格模型放在当前视点之下,然后从顶点着色器的高地纹理地图中取样本。
事实上要做的事不止这些,所以在本系列的下一篇文章中,我将继续详细geoclipmapping的运作原理和执行方法。再之后,我将讨论多分辨率heightmapping和表面着色。(本文为游戏邦/gamerboom.com编译,拒绝任何不保留版权的转载,如需转载请联系:游戏邦)
WebGL Terrain Rendering in Trigger Rally – Part 1
by Jasmine Kent
In this series of posts, I’ll talk about the terrain rendering techniques used in the WebGL game Trigger Rally.
An Interesting Problem
Rendering large, detailed terrains efficiently is an interesting problem in computer graphics and games.
Note: JavaScript performance is an area of intense interest to HTML5 game developers. This article covers some recent developments and asm.js in particular.
Doing it with WebGL makes it even more interesting. WebGL is OpenGL for the browser, providing access to the power of the GPU, but with some constraints. Importantly, CPU-side data processing with JavaScript is slower than in a native app. Transferring data to the GPU involves more security checks than in a native app, to keep Web users safe. However, once the data is on the GPU, drawing with it is fast.
A great way to maximize GPU work and minimize CPU work is to load static data (vertices, indices and textures) onto the GPU at start-up, and render it at runtime with as few draw calls as possible.
But it’s hard to make terrain look good with purely static data. Because the viewpoint will often be close to the ground surface, there can be many orders of magnitude difference in screen-space resolution between the closest and furthest parts of the terrain.
Furthermore, there are limits to the number of triangles that a given GPU can draw at interactive rates. Your triangle budget will depend on what range of systems you would like your app or game to be enjoyed on, but generally you can not afford to render a large terrain at full detail across its entire surface.
Since triangle budget is limited, we have to decide how we should distribute triangles for best effect. A uniform distribution results in low detail close to the camera, and excessive detail that the user can’t appreciate further away:
Notice that the red segment has a much larger apparent (on-screen) size than the blue segment. Ideally we would like to even this out by using more triangles close to the camera, and fewer at a distance:
But this doesn’t work so well with a moving viewpoint and purely static vertex data:
If you’re willing to do some work on the CPU, you can use one of many algorithms to adapt the level of detail (LOD) of terrain to the current viewpoint. Each algorithm balances the work between CPU and GPU in its own way.
Solution: Geoclipmapping
How can we achieve adaptive LOD with purely static vertex data? Geoclipmapping and vertex texturing to the rescue!
Instead of encoding height information in the vertex data, we keep it in a separate texture. Our vertex data can then encode a simple mesh with a higher resolution in the center, and rings of decreasing resolution as you move away from the origin:
At runtime, we position this mesh underneath the current viewpoint, and take samples from a height texture map in the vertex shader.
There’s actually a bit more to it than this, so in the next article I’ll go into the specifics of how it works, and how to implement geoclipmapping with morphing efficiently in WebGL. After that, I’ll discuss multiresolution heightmapping and surface shading.
Tune in next time! ![]() (source:gamasutra)
(source:gamasutra)
上一篇:分享《Trigger Rally》的WebGL地形渲染技巧(2)
下一篇:多人游戏平衡理论第3部分:公平性


 闽公网安备35020302001549号