如何使用Cocos2D制作简单的iPhone游戏(1)
作者:Ray Wenderlich
Cocos2D是个用于iPhone的强大开发库,可以为你的iPhone游戏开发节省大量的时间。它带有精灵支持、炫丽的图像效果、动画、实体库、音效引擎等等内容。
我刚刚开始学习使用Cocos2D,尽管有各种各样的Cocos2D初学教程,但我无法找到我真正想要的教程,即制作一款带有动画、碰撞和音频的简单游戏,不带有过多的高级功能。最终,我自行制作了一款简单的游戏,我觉得需要根据此次开发经验编写教程,以便能为其他初学者所使用。
该教程将知道开发简单iPhone游戏的从头到尾的步骤。你可以按顺序学习,或者直接跳到文章末尾的示例项目上。
下载和安装Cocos2D
你可以从Cocos2D Google Code页面下载Cocos2D。
下载代码后,你需要做的就是安装有用的项目模板。打开末端窗口,输入以下命令:./install-templates.sh -f -u。
必须注意的是,如果你有在非标准directory上安装过XCode,你可以随意将参数输入安装文本中(游戏邦注:就像在同一台电脑上有多个SDK版本的做法一样)。
开始
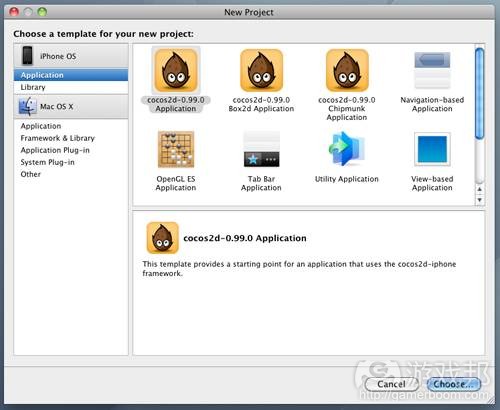
现在,让我们先开始创建简单的“Hello World”项目,并使用刚刚安装的Cocos2D模板来运行。打开XCode并新建Cocos2D项目,选择cocos2d中的“Application”模板,将项目命名为“Cocos2DSimpleGame”。
继续构建并运行这个模板。如果不出差错的话,你将会看到如下画面:
Cocos2D中融入了“界面”的概念,就像游戏中的“关卡”或“屏”一样。比如,游戏主菜单需要一个界面,主动作部分也需要一个界面,游戏结束同样需要一个界面。界面分为多个层(游戏邦注:类似于Photoshop),曾包含精灵、标签、菜单等节点。节点也可能包含其他节点(游戏邦注:比如精灵中可能有个子精灵)。
看下上述实例项目,你会发现其中只含有一个层,即HelloWorldLayer,我们将在此开始实施主要的游戏玩法。继续将其打开,你会发现现在初始方法中有个名为“Hello World”的标签。我们把这个标签拿走,用精灵来替换。
添加精灵
在我们添加精灵之前,我们需要某些图片。你可以用自己设计的图片,也可以使用这个项目中使用的图片,包括玩家图片、抛射物图片和目标图片。
获得图片后,将它们拖到XCode的资源文件夹中,确认“Copy items into destination group’s folder (if needed)”前打钩。
现在我们已经有图片了,下一步就需要为玩家图片指定位置。必须注意的是,在Cocos2D中屏幕左下角的坐标为(0, 0),往右或往上移动分别使X轴和Y轴值增加。因为这个项目采用的是风景模式,这意味着右上角的坐标为(480, 320)。
还必须注意的是,当我们设定某个物体的位置时,其位置的参考点所添加的精灵的中心点。因而,如果我们要让玩家图表在横轴上与边界对其,纵轴位于中心,我们应该:
1、位置的X轴坐标设置为“(玩家精灵宽度)/2”
2、位置的Y轴坐标设置为“(窗口高度)/2”
下图清晰地显示所设置的玩家精灵的位置:
接下来,打开Classes文件夹,点击HelloWorldLayer.m,将初始方法用以下代码替换:
-(id) init
{
if( (self=[super init] )) {
CGSize winSize = [[CCDirector sharedDirector] winSize];
CCSprite *player = [CCSprite spriteWithFile:@"Player.png"
rect:CGRectMake(0, 0, 27, 40)];
player.position = ccp(player.contentSize.width/2, winSize.height/2);
[self addChild:player];
}
return self;
}
编译运行,你会看到精灵显示完好,但背景默认为黑色。对于这个项目来说,白色的背景看起来会好很多。自定义Cocos2D中的层背景的方式之一是使用CCLayerColor。点击HelloWorldLayer.h,将HelloWorld界面声明定义如下:
@interface HelloWorldLayer : CCLayerColor
然后点击HelloWorldLayer.m,对初始方法做以下些许修改就可以将背景设定为白色:
if( (self=[super initWithColor:ccc4(255,255,255,255)] )) {
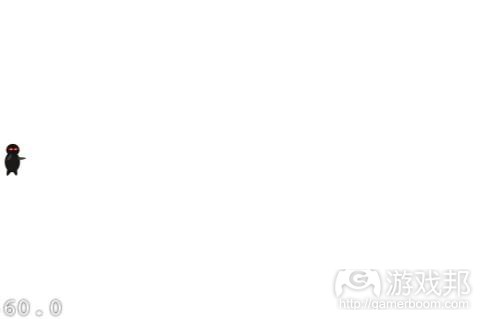
继续编译运行,你应该会看到精灵正位于白色的背景之上。
移动目标
接下来,我们将在界面中添加某些供忍者攻击的目标。为让游戏更为有趣,我们将目标设定为可以移动,否则游戏难度就太低了!因而,我们先将目标位置设定在右侧屏幕之外,然后为其设定动作,逐渐向左移动。
在最初方法之前添加以下方法:
-(void)addTarget {
CCSprite *target = [CCSprite spriteWithFile:@"Target.png"
rect:CGRectMake(0, 0, 27, 40)];// Determine where to spawn the target along the Y axis
CGSize winSize = [[CCDirector sharedDirector] winSize];
int minY = target.contentSize.height/2;
int maxY = winSize.height – target.contentSize.height/2;
int rangeY = maxY – minY;
int actualY = (arc4random() % rangeY) + minY;// Create the target slightly off-screen along the right edge,
// and along a random position along the Y axis as calculated above
target.position = ccp(winSize.width + (target.contentSize.width/2), actualY);
[self addChild:target];// Determine speed of the target
int minDuration = 2.0;
int maxDuration = 4.0;
int rangeDuration = maxDuration – minDuration;
int actualDuration = (arc4random() % rangeDuration) + minDuration;// Create the actions
id actionMove = [CCMoveTo actionWithDuration:actualDuration
position:ccp(-target.contentSize.width/2, actualY)];
id actionMoveDone = [CCCallFuncN actionWithTarget:self
selector:@selector(spriteMoveFinished:)];
[target runAction:[CCSequence actions:actionMove, actionMoveDone, nil]];}
在这里,我用较为冗长的代码来使其中的动作更容易让人理解。第一部分代表的是我们之前讨论过的内容:我们做些简单的计算来设定所创建物体的位置,并以与设定玩家精灵同样的方式放置在场景中。
这里的新元素就是动作的添加。Cocos2D提供了大量内置动作,你可以用来设定精灵动作,比如移动、跳跃、消失及其他动画动作。在这里,我们在目标上使用了以下三个动作:
CCMoveTo:我们使用CCMoveTo动作来指导物体从屏幕之外逐渐向左移动。你会注意到,我们可以指定移动的间隔时长,这里我们设定时长在2秒至4秒间随意变化。
CCCallFuncN:CCCallFuncN功能允许我们指定在动作发生时物体发出回叫信号。我们指定一种称为“spriteMoveFinished”的回叫信号。
CCSequence:CCSequence动作让那个我们可以设置系列动作按次序发生,每次一个动作。以这种方式,我们可以首先执行CCMoveTo动作,等该动作结束后再执行CCCallFuncN动作。
接下来,便是添加我们在CCCallFuncN动作中提到的回叫功能。我们可以将以下代码添加至addTarget之前:
-(void)spriteMoveFinished:(id)sender {
CCSprite *sprite = (CCSprite *)sender;
[self removeChild:sprite cleanup:YES];
}
该功能的目标在于,一旦精灵移动出屏幕后,就将其从屏幕中移除。这一点非常重要,这样就不会有大量无用的精灵存在于屏幕之上了。应该注意的是,还有其他更好的办法来处理这个问题,比如重复使用精灵,但在这个新手教程中我们采取这种较为简单的做法。
最后需要做的事情是,我们需要调用创造目标的方法!为让游戏变得有趣,我们让目标随时间不断变化。在Cocos2D中,我们可以通过将回叫功能设定为周期性回叫来实现这个目标。在初始方法中添加以下回调代码:
[self schedule:@selector(gameLogic:) interval:1.0];
然后以下列方法来执行回调功能:
-(void)gameLogic:(ccTime)dt {
[self addTarget];
}
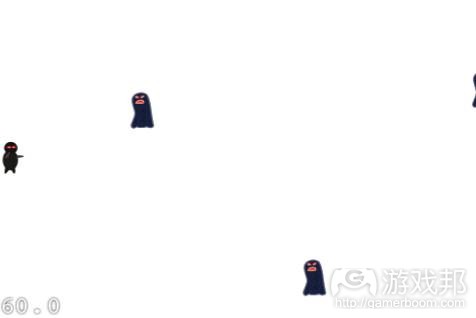
现在,如果你编辑并运行项目,你应该会看到目标在屏幕中移动,如下图所示:
射击抛射物
此时此刻,我们的忍者正希望能够有所动作,因而让我们添加射击动作!执行射击动作的方式有许多种,但是在这款游戏中,我们将设计成,当用户点击屏幕时,忍者就会朝点击点的方向射出抛射物。
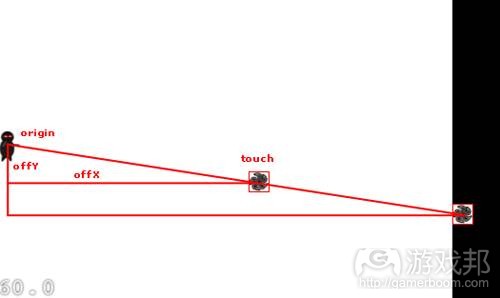
接下来,我将使用CCMoveTo动作来实现此目标,以使新手能够容易理解。为了实现这个目标,我们需要做些数学运算。这是因为CCMoveTo需要我们指定抛射物的落点,但是我们不能只使用接触点,因为接触点代表的只是玩家角色射击的方向而已。我们想保证射出的子弹能够通过接触点然后射出屏幕。
下图显示我们所要做的工作:
因此,你可以看到原点和触点以及X和Y轴平行线组成了一个小三角形。我们只需要以同等的比例来绘制出大三角形,将一个落点设置在屏幕之外。
接下来,要处理的是代码问题。首先,我们要激活层上的触点。在初始方法中添加下列代码:
self.isTouchEnabled = YES;
激活层上的接触之后,我们现在可以接收到接触事件的回调函数。因而,让我们执行ccTouchesEnded方法,当用户接触屏幕时就可以产生回调,使用下列代码:
- (void)ccTouchesEnded:(NSSet *)touches withEvent:(UIEvent *)event {
// Choose one of the touches to work with
UITouch *touch = [touches anyObject];
CGPoint location = [touch locationInView:[touch view]];
location = [[CCDirector sharedDirector] convertToGL:location];// Set up initial location of projectile
CGSize winSize = [[CCDirector sharedDirector] winSize];
CCSprite *projectile = [CCSprite spriteWithFile:@"Projectile.png"
rect:CGRectMake(0, 0, 20, 20)];
projectile.position = ccp(20, winSize.height/2);// Determine offset of location to projectile
int offX = location.x – projectile.position.x;
int offY = location.y – projectile.position.y;// Bail out if we are shooting down or backwards
if (offX <= 0) return;// Ok to add now – we’ve double checked position
[self addChild:projectile];// Determine where we wish to shoot the projectile to
int realX = winSize.width + (projectile.contentSize.width/2);
float ratio = (float) offY / (float) offX;
int realY = (realX * ratio) + projectile.position.y;
CGPoint realDest = ccp(realX, realY);// Determine the length of how far we’re shooting
int offRealX = realX – projectile.position.x;
int offRealY = realY – projectile.position.y;
float length = sqrtf((offRealX*offRealX)+(offRealY*offRealY));
float velocity = 480/1; // 480pixels/1sec
float realMoveDuration = length/velocity;// Move projectile to actual endpoint
[projectile runAction:[CCSequence actions:
[CCMoveTo actionWithDuration:realMoveDuration position:realDest],
[CCCallFuncN actionWithTarget:self selector:@selector(spriteMoveFinished:)],
nil]];}
在第一部分中,我们选择了一个触点,获得触点在当前视图中的位置,然后调用convertToGL将坐标转化成当前的布局。这一点很重要,因为我们使用的是风景模式。
接下来,我们装载抛射物精灵,像往常那样设置初始位置。随后,我们决定希望抛射物移向何处,根据之前描述的运算法则,使用玩家和触点间的矢量作为指导方向。
应该注意的是,运算法则并不是很理想。我们强迫子弹一直移动,直到其到达屏幕外的X点。
我们必须做的最后一件事是决定移动的间隔。我们想要让子弹以恒定不变的速率沿某个方向射出,因而我们还得做些数学运算。利用Pythagorean Theorem,我们可以推导出移动的速度。从几何学公式上看,三角形斜边的平方等于两边的平方和。只要我们得到移动的距离,将其除以速度就可以得到间隔时间。
剩下的工作就是像目标那样设定动作。编译运行,现在你的忍者可以以恒定的速率射出子弹了。
碰撞检测
现在,我们已经将忍者的武器射击设计完成了。但是在游戏中,忍者想要做的是击落目标。所以,让我们添加某些发现抛射物击中目标的代码。
在Cocos2D中的解决方案多种多样,包括使用物理库Box2D或Chipmunk。但是为保持这个教程的简单性,我们决定自行设置一种简单的碰撞检测。
为实现这个目标,我们首先需要将目标和抛射物设计在当前界面中。
添加以下代码至HelloWorldLayer中:
NSMutableArray *_targets;
NSMutableArray *_projectiles;
然后用初始方法来初始化:
_targets = [[NSMutableArray alloc] init];
_projectiles = [[NSMutableArray alloc] init];
清除dealloc方法中的记忆:
[_targets release];
_targets = nil;
[_projectiles release];
_projectiles = nil;
现在,修改addTarget方法,添加新目标至目标列表并设定供以后使用的标签:
target.tag = 1;
[_targets addObject:target];
然后修改ccTouchesEnded方法,添加新抛射物至抛射物列表并设定供以后使用的标签:
projectile.tag = 2;
[_projectiles addObject:projectile];
最后,修改spriteMoveFinished方法,根据标签从恰当的列表中移除内容:
if (sprite.tag == 1) { // target
[_targets removeObject:sprite];
} else if (sprite.tag == 2) { // projectile
[_projectiles removeObject:sprite];
}
编译运行项目,保证项目仍然运转良好。现在应该还看不出什么很明显的差别,但是我们需要执行某些接触察觉。
添加下列方法至HelloWorldLayer:
- (void)update:(ccTime)dt {
NSMutableArray *projectilesToDelete = [[NSMutableArray alloc] init];
for (CCSprite *projectile in _projectiles) {
CGRect projectileRect = CGRectMake(
projectile.position.x – (projectile.contentSize.width/2),
projectile.position.y – (projectile.contentSize.height/2),
projectile.contentSize.width,
projectile.contentSize.height);NSMutableArray *targetsToDelete = [[NSMutableArray alloc] init];
for (CCSprite *target in _targets) {
CGRect targetRect = CGRectMake(
target.position.x – (target.contentSize.width/2),
target.position.y – (target.contentSize.height/2),
target.contentSize.width,
target.contentSize.height);if (CGRectIntersectsRect(projectileRect, targetRect)) {
[targetsToDelete addObject:target];
}
}for (CCSprite *target in targetsToDelete) {
[_targets removeObject:target];
[self removeChild:target cleanup:YES];
}if (targetsToDelete.count > 0) {
[projectilesToDelete addObject:projectile];
}
[targetsToDelete release];
}for (CCSprite *projectile in projectilesToDelete) {
[_projectiles removeObject:projectile];
[self removeChild:projectile cleanup:YES];
}
[projectilesToDelete release];
}
以上代码看起来应该很清楚。我们只是不断重复抛射物和目标,创造与其界限盒保持一致的矩形,利用CGRectIntersectsRect来寻找交叉点。如果找到了交叉点,我们将他们从界面和列表中移除。应该注意的是,我们必须将物体添加至“toDelete”列表中,因为你无法在重复物体时将其从列表中移除。依然有多种方法可以实现这个目标,我还是会阐述较为简单的方法。
在我们开始运行项目之前,还必须做一件事情,添加以下代码至初始方法中,安排该方法以尽量高的频率运行:
[self schedule:@selector(update:)];
编译运行,现在你的抛射物命中目标时,它们应该会同时消失!
末期工作
现在,我们几乎快完成了这款游戏(游戏邦注:尽管游戏较为简单)。我们只需要添加些许音效和音乐以及某些简单的游戏逻辑。
如果你看过我关于iPhone游戏音频编程设计的系列博文,你就会知道Cocos2D开发者用此工作来在游戏中添加基础音效是多么的简单。
首先,拖动背景音乐和射击音效到资源文件夹中。你可以使用我所制作的背景音乐和音效,也可以自行制作。
然后,在HelloWorldLayer.m顶端添加下列导入:
#import “SimpleAudioEngine.h”
在初始方法中,以下列代码来控制背景音乐的播放:
[[SimpleAudioEngine sharedEngine] playBackgroundMusic:@”background-music-aac.caf”];
在ccTouchesEnded方法中,以下列代码来播放音效:
[[SimpleAudioEngine sharedEngine] playEffect:@”pew-pew-lei.caf”];
现在,让我们创造一个新界面,用来显示玩家的胜利或失败。点击Classes文件夹,然后点击File\New File,选择Objective-C类,确认子类NSObject已被选择。点击Next,然后输入GameOverScene作为文件名,确认“Also create GameOverScene.h”已选择。
然后以下列代码替换GameOverScene.h:
#import “cocos2d.h”
@interface GameOverLayer : CCLayerColor {
CCLabelTTF *_label;
}
@property (nonatomic, retain) CCLabelTTF *label;
@end@interface GameOverScene : CCScene {
GameOverLayer *_layer;
}
@property (nonatomic, retain) GameOverLayer *layer;
@end
然后以下列代码替换GameOverScene.m:
#import “cocos2d.h”
@interface GameOverLayer : CCLayerColor {
CCLabelTTF *_label;
}
@property (nonatomic, retain) CCLabelTTF *label;
@end@interface GameOverScene : CCScene {
GameOverLayer *_layer;
}
@property (nonatomic, retain) GameOverLayer *layer;
@endThen replace GameOverScene.m with the following code:
#import “GameOverScene.h”
#import “HelloWorldLayer.h”@implementation GameOverScene
@synthesize layer = _layer;- (id)init {
if ((self = [super init])) {
self.layer = [GameOverLayer node];
[self addChild:_layer];
}
return self;
}- (void)dealloc {
[_layer release];
_layer = nil;
[super dealloc];
}@end
@implementation GameOverLayer
@synthesize label = _label;-(id) init
{
if( (self=[super initWithColor:ccc4(255,255,255,255)] )) {CGSize winSize = [[CCDirector sharedDirector] winSize];
self.label = [CCLabelTTF labelWithString:@"" fontName:@"Arial" fontSize:32];
_label.color = ccc3(0,0,0);
_label.position = ccp(winSize.width/2, winSize.height/2);
[self addChild:_label];[self runAction:[CCSequence actions:
[CCDelayTime actionWithDuration:3],
[CCCallFunc actionWithTarget:self selector:@selector(gameOverDone)],
nil]];}
return self;
}- (void)gameOverDone {
[[CCDirector sharedDirector] replaceScene:[HelloWorldLayer scene]];
}
- (void)dealloc {
[_label release];
_label = nil;
[super dealloc];
}@end
必须注意的是,这里有两个不同的概念:界面和层。界面可以包含任意数量的层,虽然在这个示例项目中只包含一个。层只是在屏幕中间设立一个标签,安排转化发生3秒之后切回Hello World界面。
最后,让我们添加某些基本的游戏逻辑。首先,让我们先设置玩家已经摧毁的抛射物。将HelloWorldLayer.h中的HelloWorldLayer类做下列修改:
int _projectilesDestroyed;
在HelloWorldLayer.m中,添加GameOverScene类的导入:
#import “GameOverScene.h”
增加数量并在更新方法中检查胜利的状况,使用下列代码:
_projectilesDestroyed++;
if (_projectilesDestroyed > 30) {
GameOverScene *gameOverScene = [GameOverScene node];
_projectilesDestroyed = 0;
[gameOverScene.layer.label setString:@"You Win!"];
[[CCDirector sharedDirector] replaceScene:gameOverScene];
最后,让我们设置成,某只目标触及玩家时玩家就失败。修改spriteMoveFinished方法,添加下列代码到标签中:
GameOverScene *gameOverScene = [GameOverScene node];
[gameOverScene.layer.label setString:@"You Lose :["];
[[CCDirector sharedDirector] replaceScene:gameOverScene];
继续将项目编译运行,现在你应该可以看到胜利或失败界面。
后续发展
这个项目只是个最基本的示例,你可以使用Cocos2D在项目中添加更多新功能。或许你可以尝试添加条状图显示你还需要摧毁多少个目标才能获得胜利,也可以为怪物的死亡添加更加绚烂的动画,或出于游戏趣味性目的添加更多音效、艺术或游戏逻辑。你完全可以尽量发挥自己的才华!
游戏邦注:本文发稿于2010年2月12日,所涉时间、事件和数据均以此为准。(本文为游戏邦/gamerboom.com编译,如需转载请联系:游戏邦)
How To Make A Simple iPhone Game with Cocos2D Tutorial
Ray Wenderlich
Cocos2D is a powerful library for the iPhone that can save you a lot of time while building your iPhone game. It has sprite support, cool graphical effects, animations, physics libraries, sound engines, and a lot more.
I am just starting to learn Cocos2D, and while there are various useful tutorials on getting started with Cocos2D out there, I couldn’t find anything quite like what I was looking for – making a very simple but functional game with animation, collisions, and audio without using too many advanced features. I ended up making a simple game of my own, and thought I’d write a tutorial based on my experience in case it might be useful to other newcomers.
This tutorial will walk you through the process of creating a simple game for your iPhone with Cocos2D, from start to finish. You can follow along with the tutorial, or just jump straight to the sample project at the end of the article. And yes. There will be ninjas.
Downloading and Installing Cocos2D
You can download Cocos2D from the Cocos2D Google Code page.
After you pull down the code, you’ll want to install the useful project templates. Open up a Terminal window to the directory you downloaded Cocos2D to, and enter the following command: ./install-templates.sh -f –u
Note that you can optionally pass a parameter to the install script if you have XCode installed to a non-standard directory (like you might have done if you have more than one version of the SDK on your machine).
Hello, Cocos2D!
Let’s start by getting a simple Hello World project up and running by using the Cocos2D template we just installed. Start up XCode and create a new Cocos2D project by selecting the cocos2d Application template, and name the project “Cocos2DSimpleGame”.
Go ahead and build and run the template as-is. If all works OK, you should see the following:
Cocos2D is organized into the concept of “scenes”, which are kind of like “levels” or “screens” for a game. For example you might have a scene for the initial menu for the game, another for the main action of the game, and a game over scene to end. Inside scenes, you can have a number of layers (kind of like in Photoshop), and layers can contain nodes such as sprites, labels, menus, or more. And nodes can contain other nodes as well (i.e. a sprite could have a child sprite inside it).
If you take a look at the sample project, you’ll see there’s just one layer – HelloWorldLayer – and we’re going to start implementing our main gameplay in there. Go ahead and open it up – you’ll see that right now in the init method it’s adding a label that says “Hello World” to the layer. We’re going to take that out, and put a sprite in instead.
Adding A Sprite
Before we can add a sprite, we’ll need some images to work with. You can either create your own, or use the ones my lovely wife has created for the project: a Player image, a Projectile image, and a Target image.
Once you’ve obtained the images, drag them over to the resources folder in XCode, and make sure “Copy items into destination group’s folder (if needed)” is checked.
Now that we have our images, we have to figure out where we want to place the player. Note that in Cocos2D the bottom left corner of the screen has coordinates of (0, 0) and the x and y values increase as you move to the upper right. Since this project is in landscape mode, this means that the upper right corner is (480, 320).
Also note that by default when we set the position of an object, the position is relative to the center of the sprite we are adding. So if we wanted our player sprite to be aligned with the left edge of the screen horizontally, and vertically centered:
For the x coordinate of the position, we’d set it to [player sprite's width]/2.
For the y coordinate of the position, we’d set it to [window height]/2
Here’s a picture that helps illustrate this a bit better:
So let’s give it a shot! Open up the Classes folder and click on HelloWorldLayer.m, and replace the init method with the following:
You can compile and run it, and your sprite should appear just fine, but note that the background defaults to black. For this artwork, white would look a lot better. One easy way to set the background of a layer in Cocos2D to a custom color is to use the CCLayerColor class. So let’s give this a shot. Click on HelloWorldLayer.h and change the HelloWorld interface declaration to read as follows:
Then click on HelloWorldLayer.m and make a slight modification to the init method so we can set the background color to white:
Go ahead and compile and run, and you should see your sprite on top of a white background. w00t our ninja looks ready for action!
Moving Targets
Next we want to add some targets into our scene for our ninja to combat. To make things more interesting, we want the targets to be moving – otherwise there wouldn’t be much of a challenge! So let’s create the targets slightly off screen to the right, and set up an action for them telling them to move to the left.
Add the following method right before the init method:
I’ve spelled out things in a verbose manner here to make things as easy to understand as possible. The first part should make sense based on what we’ve discussed so far: we do some simple calculations to determine where we want to create the object, set the position of the object, and add it to the scene the same way we did for the player sprite.
The new element here is adding actions. Cocos2D provides a lot of extremely handy built-in actions you can use to animate your sprites, such as move actions, jump actions, fade actions, animation actions, and more. Here we use three actions on the target:
CCMoveTo: We use the CCMoveTo action to direct the object to move off-screen to the left. Note that we can specify the duration for how long the movement should take, and here we vary the speed randomly from 2-4 seconds.
CCCallFuncN: The CCCallFuncN function allows us to specify a callback to occur on our object when the action is performed. We are specifying a callback called “spriteMoveFinished” that we haven’t written yet – more below.
CCSequence: The CCSequence action allows us to chain together a sequence of actions that are performed in order, one at a time. This way, we can have the CCMoveTo action perform first, and once it is complete perform the CCCallFuncN action.
Next, add the callback function that we referred to in the CCCallFuncN action. You can add this right before addTarget:
The purpose of this function is to remove the sprite from the scene once it is off-screen. This is important so that we don’t leak memory over time by having tons of unused sprites sitting off-screen. Note that there are other (and better) ways to address this problem such as having reusable arrays of sprites, but for this beginner tutorial we are taking the simple path.
One last thing before we go. We need to actually call the method to create targets! And to make things fun, let’s have targets continuously spawning over time. We can accomplish this in Cocos2D by scheduling a callback function to be periodically called. Once per second should do for this. So add the following call to your init method before you return:
And then implement the callback function simply as follows:
That’s it! So now if you compile and run the project, now you should see targets happily moving across the screen:
Shooting Projectiles
At this point, the ninja is just begging for some action – so let’s add shooting! There are many ways we could implement shooting, but for this game we are going to make it so when the user taps the screen, it shoots a projectile from the player in the direction of the tap.
I want to use a CCMoveTo action to implement this to keep things at a beginner level, but in order to use this we have to do a little math. This is because the CCMoveTo requires us to give a destination for the projectile, but we can’t just use the touch point because the touch point represents just the direction to shoot relative to the player. We actually want to keep the bullet moving through the touch point until the bullet goes off-screen.
Here’s a picture that illustrates the matter:
So as you can see, we have a small triangle created by the x and y offset from the origin point to the touch point. We just need to make a big triangle with the same ratio – and we know we want one of the endpoints to be off the screen.
Ok, so onto the code. First we have to enable touches on our layer. Add the following line to your init method:
Since we’ve enabled touches on our layer, we will now receive callbacks on touch events. So let’s implement the ccTouchesEnded method, which is called whenever the user completes a touch, as follows:
In the first portion, we choose one of the touches to work with, get the location in the current view, then call convertToGL to convert the coordinates to our current layout. This is important to do since we are in landscape mode.
Next we load up the projectile sprite and set the initial position as usual. We then determine where we wish to move the projectile to, using the vector between the player and the touch as a guide, according to the algorithm described previously.
Note that the algorithm isn’t ideal. We’re forcing the bullet to keep moving until it reaches the offscreen X position – even if we would have gone offscreen in the Y position first! There are various ways to address this including checking for the shortest length to go offscreen, having our game logic callback check for offscreen projectiles and removing rather than using the callback method, etc. but for this beginner tutorial we’ll keep it as-is.
The last thing we have to do is determine the duration for the movement. We want the bullet to be shot at a constant rate despite the direction of the shot, so again we have to do a little math. We can figure out how far we’re moving by using the Pythagorean Theorem. Remember from geometry, that is the rule that says the length of the hypotenuse of a triangle is equal to the square root of the sum of the squares of the two sides.
Once we have the distance, we just divide that by the velocity in order to get the duration. This is because velocity = distance over time, or in other words time = distance over velocity.
The rest is setting the actions just like we did for the targets. Compile and run, and now your ninja should be able to fire away at the oncoming hordes!
Collision Detection
So now we have shurikens flying everywhere – but what our ninja really wants to do is to lay some smack down. So let’s add in some code to detect when our projectiles intersect our targets.
There are various ways to solve this with Cocos2D, including using one of the included physics libraries: Box2D or Chipmunk. However to keep things simple, we are going to implement simple collision detection ourselves.
To do this, we first need to keep better track of the targets and projectiles currently in the scene. Add the following to your HelloWorldLayer class declaration:
And initialize the arrays in your init method:
And while we’re thinking of it, clean up the memory in your dealloc method:
Now, modify your addTarget method to add the new target to the targets array and set a tag for future use:
And modify your ccTouchesEnded method to add the new projectile to the projectiles array and set a tag for future use:
Finally, modify your spriteMoveFinished method to remove the sprite from the appropriate array based on the tag:
Compile and run the project to make sure everything is still working OK. There should be no noticeable difference at this point, but now we have the bookkeeping we need to implement some collision detection.
Now add the following method to HelloWorldLayer:
The above should be pretty clear. We just iterate through our projectiles and targets, creating rectangles corresponding to their bounding boxes, and use CGRectIntersectsRect to check for intersections. If any are found, we remove them from the scene and from the arrays. Note that we have to add the objects to a “toDelete” array because you can’t remove an object from an array while you are iterating through it. Again, there are more optimal ways to implement this kind of thing, but I am going for the simple approach.
You just need one more thing before you’re ready to roll – schedule this method to run as often as possible by adding the following line to your init method:
Give it a compile and run, and now when your projectiles intersect targets they should disappear!
Finishing Touches
We’re pretty close to having a workable (but extremely simple) game now. We just need to add some sound effects and music (since what kind of game doesn’t have sound!) and some simple game logic.
If you’ve been following my blog series on audio programming for the iPhone, you’ll be extremely pleased to hear how simple the Cocos2D developers have made it to play basic sound effects in your game.
First, drag some background music and a shooting sound effect into your resources folder. Feel free to use the cool background music I made or my awesome pew-pew sound effect, or make your own.
Then, add the following import to the top of your HelloWorldLayer.m:
In your init method, start up the background music as follows:
And in your ccTouchesEnded method play the sound effect as follows:
Now, let’s create a new scene that will serve as our “You Win” or “You Lose” indicator. Click on the Classes folder and go to File\New File, and choose Objective-C class, and make sure subclass of NSObject is selected. Click Next, then type in GameOverScene as the filename, and make sure “Also create GameOverScene.h” is checked.
Then replace GameOverScene.h with the following code:
Then replace GameOverScene.m with the following code:
Note that there are two different objects here: a scene and a layer. The scene can contain any number of layers, however in this example it just has one. The layer just puts a label in the middle of the screen, and schedules a transition to occur 3 seconds in the future back to the Hello World scene.
Finally, let’s add some extremely basic game logic. First, let’s keep track of the projectiles the player has destroyed. Add a member variable to your HelloWorldLayer class in HelloWorldLayer.h as follows:
Inside HelloWorldLayer.m, add an import for the GameOverScene class:
Increment the count and check for the win condition in your update method inside the targetsToDelete loop right after removeChild:target:
And finally let’s make it so that if even one target gets by, you lose. Modify the spriteMoveFinished method by adding the following code inside the tag == 1 case right after removeChild:sprite:
Go ahead and give it a compile and run, and you should now have win and lose conditions and see a game over scene when appropriate!
Gimme The Code!
And that’s a wrap! Here’s the full code for the simple Cocos2D iPhone game that we developed thus far.
Where To Go From Here?
This project could be a nice basis for playing around some more with Cocos2D by adding some new features into the project. Maybe try adding in a bar chart to show how many more targets you have to destroy before you win (check out the drawPrimitivesTest sample project for examples of how to do that). Maybe add cooler death animations for when the monsters are destroyed (see ActionsTest, EffectsTest, and EffectsAdvancedTest projects for that). Maybe add more sounds, artwork, or gameplay logic just for fun. The sky’s the limit! (Source: raywenderlich.com)


 闽公网安备35020302001549号