Vertical Slice高管解析iOS双摇杆射击游戏的设计原理
本文原作者是用户体验工作室Vertical Slice的主管雷格汉姆·麦卡里斯特(Graham McAllister),他以一些双摇杆射击游戏为例,详细解析了开发者针对iOS触摸屏移动设备创建这类游戏时需注意的事项。
什么是双摇杆射击游戏?
双摇杆射击游戏是一种需使用手指操纵两种控制方式的游戏类型,其中一个摇杆负责控制游戏角色的移动,另一个摇杆的作用则是执行射击任务。
这类游戏的摄像视角一般都是直接向下俯视,或者从一个略为倾斜的视角向下俯视。它们基本上是2D游戏,没有前进(或者Z轴线)的动作。
控制方式的布局
动作控制摇杆一般是分布在左侧,但也有些游戏考虑到了左撇子玩家的需求,也会支持玩家对该设置进行调整。这种布局与Xbox 360和PS3平台的双摇杆射击游戏相同。
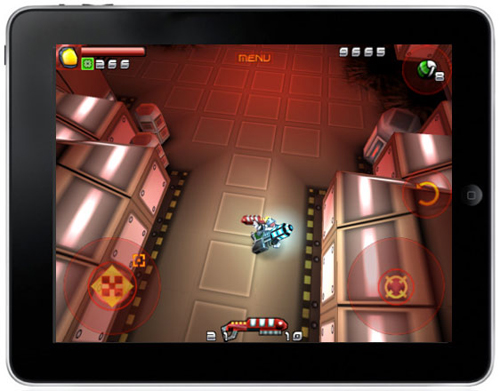
下图是iPhone游戏《迷你戈尔》(Minigore)的控制设置方式。
不同游戏设置存在区别
虽然触摸屏上仅有两个控制系统,但并非所有的双摇杆射击游戏运行效果都完全相同,游戏设计中的细微差别可能会极大地影响用户体验。
专用术语
目前还没有标准的术语来定义这种触摸控制方式,所以我们尽量用可描述的语言来形容相关操作。
下文将介绍的四个组件都有一个共同的功能,那就是虚拟摇杆区(游戏邦注:the virtual joystick region ,以下简称VJR)。
只要手指接触了这个区域,就算是输入了一个控制动作,如果手指接触的是这个区域外的屏幕,那就不算执行控制操作。
四个组件
在开发iOS双摇杆射击游戏之前,有四种主要的控制系统设计可供选择:
1.静态或动态控制方式
2.一直可视的VJR
3.VJR之外的活跃控制方式
4.靠近屏幕边缘的控制方式
这四个组件可以混搭形成不同的控制设置方式,在介绍它们的各种混搭效果之前,要先分别描述这四者的特点。
首先要强调的是,本文主要以动作控制系统为例进行说明,但射击控制系统的操作也同此理。每一个组件都是针对动作、射击这两个选项的综合设计,下文将分别对此进行说明。
组件1:动态或静态控制方式
静态控制:触摸屏控制系统会设置在iOS设备的固定角落(如下图所示),之后我们还将解释第三种组件“VJR之外的活跃控制方式”是如何延伸静态控制方式的可用性。
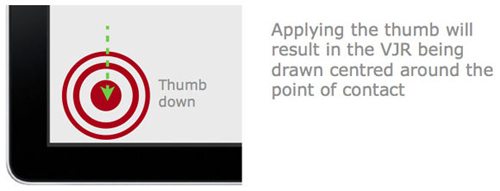
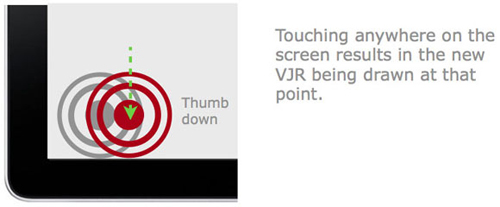
动态控制:无论玩家的手指触摸到屏幕的哪个位置,该控制系统都会自动以手指接触面为中心,形成一个VJR。
这正是动态控制方式最为重要的一个特点,这里就会涉及到第二个组件“一直可视的VJR”。
组件2:一直可视的VJR
动态控制方式有两种显示选项:一直可视方式,或者仅接触可视方式。
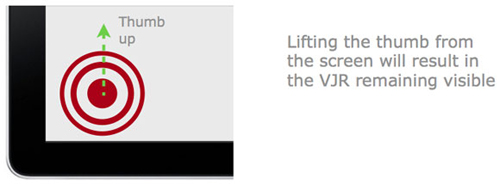
一直可视方式:只要玩家动过手指,屏幕上就会一直显示VJR,即使玩家随后松手也是如此。
系统将根据玩家手指接触屏幕的位置,决定是否画出一个新的VJR,还是显示原来的VJR(游戏邦注:我们将在下文中举例详述)。
将VJR设置为一直可视方式时一定要考虑周全,因为玩家松手的时候,屏幕上的VJR仍然存在,他们过后还得将手指准确无误地按在原点,方可避免出现不自然的人物动作,或者摄像角度偏位等现象。
现在就来详细说明玩家手指接触屏幕、松开手指,再次接触屏幕的操作情况。
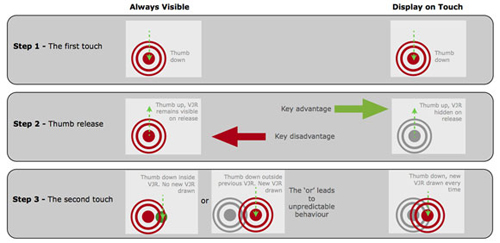
步骤1:首次接触
假设游戏刚刚开始,玩家的手指是第一次点击屏幕,VJR也是首次显示在屏幕上。
步骤2:松开手指
玩家的手指离开屏幕后,VJR会以一直可视方式显示在屏幕上。
步骤3:再次接触
当玩家的手指第二指接触 屏幕时,会有两种情况发生。
(游戏邦注:尤其要注意的是第二种情况,它是影响用户体验双摇杆射击游戏的重要原因)
步骤3出现的第一种情况——触摸到VJR之外的区域
如果玩家手指点到了原VJR以上的区域,屏幕就会以手指接触点为中心,形成一个新的VJR。
换句话说,只要新的接触点与原来的VJR之间的距离超过了其半径(如下图所示),那么屏幕上就会自动生成一个新的VJR。
步骤3出现的第二种情况——触摸到原VJR范围
在这种情况中,玩家的手指会接触到原VJR范围,会让游戏角色朝相应的方向移动。当然玩家手指也有可能准确无误地触摸到原来的VJR中心点,这时候游戏角色就不会移动,但这种概率非常之低。
这种位置偏移给微调控制带来了极大的困难,同时也是很让玩家抓狂的一个原因。游戏角色的任何一个动作,都导致游戏中的摄像镜头移位。也就意味着这种控制结合方式,不但给微调控制带来了麻烦,而且还会造成摄像镜头的抖动。
玩家想转移方向时经常会遇到这种摄像镜头抖动、无意的动作等烦人的问题,例如,他们原来想往左移,结果手指点触到的却是VJR的右侧。
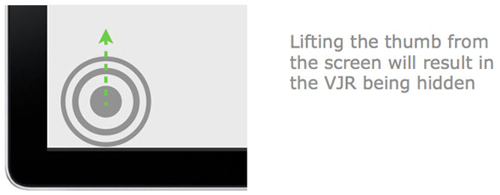
仅接触可视方式:这是一种使用更为普遍的方式,只有手指接触到屏幕时,系统才会显示VJR。
所以假如玩家松开手指时,屏幕上的VJR就会隐藏消失,当他们再次接触时,才会看到一个新的VJR。
这种方式可以保证玩家的手指永远处于VJR的中心,可以为他们提供更舒心和人性化的控制方式。
接下来要说明这种方式的具体操作情况,步骤同上:
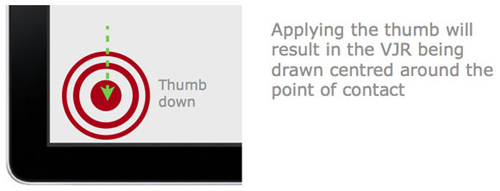
步骤1:首次接触
第一次接触时,VJR在屏幕上的显示情况与一直可视方式相同(如下图)。
步骤2:松开手指
这个步骤正是它与一直可视方式的最大区别,当玩家手指离开屏幕时,VJR就会隐藏起来。
步骤3:再次接触
由于原来的VJR已被隐藏,所以当玩家手指再次点触时,屏幕上会出现一个以手指接触点为中心的新VJR。这确实是一种更为人性化的控制方式。
以下是一直可视VJR和仅接触可视VJR的优劣对比图:
组件3:VJR之外的活跃控制方式
对动态控制来讲,当玩家手指初次接触时,屏幕会自动以手指接触点为中心,形成一个VJR圆环。玩家可以随意变化动作,指引角色向特定的方向移动或射击。
但是只要玩家的手指还没离开屏幕,大多数游戏都有可能会用到VJR之外的控制方式。
也就是说,只要玩家还没松手,这种控制方式就仍然有效,将其拖拽到左侧,角色就会向左移动,但如果松开手指,就得重新定位VJR。
对静态控制方式的影响:玩家的手指只有第一次才需要点触在VJR之内,其他时间可以自由滑过屏幕。但它的VJR之外活跃控制方式的不利之处在于,如果玩家手指离开了屏幕,过后得将其重新定位到屏幕角落的VJR才能生效。
对动态控制方式的影响:对它而言,这种手指“移位”的控制方式对用户体验的影响较小,因为用户松开手指后,可以自由在屏幕上的任何一点重新定位,再画出一个新的VJR。
组件4:靠近屏幕边缘的控制方式
正如上文所述,如果是在动态控制方式中,玩家手指点击屏幕任何一个地方,都可以生成一个VJR,但也有例外的情况——屏幕边缘。
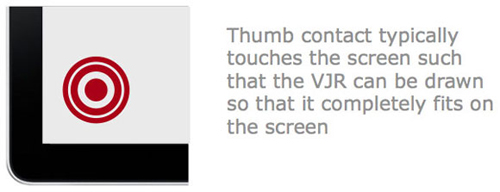
屏幕边缘的问题:在多数情况下,当手指接触iOS设备时,屏幕上总有足够的空间生成一个完整的VJR圆环。但假如手指接触点离屏幕边缘极为接近时又会怎样?在这种情况下,屏幕上不会有足够的空间生成一个完整的VJR圆环,所以游戏设计师必须仔细掂量以下两种方法。
方法1:保持完整的VJR
无论玩家接触到靠近屏幕边缘的哪一点,都会在屏幕上画出一个完整的VJR。
但这种方法的劣势在于,假如玩家点触到靠近左侧边缘的区域,游戏角色就会向左移动,而事实上他们很可能是想向另一个方向移动,或者只是想停止不动。所以这种方法极产生意外的角色移位。
方法2:以接触点为中心的VJR
无论手指接触点是否靠近屏幕边缘,都要以其为中心设置VJR。
这种方法比前者更妙,因为它高度吻合玩家的心理预期,换句话说,它的设置更人性化。
它的另一优势在于,游戏角色永远不会向计划外的方向移动,因为这个VJR是以手指接触点为中心,如果它的中心点是无效的,那就不会执行任何操作(如上图所示)。
几种组件混搭效果对比
我们在上文中已经解析了四种组件对双摇杆控制方式的影响,下面就以五款具体的iPad热门双摇杆射击游戏为例,通过对比它们的四种组件混搭效果,判断哪种搭配的玩法体验更胜一筹。
案例1:《Revolt》
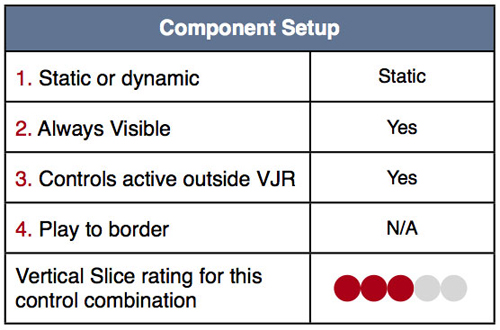
如上图所示,它采用的是静态控制方式、一直可视的VJR、支持VJR之外的活跃控制方式、不支持靠近屏幕边缘的控制方式。Vertical Slice工作室对这种组合的可行性评价是3分。
App Store用户对该游戏的一大怨言就是它的控制方式。
在我们看来,采用静态方式难以灵活控制游戏角色的动作,而且还会引起频繁的摄像镜头抖动现象。
如果将其调整为动态控制方式,应该有助于提高用户体验。
案例2:《Max Adventure》
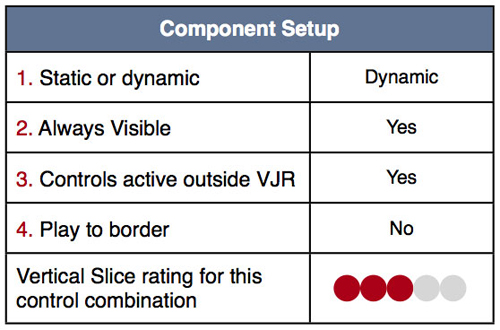
它采用动态控制方式、一直可视的VJR、支持VJR之外的活跃控制方式、不支持靠近屏幕边缘的控制方式。Vertical Slice工作室对这种组合的可行性评价是3分。
虽然App Store用户评价并未批评该游戏的控制方式,但它的两种设计仍然会造成计划外的玩家动作。
1.未支持靠近屏幕边缘的控制方式,所以玩家手指接触屏幕边缘的区域时,其角色就会向该方向移动,但他们的本意可能只是想静止不动。
2.该游戏采用了动态控制方式,但却支持一直可视的VJR,这种设计组合比较罕见。这意味着玩家松开手指后,第二次如果点触到原VJR的圆环区内(例如只是想移动一小步),就有可能造成计划外的角色移位。将VJR隐藏起来可以解决这个问题。
案例3:《喵喵欢乐大作战》(Meow Meow Happy Fight HD)
它采用动态控制方式、一直可视的VJR、支持VJR之外的活跃控制方式、不支持靠近屏幕边缘的控制方式。Vertical Slice工作室对这种组合的可行性评价是3分。
它的VJR是个一直可视的小圆核,当手指接触时该圆核会适当扩大。其控制设计的主要问题在于,当玩家松手后重新定位VJR时,很可能向随机性的方向移动,原因是它的小圆核VJR对手指接触的敏感度实在太高了。
如果要解决这个问题,应该围绕这个小圆核设置一个“死亡区”(即非活跃区),以便玩家点触屏幕时生成不必要的动作和移位。
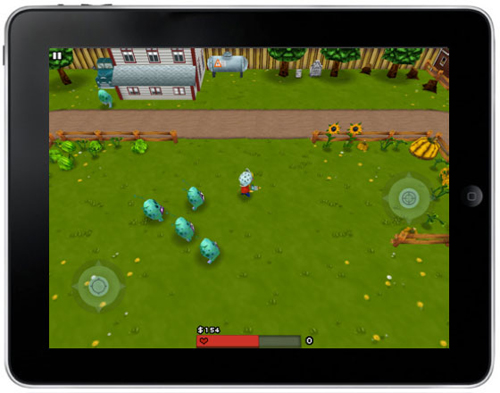
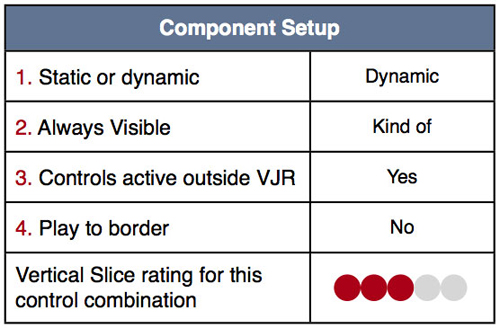
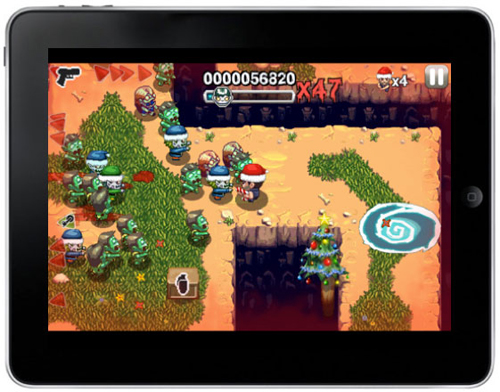
案例4:《僵尸时代》(Age of Zombies)
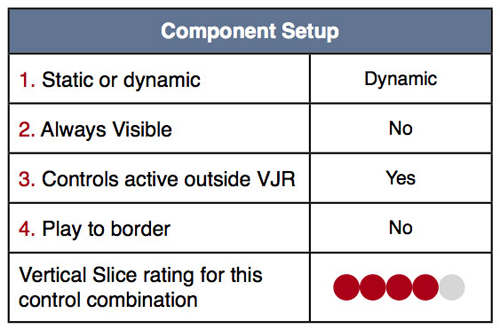
它采用动态控制方式、仅接触可视的VJR、支持VJR之外的活跃控制方式、不支持靠近屏幕边缘的控制方式。Vertical Slice工作室对这种组合的可行性评价是4分。
这种控制方式非常棒,使用了隐藏起来的动态VJR,所以是一种很舒畅和人性化的游戏设置。
但这种组合并非十全十美,因为它不支持靠近屏幕边缘的控制方式,所以玩家点触到屏幕边缘时,还是可能产生计划外的方向移动或者射击行动。
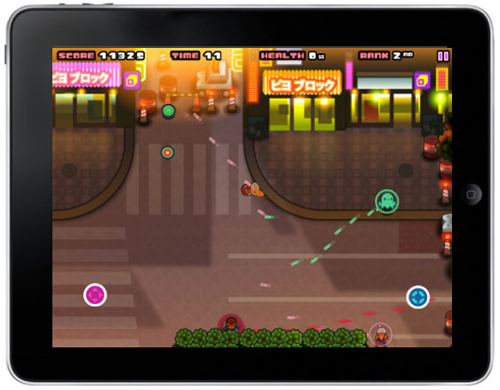
案例5:《几何战争》(Geometry Wars: Touch)
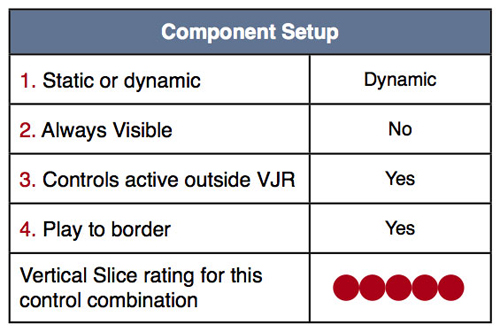
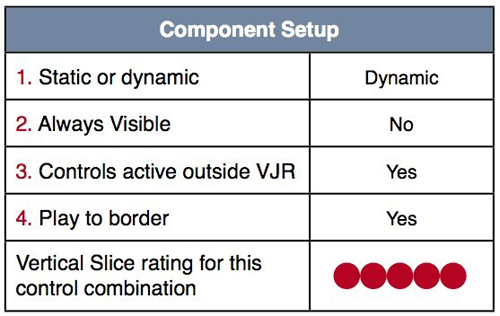
它采用动态控制方式、仅接触可视的VJR、支持VJR之外的活跃控制方式、支持靠近屏幕边缘的控制方式。Vertical Slice工作室对这种组合的可行性评价是5分。
《几何战争》的iPad版控制方式令人惊叹,在四种组件中均择其最优者而行之,所以可以提供非常舒畅、令人满意的用户体验。
顺便一提的是,该游戏的iPhone版本采用的却是静态控制方式,其用户体验并不像iPad版本这样优化。
推荐组合及设计指南
分析了以上数款双摇杆射击游戏后,我们总结出在可用性和用户体验上均达到最理想状态的组合方式为:动态控制方式、仅接触可视的VJR、支持VJR之外的活跃控制方式、支持靠近屏幕边缘的控制方式。
这种组合的优势如下:
·消除不必要的玩家移动
·消除摄像镜头颤动现象
·传递人性化的控制方式(符合用户心理预期)
·适应不同大小手指接触位置
虽然我们不能说这种组合就是金科玉律,但相信开发者没有理由不以这种组合方式来设计双摇杆控制游戏。(本文为游戏邦/gamerboom.com编译,转载请注明来源:游戏邦)
A Guide To iOS Twin Stick Shooter Usability
Graham McAllister, director of user experience studio Vertical Slice, examines the conundrum of creating a twin stick shooter for the touch-only iOS, breaking down the dos and don’ts, and examining a number of popular games to see what approaches work best.]
What is a Twin Stick Shooter?
Twin stick shooters are a genre of game which use two controls, typically operated by the thumbs. One control dictates the character’s movement, the other the direction of shooting.
Importantly, these can be operated independently, i.e. it’s possible to move in one direction, and shoot in another.
The camera angle in these games is either from directly overhead, or overhead and from a slight angle. The games are essentially 2D, i.e. there is no forward (or z-axis) movement.
Control Layout
Movement is almost always on the left-hand side, shooting on the right; some games allow the options to switch this for lefties. This layout is also consistent with twin stick shooters on Xbox 360 and PS3.
Minigore on iPhone introduces the controls very clearly.
All Games are Not Equal
With only two touch screen controls to implement, you may think that all twin stick shooters are created equal, however it turns out that subtle changes in design can greatly affect the player experience.
Terminology
No standard definitions exist to describe the interactions we’re about to introduce, so we’ll try to keep them as descriptive as possible.
Most of the terminology will be defined when we introduce the four components, however they all have one feature in common, the virtual joystick region (VJR hereafter).
Within this region, thumb contact is registered as control input, if the player’s thumb touches the screen outside of this area, it is not registered as player input.
The Four Components
There are four main design decisions to consider when implementing the controls for your iOS twin stick shooter.
1. Static or dynamic controls
2. Controls always visible
3. Controls active outside the VJR
4. Play to border
These four components are combined to form alternative control implementations.
Before we take a look at the main varieties and show examples of games which use each particular combination, let’s describe the four components.
For clarity, our examples will focus on the movement control, but all comments apply to the shooting control also. Each component is really a design decision with two options, so we’ll cover each alternative.
Component 1: Static or Dynamic Controls
Static Controls. This approach fixes the location of the touch controls, typically they’ll be within easy thumb reach of the corners of the iOS device.
Later we’ll see how component three, Controls Active Outside The VJR, extends the usability of the static control approach.
Static controls – fixed at corners of the device.
Dynamic Controls. This approach centers the controls at the point where the player touches the screen, i.e. the controls can change spatial location depending on where the player’s thumb makes contact.
Crucially, however, there is one important factor in how dynamic controls are implemented, which brings us on to the second component.
Component 2: Controls Always Visible
Dynamic controls can be displayed in one of two ways: Always Visible, or Display On Touch.
Always Visible. The always visible approach draws the VJR where the player touches the screen, and keeps the controls displayed there even if they remove their finger.
Depending on the spatial location of where the player makes contact next, the technique will decide whether to draw a new VJR, or retain the original (we’ll clarify this in an example shortly).
Deciding whether to make the VJR always visible or not is more than just a visual feedback issue.
If the player lifts their thumb from the screen and the controls remain drawn, then the player has to put their thumb back again in the exact same spot, otherwise it can cause undesirable player and camera movement.
Let’s see how this can happen in more detail by looking at a simple example of the player touching the screen, lifting their thumb, then re-touching the screen again.
Step 1 – The first touch
Let’s assume the game has just started and the player is about to touch the screen for the first time. When they make initial contact, the VJR is drawn for the first time.
Step 2 – Thumb release
At some point the player is likely to lift their thumb from the screen, at which point, the always visible approach will keep the VJR drawn.
Step 3 – The second touch
When the player reapplies their thumb to the screen, one of two possible scenarios can occur.
Scenario B, in particular, is the cause of many user experience issues with twin stick shooters.
Step 3 scenario A – touch outside the VJR
If the player’s thumb makes contact outside the VJR, then a new VJR will be drawn with the new point of contact as the centre.
In other words, if the distance between the previous and current points of contact is greater than the radius of the VJR, a new VJR will be drawn.
Step 3 scenario B – touch inside the VJR
In this case the player’s thumb makes contact within the current VJR, resulting in the character starting to move in that direction. Of course it’s possible that the player’s thumb may make contact in the exact centre of the VJR, in which case no movement would occur, however in practice this is unlikely.
It is this offset placement that makes fine control difficult, leading to player frustration. Also, depending on how the camera has been implemented in the game, any character movement could also cause camera movement. This means that this control combination will not only result in difficulty with fine control, but also cause camera shudder.
Camera shudder and unintentional movement are particularly noticeable in cases where the player wants to move one direction, e.g. left, but their thumb touches the right side of VJR to begin with.
Display on Touch. The alternative, and more common approach, is to only display the VJR when the thumb is in contact with the screen.
So if the player lifts their thumb from the screen the VJR is hidden. When the player makes contact again, the VJR is drawn at the new location.
Using this approach, the player’s thumb is always at the centre of the VJR, leading to smoother and more predicable control.
Let’s look at the same example as before, only using the Display on Touch approach.
Step 1 – the first touch
For the initial touch, the situation is the same as with the Always Visible approach.
Step 2 – thumb release
This step is the key difference, and benefit to this approach. When the player lifts their thumb, the VJR is hidden from view (not drawn).
Step 3 – the second touch
As the VJR was hidden from view on thumb release, this means that wherever the player touches next will always be the centre of the VJR.
This leads to predictable (intuitive) player controls.
Component 3: Active Outside of the VJR
For dynamic controls, when the player initially touches the screen, the VJR is typically drawn as a circle centered around the point of contact (there are exceptions; we’ll come to those later).
The player can then make a sliding gesture to direct movement (or shoot) in the desired direction.
However, as long as the player does not lift their finger off the screen, it is common in most (but not all) games to be able to continue to use the controls outside of the VJR.
This means that the controls will continue to work until the player’s finger is lifted, e.g. dragging left will move their character left etc, however when lifted, they will have to start again by touching within the VJR.
Impact on static controls. For static controls, this means that it is only the initial touch that is required to be within the VJR, after that it’s possible that the player’s thumb could drift across the screen.
For static controls, the downside of controls being active outside the VJR is that if (when) the player lifts their thumb from the screen, they have to shuffle their hand back to the VJR in the corner of the screen.
Impact on dynamic controls. For dynamic controls, this hand position “drift” has less of an effect on the player, as if their thumb loses contact with the screen, they can simply reapply it anywhere on the screen and the VJR will be redrawn at that point.
Players can move their thumb outside of the VJR and still have control.
Component 4: Play to Border
As we were saying earlier, for dynamic controls the VJR is drawn with its centre point located where the player’s thumb makes contact with the screen. However there is one exception to this: border cases.
Border cases. In most circumstances, when the player’s thumb makes contact with the screen, there will be enough space such that the entire VJR can be drawn so that it fits on-screen.
But what happens if the player’s thumb makes contact close to the edge of the screen? In these cases there is not enough space to draw the full VJR, so the designer must make a decision between two approaches, Fit and Centre.
Approach 1 – Fit VJR
If the player touches the screen near to the border, draw the VJR such that it always fits entirely on the screen.
This approach has the disadvantage that if the player makes contact close to the left hand edge (for example) their character will move left, whereas it’s possible that they were just making contact with the screen and had intended to go in another direction or simply wanted to stand still.
Ultimately, this approach can lead to unintentional player movement.
Approach 2 – Center VJR
Centre the VJR at the point of contact, regardless of whether it’s near an edge or not.
This approach is probably the better design decision as it more closely matches what the player will expect from the controls. In other words, it is more intuitive.
It also has the advantage that the character will never move off in an unintended direction as the VJR is guaranteed to be centred around the point of contact i.e. the centre point is a null input, a ‘do nothing’ instruction.
Good, Better, Best
Now that we’ve detailed the four main components that affect the controls of a twin stick shooter, let’s take a look at how these have been implemented in iOS games.
Each game will use a combination of the four components, but as we’ll see, some combinations lead to a better gameplay experience than others.
The Games
We’ll now compare five of the most popular twin stick shooters on the iOS platform. All comments relate to the iPad versions.
1. Revolt
2. Max Adventure
3. Meow Meow Happy Fight HD
4. Age of Zombies
5. Geometry Wars: Touch
Example 1: Revolt
Quite a few complaints on the App Store relating to the controls of this game.
From our viewpoint, the static controls make it difficult to control the character smoothly, also causing frequent camera judder.
Changing to dynamic controls would certainly have improved the user experience.
Example 2: Max Adventure
Although the comments on the App Store do not criticize the controls, there are two design decisions here that could lead to unintentional player movement.
1. Play to border is not used, so if the player touches near an edge they will move in that direction, even if they wanted to stand still.
2. The game makes the somewhat unusual decision of using dynamic controls but permanently visible. This means that if the player lifts their thumb but makes contact within the VJR (i.e. a small movement), it will likely result in unintentional player movement. Hiding the controls on lift would have solved this issue.
Example 3: Meow Meow Happy Fight HD
A variety on the permanently visible theme here, the VJR has a small core which is permanently visible, then it expands when touched.
The main problem with their implementation is that when you lift your thumb and reapply it, you’ll almost certainly start moving in a random direction.
The reason for this is that the sensitivity of the small core at the centre of the VJR is too high.
To solve this issue, a small “dead zone” (inactive region) region around the permanently visible core would have allowed players to tap the screen without moving unintentionally.
Example 4: Age of Zombies
These controls feel great, using dynamic VJRs which are hidden when not touched make for smooth and intuitive gameplay.
This combination is almost ideal, but not quite. As the controls don’t let the player tap close to the border without moving/shooting in that direction, means it’s still possible to move unintentionally.
Example 5: Geometry Wars: Touch
The controls for the iPad version of Geometry Wars are quite simply divine. They apply best practice in each of the four components to deliver a smooth and satisfying player experience.
Incidentally, the iPhone version uses a variation on a static approach, nowhere near as polished as its big brother on the iPad.
Recommendations and Design Guidelines
As a result of analyzing a number of the current twin stick shooters, it emerges that the best combination of the 4 design components in terms of both usability and user experience is:
Advantages of this component combination:
* Removes unintentional player movement
* Removes camera shudder
* Delivers intuitive controls (matches player expectations)
* Caters for different sized hands / grip position
Now, we’re not saying that this is a hard and fast rule, but you’d need to have some pretty good reasons to not design your twin stick shooter with this component combination.(source:gamasutra)


