使用Cocos2D和Box2D制作《Jetpack Joyride》(3)
作者:Bogdan Vladu
欢迎回到《Jetpack Joyride》游戏制作教程!在本系列教程中我们将使用Cocos2D和Box2D以及LevelHelper和SpriteHelper制作一款类似于《Jetpack Joyride》的游戏。(请点击此处查看本系列第1、第2部分)
迄今为止我们利用了一只老鼠并在其后背安上了喷射飞行器,从而让它能够飞越滚动卷轴的关卡,完成了不同动画以及连续滚动效果。
而在本部分教程中,我们将进一步处理游戏中的碰撞。换句话说,完成本部分教程后我们便能够杀死老鼠了!
同时我们也将在此添加音效,更多复杂的动画,并消除游戏玩法中的某些问题。让我们正式开始吧!
开始
首先你必须获得第2部分教程之前(包括第2部分教程)的完整项目内容。同时你还需要下载声音包。
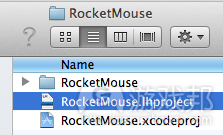
在LevelHelper中打开项目,导航到Finder的最后一个项目并双击文件RocketMouse.lhproject。
LevelHelper应该打开的是我们所创造的最后一个关卡。而如果因为某种原因LevelHelper打开了早前的关卡,你就应该来到关卡部分找到并打开最后关卡。
执行碰撞:概述
我们的游戏拥有一只飞翔的老鼠以及激光射击,并且还设置了一些供玩家收集的硬币。但是如果角色碰到硬币或激光却没有任何反应,这不是很奇怪?所以我们应该在此添加一些游戏玩法。
在此之前我们需要明确已经设立了哪些内容。
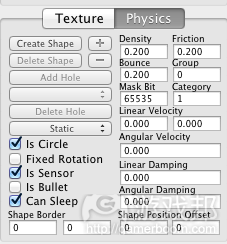
在LevelHelper中右击右边工具条(第一个标签)中的硬币,选择打开SpriteHelper Scene。然后在SpriteHelper中选择硬币,你便能够看到物理属性部分,并在“Is Sensor”选项中打勾:
之所以在这个选项打勾是因为我们希望玩家在接触到硬币时能够产生碰撞回应,从而我们便能够适时地给予玩家分数,并且我们也不希望老鼠真正表现出与硬币的碰撞行为。
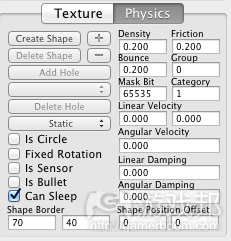
那激光呢?而如果是激光属性,这个精灵不需要勾选“Is Sensor”选项:
为什么?难道我们不想要表现出相同的行为?并非如此,只不过我们希望能够追踪激光的动画,所以需要采取不同方法。
如果选中了Is Sensor,那么碰撞效果将只会发生在老鼠第一次碰触到精灵时。而我们希望老鼠与激光能够进行连续碰撞(每一帧),因为每一帧的激光动画会发生变化(游戏邦注:例如从“开启”到“关闭”状态),在此期间老鼠要一直与激光打交道。
而如果我们在激光属性中选择了Is Sensor选项,并且当激光关闭时老鼠仍然与激光接触,这时候我们拥有碰撞反馈,但是我们却不能在此炸毁老鼠,因为毕竟激光已经消失了。
随后当激光再次开启时,因为我们已经执行了一次碰撞,所以再也无法知道玩家是否仍然碰触到激光。
我们该如何解决这一问题?很简单。结合Box2d使用LevelHelper的碰撞行为,我们便能够废除碰撞反馈,使得老鼠能够闪过激光而不产生与其碰撞的感觉。同时我们还将在每一帧中设置碰撞触发器,以此判断我们是否该杀死老鼠。
执行碰撞:硬币
打开你的Xcode项目,导航到HelloWorldScene.mm并在初始化之前说明这种新方法:
-(void) setupCollisionHandling
{
[lh useLevelHelperCollisionHandling];
[lh registerBeginOrEndCollisionCallbackBetweenTagA:PLAYER andTagB:COIN idListener:self selListener:@selector(mouseCoinCollision:)];
}
接下来在初始化(在调用retrieveRequiredObjects之后)最后调用新方法:
[self setupCollisionHandling];
在setupCollisionHandling方法中,我们首先告知LevelHelperLoader实例,我们想要使用它的碰撞处理方法而非自己创造碰撞处理方法。我的建议是:要一直使用这种方法,因为它快速,简单又方便。
在第二次调用中我们提出了新方法,即我们想要用LevelHelper调用一次碰撞——精灵与玩家标签(在这里就是老鼠精灵)以及精灵与硬币标签(在这里就是任何硬币精灵)在任何时候发生的碰撞。
是否还记得我们在第2部分是如何设置碰撞标签?LevelHelper将为这些标签自动生成常数,从而让我们能够将其用于代码的编写中。如果你想知道它们的定义,你可以按控制键并点击其中一个常数并选择“转到定义”。
LevelHelper的碰撞处理中有多种类型的碰撞,不过我们将在此使用beginOrEnd,因为我们的硬币精灵已被定义为感应器,而Box2d处理感应对象的碰撞只能发生在“开始”碰撞类型上。
以下我们将定义老鼠与硬币之间碰撞反馈的方法。在setupCollisionHandling之前添加新方法:
-(void)mouseCoinCollision:(LHContactInfo*)contact
{
LHSprite* coin = [contact spriteB];if(nil != coin)
{
if([coin visible])
{
[self scoreHitAtPosition:[coin position] withPoints:100];
}[coin setVisible:NO];
}
}
正如你所看到的,这个方法获得了一个LHContactInfo*对象作为参数。这是一个特别类,将能够给予我们关于碰撞的相关信息。
怎样从这种碰撞中获得硬币精灵?我们在registerBeginOrEndCollisionCallbackBetweenTagA和TagB调用中将硬币精灵记录为tagB。如果tag B是货币,那么我们的精灵便能够使用 [contact spriteB]。
接下来我们必须确保硬币不是无值。尽管这点不是非常重要,但是却能够帮助我们有效地避免错误。所以我们最好还是核查下是否出现无值情况。
如果硬币是可见的,我们将快速调用一个方法而给予获得货币的玩家分数奖励。随后我们设置硬币为不可见,从而将其隐藏在屏幕之后,并告知玩家现在他的虚拟钱包中已经有钱了。
现在编译将会出现一个错误,因为我们还未定义scoreHitAtPosition方法。让我们现在定义它。将以下代码置于mouseCoinCollision方法之前:
-(void)scoreHitAtPosition:(CGPoint)position withPoints:(int)points
{
score += points;
}
在HelloWorldScene.h中说明分数变量:
int score;
编译并运行游戏,你将看到当老鼠与硬币发生碰撞时,货币将会消失!
执行碰撞:激光
下一步便是处理激光与老鼠之间的碰撞。
在setupCollisionHandling方法最后添加以下代码:
[lh registerPreCollisionCallbackBetweenTagA:PLAYER andTagB:LASER idListener:self selListener:@selector(mouseLaserCollision:)];
在这里我们已经记下了玩家与激光之间的预制碰触回调。而现在我们需要定义mouseLaserCollision方法。
这么做是因为激光精灵并非感应器,而我们希望能够接收到每一帧的碰撞通知,从而让老鼠在接触被激活的激光时能够死去。
将以下代码放在mouseCoinCollision之后:
-(void)mouseLaserCollision:(LHContactInfo*)contact
{
LHSprite* laser = [contact spriteB];int frame = [laser currentFrame];
// If we make the laser a sensor, the callback will be called only once – at first collision.
// This is not good as we want to kill the player when the laser changes to active.
// So we disable the contact so that the player and laser don’t collide, but trigger a collision.
// Disabling the contact is only active for one frame,
// so on the next frame the contact will be active again, triggering the collision.b2Contact* box2dContact = [contact contact];
box2dContact->SetEnabled(false);if(playerIsDead)
return;if(frame != 0)
{
[self killPlayer];
}
}
在上述代码中,我们从接触信息中获得了精灵B,而在此精灵B也就是激光。让我们从精灵中获得当前帧,因为我们需要测试激光是否被激活,并且是否杀死玩家角色。
随后我们从LevelHelper的接触对象中获得了Box2d的接触信息,并禁止了接触以免发生任何碰撞行为。我们需要检查玩家是否死亡;如果死亡了,我们就不需要再做其它事了。
最后,我们将测试帧数是否为0。如果是0,那么激光就未被激活,我们就不需要杀死玩家。而如果不为0,这就意味着我们必须杀掉玩家。我们取消了碰撞回调机制,因为我们已经不再需要它了,而只要杀掉玩家便可。
需要注意的是,我们现在正使用两个之前未定义的内容,即killPlayer方法以及playerIsDead变量。所以我们现在需要定义它们。
在HelloWorldScene.h中添加以下类说明:
bool playerIsDead;
在HelloWorldScene.mm中定义killPlayer方法(添加于mouseCoinCollision之后):
-(void)killPlayer
{
playerVelocity = 0.0;
playerShouldFly = false;
playerIsDead = true;
playerWasFlying = false;
[rocketFlame setVisible:NO];
[player startAnimationNamed:@"mouseDie"];[paralaxNode setSpeed:0];
CGSize winSize = [[CCDirector sharedDirector] winSize];
CCLabelTTF *label = [CCLabelTTF labelWithString:@"Game Over" fontName:@"Marker Felt" fontSize:64];
label.color = ccRED;
label.position = ccp(winSize.width*0.5, winSize.height*0.75);
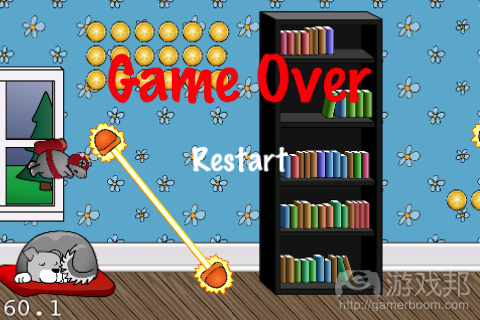
[self addChild:label];CCMenuItem *item = [CCMenuItemFont itemFromString:@"Restart" target: self selector:@selector(restartGame)];
CCMenu *menu = [CCMenu menuWithItems:item, nil];
[menu alignItemsVertically];[self addChild:menu];
}
在killPlayer玩法中,我们将玩家的速率设置为0。如果此时的玩家正处于飞行状态,那么他将会快速掉落到地面上。
随后我们明确设置了playIsDead的变量,从而我们便知道玩家在这个方法中死去了。随后我们隐藏了飞行器的火焰。
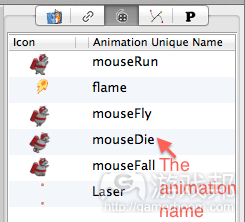
最后,我们通过使用LevelHelper方法(将作为动画独特名称以及执行动画精灵的参数)开始在玩家精灵上播放死亡动画。我们可以从LevelHelper的动画部分中获得动画名称。
之后,我们将移动速速设置为0以停止视差移动。
现在我们需要创建一个Cocos2d菜单从而让我们能够在玩家死后从新开始游戏。让我们根据如下代码在killPlayer方法之前定义restartGame方法:
-(void)restartGame
{
[[CCDirector sharedDirector] replaceScene:[HelloWorldScene scene]];
}
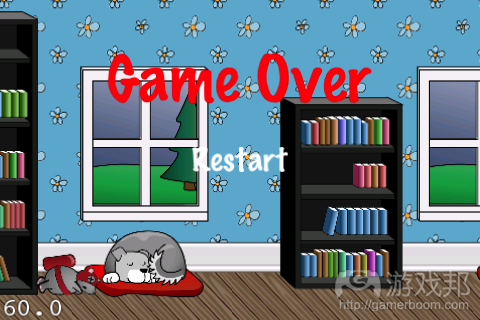
编译并运行,现在你的老鼠在碰触到激光后就会死去了!
音效
来到Finder的Xcode资源文件夹,打开一个新的Finder窗口,并导航到你在一开始所下载的声音包所在位置。
在资源文件夹中创造一个名为声音的新文件夹,并从声音包中将所有声音文件拖到这个新文件夹中。
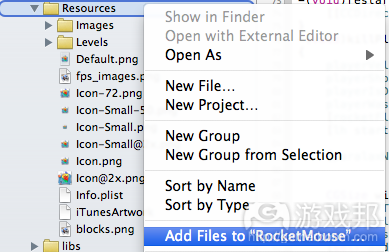
再次回到Xcode,通过右击资源文件夹并选择“Add Files to RocketMouse.”将声音文件夹添加到资源中。
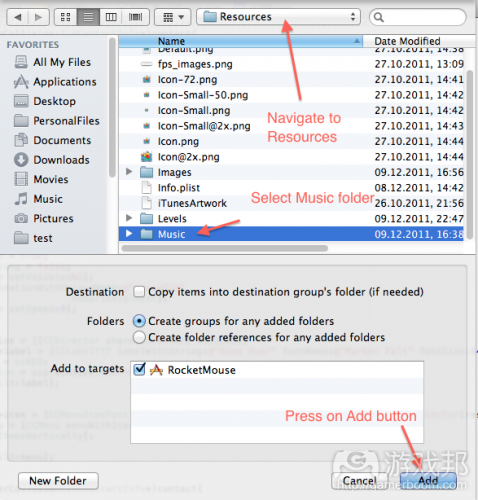
在新的窗口中导航至资源文件夹,选择声音文件夹并点击添加按钮。
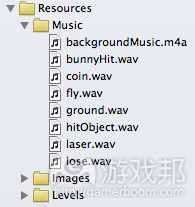
你的Xcode的资源文件夹必须如下:
现在,我们已经将声音文件添加到项目中了,让我们编写声音代码从而制造出声音!
在HelloWorldScene.mm最上方输入音频引擎:
#import “SimpleAudioEngine.h”
然后添加这个新的方法以加载我们的声音(将其置于初始方法的正上方):
-(void) setupAudio
{
[[SimpleAudioEngine sharedEngine] playBackgroundMusic:@”backgroundMusic.m4a”];
[[SimpleAudioEngine sharedEngine] preloadEffect:@”coin.wav”];
[[SimpleAudioEngine sharedEngine] preloadEffect:@”fly.wav”];
[[SimpleAudioEngine sharedEngine] preloadEffect:@”ground.wav”];
[[SimpleAudioEngine sharedEngine] preloadEffect:@”hitObject.wav”];
[[SimpleAudioEngine sharedEngine] preloadEffect:@”laser.wav”];
[[SimpleAudioEngine sharedEngine] preloadEffect:@”lose.wav”];
[[SimpleAudioEngine sharedEngine] preloadEffect:@”bunnyHit.wav”];
}
然后在初始化中调用这个方法(在setupCollisionHandling调用之后):
[self setupAudio];
在此我们将所有声音加载在声音包中。我们也加载了backgroundMusic.m4a作为音乐资源,并预加载了其余文件作为音效。
现在我们必须将音效与生成方法匹配在一起。在mouseCoinCollision方法中添加以下代码:
[[SimpleAudioEngine sharedEngine] playEffect:@”coin.wav”];
在mouseLaserCollision方法中将以下代码添加到if(frame != 0) 声明中:
[[SimpleAudioEngine sharedEngine] playEffect:@”laser.wav”];
同样我们也需要添加飞行声音。在tick方法中将以下代码添加到if playerShouldFly block中:
[[SimpleAudioEngine sharedEngine] playEffect:@”fly.wav”];
编译并运行游戏,现在你可以欣赏新的音乐和音效了!
老鼠,猫与狗之间的碰撞
现在我们的老鼠在碰触到激光后便会死去,但是当它遇到猫和狗时却能够很容易逃脱!所以让我们也对此添加一些碰撞处理。
在setupCollsionHandling方法最后添加以下内容:
[lh registerPreCollisionCallbackBetweenTagA:PLAYER andTagB:DOG idListener:self selListener:@selector(mouseDogCatCollision:)];
[lh registerPreCollisionCallbackBetweenTagA:PLAYER andTagB:CAT idListener:self selListener:@selector(mouseDogCatCollision:)];
让我们定义回调方法。因为我们的游戏将执行相同的猫和狗的碰撞行动,所以我们只需要一个方法。将以下内容添加到setupCollisionHandling方法之前的任何位置:
-(void)mouseDogCatCollision:(LHContactInfo*)contact
{
[[SimpleAudioEngine sharedEngine] playEffect:@”hitObject.wav”];
[lh cancelPreCollisionCallbackBetweenTagA:PLAYER andTagB:DOG];
[lh cancelPreCollisionCallbackBetweenTagA:PLAYER andTagB:CAT];
[self killPlayer];
}
在此我们将播放相对应的音效,并取消玩家与猫或狗之间的回调,因为我们将不再需要它们。然后便能够杀死玩家。
编译并运行游戏,现在你的老鼠在撞上猫或狗时同样也会死去了——所以千万要小心!
调整游戏玩法
现在我们的游戏越来越完善了,不过也仍然存在一些问题。
第一个问题便是,如果你在老鼠死后碰触屏幕,它将开始到处乱窜,就像复生一样。尽管“僵尸老鼠”是个不错的题材,有可能让你的游戏在App Store中窜红,但是这并不是我们所追求的效果。
所以我们最好在正式完成游戏之前停止这种僵尸行为。只要将以下内容添加到ccTouchesBegan最开始的位置便可:
if(playerIsDead)
return;
而在这里我们需要执行唯一不同操作便是测试玩家是否死亡了。如果玩家死亡了,我们也不需要做其它事了。
如果我们现在运行游戏,将不会再出现僵尸行为了。但是却仍有其它问题存在。
例如在我的关卡中存在着一个玩家难以越过的激光,因为它已经被激活了,而同时下方还有一只走动的猫,让玩家也很难从下面经过。所以你的关卡中肯定也会存在类似的问题。
这时候便需要进行测试并做出必要修改,以确保玩家能够成功地完成游戏。
在level03关卡打开LevelHelper,移动猫,狗以及激光精灵等必要对象,从而让玩家能够顺利通过(但是不要让他太轻易就通过)。
同时记得要保存修改后的关卡!
因为我们调整了关卡,所以有必要创造一种新的方法明确玩家何时碰触到地面。对此我们将定义一个新的标签,并在物理边界的最底断添加这一标签。点击定义标签按钮,并添加“地面”标签。
既然我们拥有了这个新标签,让我们将其安置在Physic Boundary的最底端,即点击Physic Boundary按钮。
在LevelHelper中保存关卡。
同时我们也仍需要定义玩家与地面之间的碰撞回调。在setupCollisionHandling方法最后添加以下代码:
[lh registerPreCollisionCallbackBetweenTagA:PLAYER andTagB:GROUND idListener:self selListener:@selector(mouseGroundCollision:)];
在setupCollisionHandling方法上方定义mouseGroundCollision方法,如下:
-(void)mouseGroundCollision:(LHContactInfo*)contact
{if(playerIsDead)
return;if(playerWasFlying)
{
[[SimpleAudioEngine sharedEngine] playEffect:@”ground.wav”];[player startAnimationNamed:@"mouseFall"
endObserverObj:self
endObserverSel:@selector(fallAnimHasEnded:animName:)
shouldObserverLoopForever:FALSE];}
playerWasFlying = false;
}
测试玩家是否死亡,如果明确了他们的死亡,我们就可以重新开始游戏。然后测试玩家在碰触到地面时是否仍会继续飞行。如果它们仍能够飞行,我们便需要播放着陆音效。
随后我们便使用告示开始播放mouseFall动画。通过这种方法,我们能够在动画结束后收到通知,从而能够继续根据玩家精灵设置另外一个动画。
所以,让我们设置mouseFall动画结束后需要调用的方法。并将其添加在mouseGroundCollision之上,如下:
-(void) fallAnimHasEnded:(LHSprite*)spr animName:(NSString*)animName
{
[player startAnimationNamed:@"mouseRun"];
}
这个新方法将被当成一种参数,即关于具有动画以及动画名称的精灵。随后便开始在玩家精灵上播放动画“mouseRun”。
现在玩游戏,你将会发现几乎一切内容都就绪了。但是还有一点需要我们马上进行修改。
你会注意到,如果我们现在运行游戏,那些从关卡中消失的硬币将不会再次出现,除非重新开始设置视差。在玩家与硬币发生碰撞后,我们隐藏了硬币,所以我们就要想办法在视差重新出现时让这些硬币再次浮现。
当你将指示器指向视差节点时,将以下代码添加到retrieveRequiredObjects方法声明中:
-(void) retrieveRequiredObjects
{
// existing lines
paralaxNode = [lh paralaxNodeWithUniqueName:@"Parallax_1"];
NSAssert(paralaxNode!=nil, @”Couldn’t find the parallax!”);// add this new line
[paralaxNode registerSpriteHasMovedToEndListener:self
selector:@selector(spriteInParallaxHasReset:)];// rest of code…
这种新方法记录下了视差的另外一种新方法(spriteInParallaxHasReset),并将在重置视差中的精灵时进行调用。我们将在精灵退出视线时调用这一方法。
在retrieveRequiredObjects声明之前定义spriteInParallaxHasReset:
-(void) spriteInParallaxHasReset:(LHSprite*)sprite
{
if(COIN == [sprite tag]){
[sprite setVisible:YES];
}
}
在此我们测试了通过视差重新设置的精灵标签,如果它是硬币标签,我们将再次将其属性设置为可视。
编译并运行游戏,你便能够看看自己可以在游戏中活多长时间了!
游戏邦注:原文发表于2012年1月12日,所涉事件和数据均以当时为准。
(本文为游戏邦/gamerboom.com编译,拒绝任何不保留版权的转载,如需转载请联系:游戏邦)
How to Make a Game Like Jetpack Joyride using LevelHelper and SpriteHelper [Cocos2D Edition] – Part 3
Bogdan Vladu
Welcome back to our Jetpack Joyride tutorial series! In this tutorial series, we are making a game similar to Jetpack Joyride using Cocos2D and Box2D, and the LevelHelper and SpriteHelper tools.
So far, we’ve got a mouse that can use his jetpack to fly through a scrolling level, complete with animations and endless scrolling. Check out how we did it in part one and part two.
I hope you enjoyed the first two parts, but, psst… part three is where we get to the really fun stuff!
In this part of the series, we’ll make our game fully capable of handling collisions.
In other words, by the end of this part we’ll be able to reward and kill the mouse! :]
We’ll also add sounds, more sophisticated animations, and we’ll iron-out some problems with game play.
So what are you waiting for – time to give our mouse the ride of his life!
Getting Started
To continue with this part of the tutorial series, first make sure that you have the complete project from Part Two, available here.
You will also need to download this sound pack, which we will be using later on.
To open our project in LevelHelper, navigate to your last project folder in Finder and double click on the file RocketMouse.lhproject.
LevelHelper should open the last level we were working on. If for some reason LevelHelper opens an earlier version of the level, just go to the Levels section to find and open the latest version.
Implementing Collisions: Overview
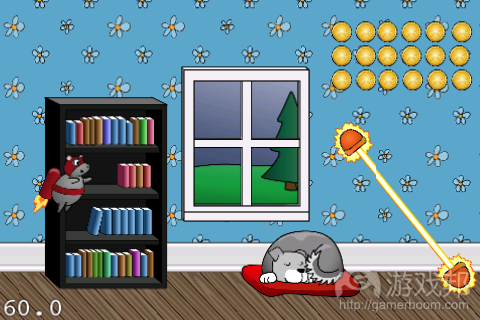
Our game has a flying mouse and shooting lasers (with the help of animations), and it also has coins for the player to collect. However, if you run into the coins or lasers nothing happens – so it’s time to add some gameplay for that!
Before we do so, however, let’s take a look at how things are currently set up.
In LevelHelper, right click the coin in the right sidebar (first tab) and select Open SpriteHelper Scene. Select the coin in SpriteHelper, and you’ll see that in the physics section, we have the “Is Sensor” option checked:
We have this checked because we want the player to trigger a collision response when it touches a coin, so that we know to give points to the user, but we don’t want the mouse to behave like it’s colliding with the coin.
What about the laser? If we look at the laser property, this sprite does not have the “Is Sensor” option selected:
Why? Don’t we want the same behavior? We do, but our need to keep track of our lasers’ animation requires us to to handle them differently.
If a sprite has Is Sensor selected, the collision will be triggered only when the mouse first touches the sprite. But for our lasers, we need the possibility of continuous collisions (every frame), because from one frame to another the animation of the laser might change (from off to on, for example) while the player is still in contact with the laser.
If we have Is Sensor enabled for the lasers, and the player makes contact with a laser when the laser is off, we have a collision response – but we wouldn’t fry the mouse, because after all, the laser is off.
But then the laser turns on. But because the collision already has been performed, we have no way of knowing if the player is still touching the laser.
How can we solve this? Well, it’s easy. Using LevelHelper’s collisions behavior together with Box2d, we can disable the collision response so that the mouse will move over the laser without behaving like it’s colliding with it. This way we will have collision trigger on every frame, and we’ll know if we need to kill the player.
Implementing Collisions: Coins
OK, finally time to code! Open up your Xcode project, navigate to HelloWorldScene.mm and declare this new method before init:
Next, call this new method at the end of init (right after the call to retrieveRequiredObjects):
So what have we done here?
In the setupCollisionHandling method, we first tell to the LevelHelperLoader instance that we want to use its collision handling and not create our own collision handling. My advice is: always use this, because its fast, easy and painless.
On the second call, we register a method that we want LevelHelper to call whenever a collision between a sprite with the tag PLAYER (in our case the mouse sprite) and a sprite with the tag COIN (in our case any coin sprite) happens.
Remember how we set up collision tags for these in part two? Well LevelHelper automatically generates constants for these so we can use them in code! You can control-click on one of them and choose “Go to definition” if you’re curious where they are defined.
LevelHelper collision handling has multiple types of collision but here we use beginOrEnd because our coin sprites are defined as sensors and Box2d handles collision for sensor objects only on “begin” collision types.
Now let’s define the methods that will be used for collision responses between the mouse and coin. Add this new method right before setupCollisionHandling:
As you can see, this method gets a LHContactInfo* object as an argument. This is a special class that will give us info about the collision.
So how do we get the coin sprite from this collision? Well, we register the coin sprite as being tagB in a call to registerBeginOrEndCollisionCallbackBetweenTagA andTagB. So if tag B is the coin, then we take the sprite using [contact spriteB].
If you want to learn more about the LHContactInfo class, check out the official LevelHelper documentation.
Next, we make sure the coin is not nil. This is not strictly necessary, but it’s a good way to avoid errors. As a general note, it’s always good to check against nil.
If the coin is visible, we call a method that we’ll write in a minute to give points to the user for taking the coin. We then make the coin invisible in order to hide it from the screen and give visual feedback to the user that he now has the coin in his virtual wallet.
Compiling now will give an error, because we did not define the scoreHitAtPosition method. Let’s define it now. Put the following before the mouseCoinCollision method:
Declare the variable score inside the HelloWorldScene.h:
Compile and run the game, and you’ll see that when the mouse collides with the coins, the coins disappear!
Implementing Collisions: Lasers
The next step is to handle the collision between the lasers and the mouse.
Inside the setupCollisionHandling method, add the following at the end:
Here we’ve registered a pre collision callback between the player and the lasers. Now we need to define the mouseLaserCollision method.
We did this because the laser sprites are not sensors and we want to receive notification about this collision on every frame in order to kill the mouse when the laser has become active.
Put the following after the mouseCoinCollision:
In the above code, we take the sprite B from the contact info. In our case sprite B is the laser. Then we take the current frame from the sprite, because we need to test if the laser is active and kill the player if it is.
We then take the Box2d contact information from the LevelHelper contact object and disable the contact so that no collision behavior will occur. We check if the player is dead. If so, we do nothing.
Finally, we test if the frame number is not 0. If it is 0, then the laser is not on, so we don’t need to kill the player. If it’s not 0, it means we need to kill the player. We cancel the collision callback because we don’t need it anymore, and kill the player.
Notice we’re using two things that we have not yet defined: the killPlayer method and the playerIsDead variable. So let’s define them.
Inside HelloWorldScene.h, put the following in the class declaration:
Then define the killPlayer method inside HelloWorldScene.mm (add after mouseCoinCollision):
In the killPlayer method above, we set the velocity of the player to 0. If the player was flying, it will now fall to the ground.
We then set the playerIsDead variable to true so we know the player is dead in the methods where this information is a factor. We hide the rocket flame.
Finally, we start the death animation on the player sprite by using a LevelHelper method that will take as arguments the animation’s unique name and the sprite on which we want to perform the animation. We can take the animation name from the Animations section inside LevelHelper.
For more details on using animations with LevelHelper, check out the official LevelHelper documentation.
After that, we stop the parallax from moving by setting its speed to 0.
Now we need to create a Cocos2d menu so that we can restart the game if the player dies. Let’s define the restartGame method before the killPlayer method as follows:
Compile and run, and now your mouse can die if he collides with a laser!
Gratuitous Sound Effects
If you’ve read game tutorials on this blog before, you know we’d never leave you hanging without some gratuitous (and awesome) sound effects! :]
Navigate to your Xcode Resources folder in Finder. Then, open a new Finder window and navigate to where you saved the sounds pack that you downloaded at the beginning of this tutorial.
Inside the Resources folder, create a new folder called Music, and drag all the sound files from the sound pack into this new folder.
Now go back to Xcode and include the music folder inside your Resources by right-clicking (or Control-clicking) on the Resources folder and choosing “Add Files to RocketMouse.”
In the new window, navigate to your Resources folder, select the Music folder, and click the Add button.
Your new Resources folder inside Xcode should look something like this:
Now that we’ve added our sound files to our project, let’s code the sound so we can make some noise!
At the top of HelloWorldScene.mm import the audio engine:
Then add this new method that will load our sounds (put this right above the init method):
Then call this method in init (right after the call to setupCollisionHandling):
This is where we load all the sounds in the pack. We load backgroundMusic.m4a as a music asset and we preload the rest of the files as effects.
Now we have to match the effects with the methods that will generate them. In the mouseCoinCollision method add the following:
In the mouseLaserCollision method add the following inside the if(frame != 0) statement:
Let’s also add the flying sound. Inside the tick method, add the following inside the if playerShouldFly block:
Compile and run the game, and enjoy the new music and sound effects! :]
The complete project up to this point can be downloaded here.
Collisions Between Mouse, Cats and Dogs
So far our mouse can die if he hits a laser, but he’s getting off to easy when it comes to the cats and dogs! So let’s add some collision handling for them as well.
Add the following at the end of setupCollsionHandling method:
Let’s now define the method for the callback. Because our game will perform the same action for collisions with cats and dogs, we only need one method. Add this somewhere before the setupCollisionHandling method:
Here we play the needed sound, then we cancel the callback between the player and the cat or dog, because we no longer need them. Then we kill the player.
Compile and run the game, and now your mouse can die when he hits a cat or dog too – so watch out! :]
Tweaking Gameplay
Our game is looking good so far, but there are still a number of problems.
The first of these problems is that if you touch the screen after the mouse dies, he starts flying around like he’s been resurrected! Although “Zombie Mouse” might make for a popular game on the App Store, this is not the effect we’re going for ;]
Let’s put a stop to this zombie behavior before it gets out of hand! Just add the following check to the beginning of ccTouchesBegan:
The only thing we’re doing differently here is testing to see if the player is dead. If they are, then we do nothing.
If we run the game now, the zombie behavior won’t occur anymore. But there are other issues.
For example, in my level there are places where the player can’t get past a laser because it’s active, but he can’t go under it because there’s a cat in the way. Your level may have similar problems.
It’s time to play-test the level and make any necessary modifications to be sure it’s possible for the player to successfully finish the game.
Open up LevelHelper with our level03 level, and drag the cats, dogs and laser sprites as necessary so that the player has a way through. (But don’t make it too easy!)
Make sure to save the level!
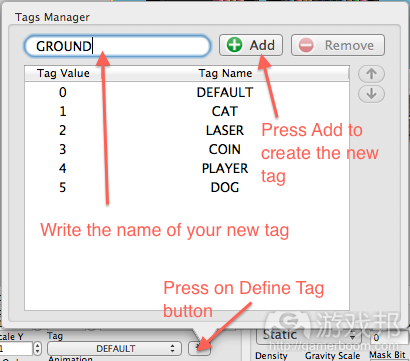
Since we’re modifying the level anyway, let’s create a way to know when the player touches the ground. To do this we’ll define a new tag and add that tag to the bottom border of the physic boundary. Click the Define Tag button (as we did in Part Two) and add the tag “GROUND.”
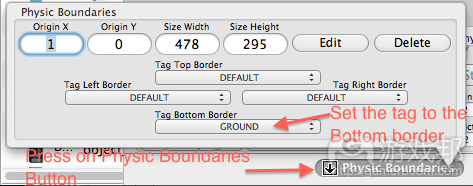
Now that we have this new tag, let’s assign it to the bottom part of the Physic Boundary shape.To do this click the Physic Boundaries button.
Save your level in LevelHelper.
We still have to define the collision callback between the player and the ground. Add the following at the end of setupCollisionHandling method:
Define the mouseGroundCollision method somewhere above the setupCollisionHandling method, as follows:
We test if the player is dead so we can return if they are. We then test if the player was flying when they touched the ground. If they were, we play landing sound.
Then we start the mouseFall animation, but we start it using a notification. That way when the animation ends, we get notified so that we can set another animation on the player sprite.
So let’s define the method that gets called when the mouseFall animation ends. Add it above mouseGroundCollision, as follows:
This new method takes as arguments the sprite that had the animation and the animation name. It then starts the animation “mouseRun” on the player sprite the normal way.
Playing the game now, it looks like we have almost everything in place. But there is still one thing we need to fix!
You may have noticed that if we run the game now, coins taken from the level don’t reappear when the parallax restarts. We hid them, remember, after player collisions, so we need to add a way to make them visible again when the parallax starts over.
Inside the retrieveRequiredObjects method declaration, add the following line, after you’ve taken the pointer to the parallax node:
This new method registers on the parallax another new method (spriteInParallaxHasReset) that will be called whenever a sprite in the parallax is reset to the back of the parallax. This method gets called when the sprite exits the view.
Define spriteInParallaxHasReset before the retrieveRequiredObjects declaration:
Here we test the tag of the sprite that was reset by the parallax, and if it’s tagged as a COIN we make it visible again.
Compile and run your game, and see how long you can play without dying! :](source:raywenderlich)






 闽公网安备35020302001549号