分享用Construct 2制作连线消除游戏的教程(2)
作者:David Silverman
在本系列第一篇中,我们花了些时间设置游戏,准备了所有必须的图像,以及随机生成的方块网格。这些系统到位之后,我们就要开始制作基本功能,并赋予玩家操控游戏的能力。(请点击此处阅读本系列第1、3、4篇)
最终游戏样本
1.添加动画
在之前的教程中,我们已经让每个方块呈现不同颜色。我认为最好是从某个准确地点挑出方块,为其添加动画,以便图像可根据玩家行为进行变化。我们将添加的第一个动画是鼠标移过事件。
首先,在Layout 1添加一个“鼠标”对象,然后返回Event Sheet 1并添加一个新事件。
Event: Mouse>Cursor is over object
Object = Block
Action: Block>Set Frame
Value = (Block.Color-1)*3 + 2
现在你已经进入游戏,方块的图像会根据你移过其上方而发生变化,在你移开光标时又变回原样。
我们要再制作一个动画事件:
Event: Block>Is Boolean instance variable set
Instance variable = IsMatched
Action: Block>Set Frame
Value = (Block.Color-1)*3 + 3
我们还必须确保当你鼠标移到一个匹配的方块时,其图像不会变化,所以要为我们所做的鼠标移过事件添加另一个条件:
Condition: Invert: Block>Is Boolean instance variable set
Instance variable = IsMatched
将此置换意味着移动图像只会用于方块并不在匹配组的时候。因为我们还没有匹配系统,所以你不会看到任何变化,但随着我们推进制作过程,这一事件迟早会发生。
现在所有的三个事件都到位了,你的事件表单应该如下图所示:
2.对换两个相邻的方块
我们要做的下一步就是给予玩家对换相邻方块的能力。为了让这一系统运行,我们将结合使用“阵列”和“函数”,如果你之前还没有用过这两个功能,建议你先去查阅相关教程。
在解释如何制作这一系统之前,我希望你去看看我们正在制作的内容,并简单解释它如何运行。要对换方块,只需简单点击并将它们拖拽到四个基本方向中的一个相邻位置顶部即可。
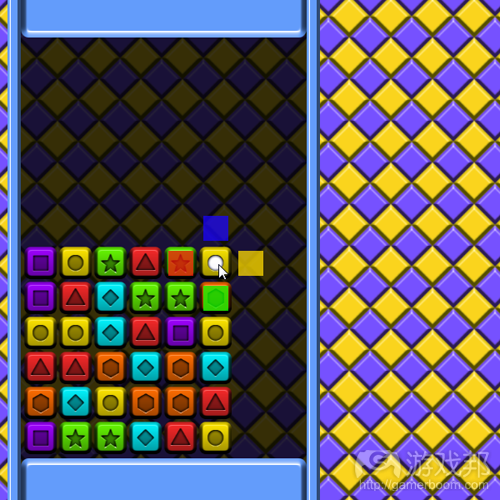
你应该已经注意到当你拖拽一个方块时,4种颜色的方形就会出现在与之相邻的方块顶部。当你放开方块时,就会有一个检查方块是否与这些彩色方形相重叠的事件发生。
如果方块会与其中一种颜色的方形重叠,它就会将你所移动的方块与拥有彩色方形的方块对换,或者将你所移动的方块移至新位置。如果你的方块并不与其中一个彩色方形重叠,那就什么都不会发生。如果方块与多种颜色的方形重叠,也同样不会发生变化。
我们使用这一系统而不检查方块本身是否与另一方块重叠的原因就在于,我们没有检查两个方块彼此关联的简便方法。通过重新定位彩色方形,然后将其作为我们的检查根据,我们对玩家试图对换方块时的下一步打算就会有更明确的概念。
添加彩色方块
现在我们已经知道发生了什么情况,我们可以开始执行了。进入Layout 1并添加一个“函数”对象,以及一个“阵列”对象。“函数”对象保持“Function”名称,但要将“阵列”重命名为BlockPositions。“函数
”对象将允许我们在代码中使用Functions,而“阵列”则将用于存储对换方块的位置。
完成这些之后,要创造4个精灵使用我们的彩色方形:
*一个绿色精灵,命名为BottomBlock
*一个红色精灵,命名为LeftBlock
*一个黄色精灵,命名为RightBlock
*一个蓝色精灵,命名为TopBlock
颜色原本无关系要,但使用这些颜色便于区分出不同方块,更便于制作游戏。这些精灵应该放置在布局之外,以免被玩家看到。
你应该将方形的大小设为30,30,并将不透明度设为0,以免玩家看到。
最后,选中实际的“方块”对象并添加“拖放”行为。
现在返回Event Sheet 1并用6个“动作”创造一个新的“事件”:
Event: Block>On DragDrop drag start
Action: BlockPositions>Set at XY
X=0
Y=0
Value=Block.X
Action: BlockPositions>Set at XY
X=0
Y=1
Value=Block.Y
Action: BottomBlock>Set Position
X = Block.X
Y = Block.Y — (Block.Width+2)
Action: TopBlock>Set Position
X = Block.X
Y = Block.Y + (Block.Width+2)
Action: LeftBlock>Set Position
X = Block.X — (Block.Width+2)
Y = Block.Y
Action: RightBlock>Set Position
X = Block.X + (Block.Width+2)
Y = Block.Y
这一事件是用于存储你所移动方块的起点,它要移动彩色方形以便它们正确对应被移动方块的位置。
你的事件应该如下所示:
了解玩家在干什么
我们将添加的下一个事件将用于检测玩家正在对换哪个方块。
首先,这个事件会检测玩家何时“放下”自己所移动的方块,然后执行一系列检查哪个彩色方形正在发生碰撞事件,是否执行了正确的对换,还是仅仅重置了移动方块的位置。
Event: Block>On DragDrop drop
Sub-Event: Block>Is overlapping BottomBlock
Action: BlockPositions>Set at XY
X=1
Y=0
Value = BottomBlock.X
Action: BlockPositions>Set at XY
X=1
Y=1
Value = BottomBlock.Y
Action: Block>Set Position
X = BlockPositions.At(0,0)
Y = BlockPositions.At(0,1)
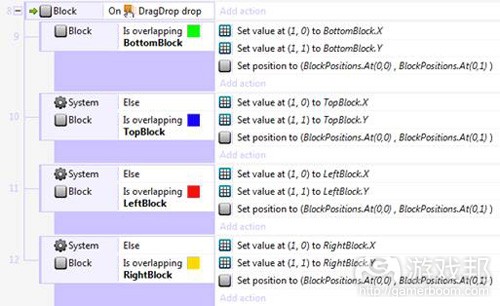
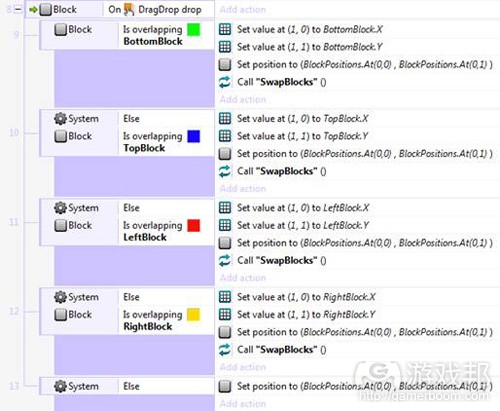
其呈现结果如下:
现在,这一事件仅能处理被移动方块之下方块的对换行为。要添加其他对换方块,右击子事件并添加一个Else。然后将第一个子事件的条件复制到Else事件,但要将目标从BottomBlock改为TopBlock。
现在,将原子事件中的Actions复制到Else事件,并将BottomBlock中的任何实例更改到TopBlock。对LeftBlock和RightBlock执行两次这种做法,这样你就一共有4个子事件了,你的事件设置如下:
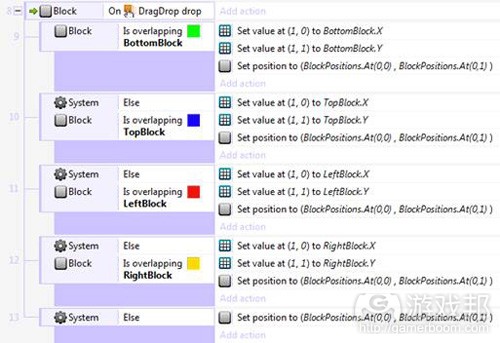
最后,添加更多Else事件:
Sub-Event: Else
Action: Block>Set Position
X = BlockPositions.At(0,0)
Y = BlockPositions.At(0,1)
真正对换方块
现在我们要开始部署对换机制了。为了对换方块,我们首先要移动玩家拖拽的方块,将其移到一个离屏位置。
这样做的原因是我们得根据它们之前的位置定位方块,如果我们一开始就将方块置于另一方块的存储位置,这样会让两个方块都居于同位,难分彼此。将方块移至一个特定位置,可以避免方块与其他方块居于同位,避免系统难以检测我们需要的是哪个方块。
之后我们将移动已同原方块进行对换的方块,将其移动原方块的位置。最后,我们要在屏幕之外将原方块移动至第二个方块的位置,并将阵列重置为0。
Event: Function>On function
Name: “SwapBlocks”
Sub-Event :
Condition: Block>Compare X
X = BlockPositions.At(0,0)
Condition: Block>Compare Y
Y = BlockPositions.At(0,1)
Action: Block> Set position
X = -80
Y = -80
Sub-Event :
Condition: Block>Compare X
X = BlockPositions.At(1,0)
Condition: Block>Compare Y
Y = BlockPositions.At(1,1)
Action: Block> Set position
X = BlockPositions.At(0,0)
Y = BlockPositions.At(0,1)
Sub-Event:
Condition: Block>Compare X
X = -80
Condition: Block>Compare Y
Y = -80
Action: Block> Set position
X = BlockPositions.At(1,0)
Y = BlockPositions.At(1,1)
Action: BlockPositions>Set at XY
X=0
Y=0
Value = 0
Action: BlockPositions>Set at XY
X=0
Y=1
Value = 0
Action: BlockPositions>Set at XY
X=1
Y=0
Value = 0
Action: BlockPositions>Set at XY
X=1
Y=1
Value = 0
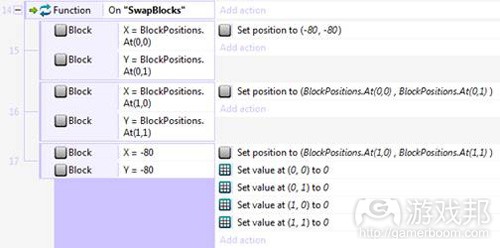
现在你的Event表单应该如下所示:
返回我们之前所制作的4个检测事件,并确定被拖拽的方块正在与哪个彩色方形碰撞,并在这四者的Actions列表末尾添加这个动作:
Action: Function>Call function
Name: “SwapBlocks”
确定玩家的真正意图
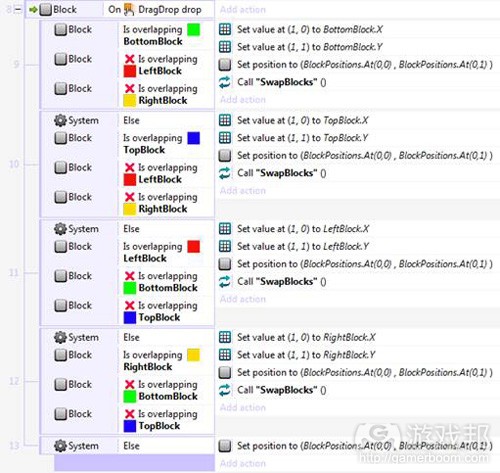
如果你现在运行游戏,应该可以看到它的运行几乎很完美了。但还有一个欠缺,就是尚未检测方块是否与多个彩色方形重叠(游戏邦注:如果是,这可能意味着移动发生错误)。
现在它是以“下、上,左,右”(Bottom, Top, Left, Right)的顺序检测彩色方形,首先找到哪个,就会进行对换。为了修复这一问题,我们得为每个检测事件添加两个反向条件:
针对Top和Bottom检测,添加以下条件:
Condition: Inverted: Block>Is overlapping another object
Object: LeftBlock
Condition: Inverted: Block>Is overlapping another object
Object: RightBlock
针对Right和Left检测,添加以下条件:
Condition: Inverted: Block>Is overlapping another object
Object: TopBlock
Condition: Inverted: Block>Is overlapping another object
Object: BottomBlock
因为这些方形只有30*30px,所以它不可能让方块同一时间在对端实现两者重叠。这些检测可让我们确保拖拽移动并不会过于偏向某一边,确保玩家能够以接近直线的方式移动方块,以便检测正确的对换行为。
你的事件表单应该如下所示:
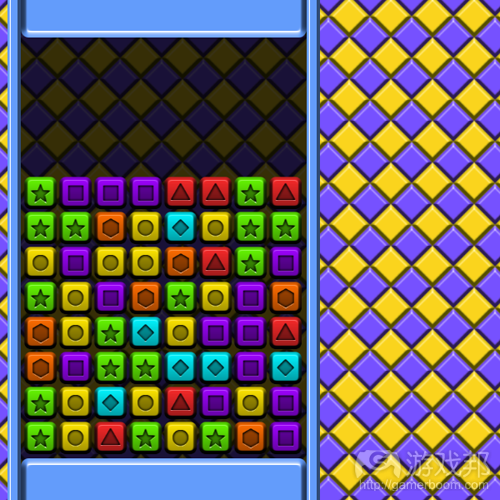
以下是游戏当前状态的样本:
总结
现在我们已经拥有功能完整的对换机制。在下一部分教程中,我们将设计一个强大的匹配检测,开始查看游戏玩法的真正运行效果。
如果你想自己继续,你应该看看如何检测两个相同颜色的方块,以及如何知晓它们彼此相邻,它们是否可匹配成组。最好是以System > For Each事件和Block对象开始,针对每个Block执行同样的检测。(本文为游戏邦/gamerboom.com编译,拒绝任何不保留版权的转载,如需转载请联系:游戏邦)
Make a Match-3 Game in Construct 2: Animations and Block Swapping
David Silverman
This entry is part 2 of 3 in the series Make a Match-3 Game in Construct 2
Make a Match-3 Game in Construct 2: The Basics
Make a Match-3 Game in Construct 2: Animations and Block Swapping
Make a Match-3 Puzzle Game in Construct 2: Match Detection
In the previous article in this series, we spent time setting up our game so that we had all of the necessary images in place, and randomly spawning a grid of blocks for the player. With those systems in place, we are now going to work on basic functionality and giving the player the ability to manipulate the game field.
Final Game Demo
Here is a demo of the game we’re working towards throughout this series:
1. Adding Animation
We ended the previous tutorial after making every block display as a different color. I thought it would be good to pick up from that exact spot and begin by adding animation to the blocks so that the images change based on what the player does or did. The first animation we will add is a mouse-over event.
First, add a mouse object to Layout 1. Then, go back to Event Sheet 1 and add a new Event.
Event: Mouse>Cursor is over object
Object = Block
Action: Block>Set Frame
Value = (Block.Color-1)*3 + 2
Now, if you go into the game, the image for the blocks should change when you hover over them, and change back when you move your cursor away.
We have one more animation event to make:
Event: Block>Is Boolean instance variable set
Instance variable = IsMatched
Action: Block>Set Frame
Value = (Block.Color-1)*3 + 3
We also need to make sure that when you hover over a matched block the image doesn’t change, so add another condition to the mouse hover event we made:
Condition: Invert: Block>Is Boolean instance variable set
Instance variable = IsMatched
Inverting this means that the hover image is only used if the block isn’t part of a match. Since we don’t have a matching system in place yet you shouldn’t see any changes, but as we move forward this event will come into play.
With all three of these events in place, your event sheet should now look like this:
2. Swapping Two Neighboring Blocks
The next thing we will work on is giving the player the ability to swap neighboring blocks. To make this system work we will be using a combination of Arrays and Functions, so if you haven’t used them in C2 before, consult the manual to find out more.
What We’re Working Towards
Before I explain how to make the system, I want you to see what we are making, and briefly explain how it works. To see what the system will be like, play the demo below. To swap blocks, simply click-and-drag them on top of a neighboring spot in one of the four cardinal directions.
You should notice that when you start dragging a block, four colored squares will appear on top of the blocks that are directly next to it. When you let go of the block there is an event which checks if the block is overlapping any of these colored squares.
If the block is overlapping one of the colored squares, it swaps the block you moved with the block that colored square was drawn on top of or just repositions your moved block to the new location. If your block isn’t overlapping one of the colored squares, it does nothing. It also does nothing if the block is overlapping multiple colored squares.
The reason we are using this system, rather than checking whether the block itself is overlapping another block, is that we don’t have any easy way of checking where the two blocks are relative to each other. By re-positioning the colored squares into the valid locations and then using them as the basis for our checks, we have a much better idea of what the player intended to do when they tried to make a swap.
Adding the Colored Blocks
Now that we understand what’s happening, we can start implementing it. Go to Layout 1 and add a Function object, and an Array object. Leave the Function object’s name as Function, but rename the Array to BlockPositions. The Function object will allow us to use Functions within our code, and the Array is what we will use to store the positions of the blocks we are swapping.
Once you’ve done that, create four new sprites to use as our colored squares:
One green sprite, named BottomBlock.
One red sprite, named LeftBlock.
One yellow sprite, named RightBlock.
One blue sprite, named TopBlock.
The colors don’t actually matter, but using these colors makes each one different so they are easy to identify, and makes it easier to follow along since that’s what I did. These sprites should be placed outside of the layout so the player cannot see them.
You should also set the size of each of these to 30,30 and give them each an Opacity of 0. In the demo above, they are each only slightly transparent because I wanted you to be able to see what was happening, but in the actual game the player should not be able to see them at all.
Finally, select your actual Block object and add the Drag & Drop behavior to it.
Now go back to Event Sheet 1 and create a new Event with six Actions.
Event: Block>On DragDrop drag start
Action: BlockPositions>Set at XY
X=0
Y=0
Value=Block.X
Action: BlockPositions>Set at XY
X=0
Y=1
Value=Block.Y
Action: BottomBlock>Set Position
X = Block.X
Y = Block.Y — (Block.Width+2)
Action: TopBlock>Set Position
X = Block.X
Y = Block.Y + (Block.Width+2)
Action: LeftBlock>Set Position
X = Block.X — (Block.Width+2)
Y = Block.Y
Action: RightBlock>Set Position
X = Block.X + (Block.Width+2)
Y = Block.Y
This event is storing the starting position of the block you moved, and it is moving the colored squares so that they are in the correct positions relative to the block that is being moved.
Your event should look like this:
Figuring Out What the Player Is Doing
The next event we will add will perform the check to see what swap the player is trying to make.
First, the event will listen for when the player ‘drops’ the block they are moving. It will then perform a series of checks to see which colored square, if any, the block is colliding with, and either perform the appropriate swap, or just reset the moved block’s position.
Event: Block>On DragDrop drop
Sub-Event: Block>Is overlapping BottomBlock
Action: BlockPositions>Set at XY
X=1
Y=0
Value = BottomBlock.X
Action: BlockPositions>Set at XY
X=1
Y=1
Value = BottomBlock.Y
Action: Block>Set Position
X = BlockPositions.At(0,0)
Y = BlockPositions.At(0,1)
This is how it should look so far:
Right now, the Event only accounts for swaps with the Block below the one being moved. To add the others, right-click the sub-event and add an Else. Then, copy the condition from the first sub-event into the Else-event but change the target from BottomBlock to TopBlock.
Now, copy the Actions from the original sub-event into the Else-event and again change any instances of BottomBlock to TopBlock. Do this two more times with LeftBlock and RightBlock, so that you have four sub-events total, and so that your event setup looks like this:
Finally, add one more Else-event:
Sub-Event: Else
Action: Block>Set Position
X = BlockPositions.At(0,0)
Y = BlockPositions.At(0,1)
Actually Swapping the Blocks
From here we will implement the swapping mechanic itself. To swap the blocks we will first move the block the player dragged to a location off-screen.
We do this because we have to locate the blocks based on their positions before we can manipulate them – if we started by placing either block in the stored position of the other block it would put them both at the same location and make them very hard to separate from each other. By moving the block to a specific location that we know no other blocks will be in, we prevent either block from ever being in the same location as another block, and prevent the system from having an issue determining which block we want.
We will then move the block they swapped the original block with to the original block’s location. Finally, we will move the original block to the location of the second block from its location off-screen, and reset the information in the array to 0.
Event: Function>On function
Name: “SwapBlocks”
Sub-Event :
Condition: Block>Compare X
X = BlockPositions.At(0,0)
Condition: Block>Compare Y
Y = BlockPositions.At(0,1)
Action: Block> Set position
X = -80
Y = -80
Sub-Event :
Condition: Block>Compare X
X = BlockPositions.At(1,0)
Condition: Block>Compare Y
Y = BlockPositions.At(1,1)
Action: Block> Set position
X = BlockPositions.At(0,0)
Y = BlockPositions.At(0,1)
Sub-Event:
Condition: Block>Compare X
X = -80
Condition: Block>Compare Y
Y = -80
Action: Block> Set position
X = BlockPositions.At(1,0)
Y = BlockPositions.At(1,1)
Action: BlockPositions>Set at XY
X=0
Y=0
Value = 0
Action: BlockPositions>Set at XY
X=0
Y=1
Value = 0
Action: BlockPositions>Set at XY
X=1
Y=0
Value = 0
Action: BlockPositions>Set at XY
X=1
Y=1
Value = 0
Your Event sheet for that should look like this:
Now, go back to the four checks we made earlier that determined which colored square the dragged block was colliding with, and add this Action to the end of the Actions list for all four:
Action: Function>Call function
Name: “SwapBlocks”
Making Sure the Player Meant to Do That
If you run the game now, it will work almost perfectly. The only thing it doesn’t do yet is check to see if the block is overlapping multiple colored squares. (If it is, we don’t want anything to happen because it means the move may be a mistake.)
Currently it checks the colored squares in the order Bottom, Top, Left, Right, and whichever it finds first, it swaps with. To fix this we have to add two inverted conditions to each check.
To the Top and Bottom checks, add these conditions:
Condition: Inverted: Block>Is overlapping another object
Object: LeftBlock
Condition: Inverted: Block>Is overlapping another object
Object: RightBlock
To the Right and Left checks, add these conditions:
Condition: Inverted: Block>Is overlapping another object
Object: TopBlock
Condition: Inverted: Block>Is overlapping another object
Object: BottomBlock
Since the squares are only 30x30px, it’s impossible for the block to be overlapping two on opposite ends at the same time. These checks allow us to make sure the dragging movement isn’t skewed to either side too much, and ensures the player has a mostly straight motion so it is clear we are detecting the right kind of swap.
Your Event sheet should now look like this:
And here’s a demo of our game in its current state:
Conclusion
We now have a fully functional swapping mechanic. In the next tutorial we’ll set up a strong match detection system and start to really see the gameplay in action.
If you want to continue working on your own, you should look at how you could detect when two blocks are the same color and how you would know whether they are next to each other and whether they form a full group. A good place to start would be with a System > For Each event with the Block object, and perform some kind of check on each Block individually.(source:gamedev)
下一篇:分析游戏设计元素之角色和环境






 闽公网安备35020302001549号