分享用Construct 2制作连线消除游戏的教程(5)
作者:David Silverman
现在,我们已经进展到一半了。在上一篇中,我们给游戏添加了得分系统,给方块添加了“重力”,优化了匹配系统。在本文中,我们将对我们的交换系统做一些小小的改进,然后添加悬浮文本(在最终版游戏中你可以看到),最后彻底完成我们的匹配系统。(请点击此处阅读本系列第1、2、3、4篇)
以下是我们在这个系列教程中将完成的最终游戏DEMO:
1、改进交换机制
现在,游戏已经能够执行非常简单的交换机制了。虽然我们用来执行交换的系统非常有效,但在游戏时你会遇到两个问题。我们必须先解决它们才能进行下一步。
这两个问题的产生原因是相同的:交换系统没有考虑到操作区域的边界。
左边,右边
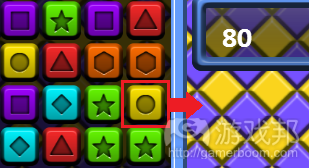
这到底是什么意思?首先,如果你想,你可以把一个方块移到操作区域之外的左边或右边,如下图所示:
如果你这么做了,你会发现游戏并不会阻止你,似乎是以为操作区域在水平方向上是无限延伸的。原因是,现在的操作区域确实是水平延伸的。
因为我们一真没有定义操作区域的左右边界在哪里,或者说,操作边界甚至没有左右边界。所以游戏永远不会阻止玩家把方块移出操作区域。当你在操作区域的其他边界移动方块,也会出现这个问题。
为了解决这个问题,我们给Block > On DragDrop drop事件添加新条件。请给检查向左交换的Sub-Event添加以下条件:
Condition: LeftBlock>Compare X
Comparison = Greater or equal
X = SPAWNX
现在,再把这个条件添加给检查向右交换的Sub-Event:
Condition: RightBlock>Compare X
Comparison = Less or equal
X = SPAWNX + Block.Width*8
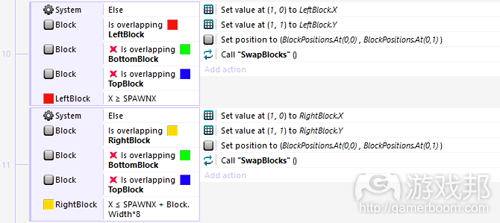
你的向左和向右交换事件现在应该像这样:
交换事件使用我们添加的这些新条件检查交换是否发生在游戏区域的水平边界内。第一个条件保证方块的交换位置不能超过最左边的方块;第二个条件方块的交换位置不能超过最右边的方块。
对于第二个条件,我使用Block.Width公式寻找最右边的方块在哪里,以确保如果这些方块的大小改变了,这个条件就不会生效。
如果你运行游戏,你应该不能再在水平方向上把方块移到操作区域之外了。
界外
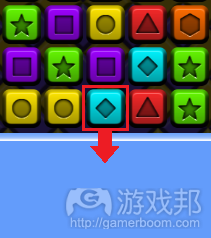
我们面临的第二个问题是,游戏不会阻止你把方块移到操作区域底部之外的地方。打开游戏,试一下如下图所示的移动动作:
做完这个交换之后。你应该看到操作区域底部的方块消失,而你移动的方块会补上它的空缺。这个问题还是因为我们没有定义操作区域的上下边界。
在这前的教程中,我们声明当达到某个高度后,方块将停止下落,但我们没有确定在交换时方块是否可以放在底部。
这个问题跟前面两个问题一样简单。打开检查向下交换的Sub-Event,添加如下代码:
Condition: BottomBlock>Compare Y
Comparison = Less or equal
Y = SPAWNY
现在你的代码应该如下:
就像前面的条件,这确保交换不会把方块放在操作区域之外,也就是低于操作区域底端的地方。
如果你在这时测试你的游戏,你应该不能把方块放在操作区域的底部之外了。
现在,我们已经解决了交换系统的问题,可以继续改进得分系统了。
2、悬浮得分文本
现在,我们的得分系统已经相当有效了,正是按我们的意思运作的。但是,得分系统虽然正确显示总分,玩家却无法知道自己每一次消除得到多少分,因为游戏进行得太快了。
为了解决这个问题,我们要添加一个显示每次消除得到多少分的文本弹出框。这一方面给游戏添加额外的视觉效果,另一方面可以让玩家清楚地看到一次大消除能得到多少分。
制作文本
在我们添加这个功能以前,我们必须先制作一个充当文本弹出框的新对象,以下是步骤:
1、打开 Layout 1。
2、插入新Text对象:
Name: FloatingPointsText
Layer: Game Field
Position: 616, 250
Size: 127, 43
Text: 0
Font: Calibri, Bold, 24
Color: 255, 255, 255
3、在右边的Projects标签中,右击FloatingPointsText对象,然后选择Behaviors。
4、添加新Fade行为,然后关闭Behaviors窗口。
5、在屏幕左边的属性中,把Fade Out时间改成1.25。
我们刚刚制作的对象就是悬浮文本,告诉玩家每次消除得了多少分。当玩家做出一个匹配时,它会刷出一个新的对象实例,改变文本以显示正确的分数。
刷出文本
为了刷出得分文本,我们要给记录FindMatches功能的NumMatchesFound添加两个新Action。
打开FindMatches功能,在每一个NumMatchesFound>3后面添加这两个Action:
Action: System>Create object
Object = FloatingPointsText
Layer = 2
X = Block.X – Block.Width/2
Y = Block.Y – Block.Width/2
Action: FloatingPointsText>Set Text
Text = NumMatchesFound * 10
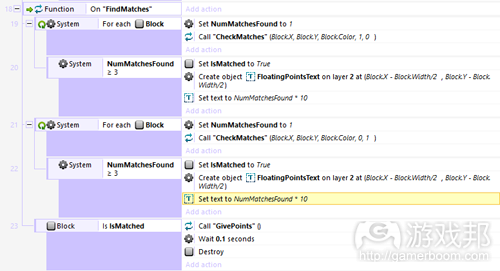
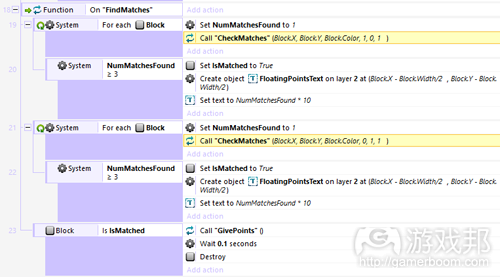
你的FindMatches功能应该显示如下:
那么这两个Action的作用是什么?第一个Action在一个匹配组的第一个方块上方创造FloatingPointsText对象,第二个Action把这个匹配组里的方块数量乘以10,就像我们的得分公式一样,然后把新对象的文本设置成计算出来的数字。
如果你在这时运行游戏,你会发现文本完全没有移动。为了解决这个问题,我们要给游戏添加一个新Event。
使文本移动
打开Event Sheet 1并加新Event:
Condition: System>Every Tick
Action: FloatingPointsText>Move at angle
Angle = -90
Distance = 0.25
你的新Event应该是这样的:
如果你现在运行游戏,你会看到文本移动了。
这时,我们的FloatingPointsText运作就达到我们想要的效果了,但你可能也注意到一个小小的问题。这个问题本身是由匹配系统的运作方式造成的,现在我们可以看到匹配仍然有问题,只要解决了这个问题,我们的匹配系统就大功告成了。
3、完成匹配系统
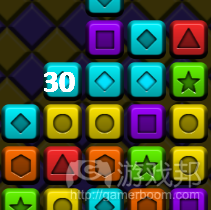
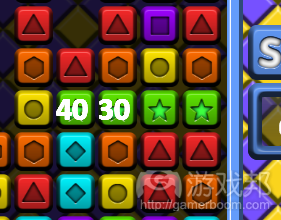
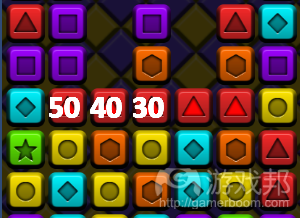
如果你还不知道我说的这个问题是什么,那么就打开游戏,做一个包含四个方块的匹配组。当你做完匹配,你会看到如下图显示的情况:
如你所见,我们其实有两个悬浮文本对象的实例。如果你做一个包含五个方块的匹配组,这个问题就更严重了——你会看到三个得分文本。
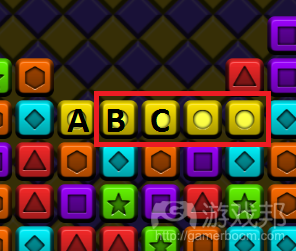
这个问题出在匹配系统的检测方式上。现在,我们的匹配系统是单独查看所有方块的,先看左右,再看上下,然后找到匹配。因此,匹配系统事实上找到三个不同的匹配组,即使这其实只是一个大匹配组。
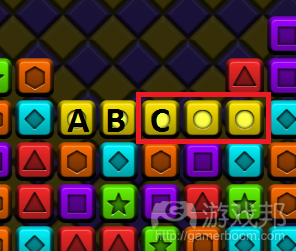
当从方块A开始,匹配系统会找到第一个匹配组,它包含五个方块:
第二个组从方块B开始,包含四个方块:
第三个组从方块C开始,包含三个方块:
所以,我们的匹配系统失效了、崩溃了,因为它多次检查相同的方块,记录的匹配组与实际不符。
解决办法
这个问题其实比看起来要容易得多。
这个问题会产生,主要是因为匹配系统无法知道哪一个方块是匹配组的第一个方块。如果我们可以保证系统只看在这个组中离右边最远的方块或位置最高的方块,那么这个匹配系统就有效了。
所以,我们只需要添加一个条件或事件保证上方或者左边没有匹配方块,以及告诉功能什么时候执行检查,这样如果系统认定的方块是匹配组的第一个方块时,游戏就能正常运行了。
我们要添加的第一个东西是CheckMatches功能的新参数。这个参数是1或0。
如果参数是1,那么功能就会知道必须执行检查以保证它确认的是匹配组中的第一个方块;如果参数是0,则功能就会知道已经执行检查,可以正常地进行下一步,即确定这个匹配组里有三个或以上的方块。
执行
打开FindMatches功能。在这个功能中,你调用CheckMatches两次。因为这是你第一次为任何选定的方块调用CheckMatches,所以你必须给各个这些功能命令添加一个新参数,并设置为1,这样它就会选定的检查方块是否是匹配组中的第一个方块。
你的FindMatches功能应该如下图所示,为了显眼,我加亮了两个变化后的语句:
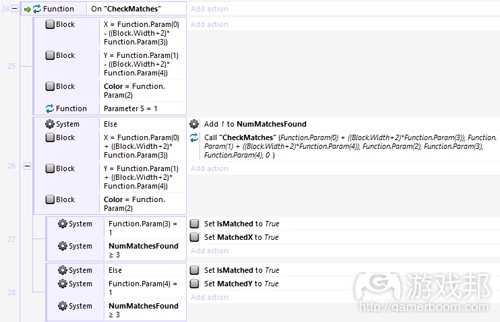
现在,为了让CheckMatches知道什么时候必须执行这个新检查,我们必须给它添加这个新检查。打开CheckMatches功能,添加这个新Sub-Event作为第一个Sub-Event:
Event: Block>Compare X
Comaprison = Equal to
X = Function.Param(0) – ((Block.Width+2)*Function.Param(3))
Condition: Block>Compare Y
Comaprison = Equal to
Y = Function.Param(1) – ((Block.Width+2)*Function.Param(4))
Condition: Function>Compare parameter
Index = 5
Comparison = Equal to
Value = 1
在你修改完CheckMatches功能以前,你还要添加Else语句到CheckMatches的顶部,你必须把这个新参数添加到CheckMatches功能,并设为0。
这个CheckMatches功能的新代码如图所示:
我们添加的Event正是我前面所描述的。第一,它会查看你选中的第一个方块的上方或左边的方块。
如果那个方块与你选中的方块的颜色一致,那么它就知道你选中的方块不是匹配组的第一个方块。
如果颜色不同,原始检查就会发生因为我们刚才添加了Else语句,然后它会像正常情况下应该做的那样查看匹配组是否包含三个或以上的方块。
如果你在这时测试游戏,做了一个包含三个以上方块的匹配组,你会看到只有一个悬浮文本对象出现。
结论
完成所有这些功能后,我们的匹配系统就大功告成了。我们可以开始执行移动系统了。因为我们在这一次的教程中已经做了很多事了,且移动系统更加复杂,所以我打算等到下一篇教程再开始解释它。
如果你已经迫不及待地想知道怎么制作这个移动系统,那么我就给你几个提示吧。你要做的第一件是当然是执行移动本身。为此,你要使用与我们在制作让得分文本对象悬浮类似的系统。然后,考虑一下如何改变移动的速度。最后,如何产生新的方块行,以及如何知道什么时候产生新方块行。
花些时间想想这些步骤吧,然后对照下一篇教程。(本文为游戏邦/gamerboom.com编译,拒绝任何不保留版权的转载,如需转载请联系:游戏邦)
Make a Match-3 Game in Construct 2: More Swapping, Points, and Matching
by David Silverman
We are now halfway through this series, and so far we’ve covered a lot. In the previous tutorial, we added a points system to our game, we finally applied “gravity” to the blocks, and we improved our matching system. In this tutorial we are going to make some small improvements to our swapping system, add the floating points text you can see in the final version of the game, and finish our matching system once and for all.
Final Game Demo
Here is a demo of the game we’re working towards throughout this series:
1. Improving the Swapping Mechanics
Right now, the game has a very simple swapping mechanic implemented. While the system we use to perform these swaps is very effective, there are two issues that you could encounter while playing, and both of them should be fixed before we go any further.
These issues stem from the same idea: that the swapping system does not take into account the game field’s borders.
To the Left, to the Right
What does this mean, exactly? Well, first, if you wanted, you could move a block outside of the game field to the left or right, by making a swap like the one illustrated below:
If you go into the game and make this swap, you will see that the game doesn’t do anything to stop you, and acts as if the game field continues forever in a horizontal direction. The reason for this is that, right now, the game field does continue forever horizontally.
Since we never defined where the left and right borders of the game field are, or even that the game field has left and right borders, the game never attempts to stop the player from moving the block further to the side. This problem also comes up when you swap off the other edge of the game field as well.
To solve this issue, we’ll add some new conditions to the Block > On DragDrop drop Event. Go to this event and add this condition to the Sub-Event which checks for left swaps:
Condition: LeftBlock>Compare X
Comparison = Greater or equal
X = SPAWNX
Now add this condition to the Sub-Event which checks for right swaps:
Condition: RightBlock>Compare X
Comparison = Less or equal
X = SPAWNX + Block.Width*8
Your left and right swapping events should now look like this:
These new conditions we added are being used by the swapping events as a check to ensure that the swap is within the horizontal borders of the game field. The first one ensures that the position the block would be swapped to is not farther to the left than the left-most Blocks, and the second one ensures that the position the block is being swapped to is not farther to the right than the right-most blocks.
With the second one, I used a formula with Block.Width to find where the right-most blocks are to ensure that, if the size of the Blocks changed, it would not prevent this condition from working.
If you run the game you should no longer be able to make horizontal swaps that would put blocks outside the game area.
Out of Bounds
The other problem we have is that the game doesn’t stop you from swapping a block below the game field. Open the game and try making a swap like the one I have illustrated in this image:
After making this swap, you should have seen the block essentially just disappear behind the bottom piece of the game field, and the blocks that were above it should have fallen to fill in the now empty space. Again, this problem is because we never defined where the bottom edge of the field is.
In the previous tutorial we declared that the blocks should stop falling after reaching a certain height, but we never said whether it was okay for a block to go below that height when performing a swap.
Fixing this will be just as simple as the previous two issues. Go to the Sub-Event which checks for downward swaps, and add this condition:
Condition: BottomBlock>Compare Y
Comparison = Less or equal
Y = SPAWNY
Your code for this section should now look like this:
Just like the previous condition, this ensures that the swap would not place the block into an area outside the game field. In this case, it looks at the area below the game field.
If you test your game at this point, you should now be unable to make swaps which put the block below the base of the game field.
At this point, we have solved the issues with the swapping system, and can move on to making our points system even better.
2. Floating Points Text
Right now, our points system is pretty effective. It works the way we intended, and already displays everything correctly. Despite that, though, if you gave the game to a player and sat them down with it, they might not be able to tell exactly how many points they were getting from each group they made, since the game can move quickly.
To solve this issue, we are going to add text pop-ups which display how many points the player makes from any groups they form. This will add extra visual flair to the game, and it will make it clear to the player how valuable larger groups can be.
Creating the Text Itself
Before we can start adding the functionality, we need to create a new object which will act as the text pop-up, so follow these steps.
Go to Layout 1.
Insert a new Text object:
Name: FloatingPointsText
Layer: Game Field
Position: 616, 250
Size: 127, 43
Text: 0
Font: Calibri, Bold, 24
Color: 255, 255, 255
In the Projects tab on the right, right-click the FloatingPointsText object, and choose Behaviors.
Add a new Fade behavior, and close the Behaviors window.
In the properties on the left side of the screen, change the Fade Out Time to 1.25.
The object we just created is going to be used to create the floating text that tells the player how many points a given group will give them. Now that we actually have this object, we need to implement it so that when the player makes a match, it will spawn a new instance of the object and change the text to show the appropriate number of points.
Spawning the Text
To spawn the points text we are going to add two new Actions to the NumMatchesFound checks in the FindMatches function.
Go to the FindMatches function, and add these two Actions to the end of each NumMatchesFound>3 check:
Action: System>Create object
Object = FloatingPointsText
Layer = 2
X = Block.X – Block.Width/2
Y = Block.Y – Block.Width/2
Action: FloatingPointsText>Set Text
Text = NumMatchesFound * 10
Your FindMatches function should now look like this:
So what are these Actions doing? The first Action creates the FloatingPointsText object on top of the first block in the group, and the second one multiplies the number of blocks in the group by 10, just like our points formula does, and sets the text of the new object to that number.
If you run the game at this point, you should notice that the text isn’t moving at all. To fix this problem we are going to add a new Event to our game.
Making the Text Move
Go back to Event Sheet 1 and add a new Event:
Condition: System>Every Tick
Action: FloatingPointsText>Move at angle
Angle = -90
Distance = 0.25
Your new Event should look like this:
If you run the game now, you will see that the text does move.
At this point, our FloatingPointsText is working the way we want it to, but you may have noticed a slight issue now that the system is in place. The issue itself stems from the way the matching system works, and now that we can see that there is still an issue with matching, we can set about fixing this final issue, and putting our matching system to bed.
3. Completing the Matching System
If you don’t yet know what issue I’m talking about, go into the game, and make a group that contains four blocks. Once your group is made, you should see something similar to what I have in the image below:
As you can see, we actually have two instances of the floating text objects. If you make a group with five Blocks, the issue gets even worse and you will actually see three instances of the points text.
The reason for this issue is based in the way that matches are detected. Right now, our matching system looks at every block individually, and looks in the right-direction, and the downward-direction, to find matches. Because of this, the matching system is actually finding three different sized groups here, even though it is actually just one large group.
The first group will be found when it starts with Block A, and will contain five blocks:
The second group will be found when it starts with Block B, and will contain four blocks:
And the third group will be found when it starts with Block C, and will contain three blocks:
So, right now, our matching system is very inefficient – and broken – since it is checking the same blocks multiple times and registering more groups than there actually are.
How We’ll Fix This
Fixing this issue is actually much simpler than it might seem at first.
The issue here stems primarily from the fact that the matching system has no way of knowing whether the block it’s starting with is actually the beginning of the group. If we could guarantee that we only looked at Blocks which were the farthest to the right, or the highest up, within the groups they belonged to, then the matching system would be effective as-is.
So, all we have to do is add a condition or Event that ensures there are no matching blocks above, or to the left of, the block we start with, and to tell the function when it has performed this check, so that it can proceed normally if the block it’s looking at is the start of the group.
The first thing we will add is a new parameter for the CheckMatches function. This parameter will be an integer and it will be either 1 or 0.
If the parameter is 1, it will indicate to the function that it needs to perform the check to ensure it’s looking at the initial block in the group; if it is 0, it will indicate to the function that it has already performed this check, and can proceed normally to determine if the group is comprised of three or more blocks.
Let’s Do It
So, start off by going to the FindMatches function. In this function you call CheckMatches twice. Since this is the first time you call CheckMatches for whatever block you are looking at, you need to add a new parameter to each of these function calls and set it to 1 so that it will check to see whether the block it’s looking at is the start of a group.
Your FindMatches function should now look like this, and I have highlighted the two changed statements for your convenience:
Now that we are telling CheckMatches when it needs to perform this new check, we need to actually add the new check for it to perform. Go to your CheckMatches function, and add this new Sub-Event as the first Sub-Event:
?
Event: Block>Compare X
Comaprison = Equal to
X = Function.Param(0) – ((Block.Width+2)*Function.Param(3))
Condition: Block>Compare Y
Comaprison = Equal to
Y = Function.Param(1) – ((Block.Width+2)*Function.Param(4))
Condition: Function>Compare parameter
Index = 5
Comparison = Equal to
Value = 1
Before you finish modifying the CheckMatches function you also need to add an Else statement to the top of the original event for the CheckMatches function, and you need to add the new parameter to the CheckMatches function call and set it to 0.
The new code for the CheckMatches function should look like this:
The Event we added does exactly what I described above. First, it looks at the block above, or to the left of, the initial block you pass in.
If that block is the same color as the one you passed in, it does nothing since it knows that the block you passed in is not the first Block in that group.
On the other hand, if it’s not the same color as the block you passed in, the original check occurs because of the Else statement we just added, and it looks for a group of three or more blocks the way it normally would.
If you test the game at this point, and make a group with more than three blocks, you should see only one floating text object telling you how many points that group was worth.
Conclusion
Now that we have finished fixing up all of these features, and we have finally completed our matching system, we are ready to implement the movement system. Since we’ve already done a lot in this tutorial, and since the movement system requires us to make multiple complex systems, I am going to wait till the next article to start the movement system.
If you are anxious to start working on it, consider a few of these things. Obviously the first thing you have to do is implement the movement itself. For that, try using a similar system to what we used when making the points text objects float. From there, start considering how you would change the speed at which they move. Finally, how will you generate new rows of Blocks for the player, and how will you know when to generate new rows?
Take some time to consider these things, and I will see you back here next week for the next big installment of the series.(source:gamedev.tutsplus)






 闽公网安备35020302001549号