分享制作JRPG游戏状态和战斗系统的方法
作者:Dan Schuller
本文主要概括制作一款JRPG(日本角色扮演游戏)的过程,其中包括打造JRPG框架的结构和系统,如何管理游戏模式,如何使用贴图来展现世界,如何为RPG战斗系统编码。
JRPG发源地
1983年,Yuji Horii、Koichi Nakamura和Yukinobu Chida三人飞往美国出席了AppleFest ’83大会,当时各路开发者聚集在此展示面向Apple II制作的内容,其中最令人大开眼界的当属最新版本RPG《Wizardry》。
回到日本后,他们决定开发《Dragon Warrior》这款类似于《Wizardry》但主要面向NES平台的RPG游戏。结果游戏大获成功,也因此界定了JRPG的地位,虽然《Dragon Warrior》在美国并未受到热捧,但数年之后有另一款游戏做到了。
1987年,原版《最终幻想》问世,由此诞生了史上最热销的电子游戏品牌之一,它至少是西方人眼中最具标志性的JRPG。
题材
游戏题材从未得到准确的定义——它们更像是一系列惯例的集合体。RPG通常有一个升级系统,一个或数个拥有技能和统计资料的玩家角色、武器和盔甲,战斗和探索模式,以及强大的叙事内容,玩家一般是通过在地图中穿行而获得游戏进展。
日式RPG是以《Dragon Warrior》为蓝本的RPG,它们更为线性,多为回合制战斗系统,一般有两种地图类型:世界地图和本地地图。原始JRPG包括《Dragon Warrior》、《最终幻想》、《Wild Arms》、《Phantasy Star》以及《Chrono Trigger》。本文将讲述的JRPG则与早期的《最终幻想》较为相似。
制作JRPG的五个理由
1.经得起时间考验
《最终幻想VI》和《Chrono Trigger》等游戏仍然极具可玩性。如果你制作JRPG就等于在掌握一种在当代玩家中仍然极有人气的永恒游戏形式。它们具有很棒的框架,你可以添加自己的调整内容进行试验(例如叙事内容、视觉风格、机制等)。如果你可以制作出一款发布数十载后仍然大有市场的游戏,那不是很棒的事情吗?
2.游戏机制具有广泛适用性
《使命召唤》是世界最著名的FPS游戏之一,它也使用了RPG元素;社交游戏《FarmVille》基本上是SNES RPG游戏《Harvest Moon》的克隆版本,即使是《Gran Turismo》这种竞速游戏也含有RPG关卡和体验。
3.局限性培养创造性
正如作家会面对白纸束手无策一样,游戏开发者可能也会因为面临太多选择而不知何入着手的苦恼。而JRPG已经为你确定了许多选择,你就无需再受选择麻痹症之苦,你可以自由遵循这类游戏的多数惯例,并根据自己的需求进行相应调整。
4.可以作为独立项目
《最终幻想》几乎是凭程序员Nasir Gebelli一人完成编程。借助现代工具和语言,当前开发者更易于创作这类游戏。多数RPG的大部分工作并非编程而是语言——但你的游戏未必就是这种情况。如果你适当压缩内容,将关注点适当移到质量而非数量,那就有可能完成一个很棒的JRPG独立项目。
拥有开发团队对制作游戏很有帮助,你也可以将美术和音频资产外包给他人,或者使用一些来自opengameart.org等网站的出色创意资产。
5.赢利
此类游戏拥有一批铁杆粉丝,以及一批商业表现出众,并支持在Steam下载的独立JRPG作品(如下图所示)。
结构
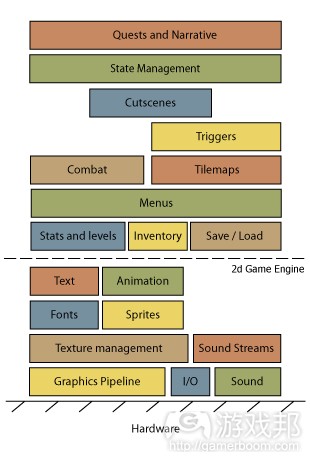
JRPG有许多共同的惯例和机制,我们可以将典型的JRPG划分为大量系统:
软件开发过程中有一个人们反复进行的模式:分层。这涉及到程序的系统如何叠加于另一者,适用性更广的层次位于底端,而需要立即解决问题的层次则居于顶端。JRPG也不例外,也可以将其视为一系列层次——较低层次处理基本的图像功能,较高层次处理任务道具和角色状态。
(小贴士:开发一个新系统时,最好先创建低层次,然后再逐个叠加上去。使用中间件有助于跳过一些许多游戏常见的低层次。在上述的结构图表中,所有居于虚线之下的层次都是由2D游戏引擎进行处理。)
从以上结构图表可以看出,JRPG是由许多系统组成,但多数系统可以像游戏的不同模式一样集合在一起。JRPG具有十分独特的游戏模式:它们有世界地图,本地地图,战斗模式以及数个菜单模式。这些模式几乎完全独立,具有自成一体的代码,因此每个都很容易开发。
但如果没有游戏内容,游戏模式也就毫无用处了。一款RPG包含许多地图文件,怪物定义,对话台词,运行过场动画的脚本,以及控制玩家进程的玩法代码。在此我们不赘述制作JRPG的细节,仅围绕其中最重要的环节进行讨论。处理游戏模式对制作一款可管理的JRPG来说至关重要,所以我们将首先探索这个系统。
管理游戏状态
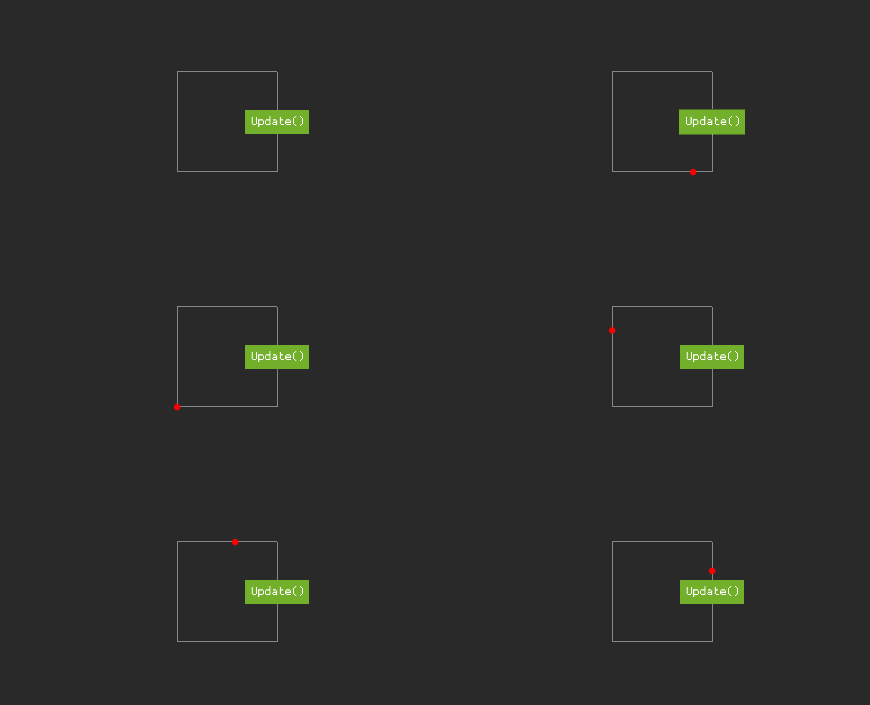
下图显示了游戏循环运行状态,每帧都调用了一个更新函数。这相当于游戏的心跳,几乎每款游戏都会以此创建框架。
你是否曾遭遇过开启一个项目,但却因为发现难以添加新功能或频频遭遇漏洞而停滞不前?也许你尝试将所有的代码塞入一个鲜有框架的更新函数,却发现代码出现一团糟。解决此类问题的一个绝佳方案就是将代码划入为不同的游戏状态,这样可以更清楚地获知其中情况。
有一个通用的游戏开发工具是状态机,它可以运用于处理动画、菜单、游戏流程、AI等所有方面……它是游戏开发的必需品。对JRPG而言,我们可以使用状态机处理不同的游戏模式。在此我们将以普通的状态机为例,对其进行较小调整,令其更适用于JRPG。让首先我们要看看一般的游戏流(如下图):
在典型的JRPG中,你可能最先进入本地地图游戏模式,自由地在城镇中漫步,并与其中的居民互动。然后你可以离开进入一个不同的游戏模式并看到世界地图。
世界地图与本地地图十分相似,但规模更大,你可以看到山峰和城镇,而不只是树木和篱笆。如果你由此返回城镇,游戏模式也会切换回本地地图。
无论是在世界地图还是本地地图,你都可以通过菜单查看角色状态,有时候在世界地图中你可能会卷入一场战斗。以上图表描述了这些游戏模式和转场,这是JRPG玩法的基本流程,也是我们创造游戏状态的起点。
使用状态机处理复杂度
在我们的例子中,状态机是托管我们游戏各个模式的代码块,允许我们从一个模式切换到另一个模式,并即时更新和渲染当前模式。
根据实现语言的情况,状态机通常包含一个StateMachine类和一个界面IState(执行所有状态)。
(小贴士:一个界面只是含有成员函数但没有执行的类。继承于一个界面的类要用于执行成员函数。这意味着界面没有代码,它只是用于指定其他类提供特定功能。它允许你用同样的方式使用不同的类,因为它们有一组由同个通用界面定义的成员函数。)
状态机最好用伪代码概述基本系统进行描述:
class StateMachine
{
Map<String, IState> mStates = new Map<String, IState>();
IState mCurrentState = EmptyState;public void Update(float elapsedTime)
{
mCurrentState.Update(elapsedTime);
}public void Render()
{
mCurrentState.Render();
}public void Change(String stateName, optional var params)
{
mCurrentState.OnExit();
mCurrentState = mStates[stateName];
mCurrentState.OnEnter(params);
}public void Add(String name, IState state)
{
mStates[name] = state;
}
}
以上代码是不含错误校验的简单状态机。
让我们看看以上状态机代码如何运用于游戏。游戏刚开始时会创建一个StateMachine,会添加所有不同的游戏状态,设置好最初状态。每个状态都要由一个String名称(用于调用改变状态的函数)进行定义。这里只有一个现行状态mCurrentState,它在每个游戏循环中进行渲染和更新。
其代码可能如下:
StateMachine gGameMode = new StateMachine();
// A state for each game mode
gGameMode.Add(“mainmenu”, new MainMenuState(gGameMode));
gGameMode.Add(“localmap”, new LocalMapState(gGameMode));
gGameMode.Add(“worldmap”, new WorldMapState(gGameMode));
gGameMode.Add(“battle”, new BattleState(gGameMode));
gGameMode.Add(“ingamemenu”, new InGameMenuState(gGameMode));gGameMode.Change(“mainmenu”);
// Main Game Update Loop
public void Update()
{
float elapsedTime = GetElapsedFrameTime();
gGameMode.Update(elapsedTime);
gGameMode.Render();
}
在这个例子中,我们创造了所需的一切状态,将它们添加到StateMachine并在主菜单中设置了起始状态。如果我们运行这一代码就会首先渲染和更新MainMenuState。这代表多数游戏最初启动时出现的菜单,其中包括“开始游戏”和“加载游戏”等选项。
当用户选择“开始游戏”,MainMenuState就会调用gGameMode。Change(“localmap”, “map_001″) 以及LocalMapState变成了新的现行状态。这个状态之后会更新和渲染地图,允许玩家开始探索游戏。
以下图表显示了一个状态机在WorldMapState和BattleState之间切换的可视化状态。在游戏中这相当于玩家在世界中漫游,遭遇怪物攻击,进入战斗模式,然后重返地图。
让我们快速查看一下状态界面以及执行它的EmptyState类:
public interface IState
{
public virtual void Update(float elapsedTime);
public virtual void Render();
public virtual void OnEnter();
public virtual void OnExit();
}public EmptyState : IState
{
public void Update(float elapsedTime)
{
// Nothing to update in the empty state.
}public void Render()
{
// Nothing to render in the empty state
}public void OnEnter()
{
// No action to take when the state is entered
}public void OnExit()
{
// No action to take when the state is exited
}
}
界面Istate要求每个状态运用于状态机之前都含有4个方法:Update(), Render(), OnEnter() and OnExit()。
Update()和Render()为当前活跃状态调用每一帧;在改变状态时调课堂OnEnter()和OnExit()。除此之外其他都很简单明了。现在你就知道自己可以针对游戏的所有不同环节创造多种状态。
这是基本的状态机。它适用于多种情况,但处理游戏模式时我们可以对其进行改良。在当前系统支持下,改变状态需要大量开支——有时候切换到BattleState时,我们会离开WorldState,开始战斗,然后返回WorldState在战斗开始之前的设置。使用我们所描述的标准状态机来执行这种操作比较棘手。使用状态堆栈可能更容易解决问题。
使用状态堆栈更易于执行游戏逻辑
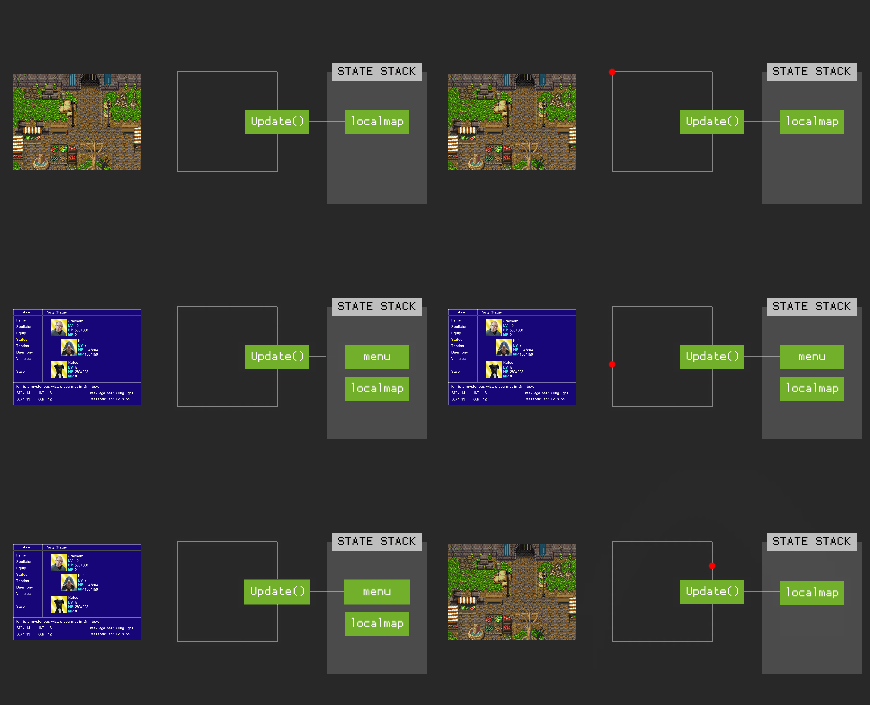
我们可以将标准状态机转变为一个状态堆栈,正如下表所示。例如,MainMenuState在游戏开始时最推到堆栈上。当我们启动一个新游戏时,LocalMapState就会推到顶端。此时MainMenuState不再被渲染或更新,而是等待我们重返该状态。
以下图表显示了状态堆栈的可视化形象,显示了InGameMenuState被推到堆栈而后离开的过程。
现在我们已经了解堆栈运行的原理,让我们看看一些执行代码:
public class StateStack
{
Map<String, IState> mStates = new Map<String, IState>();
List<IState> mStack = List<IState>();public void Update(float elapsedTime)
{
IState top = mStack.Top()
top.Update(elapsedTime)
}public void Render()
{
IState top = mStack.Top()
top.Render()
}public void Push(String name)
{
IState state = mStates[name];
mStack.Push(state);
}public IState Pop()
{
return mStack.Pop();
}
}
上述状态堆叠代码不含错误校验并且非常简单明了。可以使用Push()调用将状态推到堆栈,并以Pop() 调用取消,在堆栈最顶端的状态就是需要更新和渲染的状态。
使用基于堆叠的方法对菜单更有好处,经过一点小修改就可以将其用于对话框和通告。如果你觉得这太冒险,那就将两者结合起来并使用一个支持堆栈的状态机。
使用StateMachine, StateStack或者其他两种组合可以创造出一个很棒的框架。
下一步操作:
1.用你最喜爱的编程语言执行状态机代码。
2.创造继承自IState的MenuMenuState和GameState。
3.将主菜单设置为初始状态。
4.让两个状态都渲染不同图像。
5.摁压按钮,让主菜单转变为游戏状态。
地图
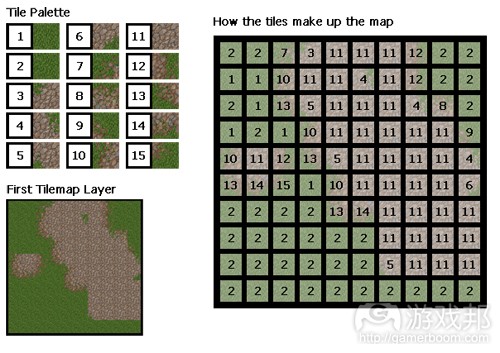
地图用于描述游戏世界的情况,沙漠、太空飞船、丛林都可以用贴图来表示。贴图是一种使用数量有限的小图片来创造更大图像的方法。以下图表显示了其工作原理:
以上图表有三个部分:贴图调色板,图类构造过程的可视化图表,以及渲染到屏幕的最终地图。
贴图调色板是所有用于制作地图的贴图集合。调色板中的每个贴图都由一个整数来定义。例如,贴图1就是草地,标示它将用于贴图可视化图表中的位置。
图类只是一个数字阵列,每个数字对应的是调色板中的贴图。如果我们想制作一个遍布草地的地图,就只需要一个布满数字1的阵列,当我们渲染这些贴图时我们会看到一个由许多小草地贴图组成的地图。贴图调色板通常载入一个包含许多小贴图的大纹理,但调色板的每个条目都可以自成一个图像文件。
(小贴士:为何不使用一排阵列来代表贴图?第一个阵列可以用一排成行的贴图来表示。
我们不这么做的原因只是为了简便和效率。如果你有一排整理,那就是一个持续的内存块。如果你有一排阵列,那就是含有指针的第一个阵列的内存块,每个指针都指向一排贴图。这种间接性会降低执行效率——因为我们是针对每帧绘制地图,当然是越快越好。)
让我们看看描述贴图的代码:
//
// Takes a texture map of multiple tiles and breaks it up into
// individual images of 32 x 32.
// The final array will look like:
// gTilePalette[1] = Image // Our first grass tile
// gTilePalette[2] = Image // Second grass tile variant
// ..
// gTilePalette[15] = Image // Rock and grass tile
//
Array gTilePalette = SliceTexture(“grass_tiles.png”, 32, 32)gMap1Width = 10
gMap1Height = 10
Array gMap1Layer1 = new Array()
[
2, 2, 7, 3, 11, 11, 11, 12, 2, 2,
1, 1, 10, 11, 11, 4, 11, 12, 2, 2,
2, 1, 13, 5, 11, 11, 11, 4, 8, 2,
1, 2, 1, 10, 11, 11, 11, 11, 11, 9,
10, 11, 12, 13, 5, 11, 11, 11, 11, 4,
13, 14, 15, 1, 10, 11, 11, 11, 11, 6,
2, 2, 2, 2, 13, 14, 11, 11, 11, 11,
2, 2, 2, 2, 2, 2, 11, 11, 11, 11,
2, 2, 2, 2, 2, 2, 5, 11, 11, 11,
2, 2, 2, 2, 2, 2, 2, 2, 2, 2,
];
比较以上代码和图表,可以明显看到图类是由更小的系列贴图组成的。描述地图之后我们就可以编写一个简单的渲染函数在屏幕上将其绘制出来。该函数的细节会根据视口设置和绘图函数而变化。我们的渲染函数如下所示:
static int TilePixelSize = 32;
// Draws a tilemap from the top left, at pixel position x, y
// x, y – the pixel position the map will be rendered from
// map – the map to render
// width – the width of the map in tiles
public void RenderMap(int x, int y, Array map, int mapWidth)
{
// Start by indexing the top left most tile
int tileColumn = 1;
int tileRow = 1;for(int i = 1; map.Count(); i++)
{
// Minus 1 so that the first tile draws at 0, 0
int pixelPosX = x + (tileColumn – 1) * TilePixelSize;
int pixelPosY = y + (tileRow – 1) * TilePixelSize;RenderImage(x, y, gTilePalette[gMap1Layer1[i]]);
// Advance to the next tile
tileColumn += 1;
if(tileColumn > mapWidth)
{
tileColumn = 1;
tileRow += 1;
}
}
}– How it’s used in the main update loop
public void Update()
{
// Actually draw a map on screen
RenderMap(0, 0, gMap1Layer1, gMap1Width)
}
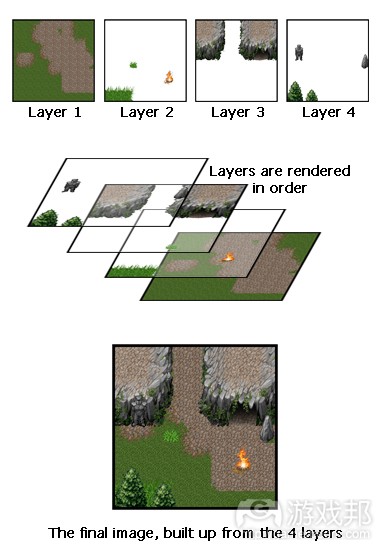
我们目前所使用的地图还很简单,多数FRPG将使用图类的多个层次来创造更有趣的场景。以下图表是我们的首个地图,添加了三个层次之后变成了更具有观赏性的地图。
正如我们之前所见,每个图类都是一排数字,因此一排此类阵列就可以组成一个层次完整的地图。当然,渲染图类还只是添加游戏探索的第一步,地图还应该含有碰撞信息,支持移动实体,以及使用触发器的基本交互行为。
触发器是当玩家执行一些操作而“触发”的一块代码。触发器可以识别许多操作。例如,将玩家角色移动到一个贴图可能触发一个动作——通常发生于移动到门口,传送点或地图的边缘。触发器可能会安置在这些贴图以便将角色传送到室内地图,世界地图或者相关的本地地图。
另一个触发器可能有赖于摁压“使用”按钮。例如,玩家若是前往某个路标,并按下“使用”,然后启动了一个触发器,弹出一个关于路标文本的对话框。触发器可用于所有的地方,以便将地图拼凑起来并提供交互性。
JRPG通常具有极为精细和复杂的地图,所以我建议你不要自己动手制作这种地图,最好是使用图类编辑器来完成。你可以用一些现成的免费资源,对此我推荐你试试Tiled,我就是使用这个工具制作了这些地图范例。
下一步操作:
1.获取Tiled。
2.从opengameart.org获取一些贴图。
3.创造一个地图并将其载入你的游戏。
4.添加一个玩家角色。
5.将角色从一个贴图移到另一个贴图。
6.让角色在贴图之间的移动更为顺畅。
7.添加碰撞检测(你可以使用新层次来存储碰撞信息)。
8.添加简单的触发器来切换地图。
9.添加触发器来阅读标志——可以考虑使用我们之前提到的状态堆栈来呈现对话框。
10.制作一个含有“开始游戏”选项的主菜单状态,以及本地地图状态,并将它们连接在一起。
11.设计一些地图,添加一些NPC,尝试简单的获取模式,充分发挥你的想象力吧。
战斗
最后,轮到战斗系统了。如果没有战斗元素,JRPG还有什么好玩?战斗是许多游戏发挥创意,引进新技能系统,新战斗框架,或不同符咒系统的地方——总之这里具有多种变化。
多数战斗系统使用回合制结构,一次只允许一方出招。首个回合制战斗系统很简单,每个实体要依次轮流出手:玩家一次,敌人一次,再轮到玩家,然后再轮到敌人。这种设计之后迅速被更为复杂,可提供更多策略和战术的系统所取代。
这里我们要研究的是基于活跃时间的战斗系统,这里的战斗者并不一定获得平等的回合。出手更快的实体可能获得更多机会,并且其采取的动作也会影响到每一回合所花费的时间。例如,手持短剑的战士可能只需20秒,而召唤怪兽的巫师却可能需要2分钟。
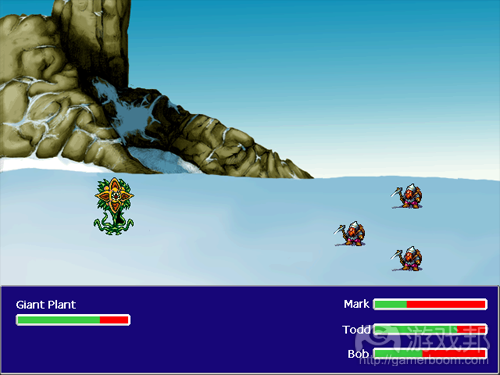
以上截图显示了典型JRPG的战斗模式。玩家控制角色在右边,敌人角色在左边,底部的文本框显示了关于战斗者的信息。
在战斗开始之初,怪物和玩家精灵会添加到场景中,之后再决定实体采取动作的顺序。这个决定部分取决于战斗如何开始——如果玩家中了埋伏,怪物就会最先发起攻击,不然一般是根据速度等实体情况来决定谁先出手。
玩家或怪物所做的一切都属于动作:攻击是一种动作,使用魔法也是动作,甚至决定下一步要采取什么动作也算是一种动作!最好使用队列来追踪动作的顺序。居于最顶端的是下一步要发生的动作,每个动作都有一个随着每帧流逝的倒计时器。
战斗流是用含有两种状态的状态机控制:有一个状态用于标记动作,另一个状态用于执行到时间的顶端动作。以下例子执行的是含有动作队列的基本战斗状态:
class BattleState : IState
{
List<IAction> mActions = List<IAction>();
List<Entity> mEntities = List<Entity>();StateMachine mBattleStates = new StateMachine();
public static bool SortByTime(Action a, Action b)
{
return a.TimeRemaining() > b.TimeRemaining()
}public BattleState()
{
mBattleStates.Add(“tick”, new BattleTick(mBattleStates, mActions));
mBattleStates.Add(“execute”, new BattleExecute(mBattleStates, mActions));
}public void OnEnter(var params)
{
mBattleStates.Change(“tick”);//
// Get a decision action for every entity in the action queue
// The sort it so the quickest actions are the top
//mEntities = params.entities;
foreach(Entity e in mEntities)
{
if(e.playerControlled)
{
PlayerDecide action = new PlayerDecide(e, e.Speed());
mActions.Add(action);
}
else
{
AIDecide action = new AIDecide(e, e.Speed());
mActions.Add(action);
}
}Sort(mActions, BattleState::SortByTime);
}public void Update(float elapsedTime)
{
mBattleStates.Update(elapsedTime);
}public void Render()
{
// Draw the scene, gui, characters, animations etcmBattleState.Render();
}public void OnExit()
{}
}
以上代码显示了使用简单状态机和动作队列的战斗模式流的控制方式。战斗中所包含的所有实体都有一个添加到队列中的决定动作。
玩家的决定动作将产生一个含有RPG稳定选项(游戏邦注:包括攻击、魔法和道具)的菜单,玩家决定好用哪个动作之后,该决定动作就会从队列中移除,然后添加一个最新选择的动作。
AI的决定动作将检测场景,并决定下一步操作(使用行为树、决定树或类似技巧),然后它也会移除决定动作并在队列中添加新动作。
BattleTick类控制了动作更新,如下图所示:
class BattleTick : IState
{
StateMachine mStateMachine;
List<IAction> mActions;public BattleTick(StateMachine stateMachine, List<IAction> actions)
: mStateMachine(stateMachine), mActions(action)
{
}// Things may happen in these functions but nothing we’re interested in.
public void OnEnter() {}
public void OnExit() {}
public void Render() {}public void Update(float elapsedTime)
{
foreach(Action a in mActions)
{
a.Update(elapsedTime);
}if(mActions.Top().IsReady())
{
Action top = mActions.Pop();
mStateMachine:Change(“execute”, top);
}
}
}
BattleTick是BattleMode状态的一个子状态,直到顶端动作的倒计时器为0时才会被勾选。之后它会启动队列中的顶端动作,并切换到执行状态。
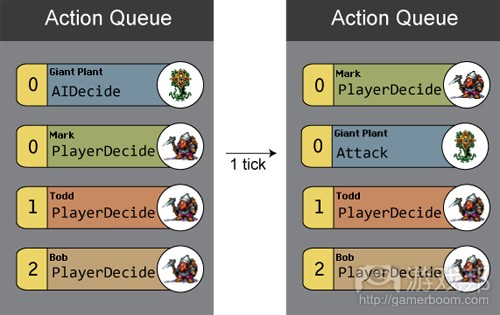
以上图表显示了战斗开始前的一个动作队列。此时还没有人出手,大家都在自己的时间设置中待命。
Giant Plant的倒计时为0,所以它下一个执行的动作是AIDecide。在这种情况下,AIDecide动作会让怪物进行攻击。攻击动作基本上是立即发生,并添加到队列中作为第二个动作。
在BattleTick的下一次迭代中,玩家将选择自己的侏儒Mark所要执行的动作,这也会改变队列状态。而这之后的BattleTick迭代,Plant将攻击其中一个侏儒。攻击动作会从队列中移除,并移交至BattleExecute状态,这会激活Plant的攻击,并进行所有必要的战斗运算。
当怪物攻击结束后,另一个AIDecide动作将添加到队列中以待另一只怪物出击。BattleState将以这种方式持续运行直到战斗结束为止。
如果实体死亡,其所有动作都将从队列中移除——我们可不希望看到已经毙命的怪物突然又复活展开攻击(除非我们制作的是僵尸等不死之身)。
动作队列及简单的状态机是战斗系统的核心,你现在应该已经清楚其结合原理。这并不足以构成一个独立的解决方案,但却可以作为一个创建具有更多功能和复杂性机制的模版。动作和状态是帮助管理战斗复杂性,并令其更易于扩展和开发的抽象概念。
下一步操作:
1.编写BattleExecute状态。
2.可能添加更多状态,例如BattleMenuState和AnimationState。
3.使用简单的数值渲染背景和敌人。
4.编写简单的攻击动作,并运行简单的轮流攻击的战斗。
5.给予实体特殊技能或魔法。
6.制作一个命值低于25%的时候能够自癒的敌人。
7.创造一个能够开启战斗状态的世界地图。
8.创造一个呈现战利品和XP增值情况的BattleOver状态。
总结
我们已经深入探讨了如何制作JRPG的细节,讨论了如何使用状态机或堆栈构建代码,如何使用图类和层次来呈现世界,如何使用动作队列和状态机来控制战斗流。
但仍有许多方面未能详细展开。制作一款完善的JRPG还包括XP和升级系统,保存和载入游戏,菜单上的许多GUI代码,基本的动画和特效,处理过场动画的状态,战斗机制(游戏邦注:例如休眠、毒药、基本加成和阻力)等许多元素。
但你制作一款游戏并不需要覆盖所有这些内容,《To The Moon》基本上就只有地图探索和对话元素。你可以在制作游戏过程中逐渐增加新功能。
制作任何游戏最困难的地方就在于完成任务,所以一开始可以先从小处着手,制作迷你RPG。如果你发现自己被困住了,不妨缩小游戏规模,令其更简单易做并完成它。你可以会在开发过程中找到许多新鲜而令人兴奋的点子,那就先写下来,但要克制住扩大游戏规模的冲动,更不要三心二意,开始制作新游戏。(本文为游戏邦/gamerboom.com编译,拒绝任何不保留版权的转载,如需转载请联系:游戏邦)
How to Build a JRPG: A Primer for Game Developers
Dan Schuller
Five Reasons You Should Make a JRPG
The Unlikely Birthplace of JRPGs
The slime – one of Dragon Warrior’s iconic enemies. In 1983, Yuji Horii, Koichi Nakamura and Yukinobu Chida flew to America and attended AppleFest ’83, a gathering of developers showing off their latest creations for the Apple II. They were blown away by the latest version of an RPG called Wizardry.
On returning to Japan, they decided to create Dragon Warrior, an RPG that was similar but streamlined for the NES. It was a massive hit, defining the JRPG genre. Dragon Warrior didn’t fare as well in America, but a few years later another game did.
In 1987, the original Final Fantasy was released, spawning one of the best selling video game franchises on Earth which became, at least in the West, the iconic JRPG.
The Genre Talk
Game genres are never precisely defined – they’re more a fuzzy collection of conventions. RPGs tend to have a leveling system, one or several player characters with skills and statistics, weapons and armor, combat and exploration modes, and strong narratives; game progress is often achieved by advancing across a map.
Japanese RPGs are RPGs created in the mold of Dragon Warrior; they’re more linear, combat is often turn-based and there are usually two types of map: a world map and a local map. Archetypal JRPGs include Dragon Warrior, Final Fantasy, Wild Arms, Phantasy Star and Chrono Trigger. The type of JRPG we’re going to talk about in this article is one similar to an early Final Fantasy.
Five Reasons You Should Make a JRPG
1. They’ve Stood the Test of Time
Games like Final Fantasy VI and Chrono Trigger are still very enjoyable to play. If you make a JRPG you’re learning a timeless game format that modern players are still very receptive to. They make for a great framework to add your own twist and experiment – be that in the narrative, presentation or mechanics. It’s a great thing if you can make a game that’s still played and enjoyed decades after it’s first release!
2. The Game Mechanics Are Widely Applicable
Call of Duty, one of the world’s most popular FPS games, uses RPG elements; the social game boom surrounding FarmVille was basically a clone of the SNES RPG Harvest Moon; and even racing games like Gran Turismo have levels and experience.
3. Constraints Foster Creativity
Much as a writer might be intimidated by a blank sheet of paper, a game developer may find themselves paralyzed by the large number of possible choices when designing a new game. With a JRPG a lot of the choices have been decided for you, so you don’t have that choice paralysis, you’re free to follow the conventions for most decisions and deviate from convention at the points that matter to you.
4. It’s Doable as a Solo Project
Final Fantasy was almost entirely coded by a single programmer, Nasir Gebelli, and he was doing it in assembly! With modern tools and languages it’s far easier to create this type of game. The
largest part of most RPGs isn’t the programming it’s the content – but this doesn’t have to be the case for your game. If you dial it back a little on the content and focus on quality over quantity then a JRPG is a great solo project.
Having a team can help with any game, and you might want to outsource the art and music, or use some of the excellent creative commons assets from places such as opengameart.org. (Editor’s note:
Our sister site GraphicRiver also sells sprite sheets.)
5. For Profit!
JRPGs have a dedicated following and a number of indie JRPGs (such as the ones pictured below) have done well commercially and are available on platforms like Steam.
Architecture
JRPGs share so many conventions and mechanics that it’s possible to break a typical JRPG down into a number of systems:
In software development one pattern is seen over and over again: layering. This refers to how the systems of a program build on top of each other, with broadly applicable layers at the bottom and layers more intimately dealing with problem at hand near the top. JRPGs are no different and can be viewed as a number of layers – lower layers deal with basic graphic functions and upper layers deal with quests and character stats.
Tip: When developing a new system it’s best to start by creating the bottom layers first and then moving layer by layer to the top. Using middleware helps you skip several of the lower layers
common to many games. On the architecture diagram above, all the layers below the dotted line are handled by a 2D game engine.As you can see from the architecture diagram above, there are a lot of systems the make up a JRPG but most systems can be grouped together as separate modes of the game. JRPGs have very distinct game modes; they have a world map, local map, combat mode and several menu modes. These modes are almost entirely separate, self-contained pieces of code, making each one simple to develop.
Modes are important but they would be useless without game content. An RPG contains many map files, monster definitions, lines of dialog, scripts to run cutscenes and gameplay code to control how the player progresses. Covering how to build a JRPG in detail would fill an entire book, so we’re going to concentrate on some of the most important parts. Handling the game modes cleanly is critical to producing a manageable JRPG, so that’s the first system we’ll explore.
Managing Game State
The image below shows the game loop pumping away, calling an update function every frame. This is the heartbeat of the game and nearly all games are structured this way.
Have you ever started a project but stalled because you found it too hard to add new features or were plagued by mysterious bugs? Maybe you tried to cram all of your code into the update function with little structure and found the code became a cryptic mess. An excellent solution to these types of problem is to separate the code out into different game states, giving a much clearer view of what’s happening.
A common gamedev tool is the state machine; it’s used all over the place, for handling animations, menus, game flow, AI… it’s an essential tool to have in our kit. For the JRPG we can use a
state machine to handle the different game modes. We’ll take a look at a normal state machine and then we’ll mix it up a little, to make it more suitable for the JRPG. But first let’s take a
little time to consider the general game flow pictured below.
In a typical JRPG you’ll probably start off in the local map game mode, free to wander around a town and interact with its inhabitants. From the town you can leave – here you’ll enter a
different game mode and see the world map.
The world map acts very much like the local map but at a larger scale; you can see mountains and towns, instead of trees and fences. While on the world map if you walk back into the town the mode will revert to the local map.
In either the world map or local map you can bring up a menu to check out your characters, and sometimes on the world map you’ll be thrown into combat. The diagram above describes these game modes and transitions; this is the basic flow of JRPG gameplay and is what we’ll create our game states from.
Handling Complexity With a State Machine
A state machine, for our purposes, is a piece of code that holds all the various modes of our games, that allows us to move from one mode to another, and that updates and renders whatever the current mode is.
Depending on the implementation language a state machine usually consists of a StateMachine class and an interface, IState, that all states implement.
Tip: An interface is just a class with member function definitions but no implementation. Classes that inherit from an interface are required to implement its member functions. This means an
interface has no code, it just specifies that other classes provide certain functionality. This allows different classes to be used in the same way because we know they have a group of member
functions defined by a common interface.
A state machine is best described by sketching out a basic system in pseudocode:
This code above shows a simple state machine with no error checking.
Let’s look at how the above state machine code is used in a game. At the start of the game a StateMachine will be created, all the different states of the game added and the initial state set.
Each state is uniquely identified by a String name which is used when calling the change state function. There is only ever one current state, mCurrentState, and it’s rendered and updated each
game loop.
The code might look like this:
In the example, we create all the states required, add them to the StateMachine and set the starting state to the main menu. If we ran this code the MainMenuState would be rendered and updated first. This represents the menu you see in most games when you first boot up, with options like Start Game and Load Game.
When a user selects Start Game, the MainMenuState calls something like gGameMode.Change(“localmap”, “map_001″) and the LocalMapState becomes the new current state. This state would then update and render the map, allowing the player to start exploring the game.
The diagram below shows a visualization of a state machine moving between the WorldMapState and BattleState. In a game this would be equivalent to a player wandering around the world, being attacked by monsters, going into combat mode, and then returning to the map.
Let’s have a quick look at the state interface and an EmptyState class that implements it:
The interface IState requires each state to have four methods before it can be used as a state in the state machine: Update(), Render(), OnEnter() and OnExit().
Update() and Render() are called each frame for the currently active state; OnEnter() and OnExit() are called when changing state. Apart from that it’s all pretty straightforward. Now you know
this you can create all kinds of states for all the different parts of your game.
That’s the basic state machine. It’s useful for many situations but when dealing with game modes we can improve upon it! With the current system, changing state can have a lot of overhead –
sometimes when changing to a BattleState we’ll want to leave the WorldState, run the battle, and then return to the WorldState in the exact setup it was before the battle. This kind of operation
can be clumsy using the standard state machine we’ve described. A better solution would be to use a stack of states.
Making Game Logic Easier With a State Stack
We can switch up the standard state machine into a stack of states, as shown the diagram below. For example, the MainMenuState is pushed on the stack first, at the start of the game. When we start a new game, the LocalMapState is pushed on top of that. At this point the MainMenuState is no longer rendered or updated but is waiting around, ready for us to return to.
Next, if we start a battle, the BattleState is pushed on the top; when the battle ends, it’s popped off the stack and we can resume on the map exactly where we left off. If we die in the game then
LocalMapState is popped off and we return to MainMenuState.
The diagram below gives a visualization of a state stack, showing the InGameMenuState being pushed on the stack and then popped off.
Now we have an idea how the stack works, let’s look at some code to implement it:
This above state stack code has no error checking and is quite straightforward. States can be pushed onto the stack using the Push() call and popped off with a Pop() call, and the state on the very top of the stack is the one that’s updated and rendered.
Using a stack-based approach is good for menus, and with a little modification it can also be used for dialog boxes and notifications. If you’re feeling adventurous then you can combine both and have a state machine that also supports stacks.
Using StateMachine, StateStack, or some combination of the two creates an excellent structure to build your RPG upon.
Next Actions:
1.Implement the state machine code in your favorite programming language.
2.Create a MenuMenuState and GameState inheriting from IState.
3.Set the the main menu state as the initial state.
4.Have both states render different images.
5.On pressing a button, have the state change from the main menu to the game state.
Maps
Maps describe the world; deserts, spaceships, and jungles can all be represented using a tilemap. A tilemap is a way of using a limited number of small images to build up a bigger one. The diagram below shows you how it works:
The above diagram has three parts: the tile palette, a visualization of how the tilemap is constructed, and the final map rendered to the screen.
The tile palette is a collection of all the tiles used to create a map. Each tile in the palette is uniquely identified by an integer. For example, tile number 1 is grass; notice the places where
it’s used on the tilemap visualization.
A tilemap is just an array of numbers, each number relating to a tile in the palette. If we wanted to make a map full of grass we could just have a big array filled with the number 1, and when we
rendered those tiles we’d see a map of grass made up from many small grass tiles. The tile palette is usually loaded as one big texture containing many smaller tiles but each entry in the palette
could just as easily be its own graphic file.
Tip: Why not use an array of arrays to represent the tilemap? The first array could represent by an array of rows of tiles.
The reason we don’t do this is just for simplicity and efficiency. If you have an array of integerss, that’s one continuous block of memory. If you have an array of arrays then that’s one block
of memory for the first array which contains pointers, with each pointer pointing to a row of tiles. This indirection can slow things down – and since we’re drawing the map each frame, the faster the better!
Let’s look at some code for describing a tile map:
Compare the above code with the diagram and it’s quite clear how a tilemap is built up from a small series of tiles. Once a map is described like this then we can write a simple render function to draw it on the screen. The exact details of the function will change depending on the viewport setup and drawing functions. Our render function is shown below.
The map we’ve used so far is quite basic; most JRPGs will use multiple layers of tilemaps to create more interesting scenes. The diagram below shows our first map, with three more layers added it to, resulting in a far more pleasing map.
As we saw previously, each tilemap is just an array of numbers and therefore a full layered map can be made from an array of those arrays. Of course, rendering the tilemap is really just the first step in adding exploration to your game; maps also need to have information about collision, support for moving entities around, and basic interactivity using triggers.
A trigger is a piece of code that’s only fired when the player “triggers” it by performing some action. There are lots of actions that a trigger may recognize. For instance, moving the player character on to a tile may trigger an action – this commonly happens when moving onto a doorway, teleporter or the edge tile of map. Triggers may be placed on these tiles to teleport the character to an indoor map, world map or related local map.
Another trigger might depend on the “use” button being pressed. For instance, if the player goes up to a sign and presses “use” then a trigger is fired and a dialog box is displayed showing the
text of the sign. Triggers are used all over the place to help stitch maps together and provide interactivity.
JRPGs often have a lot of quite detailed and complicated maps, so I recommend that you don’t try and make them by hand, it’s a much better idea to use a tilemap editor. You can use one of the excellent free existing solutions or roll your own. If you want to try an existing tool then I definitely recommend checking out Tiled which is the tool I used to create these example maps.
Related Posts
•Introduction to Tiled
•Parsing Tiled TMX Format Maps in Your Own Game Engine
•Getting to Know Ogmo Editor
Next Actions:
1.Get Tiled.
2.Get some tiles from opengameart.org.
3.Create a map and load it into your game.
4.Add a player character.
5.Move the character from tile to tile.
6.Make the character smoothly move from tile to tile.
7.Add collision detection (you can use a new layer to store collision information).
8.Add a simple trigger to swap maps.
9.Add a trigger to read signs – consider using the state stack we talked about earlier to display the dialog box.
10.Make a main menu state with a “Start Game” option and a local map state and link them together.
11.Design some maps, add some NPCs, try a simple fetch quest – let your imagination run free!
Combat
Finally, on to the fighting! What good is a JRPG without combat? Combat is where a lot of games choose to innovate, introducing new skill systems, new combat structure, or different spell systems – there’s quite a lot of variation.
Most combat systems use a turn-based structure with only one combatant permitted to take an action at a time. The very first turn-based battle systems were simple, with every entity getting a turn in order: player’s turn, enemy’s turn, player’s turn, enemy’s turn, and so on. This quickly gave way to more intricate systems offering more leeway for tactics and strategy.
We’re going to have a close look at Active-Time based combat systems, where combatants don’t all necessarily get an equal number of turns. Faster entities may get more turns and the type of
action taken also affects how long a turn takes. For instance, a warrior slashing with a dagger may take 20 seconds but a wizard summoning a monster may take two minutes.
The above screenshot shows the combat mode in a typical JRPG. Player-controlled characters are on the right, enemy-characters on the left, and a textbox at the bottom shows information about the combatants.
At the start of combat, the monster and player sprites are added to the scene and then there’s a decision about which order the entities take their turns. This decision may partially depend on how the combat was launched: if the player was ambushed then the monsters will all get to attack first, otherwise it’s usually based on one of the entity stats such as speed.
Everything the player or monsters do is an action: attacking is an action, using magic is an action, even deciding what action to take next is an action! The order of actions is best tracked using
a queue. The action at the top is the action that will take place next, unless no faster action preempts it. Each action will have a countdown that decreases as each frame passes.
The combat flow is controlled using a state machine with two states; one state to tick the actions and another state to execute the top action when the time comes. As always, the best way to understand something is to look at the code. The following example implements a basic combat state with an action queue:
The code above demonstrates the control of the battle mode flow using a simple state machine and a queue of actions. To begin with, all the entities involved in the battle have a decide-action added to the queue.
A decide-action for the player will bring up a menu with the RPG stable options Attack, Magic, and Item; once the player decides on an action then the decide-action is removed from the queue and the newly chosen action is added.
A decide-action for the AI will inspect the scene and decide what to do next (using something like a behavior tree, decision tree or similar technique) and then it too will remove its decide-action and add its new action to the queue.
The BattleTick class controls the updating of the actions, as shown below:
BattleTick is a sub state of the BattleMode state and it just ticks until the top action’s countdown is zero. It then pops the top action out of the queue and changes to the execute state.
The diagram above shows an action queue at the start of a battle. No one has yet taken an action and everyone is ordered by their time to make a decision.
The Giant Plant has a countdown of 0, so on the next tick it executes its AIDecide action. In this case the AIDecide action results in the monster deciding to attack. The attack action is almost
immediate and gets added back into the queue as the second action.
On the next iteration of BattleTick, the player will get to choose which action his dwarf “Mark” should take, which will change the queue again. The next iteration of BattleTick after that, the
Plant will attack one of the dwarves. The attack action will be removed from the queue and passed over to the BattleExecute state, and it will animate the plant attacking as well as doing all the
necessary combat calculations.
Once the monster’s attack is finished another AIDecide action will be added to the queue for the monster. The BattleState will continue this way until the end of the combat.
If any entity dies during the combat all its actions need to be removed from the queue – we don’t want dead monsters suddenly reanimating and attacking during the game (unless we’re purposely making zombies or some kind of undead!).
The action queue and simple state machine are the heart of the combat system and you should now have a good feel for how it fits together. It’s not complete enough to be a standalone solution but it can be used as a template to build something more fully functioning and intricate. Actions and states are good abstraction that help manage the complexity of combat and make it easier to expand and develop.
Next Actions:
1.Write the BattleExecute state.
2.Perhaps add more states, such as BattleMenuState and AnimationState.
3.Render backgrounds and enemies with basic health stats.
4.Write a simple attack action and run a simple battle of trading attacks.
5.Give entities special skills or magic.
6.Make an enemy that will heal itself if below 25% health.
7.Create a world map to launch the battle state from.
8.Create a BattleOver state that shows loot and XP gain.
Review
We’ve had a high level look at how to make a JRPG, diving into some of the more interesting details. We’ve covered how to structure code using a state machine or stack, how to use tilemaps and layers to display our world, and how to control the flow of combat using an action queue and state machine. The features we have covered make a good base to build on and develop from.
But there’s also a lot that hasn’t been covered at all. Making a full JRPG includes XP and leveling systems, saving and loading of the game, lots of GUI code for the menus, basic animations and special effects, states for handling cutscenes, combat mechanics (such as sleep, posion, elemental bonuses and resistances), to name just a few things!
You don’t need all these things for a game, though; To The Moon basically had only map exploration and dialog. You can incrementally add new features as you make your game.
Where to Go From Here
The hardest part of making any game is finishing it, so start small, think of a mini-rpg; escape a dungeon, a single fetch quest, and then build up. If you find you’re getting stuck then reduce
the scope of the game, make it simpler and finish it. You might find as you develop you get lots of new and exciting ideas, which is good, write them down but resist the urge to increase the scope of your game, or even worse start a new one.(source:gamedev)





 闽公网安备35020302001549号