分享正确使用模拟控制杆盲区的方法
作者:Josh Sutphin
我看到过几个关于模拟控制杆盲区的讨论。不幸的是,我看到的大多数建议都相当糟糕,所以我觉得我可以分享一些我过去6年从事大型PS3项目(如《Warhawk》和MStarhawk》)时学习到的简单技巧。
(注:以下代码案例语言是C#,且以Unity基础,但基本原理适用于几乎所有语言/API。)
什么是盲区?
如果你已经知道了,那就可以跳过这部分了。至于不知道的,请参看以下简介!
模拟控制杆通常以两个数字座标的形式发送输入到代码中。这两个数字中,一个代表X轴(水平轴),另一个代表Y轴(垂直轴)。通常数字的范围是-1(充分伸展的一个方向)到+1(充分伸展的反方向),而0就是一个盲点。也就是说,如果你没有接触控制杆,座标就返回(0,0)。
但事实上,控制杆的质量各不相同,且会持续耗损;你有时候可能会使用带有不准的或失灵的控制杆的游戏控制器:在这两种情况下,盲点位置就会有所偏离(0,0),即使你并没有接触到控制杆。代码无法响应过于微小的控制杆移动。
盲区只是一个最小输入的阈值,通常介于0.1到0.2。如果来自控制杆的输入小于这个区间,那就会被忽略。
你有没有玩过一款游戏,摄像机移动或旋转得非常慢,即使你完全没有碰控制杆?那就是错失(或太小的)盲区的情况(令人奇怪的是,我在许多Xbox 360FPS游戏中都遇到这个问题)。
总结一下:盲区的作用就是阻止来自不准、失灵控制杆的意外输入,使玩家游戏更愉快。
轴向盲区
好吧,我们可以开始看看盲区的执行办法。这是大部分人都会首先考虑的办法,因为最直观:
float deadzone = 0.25f;
Vector2 stickInput = new Vector2(Input.GetAxis(“Horizontal”), Input.GetAxis(“Vertical”));
if(Mathf.Abs(stickInput.x) < deadzone)
stickInput.x = 0.0f;
if(Mathf.Abs(stickInput.y) < deadzone)
stickInput.y = 0.0f;
是够简单了:如果我们的输入大小在两个方向上都小于盲区,那么我们可以简单地将那个方向上的输入归零,就这么办,对吧?
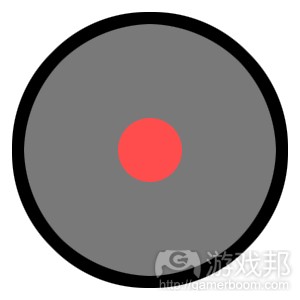
以下是盲区的图示。圆圈表示控制杆的旋转空间(游戏邦注:它与控制杆所在的控制器上的圆孔一样),红色区域表示盲区生效、取消输入的范围:
事实上,这个执行办法相当糟糕,当你以扫射动作旋转控制杆时(这在FPS中是非常普遍的动作),你就会注意到这一点。当你旋转控制杆超过其中一个基本方向——红色区域内的任何地方,你就会感觉到它在那个方向上突然失灵了。如果你制作的游戏是四方向移动的2D游戏(如《炸弹人》之类的),那就正适合;但对于任何需要模拟精度的游戏(游戏邦注:如FPS或双杆射击游戏)来说,这还远远不够精确。
径向盲区
幸运的是,基本方向的失灵问题很容易解决。我们只需要测试全部输入矢量的大小,而不是分别测试各个轴:
float deadzone = 0.25f;
Vector2 stickInput = new Vector2(Input.GetAxis(“Horizontal”), Input.GetAxis(“Vertical”));
if(stickInput.magnitude < deadzone)
stickInput = Vector2.zero;
这个办法好多了。对于大多数游戏,这种程度就够了;事实上,这个办法是近来最常见的。下图表示控制杆的这种盲区:
当我们说到盲区时,这就是我们通常能想到的:控制杆中央的一小块区域无法感知输入。这个区域的大小是根据不准的、用旧的控制杆在无人为输入的情况下,可能自动失灵的范围得到的。
高精度问题
如果是第一或第三人称射击游戏,那么对精度的要求就会很高。前一种办法可以解决大幅度活动问题,但当你试图做非常小的调整动作(如用狙击枪瞄准)时,你就会发现问题了。当你慢慢地把控制杆从盲点移开,你会感觉到盲区的边缘,你的手臂好像是突然进入运动状态。这让玩家觉得不流畅,使高精度的玩法显得极其无聊。
前一种办法的问题在于,在盲区下将输入矢量切断,这意味着所有处于盲区内的精度完全丧失了。换句话说,你再也不能顺畅地将输入从0过渡到+1;相反地,你的输入会先从0突变成+0.2,然后再从0.2突变成+1。
以下是这种盲区的图示:
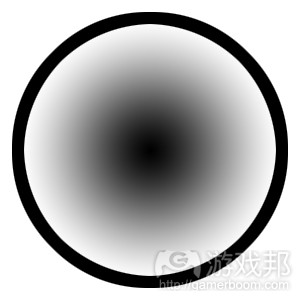
上图显示了结果输入的强度(当盲区生效时)。注意,盲区边缘是完全可见的:当你将控制棒从中心移开进,梯度值会在那个边缘上突然变化,而不是流畅地过渡。
成级径向盲区
幸好高精度问题也非常容易解决。我们只需要重新调节非盲区空间的切断的输入矢量:
float deadzone = 0.25f;
Vector2 stickInput = new Vector2(Input.GetAxis(“Horizontal”), Input.GetAxis(“Vertical”));
if(stickInput.magnitude < deadzone)
stickInput = Vector2.zero;
else
stickInput = stickInput.normalized * ((stickInput.magnitude – deadzone) / (1 – deadzone));
以下是这种盲区的图示:
注意,没有可见边缘了:当你把控制杆从中心移开时,梯度值会平稳地变化,而盲区仍然存在。这就是理想的状态。
根据游戏选择盲区执行办法
我并没有说你不能使用任何其他办法。最重要的是,根据你的项目选择最合适的办法。以下我例举了三种情况:
1、四方向移动游戏:轴向盲区其实很适合这种游戏,因为它只对与四个方向相关的输入矢量生效。
2、双杆射击游戏:在这类游戏中,输入的精度并不重要——玩家关心的是方向,所以简单的径向盲区就适合这类游戏。
3、高精度FPS:在这类游戏中,有时候需要扫射,有时候需要微调准星。在这种情况下,就要将成级径向与轴向盲区相结合,这样一个轴向的输入越强,其他轴向的盲区就越大。(在LightBox中我们称之为“领结”,因为盲区图示看起来就像个领结。至于执行办法,留给读者当课后练习吧!)
现在就开始正确运用盲区吧!玩家会感谢你的!(本文为游戏邦/gamerboom.com编译,拒绝任何不保留版权的转载,如需转载请联系:游戏邦)
Doing Thumbstick Dead Zones Right
by Josh Sutphin
As OUYA Kickstarter backers begin receiving their dev units, I’ve seen several discussions pop up about thumbstick dead zones. Unfortunately most of the advice I’ve seen is pretty bad, so I thought I’d share some simple techniques I’ve learned over the last six years working on major PS3 titles Warhawk and Starhawk.
(Note: The following code samples are in C# and based on Unity, but the basic principle should be clear enough to adapt to whatever language/API you’re working within.)
What’s A Dead Zone?
Skip this section if you already know. For the rest of you, here’s a quick primer!
Analog thumbsticks typically send input to your code in the form of two numbers: one for the X (horizontal) axis, and one for the Y (vertical) axis. Usually the number ranges from ?1 (fully extended one direction) to +1 (fully extended the opposite direction), where 0 is dead-center. The assumption is that if you’re not touching the stick, it’ll return (0, 0).
In reality, though, thumbsticks vary in quality and wear out over time. You’ve probably used a gamepad at some point that had a loose or “wiggly” stick; in that case, the neutral position is just a little bit off from (0, 0), even though you’re not touching the stick. To your code, that’s indistinguishable from the player pushing the stick just a tiny, tiny bit.
Dead zones are simply a minimum input threshold, often somewhere between 0.1 to 0.2. If the input received from the stick is smaller than that, it’s ignored.
Have you ever played a game where the camera moved or rotated very slowly of its own accord, even though you weren’t touching the stick at all? That’s a case of a missing (or too-small) dead zone. (Curiously, I see this issue in a lot of Xbox 360 first-person shooters.)
So to sum up: dead zones prevent unexpected input from loose thumbsticks, which makes players happy.
The Na?ve Way — Axial Dead Zone
Okay, let’s start with a look at the na?ve implementation of a dead zone. This is the method everyone jumps to first, because it’s the most immediately intuitive:
float deadzone = 0.25f;
Vector2 stickInput = new Vector2(Input.GetAxis(“Horizontal”), Input.GetAxis(“Vertical”));
if(Mathf.Abs(stickInput.x) < deadzone)
stickInput.x = 0.0f;
if(Mathf.Abs(stickInput.y) < deadzone)
stickInput.y = 0.0f;
Simple enough: if our input magnitude in either direction is less than our dead zone, we simply zero out the input in that direction, and that’s all there is to it… right?
Well, here’s a diagram of what this kind of dead zone looks like. The circle represents rotation space of the thumbstick (it’s the same as circular opening in your controller that the stick is seated in), and the red shaded area represents where the dead zone will kick in and cancel out your input:
In practice, this implementation feels very bad, and you’ll notice it whenever you try to rotate the stick in a sweeping motion (which is a really common gesture in first-person shooters). What happens is, as you rotate the stick across one of the cardinal directions — anywhere within the red shaded area — you’ll feel it “snap” to the cardinal. If you’re making a game that’s all about 2D four-directional movement (maybe a Bomberman clone or something) then that’s great, but for anything requiring analog precision (like a first-person or twin-stick shooter) this is nowhere near accurate enough.
A Better Way — Radial Dead Zone
Fortunately it’s really easy to get rid of the cardinal-direction snap. We simply test the magnitude of the entire input vector, rather than testing each axis separately:
float deadzone = 0.25f;
Vector2 stickInput = new Vector2(Input.GetAxis(“Horizontal”), Input.GetAxis(“Vertical”));
if(stickInput.magnitude < deadzone)
stickInput = Vector2.zero;
This is much better. For many games, you could probably ship with this; in fact, this method is the most common one I’ve seen people propose recently. Here’s what that dead zone looks like on the stick:
When we think about dead zones, this is usually the kind of thing we’re envisioning: a very small area in the center of the stick within which input is ignored. The size of the area is simply our best guess at how far a loose, worn-out stick is likely to wiggle on its own, without physical input.
The High-Precision Problem
If you’re making a first- or third-person shooter, odds are you need all the input precision you can get. The previous method covers you for large movements, but you’ll find a flaw when you try to make very fine, low-magnitude adjustments (like aiming a sniper rifle). As you slowly push the stick away from neutral, you’ll feel the edge of the dead zone as your aim suddenly “kicks” into motion. This doesn’t feel smooth, and can make high-precision gameplay feel extremely tedious in a way that can be hard to define.
The problem with the previous method is that it’s clipping the input vector below the dead zone, which means all the precision that exists inside the dead zone is completely lost. In other words, you can’t smoothly ramp your input from 0 to +1 any more; instead you snap from 0 to +0.2 (or whatever your dead zone is), and then you ramp from +0.2 to +1.
Here’s an illustration:
The gradient indicates the strength of the resulting input (after the dead zone is applied). Note that the edge of the dead zone is clearly visible: as you push the stick away from the center, the gradient value changes suddenly, not smoothly, at that edge.
The Right Way — Scaled Radial Dead Zone
Fortunately, the high-precision problem is also very easy to fix. We just need to rescale the clipped input vector into the non-dead zone space:
float deadzone = 0.25f;
Vector2 stickInput = new Vector2(Input.GetAxis(“Horizontal”), Input.GetAxis(“Vertical”));
if(stickInput.magnitude < deadzone)
stickInput = Vector2.zero;
else
stickInput = stickInput.normalized * ((stickInput.magnitude – deadzone) / (1 – deadzone));
Here’s what the adjusted dead zone looks like:
Notice that there’s no longer a visible edge: as you push the stick away from the center, the gradient value changes smoothly while the dead zone is still preserved. This feels buttery-smooth, just as God intended.
Dead Zones For Fun and Profit
I called it the “right” way but that doesn’t mean you’ll never use any other method, ever. The most important thing is to use the method that makes sense for your particular project. Here are a few scenarios:
Tile-based (4-way) movement: The Axial Dead Zone actually works well here since it snaps analog input to the only four input vectors that are actually relevant.
Twin-stick shooter: In these games the magnitude of input rarely matters — all you care about is direction — so the simple Radial Dead Zone should be perfectly suitable here.
Super-polished FPS: Sometimes you need to sweep your aim through a line, and keep the crosshair on or close to the line. In this case you might want to blend a Scaled Radial with a modified Axial Dead Zone, such that the stronger your input in one axis, the larger the dead zone gets for the other axis. (At LightBox we called this the “bowtie” because the dead zone diagram looks like… a bowtie. I’ll leave the implementation of this one as an exercise for the reader!)
Now go forth and implement your dead zones properly! It’s easy, and your players will appreciate it.
P.S. For what it’s worth, I’ve noticed that the OUYA controller seems to require a larger dead zone than the Xbox 360 controller. I had to go up as high as 0.25 to get a new, unworn OUYA controller to sit reliably at neutral, while a new, unworn Xbox 360 controller was fine around 0.1.(source:gamasutra)


 闽公网安备35020302001549号