解析游戏AI寻径方法的设计原理
(本文首发于《游戏开发者》杂志的2011职业指导期,独立游戏开发者、教育者及FlashPunk API开发者Chevy Ray Johnston在文中详述AI了寻径的基础知识。)
我现在住在公寓的第10层,我想到街边的咖啡厅喝咖啡,那么我要怎么去呢?我开始寻径了。
日常寻径活动
我的一般路线是:走出公寓,拐弯,走进电梯,出前厅,然后直走到咖啡厅。我没有沿着这幢建筑走,因为那样太费时间了;我也不能从窗户直接跳下去,虽然那样更快,但我怕伤了我的脊椎。所以我只能老实地按路线走,但是,电梯坏了。
我的理想路线被突然截断了!但我已经考虑到这种可能性了(或者说至少有些明智的施工人员想到了),我继续向走廊尽头的楼梯口走去。因为我住在第10层,走路当然比搭电梯慢了,但最终我还是走到底层,最后从公寓的后门出来了。我又想到:我得折回去咖啡厅,所以我绕着公寓走到正对面的街道。瞧!我又回到理想路线上了,最终成功抵达目的地。
这就是寻径,从我们蹒跚学步起,我们每天都在从A走到B。如何在游戏中实现寻径是游戏设计师每天都在思考的问题,并且,寻径是游戏兴起的数十年来,已经反复出现又反复解决的问题。
例如,你正在制作一个地下城爬行者或者一款MMORPG。玩家点击屏幕上的某个点,表示希望玩家角色走到那一点。除非你的游戏真的太空了,不然玩家角色在抵达目的地前必然要经历一个绕道、拐弯、往上往下,左移右动的过程。或者,你做的游戏是RTS,你选定若干辆坦克,命令其在某地点集合。虽然这支坦克大军的动作相同,但你不能让坦克们撞上对方(彼此重叠)。
在游戏中,你要处理的是抽象的游戏对象,它们不能自觉地处理彼此和周边障碍物之间的关系。事实上,它们根本就不知道其他对象的存在。利用有效的信息向游戏对象传达路径意图和决定行径方式是程序师的工作。
你的游戏越复杂,寻径的条件就越多,解决方式也越复杂。如果我在这里直接了当地告诉读者,现在的程序师会用什么高级方法解决这些问题,估计会秒杀一帮初学者(因为技术要求太高了)。如果能够把一个大的过程分割成数个明确的步骤,那么条理清晰的指令对游戏开发者而言,就是一项可观的技术。先从简单的问题入手,再逐渐拓展复杂性,这样我们就在从A到B的寻径问题上迈出一小步了。
分解问题
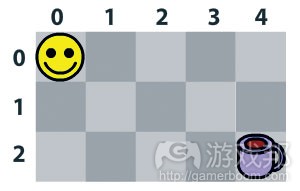
看以下的图1,构成一个最基本的寻径问题的元素是:一个玩家、咖啡和一块游戏场地。我的目标是得到咖啡(游戏邦注:即抵达咖啡标所在方格),但前提是我得穿过游戏场地。我已经把这块游戏场地平均分割成数个小方格。我这么做是为了尽量简化问题,也就是说,我们的游戏玩家(我自己)只能在格与格之间移动(上下左右)。
我们的寻径方式受到现有信息的约束,所以呢?我们的起点是(0,0),目标点是(4,2)。现在,我们要做的就是比较玩家所在位置和目标位置,然后依此作决定。如果你是写代码的话,那么代码应该如下:
Move Horizontally
if COFFEE IS TO MY RIGHT
MOVE RIGHT
else if COFFEE IS TO MY LEFT
MOVE LEFT
Move Vertically
if COFFEE IS BELOW ME
MOVE DOWN
else if COFFEE IS ABOVE ME
MOVE UP
(代码大意:水平移:如果咖啡在我的右边,那么就右移,或者如果咖啡在我的左边,那么就左移;垂直移:如果咖啡在我的下方,那么就下移,或者如果咖啡在我的上方,那么就上移。——@~@大家应该都明白吧?)
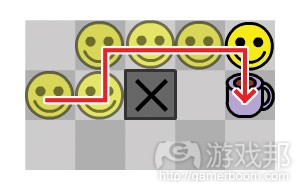
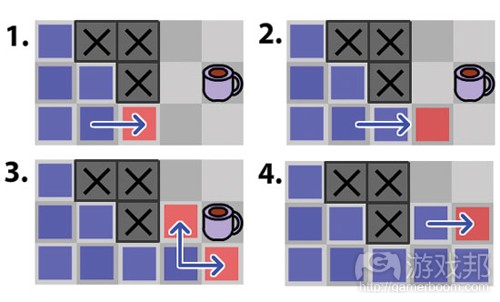
所以,我们就有了两段代码。第一段是让我水平移,第二段是我垂直移。如果我们执行代码,那么就可以得到如图2所示的路径。
就算你看不懂上面的代码,看图3也会明白是怎么回事了。这种逻辑很简单,我拿到咖啡的路线是最短的,6格。
游戏设计师有必要用钻研的眼光看待自己需要解决的寻径问题,然后尽量用最简单的方式解决。因为没有什么障碍物妨碍我奔向咖啡,所以这个问题太简单了。如果我们在路线上摆上障碍物,解决方案会发生什么变化呢?
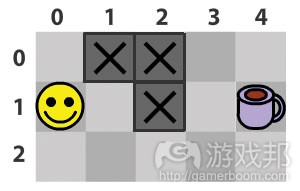
如图3、你可以看到,上述代码只能运行到第一步,然后就停止了。根据我们的逻辑,“我得右移,但没法移;咖啡此时还在右边,所以不能垂直移动。”这意味着我撞墙了就是撞墙了,只能死嗑。唉,可怜的家伙。
因为我们把一个复杂的元素引入路径中,所以我们现在需要引入相应的解决方案。我们得告诉这个撞墙的“我”前方有墙,另辟他径。把前面提到的代码改写:
Move Horizontally
if COFFEE IS TO MY RIGHT
if WALL IS TO MY RIGHT
MOVE UP
else
MOVE RIGHT
else if COFFEE IS TO MY LEFT
MOVE LEFT
我们只是把另一个条件添加到代码的第一段中,这样就解决了“撞墙”的问题。现在,我们得到的新路径如图4所示。
虽然这个解决方案能处理特定情况,但我们还是有办法“故伎重施”:如果我们在这堵墙的上方再放两堵墙,那么我们的玩家就会沿着墙往上走,直到绕过墙。因为考虑到往下走显然会更快抵达目标,所以上述并非最佳路线。
最初的代码就像一棵开枝散叶的树,树枝总是红色的行动,蓝色的部分是我们用逻辑条件把树枝分裂成更多枝条,以应对不同的情况(更复杂的情况)。复杂性越高,条件和我们的逻辑树的枝条就越多,我们的玩家移动情况就越好。
但是,有时候可能的条件太多了,游戏开发者根本不可能全部预测并解决掉。就算他们可以,运算结果也太过庞大复杂,最终会降低游戏运行速度。许多聪明的程序师想出了特别的“搜索”算法来解决这个问题,而不是一步一步地摸索到目标地。我没有时间把这些算法全盘托出,但我可以重点分析其中之一。一旦你理清了这种算法的运作,其他寻径算法自然也容易理解了。
广度优先搜索
广度优先搜索(BFS)算法的概念很直观,因此,游戏开发新手有时候自己就会用上,虽然可能没有意识到自己的算法就是BFS。以下是BFS的伪代码(游戏邦注:“node”表示方格):
CREATE AN EMPTY QUEUE
ADD START NODE TO QUEUE AND MARK IT
while QUEUE IS NOT EMPTY
PULL NODE FROM QUEUE
if NODE IS THE GOAL
EMPTY THE QUEUE, WE ARE DONE!
else for each NEIGHBOR OF NODE
if NEIGHBOR IS EMPTY AND NOT MARKED
ADD NEIGHBOR TO QUEUE AND MARK IT
如果你没看懂上面的代码,那就看以下要旨:我们有一个仅包含已标记的起始节点(相当于上文的方格)的“队列”。然后,我们运行循环的一段代码,即每次从队列中取出一个节点直到队例为空。在这段循环代码中,我们选定被取出的节点,然后检查各个节点的“邻居”。对于各个这些节点,只要它还没标记,我们就把它标记后添加到队列中。这个循环一直持续到所有“邻居”都搜索完毕,即我们找到目标节点。
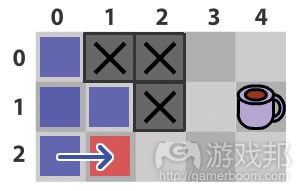
我们来一步一步地分析。我们的寻径问题太过复杂,之前的代码没办法用BFS解决,如图5所示。当我们运行代码时,首先从玩家所在的节点开始。这个节点于是被标记,然后检查该点的“邻居”。在我们的案例中,已标记节点为蓝色,队列中的节点为红色(如图6)。
因为现在有三个节点在队列中,如图7所示,所以循环将继续进行。每一个红色方格都会受到排查,然后把自己的“邻居”拉进队列中。
那么现在怎么回事了?在图8中,底部的节点把它唯一的邻近节点添加到队列中,因为上方的两个红色节点没有任何空“邻居”可添加。根据我们排查“邻居”的规定,位置为(1,1)的节点应该作为移动的第一步,但没关系,我们在位置(1,2)又得到一个队列中的节点。
图7表示的是按BFS算法的路径。如你所见,只要从开始到结束存在路径,BFS算法就能够抵达目标节点。如果存在目标,这种算法也能在更复杂的范围内搜索。(不过计算成本太高啦)
但还没完呢。尽管我们知道存在一个明确的目标路径,但我们不和道那条路径到底是什么。这是因为BFS算法其实并没有创造出路径,只是为我们搜索路径。幸运的是,利用搜索到的信息,我们其实可以自己创造出路径。我们的方法就是从目标点折回。
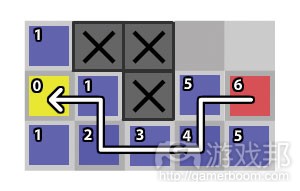
利用BFS寻径的技巧是,给各个节点赋值(如图9所示)。这些值就是方格的代价,也就是各个节点与起点的距离。所以,最小的值总是0,也就是起始节点,因为显然没有其他节点比起点离本身更近的啦。
利用以上信息,我们要做的只是从目标节点”倒数“,直到我们抵达目标。如图10所示,我从终点节点开始。我只是检查各个相邻节点,然后移动到代价最低的邻近节点,直到回到起点节点。现在我们有了一条路径!事实是,这条路径是反向的,我们最后一步只是颠倒这条路径,所以我们的玩家就能沿着这条路径达到目标。
不同的场地图形
知道怎么计算最短的路径当然不错,但你可能会问:”如果我的游戏场地不是方格呢?“如果是这样,那么你就要像一个真正的AI程序师那样思考了,因为这是你在游戏开发过程中将遇到的新寻径问题。如果场地不是用案例中的方格,而是用图11中的两种图案,还能运用BFS算法解决第一个问题吗?
当然可以。你大概已经注意到了,搜索代码并没有区分方格的“邻居”的数量或者“邻居”的位置,只是你必须能够搜索它们并且给它们赋值。在图12的第一种图案中,有些圆的“邻居”其实比其他圆更多,且与“邻居”的距离也不相同,所以你当你赋值时就得计算更精确的距离。第二种图案是六边形,所以各个图形都有最多6个“邻居”,但与它们的距离是固定的,这点与方格图形相似。
你所使用的图形取决于你想开发的游戏类型和路径类型,所以自然而然的,当考虑寻径时,有必要把这些记在心上。我正在制作一款基于六边形面板的策略游戏,或者说是一款更开放的寻径游戏?对于后者,你可能会想到制作分离的节点图形(如图12的左半边图案),即把每个节点都被置于重要的或战略的移动位置。
进一步思考寻径
虽然BFS算法不错,但往往与最高明或最节省的寻径问题解决方案相去甚远。但BFS算法众所皆知,无论你开发游戏使用的是何种编码语言或平台,用谷歌一搜,你能学习的BFS算法教程或资源代码就全出来了。
既然你已经知道BFS是怎么一回事了,为什么不再深入一些?针对不同的寻径条件,游戏开发者们已经找到了许多不同的解决方案和玩法类型。当研究时,就把有效的方法一步一步地分解开来,再运用到自己的开发中(图形、移动代价等等)。我没法全面分析所有方法,便我将简要地解释比较普遍的方法之一。
A*算法
我之所以介绍BFS算法,是因为它正是非常流行的A*算法的始祖。A*算法的目标与BFS相同,但因为它减少了搜索的节点总数,所以运行速度更快。
记得我们刚刚逐句执行广度优选搜索算法,我们给各个节点赋值,所以当寻径结束时,我们可以算出最短的路径。A*算法其实是BFS的改良版。但怎么改良的?在BFS中,节点的代码计算如下:
COST = DISTANCE_FROM_START
但A算法计算各个方格代价的方法如下:
COST = DISTANCE_FROM_START + DISTANCE_TO_FINISH
“到终点的距离”不是到结束点的真正距离,只是一个估算。这种估算没有把墙或者其他东西计算在内,所以准确地来说,这是一种“试探法”。之所以这么叫是因为A*算法执行不同的试探法是不同的,改变试探法就会产生不同的路径。
某种图形更适合某种试探法。在下面的案例中,我将利用平方距离来计算代价,即把水平距离添加到垂直距离中,因为我们用的是方形图案,所以我们的玩家只能水平和垂直移动。
再搞清楚A*算法怎么改良BFS算法前,最好先看看此二者在相同的图形中的应用状况。在图13中,我把小图换成大图,并且利用BFS找出抵达终点的路径。你可以看到,各个节点到为止用于计算的代价。但请注意,搜索向上拓展到图片的左上方,这是路线并没有经过的区域。如果这个图片更大一些,搜索会一直延伸到10,因为这种搜索法一直在拓展它的广度,直到抵达标记代价为10的目标。
那么A*算法是怎么利用特定的代价值呢?A*算法没有用上BFS算法所用的那种“队列”,而换成了“优先队列”。这意味着算法的每一次循环,不是取出下一个节点,而是明确地取出队列中代价值最低的那个节点!
图12反映了执行A*算法的路径。你马上就会发现,这种搜索法完全忽略了左上方的节点!这是因为当算法向右移动时,所有的节点代价都是9,所以它们首先从优先队列中取出来。而在考虑这些节点以前,算法已经找到结束的路径了!
无论这个场地有多大,A*算法仍然只搜索节点的相同数值。因为这样可以缩小搜索范围。所以A*算法比BFS算法更快。因为这种算法的广泛运用,你可以从网上找到许多样本、教程和资源代码,什么编程语言都有。
总结
大部分游戏场都设置了更多障碍物、移动物品和规则条件,如果把这些纳入考虑范围的话,以上解决方案显然不能胜用。有时候,你可能想要一个使用最短路径的寻径设置。例如,你希望坦克沿着道路移动,而不是直接从壕沟上开过去,就算那条路线最短也不行。
幸运的是,A*算法可以根据游戏玩法条件来调整,所以我鼓励大家多找点教程和资源代码作研究。或者自己亲自从头编写这种代码。
如果你掌握了这些,那么你可以探究新的方法并努力想出自己的解决方案。有时候在游戏开发过程中,一个简单古怪的寻径方法比最精准的那个更有效得多。如果你打算研究更多寻径算法和解决办法,我推荐用以下术语查找:Wall tracing、Best-first search、Dijkstra’s algorithm、 Navigation meshes、 Flocking algorithms和Potential function-based movement。(本文为游戏邦/gamerboom.com编译,拒绝任何不保留版权的转载,如需转载请联系:游戏邦)
Getting There From Here: An Introduction To AI Pathfinding
- Chevy Ray Johnston
[In this article, first published in Game Developer magazine's 2011 Career Guide issue, indie game developer, educator, and FlashPunk API creator Chevy Ray Johnston details the basics of AI pathfinding.]
I’m currently located in my 10th floor apartment and I want to get to the coffee shop down the street, so how do I get there? It’s time to do some pathfinding.
Everyday Pathfinding
Well, here is my usual route: exit my apartment, turn the corner down the hall, enter the elevator, exit the lobby, and then walk down the street until I reach the shop. I don’t walk around the building, because that would take longer; and I don’t jump out the window because, although that would be quicker, it would likely be detrimental to the condition of my spine. So I start along my path, but alas, the elevator is broken.
Suddenly, my optimal path to caffeinated goodness has been intercepted! But I’ve considered this possibility (or at least some wise builders have), and I continue on to the stairwell at the end of the hall. Since I’m on the 10th floor, this is slower than the elevator, but eventually I make it to the bottom and exit out the back of the building. From here, I recalculate: I need to get back on track to the coffee shop, so I walk around the building to the front-facing street, and voilà, I have reunited with my optimal path and can reach my destination.
Welcome to pathfinding, something humans do every day when we get up on our feet and walk from A to B. The question of how to do this in games is something that game developers are faced with all the time, and have been solving and re-solving for decades.
For example, let’s say you’re making a dungeon crawler or an MMORPG, and the player clicks on a location on the screen, indicating they want their avatar to walk there. Unless your game world is painfully empty, then there are going to be obstacles that they will have to navigate around, under, or deal with in order to reach that location. Or perhaps you’re making an RTS game, and you select a group of tanks you’ve just built and order them to rendezvous somewhere. They’re going to not only have to do the same thing, but also avoid running into (and overlapping with) each other as they do so.
When dealing with games, you’re dealing with abstract game objects, which don’t intuitively know how to navigate around each other and terrain obstacles. In fact, they don’t even inherently know that any of these other objects exist. It’s your duty as a programmer to use the information available in your game world to communicate to your objects what paths you want them to take and how to determine those paths.
The more complex your worlds are, and the more conditions your pathfinding requires, the more complex this solution becomes. But to jump right into some of the more advanced methods employed by programmers today would be overkill. Being able to break down a larger procedure into a set of specific, logical instructions is an invaluable skill for a game developer. By starting with a simple problem, solving it, and then introducing complexities one by one, we can approach the problem of how to get from A to B one baby step at a time.
Break Down The Problem
If we take a look at Figure 1, we have everything we need to solve this problem at its most basic level: a player, coffee, and a playing field. I want to get to the coffee, but to do so, I have to navigate across the playing field, which I have broken down into a set of grid cells. I have done this to simplify the problem as much as possible, so we’ll say that our game player (myself), can only move between adjacent cells (right, left, down, or up).
Figure 1
Our pathfinding is limited to the information we have, so what is that? We have our start position (0,0) and our goal position (4,2). Now all we have to do when we move our player is compare his position with the one he wants to move to, and determine his movement based on that. If you were to code that, it might look something like this:
Move Horizontally
if COFFEE IS TO MY RIGHT
MOVE RIGHT
else if COFFEE IS TO MY LEFT
MOVE LEFT
Move Vertically
if COFFEE IS BELOW ME
MOVE DOWN
else if COFFEE IS ABOVE ME
MOVE UP
So here we have two chunks of code. The first moves him horizontally, and the second moves him vertically. If we keep alternating between the two as they’re running, starting with the first, the results will be as in Figure 2.
Figure 2
Coffee achieved! Even if you don’t understand that code, the concept should be quite clear. If the coffee is right, move right, otherwise move left; the same goes for up and down. Even using very simple logic like that, Mr. Happy here finds his coffee using what appears to be the shortest path available, in six steps.
It’s really helpful for game developers to think critically about the pathfinding problem they need to solve, and to solve that problem in the most fitting way possible. Since there was nothing blocking Happy’s way to the coffee, this particular solution was easy. So what happens to this solution if we suddenly toss an obstacle in the way?
In Figure 3, you can see that the method works for one step, but then it halts. Our logic says, “He needs to move right, but he can’t,” and “He’s in the right y-position, so don’t move vertically.” This means he doesn’t move anywhere once he hits that wall. He is forever caffeine-deprived, poor fellow.
Figure 3: We’ve all had moments like this.
Since we’ve introduced a complexity that breaks our pathfinding, we now need to introduce a solution to handle that complexity. We need to tell our character to do something different in the case where he encounters a wall. So what I’ve done now is adjust the pseudo-code from before to take the wall into account:
Move Horizontally
if COFFEE IS TO MY RIGHT
if WALL IS TO MY RIGHT
MOVE UP
else
MOVE RIGHT
else if COFFEE IS TO MY LEFT
MOVE LEFT
What we’ve done here is add another condition to the horizontal portion of our code, which will handle the case in which we hit a wall. If we then apply this, our happy protagonist will make it to the coffee as seen in Figure 4.
Figure 4: Wall: 0 Coffee: 1
While this worked for that particular case, it’s easy to see how we could once again break this method: if we add a whole bunch of walls on top of this one, our player will just move up along them until he can get past. Considering that it would be much faster to go under them, instead of all the way around, this solution isn’t really our best.
You’ll notice that the pseudo-code is a branching tree, and the branches of this tree are always the actions in red. The blue parts are where we use logical conditions to split the tree into more branches to handle different cases (more complexities). The more complexities we have, the more conditions and branches our logic tree will have, and the better our player’s movement will be.
But sometimes there are so many possible conditions that it is nearly impossible for a game developer to foresee and handle them all. Or they can, but the result will be such a large and complex tree that it uses up too much computation and slows down the game. What many clever programmers have done to handle this is come up with special algorithms that are designed to “search” an area, rather than evaluate behavior on a step by step basis, until they find the target location. I don’t have enough time and space to explain all these algorithms, but I will cover one in particular, because once you understand how it operates, it is much easier to make sense of the context in which pathfinding code often occurs.
The Breadth-First Search
The breadth-first search (BFS) algorithm is very intuitive in concept, and because of this, novice game developers sometimes stumble upon it themselves without even realizing what it is. Here is what BFS looks like in pseudo-code, where a “node” represents a grid cell.
CREATE AN EMPTY QUEUE
ADD START NODE TO QUEUE AND MARK IT
while QUEUE IS NOT EMPTY
PULL NODE FROM QUEUE
if NODE IS THE GOAL
EMPTY THE QUEUE, WE ARE DONE!
else for each NEIGHBOR OF NODE
if NEIGHBOR IS EMPTY AND NOT MARKED
ADD NEIGHBOR TO QUEUE AND MARK IT
If you’re having trouble following that, here’s the gist of what is happening: We have a “queue” of nodes that starts with just our marked starting node in it. Then, we run a piece of code that loops, pulling a node from the queue every time until it is empty. In this loop’s code, we take the node that was pulled and look at each of its “neighbors,” or adjacent nodes. For each of those nodes, as long as it hasn’t already been marked, we mark it and add it to the queue. This loop will continue as long as there are neighboring nodes to be explored, and will stop when we have found the goal node.
Let’s walk through that step by step and see what happens. We’ll start with a pathfinding problem too complex for our earlier code and solve it using BFS, as seen in Figure 5. When we run the code, it will start with the first node, which is where our player is located. That node will be marked, and then its neighboring nodes will be examined. In our example, marked nodes show up as blue, and nodes in the queue will show up red (see Figure 6).
Figure 5: A more complex scenario.
Figure 6: BFS “expands” out from the starting point.
Since we have three nodes in the queue now, as you can see in Figure 6, the loop will keep running. On the next pass, it will then do the exact same thing for each of those red nodes, marking them and then adding their neighbors to the queue.
See what is happening here? In Figure 7, the bottom node added its only available neighbor because the upper two nodes in the queue did not have any empty neighbors to add. Depending on the order in which we check neighbors, the node at (1,1) may have moved first, but this doesn’t matter, we still end up with one node in the queue at (1,2).
Figure 7: BFS only searches available tiles.
Figure 8 shows what happens if we keep stepping through this algorithm until the goal is reached. As you can see, as long as a path exists from start to finish, the BFS algorithm will be able to get to the goal eventually. This search would find this goal in even the largest of mazes, if it existed (although it would be expensive to calculate).
Figure 8: The search keeps expanding until it finds the target position.
But we’re not finished yet. Although we know a clear path to the goal exists, we don’t know exactly what it is. That’s because the BFS algorithm doesn’t actually create a path, it just does the search for us. Fortunately, using the information that the search has provided us with, we can actually create the path ourselves, and we do that by working our way back to the goal.
The trick to using BFS for pathfinding is, as you’re performing the search, to do what I’ve done as seen in Figure 9-assign values to each of the nodes. This value is the node’s cost, or in other words, each node’s distance (or “movements”) from the start node. So the lowest value is always going to be 0, the start node, because obviously no node is closer to the start than itself.
Figure 9: Values representing distance from the yellow tile.
Using that knowledge, all we have to do is simply “count down” from the goal node until we reach the goal. As you can see in Figure 10, I start with the finish node. From there, I just examine each adjacent node and move to the neighbor with the lowest cost until the starting node is reached. And now we have a path! The fact that the path is backward is trivial, our last step is simply to reverse the path so our player is able to walk along it to reach the goal.
Figure 10: We “track back” to the starting tile.
Different Kinds of Graphs
Knowing how to calculate the shortest path like that is cool, but you may be asking, “What if my game is not on a grid?” If so, then you’re starting to think like a real AI programmer now, because this is the next stage of problems you start to face when designing the pathfinding in your games.
To address the first question, what would happen if, instead of using a grid like I did in the example above, you were to apply the BFS algorithm to either of the graphics in Figure 11 instead? Would it work?
Figure 11: The BFS approach works with many different kinds of graphs.
The answer is yes, it certainly would. You might have already noticed that the actual code for the search does not distinguish how many neighbors a node has or where they have to be, only that you need to be able to search them and assign them a movement cost. In the first graph in Figure 11, some nodes actually have more neighbors than others, and the distance between them varies, so you’d want to calculate a more precise distance when applying cost. The second graph is made up of hexagons, so each node can have a maximum of 6 neighbors, but the distance between them is constant, similar to the square graph.
The kind of game you are developing and the kinds of paths you want to create will determine which kind of a graph you use, naturally, so it’s important to keep this in mind when thinking about pathfinding. Am I creating a strategy game on a hexagon board, or a more open-world game with large navigable areas? For the latter, maybe you’d want to create a separate node-graph (like the one on the left in Figure 11), with each of the nodes placed at an important or strategic movement location.
Taking Pathfinding To The Next Step
While the BFS algorithm works fine, it is often far from the most elegant or least expensive solution to most pathfinding problems. But it is a well-known algorithm, and no matter what coding language or platform you are developing your game in, a quick Google search will likely result in tutorials or source code that apply it for you to learn from.
Now that you know how BFS works, why not explore more? There are many different approaches to pathfinding that game developers have explored for many different situations and styles of gameplay. When studying, do as you’ve done here and break down how the method works step by step, and apply it to the game you are creating (graph, movement cost, and so forth). I am unable to cover all of these various methods here, but I will briefly explain one of the more popular ones.
The A* Algorithm
My ulterior motive in introducing the BFS algorithm was that it is the ancestor of the extremely popular A* algorithm. The goal of A* is the same as BFS, but it’s designed to be faster by reducing the total amount of nodes that are searched.
Remember as we are stepping through the breadth-first search, we assign a cost to each node, so we can use that to determine the shortest path when it is complete. A* is actually an evolved version of BFS that uses that cost while it is doing its search! But how? In BFS, a node’s cost is calculated as such:
COST = DISTANCE_FROM_START
But A* calculates its each node’s cost like this:
COST = DISTANCE_FROM_START + DISTANCE_TO_FINISH
The “distance to finish” is not the actual distance to the finish, but an estimate. This estimate does not take walls or anything into account, so you’ll often see it referred to more accurately as a “heuristic.” It’s called that because different implementations of the A* algorithm use different heuristics, because changing it will actually result in different kinds of paths.
Certain heuristics are better optimized for certain kinds of graphs or situations. In the following examples, I will be calculating the cost using square distance, meaning the horizontal distance is added to the vertical distance, because we are using a square graph and restricting our player to just horizontal and vertical movement.
To understand how A* improves on the BFS approach, it’s best to see them both applied to the same graph. In Figure 12, I’ve taken a larger graph and used BFS to search out a path to the finish. You can see the cost of each node used to calculate the path. But notice that the search extended up into the top-left area of the graph, where the path doesn’t even go. If this graph was even bigger, the search would’ve gone way up there until it reached 10, because this search kept on expanding its breadth until it reached the goal at 10 moves.
Figure 12: BFS is good, but searches a lot of space to get to the goal.
So how does A* use this special cost value? Instead of using a queue, like our BFS algorithm does, it uses a priority queue. This means every time the algorithm loops, instead of just pulling out the next node, it pulls out specifically the queue with the lowest cost value!
Figure 13 shows A* applied to the same graph. You’ll immediately notice that this search totally ignores the cells on the top-left! This is because as the search started moving right, you’ll notice the cells all had a cost of 9, so they were being pulled from the priority queue first. And before those cells could even be considered, the search had found its way to the finish!
Figure 13: A* uses a priority queue to reduce the search area.
No matter how huge this graph extended in all directions, A* would still only search the same amount of nodes. Because it’s designed to reduce the search area, this often makes A* much less expensive than BFS computationally. Because of this algorithm’s popularity, there are examples, tutorials, and source code available for it across the internet in just about every programming language.
Where to Go From Here
It’s important to realize that the above solutions are rarely adequate for most gaming situations, which often have more obstacles, moving objects, and more rules and conditions to take into consideration. Sometimes, you may not even want a unit to pathfind using the shortest path (for example, you want a tank to move along a road, not cut through a ditch, even if it’s a shorter path).
Luckily, algorithms like A* can be tailored and poked around to adapt to gameplay situations, so I encourage looking up tutorials and source code for these algorithms in your language of choice and playing around with them. Or, even better, build them yourself from the ground up.
Once you’ve mastered these, explore new methods and try coming up with your own. Sometimes in game development, a simple, quirky pathfinding method is much more charming and effective than the most accurate one. If you’re looking for more pathfinding algorithms and approaches to read up on, I recommend searching for the following terms: Wall tracing, Best-first search, Dijkstra’s algorithm, Navigation meshes, Flocking algorithms, and Potential function-based movement. (source:gamecareerguide)
上一篇:游戏可玩性设计的13项基本原理
下一篇:分享以深度技能重塑游戏机制的经验




.jpg)



 闽公网安备35020302001549号