分享创造程序生成赛道的方法
作者:Gustavo Maciel
当今程序生成游戏的数量十分庞大。《Minecraft》和《Canabalt》等游戏的重玩性对许多玩家极具吸引力,对于那些未有足够时间或技术创造这种关卡的开发者亦是如此。
现在你可以在许多网站上找到关于创造程序生成地形和事件的技术贴,但如果你想创造一些新的程序生成内容,那就要敢于动手尝试创造这一内容。在此我将分享自己创造程序生成赛道的过程。
思考
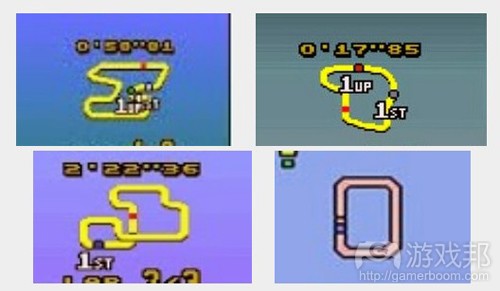
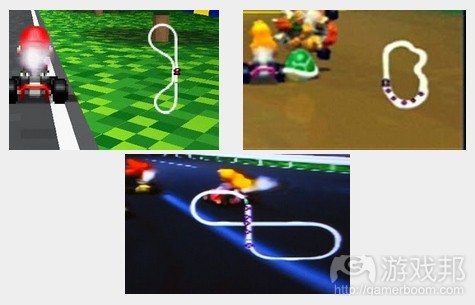
在我们形成任何想法之前,我们必须知道自己想创造什么内容。我们可以先参考以下图片:
*《TopGear》:
*《MarioKart》:
*现实生活
我们可以从这些照片中看到赛道(我们想创造的类型):
1.是完美的环形。也就是说,它的起点和终点位于同一点,这样玩家才能完成一圈;
2.可能非常直(但要形成一个循环的多边形,它至少要有3个弯曲之处);
3.但也可能非常弯曲;
4.可能是凹凸不平的;
5.在横向时可能有交叉点,这样就可以避免赛道自我重叠的情况;
6.一个拐弯可能是非常空旷的(也就是说,它们的角度接近于180),或者非常封闭的(角度接近于0);
7.但也不能太封闭,否则赛道就会自我重叠了。
这7个简单的原则为我们定义了赛道的特点。
执行
现在,我们可以从一个简单的语句入手:赛道是一个多边形。我知道多边形不会自我交叉,但我们会实现这一点的。首先我们得从某处开始,而我们从第一年上学开始就已经知道要从简单的点入手了。
最近,我听到许多人说Perlin/Simplex噪音就是程序生成游戏的答案,另外我发贴说自己正在开发这些赛道时,有名网友就问我这些赛道是不是用Perlin噪音法制作的。当然,以内插值替换的噪音在许多区域都很管用,但有时候试图将其嵌入任何地方却很费时费劲。例如,从一个由Simplex噪音生成的地图中提取出的多边形可以产生很棒的结果,但这并不是一个非常简便的方法,对许多人来说也不是一个非常简便的可视化形式。如果你想创造自己的程序生成内容,你就得先从最简单的方法入手形象化内容生成,这在开发过程中对你更有好处。此时要选择以你自己的语言`rand()`函数来生成一个1D噪音。
我们将使用一个简便的方法来创造一个多边形,这就是Convex Hull(凸壳)。简单地说,这就是一个包含了所有决定点的最小多边形。
我们将确定赛道应有的中等大小。我确定的是250 * 250,这将得到约为600m(以矩形周长来衡量)的赛道。你可以确定自己想要的规格,甚至使用英里而百米的其他单位。
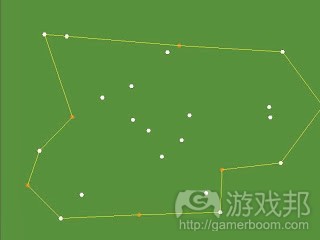
在这个确定好的矩形中,生成一个随机分布点的集合。
int pointCount = Random(10, 20); //we’ll have a total of 10 to 20 points
Vector2[] points = new Vector2[pointCount * 2];
for(int i = 0; i < pointCount; ++i)
{
float x = Random(0.0f, 250.0f) – 125f; // we subtract 125 to keep the square centralized
float y = Random(0.0f, 250.0f) – 125f;
points[i] = new Vector2(x, y);
}
这是创造随机点的极佳方法,但这些点分布得太随机了,它们并不遵从任何分布规则,而是四处散落其中。但对我们来说,这些点并无大碍。如果你想要更为简洁的赛道,可以考虑进行调整。
在生成一个点的集合后,我们就可以生成凸壳了。在此我并不打算讨论关于如何计算凸壳的详细情况,因为网络上已经有太多关于这一话题的文章。我所执行的方法(可能也是你想使用的方法)仅选择其中一点构成多边形,它们是以逆时针方向来分类的。
Vector2[] dataSet = ConvexHull.computePolygon(points);
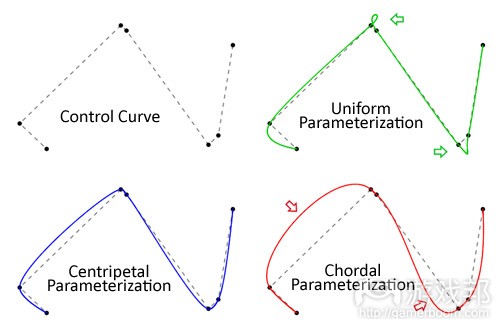
很简单。此时我们已经有了一个凸多边形,其中的小问题在于:在某些情况下,一些顶点可能会变得非常“尖锐”,当我们将曲线运用于赛道时,就会在内插值中产生一点尖头,如下图所示:
注意图中的绿色曲线在密集点所创造的一些“小环形”。我们将通过创造一个驱动dataSet,并将过密集的点分开的函数来避免这一情况。
void pushApart(Vector2[] dataSet)
{
float dst = 15; //I found that 15 is a good value, though maybe, depending on your scale you’ll need other value.
float dst2 = dst*dst;
for(int i = 0; i < dataSet.length; ++i)
{
for(int j = i+1; j < dataSet.length; ++j)
{
if(dataSet[i].dst2(dataSet[j]) < dst2)
{
float hx = dataSet[j].x – dataSet[i].x;
float hy = dataSet[j].y – dataSet[i].y;
float hl = (float)Math.sqrt(hx*hx + hy*hy);
hx /= hl;
hy /= hl;
float dif = dst – hl;
hx *= dif;
hy *= dif;
dataSet[j].x += hx;
dataSet[j].y += hy;
dataSet[i].x -= hx;
dataSet[i].y -= hy;
}
}
}
}
现在我们就可以不时调用这个函数,以便稳定各个点。对我来说,调用3次就够了。
int pushIterations = 3;
for(int i = 0; i < pushIterations; ++i)
{
pushApart(dataSet);
}
如果你想要一个简单而凸出的赛道,你就可以直接跳到本文末尾,查看插值法和Mesh部分的内容,因为我们已经有了赛道的制作基础。
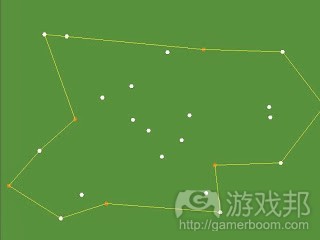
由于我们的定义并不局限于凸面地图,所以还要在我们已经拥有的点中再添加更多点,这将为增加赛道上的轨道受到一点干扰,令其成为非凸面的形状。我们将在每2个点间创造一个新点,并为每一者选择一个长度和方向,在其中运用这些长度和方向的位移。请看以下代码:
Vector2[] rSet = new Vector2[dataSet.length * 2];
Vector2 disp = new Vector2();
float difficulty = 1f; //the closer the value is to 0, the harder the track should be. Grows exponentially.
float maxDisp = 20f; // Again, this may change to fit your units.
for(int i = 0; i < dataSet.length; ++i)
{
float dispLen = (float)Math.pow(Random(0.0f, 1.0f), difficulty) * maxDisp;
disp.set(0, 1);
disp.rotate(MathUtils.random(0.0f, 1.0f) * 360);
disp.scale(dispLen);
rSet[i*2] = dataSet[i];
rSet[i*2 + 1] = new Vector2(dataSet[i]);
rSet[i*2 + 1].add(dataSet[(i+1)%dataSet.length]).divide(2).add(disp);
//Explaining: a mid point can be found with (dataSet[i]+dataSet[i+1])/2.
//Then we just add the displacement.
}
dataSet = rSet;
//push apart again, so we can stabilize the points distances.
for(int i = 0; i < pushIterations; ++i)
{
pushApart(dataSet);
}
要注意其中的困难参数,它让适量的长度接近于1或者maxDisp,这有助于改变赛道的难度,增加更多拐弯。
我们的地图几乎完工了,我们刚刚执行的这个方法添加了一些很棒的拐弯,也让它在某些时候进行了自我交叉。它只有一个问题(我们之前已经提到),有些拐弯处彼此过于接近了。当你试图创造一个带有厚度的网格时,赛道可能会自我重叠。通过让两个相邻点的最大角度不要超过100,我们可以解决这个问题。
这就是我们固定角度的函数。
void fixAngles(Vector2[] dataSet)
{
for(int i = 0; i < dataSet.length; ++i)
{
int previous = (i-1 < 0) ? dataSet.length-1 : i-1;
int next = (i+1) % dataSet.length;
float px = dataSet[i].x – dataSet[previous].x;
float py = dataSet[i].y – dataSet[previous].y;
float pl = (float)Math.sqrt(px*px + py*py);
px /= pl;
py /= pl;float nx = dataSet[i].x – dataSet[next].x;
float ny = dataSet[i].y – dataSet[next].y;
nx = -nx;
ny = -ny;
float nl = (float)Math.sqrt(nx*nx + ny*ny);
nx /= nl;
ny /= nl;
//I got a vector going to the next and to the previous points, normalised.float a = (float)MathUtils.atan2(px * ny – py * nx, px * nx + py * ny); // perp dot product between the previous and next point. Google it you should learn about it!
if(Math.abs(a * MathUtils.radDeg) <= 100) continue;
float nA = 100 * Math.signum(a) * MathUtils.degRad;
float diff = nA – a;
float cos = (float)Math.cos(diff);
float sin = (float)Math.sin(diff);
float newX = nx * cos – ny * sin;
float newY = nx * sin + ny * cos;
newX *= nl;
newY *= nl;
dataSet[next].x = dataSet[i].x + newX;
dataSet[next].y = dataSet[i].y + newY;
//I got the difference between the current angle and 100degrees, and built a new vector that puts the next point at 100 degrees.
}
}
我们需要不时调用这个函数,还需要整修距离,因为这个函数会再次令这些点靠拢。
for(int i = 0; i < 10; ++i)
{
fixAngles(dataSet);
pullApart(dataSet);
}
10次迭代应该就够了,这下我们就有了一个非常完善的赛道了!
内插值和网格
也许有人会问“好,但这些线段和点要怎么处理呢?它们看起来并不像个赛道,但我并不认为这种赛道玩得了游戏……”
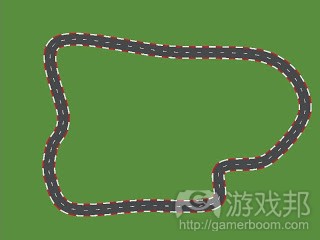
尽情发挥你的创意吧!有了dataSet,你就能够创造更多有趣的事物。以下就是我运用一个CatmullRom曲线时产生的一个效果:
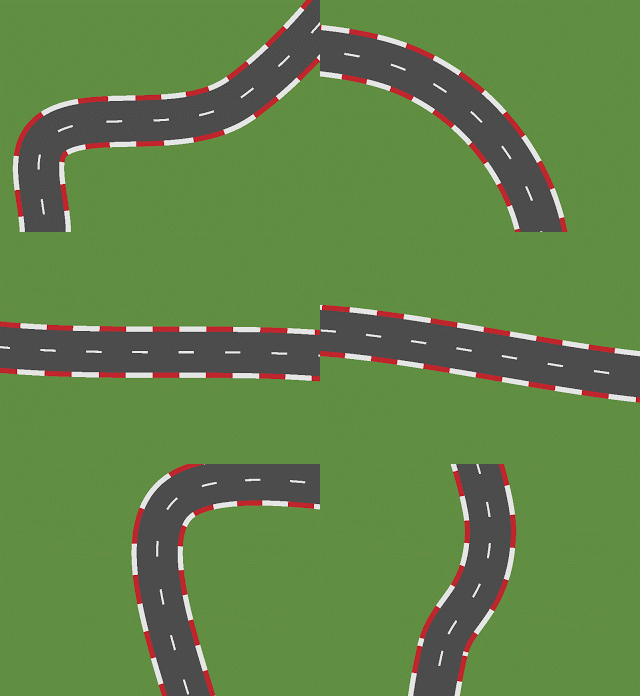
你也不需要受限于点和线段,你还可以创造像下图这种网格:
提示:赛道的每个点可能都会计算曲线的一个点,并由此进行添加或扣除。还是让代码来解释一切吧:
for(float i = 0; i <= 1.0f;)
{
Vector2 p = CatmullRom.calculatePoint(dataSet, i);
Vector2 deriv = CatmullRom.calculateDerivative(dataSet, i);
float len = deriv.Length();
i += step / len;
deriv.divide(len);
deriv.scale(thickness);
deriv.set(-deriv.y, deriv.x);
Vector2 v1 = new Vector2();
v1.set(p).add(deriv);
vertices.add(v1);
Vector2 v2 = new Vector2();
v2.set(p).sub(deriv);
vertices.add(v2);if(i > 1.0f) i = 1.0f;
}
以此计算指标、颜色等应该不算难事,这是一个良好的开端。
这就是我的方法了,好好利用这一算法,根据你的需求进行调整,创造一款出色的赛车游戏吧!(本文为游戏邦/gamerboom.com编译,拒绝任何不保留版权的转载,如需转载请联系:游戏邦)
Generating Procedural Racetracks
by Gustavo Maciel
The original post can be found here: bordeen.blogspot.com/2013/12/how-to-generate-procedural-racetracks.html
The amount of procedural games nowadays is very big. From Minecraft to Canabalt, the replayability that this form of random game gives is very appealing to a lot of players; And to developers too, that sometimes doesn’t have enough time or skill to create levels good enough to keep players entertained for long time spans.
Subjects like procedural terrain and procedural events are well covered in a lot of sites in the web, some other subjects are covered in PCG wiki and some other forums. Even though, if you want to create some new type of procedural content, you have to venture and empirically test methods to create this content. We’ll treat here my adventure on creating procedural racetracks.
Thinking of it
Before we start to shape any idea, we have to know well what is the content that we want to create. We can look some photos to help on this:
TopGear:
MarioKart:
Real life:
We can see on these photos that a racetrack (not all of them, but the kind we want to create):
Is a perfect loop. That is, the start and the end are the SAME point, this way the player can lap;
It can be very straight (though it should have at least 3 curves, to form a looping polygon);
But it can be very curvy too;
It can either be concave or convex;
It can have intersections, preferably, in a transverse way, so it will avoid the track going over itself;
One curve can be very open(that is, their angle is closer to 180), or very closed(angle closer to 0);
But not that closed, otherwise the track will get over itself.
7 simple traits that define for us what a racetrack is, and what characteristics define them.
For you that want a walk-through on how to create any procedural content, I didn’t had an epiphany and came with all of these traits just by looking images. I only noticed 3 or 4 traits, the others were being noticed while I was testing. If while testing the generated content doesn’t resembles what it actually is in real life, then try to come with a rule that make it fit in.
Implementation
Ok, mathematically, we can start with a simple statement: a racetrack is a polygon.
Yes, I know, polygons don’t intersect themselves, but we’ll get there. First we need to start from somewhere, and starting from an easy point that we all know since the first years at school helps a lot.
Recently, I hear a lot of people saying that Perlin/Simplex noise is an answer to any PCG, by the way, when I posted a #ScreenshotSaturday that I was working on these tracks, one guy asked me if they were generated with Perlin noise. Of course interpolated noise is useful in a lot of areas, but sometimes trying to fit them in every place can be very hard to you and your time. For example, taking a polygon from a map generated with Simplex noise can give us a very cool result, but this isn’t a very simple method, and it isn’t very easy to visualize for a lot of people. If you want to create your own kind of procedural content, you have to try to start with the easiest method to visualize the generation, which will be better for you during the development. This time, generating a 1D noise with your own language `rand()` function was chosen.
We’ll use a method that will give us a polygon with no martyr. I show you the Convex Hull. In short words, a convex hull is the smallest polygon that can be obtained that contains a entire determined set of points. This seems very interesting for us!
We’ll start defining the medium size that our track should have. I defined 250×250, which would give us (aproximately) one track of 600m (roughly measured by the rectangle perimeter) You can define what you want too, even use other units, like miles instead of meters.
From this defined retangle, generate a collection of random points inside it.
int pointCount = Random(10, 20); //we’ll have a total of 10 to 20 points
Vector2[] points = new Vector2[pointCount * 2];
for(int i = 0; i < pointCount; ++i)
{
float x = Random(0.0f, 250.0f) – 125f; // we subtract 125 to keep the square centralized
float y = Random(0.0f, 250.0f) – 125f;
points[i] = new Vector2(x, y);
}
Well, this method works well to create random points, but these points are too random, they don’t follow any rule of distribution and scattering as the described by Mick West in this GamaSutra post , but for our purposes, our points are fine. If you want more concise tracks, consider fixing this.
After generating a collections of points, we can generate the convex hull. I won’t talk about details on how to calculate a convex hull, since there are tons of articles treating this on the web.
The implemention that I used (and probably the one you’ll want to use) returns a new collection of points with only the ones that are part of the polygon, and they’re already sorted in a counter clockwise manner.
Vector2[] dataSet = ConvexHull.computePolygon(points);
Very simple. At this point we already have a convex polygon very beautiful, the little problem that may trick us ahead: In some cases, some vertices can get very “cumpled”, and when we apply a spline to the track, this causes a little cusp in the interpolation, it looks like this:
Notice how the green curve create some “little loops” where the points are too close. We will try to avoid this creating a function that actuate on out dataSet and push the points that are too close apart.
void pushApart(Vector2[] dataSet)
{
float dst = 15; //I found that 15 is a good value, though maybe, depending on your scale you’ll need other value.
float dst2 = dst*dst;
for(int i = 0; i < dataSet.length; ++i)
{
for(int j = i+1; j < dataSet.length; ++j)
{
if(dataSet[i].dst2(dataSet[j]) < dst2)
{
float hx = dataSet[j].x – dataSet[i].x;
float hy = dataSet[j].y – dataSet[i].y;
float hl = (float)Math.sqrt(hx*hx + hy*hy);
hx /= hl;
hy /= hl;
float dif = dst – hl;
hx *= dif;
hy *= dif;
dataSet[j].x += hx;
dataSet[j].y += hy;
dataSet[i].x -= hx;
dataSet[i].y -= hy;
}
}
}
}
Now we’ll call this function some times so the points can stabilize. To me, calling it 3 times was enough.
int pushIterations = 3;
for(int i = 0; i < pushIterations; ++i)
{
pushApart(dataSet);
}
If you want a simple and convex racetrack, you can jump to the end of the article, to the Interpolation and Mesh part, because we already have the basis for the track done.
As our definitions go beyond a convex map, we’ll add some more points between the ones we already have, and these will be perturbed a little to increase the number of curves on the track and give it a non-convex form. We’ll do this creating a new point between each 2 points, and for each one, choosing a length and direction and applying a displacement of these length and direction on it.
Code speaks better:
Vector2[] rSet = new Vector2[dataSet.length * 2];
Vector2 disp = new Vector2();
float difficulty = 1f; //the closer the value is to 0, the harder the track should be. Grows exponentially.
float maxDisp = 20f; // Again, this may change to fit your units.
for(int i = 0; i < dataSet.length; ++i)
{
float dispLen = (float)Math.pow(Random(0.0f, 1.0f), difficulty) * maxDisp;
disp.set(0, 1);
disp.rotate(MathUtils.random(0.0f, 1.0f) * 360);
disp.scale(dispLen);
rSet[i*2] = dataSet[i];
rSet[i*2 + 1] = new Vector2(dataSet[i]);
rSet[i*2 + 1].add(dataSet[(i+1)%dataSet.length]).divide(2).add(disp);
//Explaining: a mid point can be found with (dataSet[i]+dataSet[i+1])/2.
//Then we just add the displacement.
}
dataSet = rSet;
//push apart again, so we can stabilize the points distances.
for(int i = 0; i < pushIterations; ++i)
{
pushApart(dataSet);
}
In brown, the added midpoints.
Pay attention to the difficulty parameter, it makes the length of the vector be closer to 1 or maxDisp, this can help changing the difficulty of a track, putting more curves.
difficulty = 1f/20f
difficulty = 20f
Our map is ALMOST done, this last method we did add some cool curves, and also make it intersect itself in some cases. It just gives us one problem (that we already took note before), some curves are too closed. The track may go over itself when you try to create a mesh with thickness for it. I solved this by making that the max angle of two adjacent points never get greater than 100 degrees.
Here is my function that fix the angles.
void fixAngles(Vector2[] dataSet)
{
for(int i = 0; i < dataSet.length; ++i)
{
int previous = (i-1 < 0) ? dataSet.length-1 : i-1;
int next = (i+1) % dataSet.length;
float px = dataSet[i].x – dataSet[previous].x;
float py = dataSet[i].y – dataSet[previous].y;
float pl = (float)Math.sqrt(px*px + py*py);
px /= pl;
py /= pl;
float nx = dataSet[i].x – dataSet[next].x;
float ny = dataSet[i].y – dataSet[next].y;
nx = -nx;
ny = -ny;
float nl = (float)Math.sqrt(nx*nx + ny*ny);
nx /= nl;
ny /= nl;
//I got a vector going to the next and to the previous points, normalised.
float a = (float)MathUtils.atan2(px * ny – py * nx, px * nx + py * ny); // perp dot product between the previous and next point. Google it you should learn about it!
if(Math.abs(a * MathUtils.radDeg) <= 100) continue;
float nA = 100 * Math.signum(a) * MathUtils.degRad;
float diff = nA – a;
float cos = (float)Math.cos(diff);
float sin = (float)Math.sin(diff);
float newX = nx * cos – ny * sin;
float newY = nx * sin + ny * cos;
newX *= nl;
newY *= nl;
dataSet[next].x = dataSet[i].x + newX;
dataSet[next].y = dataSet[i].y + newY;
//I got the difference between the current angle and 100degrees, and built a new vector that puts the next point at 100 degrees.
}
}
We need to call this function some times, and also need to adjust the distances, because this function can clump the points together again.
for(int i = 0; i < 10; ++i)
{
fixAngles(dataSet);
pullApart(dataSet);
}
10 iterations should be enough, and that is it! We have a track very well done!
Interpolation and Mesh
“Ok, but… what can we do with these lines and points? They really seem like a racetrack, but I don’t think that we can play in a track like this…”
Well, be creative! Having a dataSet is enough to create more interesting things.
Here is one example that we have when we apply a CatmullRom spline:
CatmullRom makes it very smooth!
And you don’t have to limit it to points and lines, you can create a mesh from this.
Finished track
With cars it can turn into a beautiful game
As a tip, every vertice of the track can be found calculating a point of the spline and adding/subtracting it’s derivative from it. Argh, code explains it MUCH better:
for(float i = 0; i <= 1.0f;)
{
Vector2 p = CatmullRom.calculatePoint(dataSet, i);
Vector2 deriv = CatmullRom.calculateDerivative(dataSet, i);
float len = deriv.Length();
i += step / len;
deriv.divide(len);
deriv.scale(thickness);
deriv.set(-deriv.y, deriv.x);
Vector2 v1 = new Vector2();
v1.set(p).add(deriv);
vertices.add(v1);
Vector2 v2 = new Vector2();
v2.set(p).sub(deriv);
vertices.add(v2);
if(i > 1.0f) i = 1.0f;
}
Calculate the indices, colors, etc shouldn’t be hard, this is a good start.
And this is it! Make very good use of the algorithm, modify it to your needs, create a new wonderful nextgen racing game and tell me!(source:gamasutra)







 闽公网安备35020302001549号