分享高级地形贴图的抛雪球算法
作者:Andrey Mishkinis
在本文中,我将解释如何贴图的抛雪球算法制作出更加自然的地形。这种算法在3D和2D游戏的着色器中都可使用。
上地形贴图的最常用方法之一是混合多个图层。各图层有一个确定地形纹理存在范围的不透明贴图。这种方法就是,把不透明贴图置于更高层级,露出不透明贴图是部分或完全透明的下级图层。不透明贴图是按百分比计算的。当然在地形的各个点上,所有图层的不透明度总和将达到百分百,因为地形不可能透明。不是拼贴材质,这个不透明贴图可能在所有地形上伸展,所以细节程度相当低。
现在,我们再来看看最有趣的部分——混合贴图的算法。为了简化,我们的地形只包含沙子和鹅卵石。
混合的最简单做法就是,把贴图颜色的不透明度相乘,然后把结果相加。
float3 blend(float4 texture1, float a1, float4 texture2, float a2)
{
return texture1.rgb * a1 + texture2.rgb * a2;
}
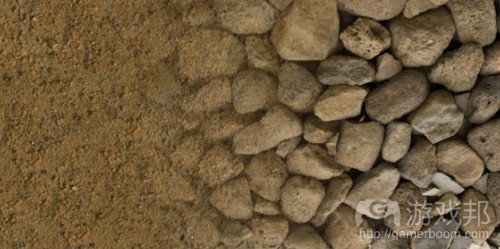
这种技术在Unity3D的标准地形编辑器中有使用。正如你所见,过渡很平滑,但不太自然。石头看起来就好像被沙子污染了,但在现实世界中这是不可能发生的情况。沙子不会粘着石头,相反地,沙子会落下来,填补到石头之间的缝隙里,而石头表面仍是干净的。
我们试一下在Excel中模拟这种行为。因为我们希望沙子落在石头之间的缝隙之间,所以每一张贴图都必须有深度贴图。在这个例子中,我们把深度贴图当作由灰度图产生的图像,且被保存在贴图的alpha通道中。在Unity3D中,你可以在贴图检视界面中通过设置“来自灰度图的Alpha”标签来完成。
首先,我们要考虑沙子和石头的深度贴图的简化模型。
蓝线表示沙子的深度图,红色表示鹅卵石。注意,石头顶部高于沙子层。考虑到这个事实,我们将尝试绘制出超出部分的贴图的像素点。
float3 blend(float4 texture1, float a1, float4 texture2, float a2)
{
return texture1.a > texture2.a ? texture1.rgb : texture2.rgb;
}
很好!石头的顶部是干净的,而沙子就落在石头之间的缝隙里。但我们还没考虑图层的不透明度。我们只要把深度贴图和不透明贴图相加就行了。
float3 blend(float4 texture1, float a1, float4 texture2, float a2)
{
return texture1.a + a1 > texture2.a + a2 ? texture1.rgb : texture2.rgb;
}
较低透明度的总合比通常更高。
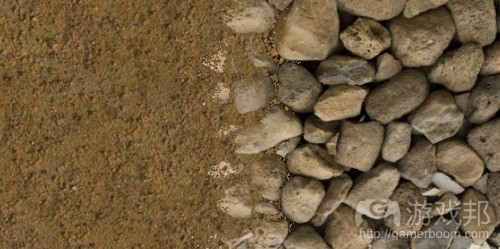
所以沙子到石头的过渡更加自然了。如你所见,沙子开始落在石头缝之间,渐渐隐藏起来。但因为计算是一像素一像素发生的,贴图边界的人工迹象就开始明显了。为了改进结果,我们将把若干而不是一个象素点混合起来。
float3 blend(float4 texture1, float a1, float4 texture2, float a2)
{
float depth = 0.2;
float ma = max(texture1.a + a1, texture2.a + a2) – depth;float b1 = max(texture1.a + a1 – ma, 0);
float b2 = max(texture2.a + a2 – ma, 0);return (texture1.rgb * b1 + texture2.rgb * b2) / (b1 + b2);
}
在下列代码中,我们首先得到在某种深度下可看到的地面部分。
然后我们把它标准化,以得到新的不透明度。
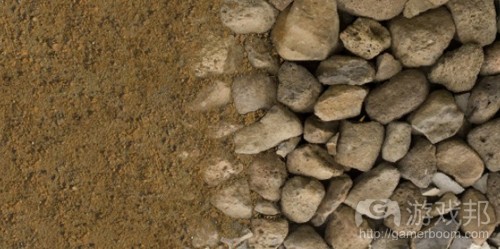
以上就是贴图混合算法的结果,相当接近自然地形。
总之,我的目的就是介绍这种算法及其用法。
这个着色器是为回合制策略独立游戏《Steam Squad》开发的。因为我们使用的引擎和开发平台是Unity3D。因为Unity IDE相当灵活,所以我们制作了自己的关卡设计器拓展。一般来说,这个关卡设计器就是是精简版Unity3D地形编辑器加上《Titan Quest》编辑器中的某些功能。
当你给某地形上贴图时,你就需要根据贴图来重新计算不透明贴图。因为所有不透明度总和达到100%,编辑就会自动标准化其他图层的不透明贴图。(本文为游戏邦/gamerboom.com编译,拒绝任何不保留版权的转载,如需转载请联系:游戏邦)
Advanced Terrain Texture Splatting
by Andrey Mishkinis
The following blog was, unless otherwise noted, independently written by a member of Gamasutra’s game development community. The thoughts and opinions expressed here are not necessarily those of Gamasutra or its parent company.
Want to write your own blog post on Gamasutra? It’s easy! Click here to get started. Your post could be featured on Gamasutra’s home page, right alongside our award-winning articles and news stories.
In this article I will explain texture splatting algorithm which allows to create more natural terrain. This algorithm may be used in shaders of 3D games as well as in 2D games.
One of the most common ways of terrain texturing is blending multiple tiled layers. Each layer has an opacity map which defines extent of texture presence on the terrain. The method works by applying an opacity map to the higher levels, revealing the layers underneath where the opacity map is partially or completely transparent. Opacity map is measured in percentage. Of course on each point of a terrain the sum of opacities of all layers makes hundred percent as the terrain can’t be transparent. Instead of tile textures, the opacity map stretches entirely on all terrain and therefore has quite low level of details.
Now we will pass to the most interesting part — algorithms of blending of textures. For simplicity and obviousness our terrain will consist of sand and large cobble-stones.
Simplest way of blending is to multiply texture color with opacity and then sum results.
float3 blend(float4 texture1, float a1, float4 texture2, float a2)
{
return texture1.rgb * a1 + texture2.rgb * a2;
}
Such technics is used in Unity3D in the standard terrain editor. As you can see, the transition is smooth but unnatural. Stones look evenly soiled by sand, but in real world it doesn’t happen. Sand doesn’t stick to stones, instead it falls down and fills cracks between them, leaving tops of stones pure.
Let’s try to simulate this behavior in Excel plots. As we want sand to be “fallen down” between cobble-stones, for each texture we need the depth map. In this example we consider depth map is generated from grayscaled image and stored in alpha channel of texture. In Unity3D it can be done in texture inspector by setting flag “Alpha From Grayscale”.
First of all we will consider the simplified model of depth map of sand and stones.
The blue line on the plot symbolizes the depth map of sand and red is cobble-stones. Notice that tops of stones lies higher than sand level. Considering this fact, we will try to draw pixels of that texture which is above.
float3 blend(float4 texture1, float a1, float4 texture2, float a2)
{
return texture1.a > texture2.a ? texture1.rgb : texture2.rgb;
}
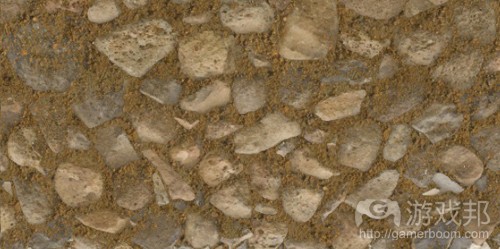
Excellent! Tops of cobble-stones remain pure whereas sand lies in cracks between them. But we didn’t consider opacity of layers yet. To use it we just sum depth map and opacity map.
float3 blend(float4 texture1, float a1, float4 texture2, float a2)
{
return texture1.a + a1 > texture2.a + a2 ? texture1.rgb : texture2.rgb;
}
At the expense of summation less transparent texture will be higher than usually.
So we got more natural transition from sand to stones. As you can see, grains of sand start filling cracks between cobble-stones, gradually hiding them by itself. But as calculations happens pixel-by-pixel, artifacts began to appear on border between textures. To smooth result we will take several pixels in depth instead of one and blend them.
float3 blend(float4 texture1, float a1, float4 texture2, float a2)
{
float depth = 0.2;
float ma = max(texture1.a + a1, texture2.a + a2) – depth;
float b1 = max(texture1.a + a1 – ma, 0);
float b2 = max(texture2.a + a2 – ma, 0);
return (texture1.rgb * b1 + texture2.rgb * b2) / (b1 + b2);
}
In the code above we at first get part of a ground seen at a certain depth.
And then we normalize it to get new opacities.
As a result we found the algorithm of textures blending, which allows us to reach close to a natural terrain images.
In summary I want to tell about for what this algorithm was developed and how we use it.
The shader was developed for turn-based strategic indie game Steam Squad. As engine and developing platform we use Unity3D. And as Unity IDE is extremely flexible, we made own level designer extension. In general the level designer is simplified Unity3D terrain editor with some features of Titan Quest Editor.
When you paint texture on a terrain there is a recalculation of the opacity map corresponding to this texture. And as the sum of all opacities has to make 100%, editor automatically normalizes opacity maps of other layers.(source:gamasutra)


 闽公网安备35020302001549号