


分享使用Unity 3D免费版本编写游戏的教程(三)
作者:John Boardman
这系列文章的第三部分会比较有趣,因为我们将越过PC/Mac而开始支持iOS和Android!Unity4通过将这些平台的授权版本改为免费版本而实现了这种可能性。我在这一过程中学到了许多重要内容,并希望能够在此与你们进行分享。
请先阅读有关这一Unity 3D教程的第一部分和第二部分内容。你将会注意到我在此舍弃了我们之前所使用的JavaScript。因为我发现这里的语法都十分相似,所以我们不再需要从一种语言转换到另一种语言。所以我会只是用C#去执行Unity。
在第三部分教程中,我们将讨论到以下内容:
改变第一部分和第二部分的会议版本游戏
支持加速器,触屏,键盘
使用动态字体去创造具有独立分辨率的UI,即能够作用于手持设备和传统计算机
在没有键盘(虚拟或其它)时收集输入内容将发挥功效
面向iOS和Android的Unity创建设置
执行设置
代码已经在GitHub上更新了,所以你可以免费下载它并基于任何方式进行改变。
游戏已经在以下平台上成功测试过了:
1.PC
2.Mac
3.iPad(第四代)
4.iPhone5
5.Kindle Fire(第一代)
6.三星Galaxy S2
7.三星Galaxy S3
8.三星Galaxy Nexus
9.HTC Desire
10.DroidX
改变会议版本游戏
游戏的会议版本是为了市场营销目的而创造的。因此,在用户玩游戏前,屏幕会为了获取某些信息而出现。游戏只会保存玩家第一次玩游戏的分数。但是这不通用且不能创造游戏乐趣。所以在这个版本中,我们舍弃了信息屏幕,并设定只要分数是在前10内便能够得以保存。同样的,比起所有市场营销信息,现在它只会询问首字母内容(为了让它显得更有趣我设置了一些标点字符和数字)。
支持加速器,触屏和键盘
在最初宣称手机授权的免费版本时,我希望看到游戏是否可以不做出任何改变而运行于手机上。所以我便创造了构建设置并面向Android进行编译,然后将文件复制到我的三星Galaxy S3上进行尝试。我轻敲了开始游戏按键,然后在数据输入域中输入了我的信息。到目前为止一切都很棒!
在屏幕出现“按压空格以开始”的内容前,所有一切都进展顺利。当然,手机上并没有空格键,也没有其它方法能够获得虚拟按键。那时候我以为“这非常简单”,并想着如何像按压按键那样创造一个轻拍行动。着眼于Input.touches文件以及TouchPhase.Stationary引导着我首次尝试使用碰触作为按压行动。我会使用Stationary是因为觉得“我只想要它能传达用户的手指还未移走。”
我同样也在寻找一些通用方法去明确代码是否能够运行于手机设备上。我想出的最有用的方法便是测试加速器以避免陷入检查操作系统附带条件的琐事中。尽管这可能不适用于所有手机设备,但却在我尝试的所有设备中都能够发挥功效,并能够替代像“supportsTouch”等内容。
bool touched = false;
bool space = false;
if (SystemInfo.supportsAccelerometer) {
foreach (Touch touch in Input.touches) {
if (Input.touchCount == 1 && touch.phase == TouchPhase. Stationary) {
touched = true;
break;
}
}
} else if (Input.GetKeyDown(KeyCode.Space)) {
space = true;
}if (touched || space) {
// fire weapon
}
这一方法在某种程度上是有用的。结果便是,Stationary代表着“面向每一帧都返回yes,与此同时用户的手指一直停留在屏幕上未移动”,这便意味着我是无意中执行了自动射击。最终我在用户获得1万个分数点时使用该方法进行升级。而为了限制“每次轻敲射击一次”,我使用了TouchPhase.began。
所以碰触是作用于射击。简单地测试Input.touchCount = 2让我能够支持打开防护物,即在“S”之前所做的那里。其它“碰触”添加是关于,如果3个手指按住主屏幕,“重设数据”按键便会出现。这替代了之前打入“key”进行呈现的方法。
现在我们便可以射击并拥有防护物了,但是我们仍然不能移动。所以是时候加入加速器了。我希望不管用户是使用倾斜还是方向键,我的转换位置都能在同个地方结束。我们可以通过首次检查去明确键盘是否正在使用(这将在之后的设置环节深入讨论)。如果未在使用,我们便可以询问Unity当前的X和Y的加速度是什么。这些值是根据屏幕基于水平和垂直轴的倾斜度而发生改变。倾斜度越明显,数值便会越高。
在经过一些实验后,我决定让默认值不提供足够的敏感度。我围绕着“容差系数”进行设置,直到10.0f变得合适。应该将这一数值呈现在Unity上并创造一个设置,从而让用户能够调整敏感度,但是在测试了10个不同设备后,所有的数值几乎都是相同的。此外,这一数值也会让我们觉得与使用键盘箭头相类似。
所以不管怎样,当X和Y的转换值都趋于标准化时,我会推动着玩家移向那个位置,锁定那个位置让用户不能离开屏幕。
// From scriptPlayer.cs lines 38-61
void Update () {
float transH = 0;
float transV = 0;Vector3 dir = Vector3.zero;
if (!useKeyboard) {
dir.x = Input.acceleration.x;
dir.y = Input.acceleration.y;transH = dir.x * (playerSpeedH + 10.0f) * Time.deltaTime;
transV = dir.y * (playerSpeedV + 10.0f) * Time.deltaTime;
} else {
// calculate x and y movement based on time
transH = Input.GetAxis(“Horizontal”) * playerSpeedH * Time.deltaTime;
transV = Input.GetAxis(“Vertical”) * playerSpeedV * Time.deltaTime;
}transform.Translate(transH, transV, 0);
float z = transform.position.z;// ensure movement does not go outside playfield
transform.position = new Vector3(Mathf.Clamp(transform.position.x, playerPosHMin, playerPosHMax), Mathf.Clamp (transform.position.y, playerPosVMin, playerPosVMax) , z);
当设置了这一代码后,玩家便能够移动,射击并使用盾牌了。这些所有的设置都是为了让这款简单的游戏具有游戏性。
Unity是用于开发游戏的强大跨平台工具。多亏了出色的文件设置以及一些谷歌搜索,我们只需要几个小时的时间便能够做出这些改变。当你被困住时,需要记住别人也会被困住,那么你便可以通过搜索去获得答案,因为虚幻的社区正在使用并分享有关Unity的信息。在固定了游戏玩法后,我将关注点转向了UI,因为这里存在着一些问题。
使用动态字体去创造具有独立分辨率的UI,即能够作用于手持设备和传统计算机
使用基本的Unity去设计UI具有一定的挑战性。Asset Store中有一些库存能够提供帮助,但是因为我们所面对的是一款简单的游戏,所以我只想使用基本的Unity,从而避免对于任何费钱的库存的依赖。当我为会议创造UI时,我只需要为一个屏幕分辨率费心。而现在我却面对着一个未知范围的分辨率。
在测试游戏时,我注意到手机设备上的字体非常小,因为在一个小小的显示器上它们具有非常高的屏幕分辨率。所以我按照往常那样基于这些情境进行设置,并开始在谷歌上搜索以明确之前是否有人做过类似的尝试。
在这种情况下,我发现面向Unity 3的分辨率并不能支持手机上的动态字体。我记得曾在Unity 4上看过有关手机的动态字体,但是我却找不到任何有关它的例子。最后,我决定尝试看看这一脚本,即使用Screen.dpi去决定特定屏幕的字体大小。我敢保证,如果Unity可以返回一个数值(除了0)进行呈现(而不是报告它们的DPI),这一方法便会很有效。我需要一些能够作用于任何平台和屏幕的内容,如此便不需要进行删减了。
相反地,我选择基于屏幕分辨率去设置字体大小,因为Screen.width总是会返回游戏当前运行的窗口的宽度,或者屏幕宽度(游戏邦注:如果它是全屏的话)。我只选择根据屏幕宽度去设置字体大小是因为我总是会在场景中运行游戏。以下两张截图便呈现出了我正在解决的问题。
第一张截图是关于没有动态字体的游戏。压缩这张图片并置于手机设备中,你便能够感受到默认字体有多小。并且按键也很小,从而导致我们很难选中正确的对象。
1.jpg)
screenshot(from gamasutra)
第二张截图则是关于带有动态字体的屏幕。我可以适当修改框架的垂直规模,但关键在于不管你使用的是何种屏幕分辨率,现在所呈现在的内容都会是一样大。
2.jpg)
screenshot(from gamasutra)
对于字体大小的计算是基于屏幕宽度乘以其它容差系数(这将再次呈现在Unity上并为用户控制创造一种设置)。我尝试着在笔记本电脑/台式机和手机上使用相同的代码,但是因为两者间的DPI存在具有的差异,我只能使用不同的元素。如果最终字体大小小于5,我便会想办法将其设置为5.
这些容差系数具有很大的威力,因为只要做出细微的改变就能明显地缩放UI了。你必须记住,因为DPI的差异性,你只有将其用于设备上才能看到明显的不同。
这是在我的scriptFont.cs类上的第一个方法:
public static int GetSizeFromResolution() {
int size = (int)(Screen.width * .016);
if (SystemInfo.supportsAccelerometer) {
size = (int)(Screen.width * .024);
}if (size < 5) size = 5;
return size;
}
现在我们知道该使用怎样的字体了,但是我们该如何告诉Unity这一情况呢?根据我的经验,答案便是“看情况而定”,我将告诉你答案。Unity现在支持使用XML这类型的标签去指明有关字体的属性。
让我们着眼于scriptFont中的另一种方法,即MakeString()去明确它是如何发挥作用。这是创造标记字符串去呈现我想要看到的字体的捷径。为了节省屏幕空间,我压缩了该方法,但我也会建议你们在所有条件语句中使用括号而避免遇到一些无意识的副作用,如callMethod2()经常会被乱调用。但是因为格式化原因,我们总是很难察觉到问题,并且基于代码的执行进行追踪总是很让人沮丧。
BAD CODE:
if (blah == true)
callMethod1();
callMethod2();
do something else…
所以不要这么做好吗。不管怎样,以下方法能够帮助我们轻松地创造一个有关特定大小,特定颜色,粗体或斜体的标记字符串。我还有其它无需考虑各种参数的快捷方法。
public static string MakeString(string text, int size, string color, bool bold, bool italic) {
string newText = “”;if (color != null) newText += “”;
if (bold) newText += “”;
if (italic) newText += “”;newText += text;
if (italic) newText += “”;
if (bold) newText += “”;
if (color != null) newText += “”;
newText += “”;
return newText;
}
很棒!现在我们便可以创造有趣的字符串了,但是这时候有两个陷阱在等着我们!首先,在GUIStyle中有一个名为richText的实例变量。如果我们并未将其设置为true,XML便不能运行!其次,GUIStyle只能用于OnGUI内部。如果你尝试着在该方法外部使用它,Unity便会产生抱怨。
对于每种UI控制都存在一种类型。大多数情况下,我们只想要基于字体信息去增加类型。然而对于Label,我们希望创造一个全新的类型并使用它。我尝试了各种方法去使用现有的类型,但是它却都不能接受我的改变。也许这在Unity中是个漏洞,或者是我自己这环出错了。所以让我们将这些内容与其中的一个UI屏幕整合在一起,从中判断它是如何发挥功效。最简单的便是面对实际的游戏屏幕,即左上方呈现出分数和其它信息。以下便是来自scriptSceneManager.cs.:
void OnGUI() {
GUIStyle style = new GUIStyle();
style.richText = true;
style.normal.textColor = Color.white;
int size = scriptFont.GetSizeFromResolution();
int y = size;
GUI.Label(new Rect(size, y, size * 10, size), scriptFont.MakeString (“Time : ” + gameTime), style);
y += size + 1;
GUI.Label(new Rect(size, y, size * 10, size), scriptFont.MakeString (“Score : ” + score), style);
y += size + 1;
GUI.Label(new Rect(size, y, size * 10, size), scriptFont.MakeString (“Lives : ” + lives), style);
if (!shieldOff) {
y += size + 1;
GUI.Label(new Rect(size, y, size * 10, size),
scriptFont.MakeString(“Shield : ” + shieldStrength), style);
}if (score >= bonusScore) {
y += size + 1;
GUI.Label(new Rect(size, y, size * 10, size),
scriptFont.MakeString(“AUTOFIRE”, “red”, true, true), style);
}
因为背景是黑色的,所以我将文本颜色设置为白色。需要注意的是,所有UI元素的位置和大小都是由合适的字体大小和一些空间补偿所决定。拥有字体大小能够将屏幕变成一个行与列的虚拟集去替代像素。所有的字符串都是利用MakeString方法为控制创造XML类的文本,从而避免呈现出杂乱的标签。我们可以为Label创造一个新类型,但是对于Button和Box我们却必须采取不同的方法并转变内嵌类型。为什么?我也希望能够合理地回答这一问题,但是我必须通过编写代码和测试才能明确答案。这一代码是来自scriptScreenMainMenu.cs.:
void OnGUI () {
int size = scriptFont.GetSizeFromResolution();
GUIStyle boxStyle = GUI.skin.box;
boxStyle.richText = true;
boxStyle.normal.textColor = Color.white;GUIStyle buttonStyle = GUI.skin.button;
buttonStyle.richText = true;
buttonStyle.normal.textColor = Color.white;
buttonStyle.fontSize = size;
GUI.skin包含内嵌类型,对此我们可以自由地检索与改变。而Box则是关于打开richText并设置textColor。Buttons比较难处理。尽管我尝试了各种方法,但是除非我能在Button类型中设置fontSize,否则它便不能运行。它似乎也总是会忽视richeText设置。
在没有键盘(虚拟或其它)时收集输入内容将发挥功效
有时候,设备或操作系统所执行的任务并没有任何意义。我便遇到过两种类似的情况,并且我也发现其他开发者也曾遇到过同样的情况。能够给你带来更多利益的一个平台是iOS,另一个便是Android设备,这也是我为何不会偏袒任何一种环境的主要原因—-我希望它们都能够有效地运行!
HTC(Desire)—-Desire拒绝将虚拟键盘递交给Unity。我所尝试的任何方法都不能呈现它。我想其它地方也会有人抱怨关于其它HTC设备的同样问题。
iOS—-与Android设备一起,你可以使用蓝牙键盘,选择键盘设置,并使用键盘而不是触屏和加速器。另一方面,iOS也拒绝向Unity传达键盘事件,所以这便没用了。我不知道这是iOS的错还是Unity的错,但不管原因是怎样的最终结果都是不可改变的—-iOS用户不能使用这一有效的功能。
在这种情况下有什么补救办法吗?iOS用户是完全使用触屏,而HTC所面临的问题则更加眼中,因为在这里甚至连虚拟键盘都不可用。对于我的高分屏幕,我希望让用户能够输入他们的首字母(游戏邦注:这是不同于要求更多信息的会议版本)。因为没有键盘,我认为按键便是更好的选择。因为这是一款怀旧游戏,所以我们必须设置怀旧风格的分数屏幕。其它依赖于键盘的游戏也许就需要探索其它的方法去应对这种局限性。
甚至基于按键选择,我也必须进行多次设计迭代,从而才能创造出可在触屏上轻松使用的UI。举个例子来说吧,不要将当前的首字母置于按键下方,否则用户便看不到它们,因为会被手指挡住!同时,如果创造出足够大的按键,用户便能够非常确定该按压哪个按键。最后,我清楚地隔开了SAVE按键,从而避免玩家会不小心按到。
.jpg)
button(from gamasutra)
执行设置
当我意识到Android设备能够使用配对蓝牙键盘时,我便陷入窘境中。我不能在Unity中找到任何可检测“现实”键盘存在的内容,所以我不能自动操作它。很多游戏带有Setting区域去配置环境元素,如音效,音乐和敏感度等,所以我认为这是支持键盘的一种有效选择。
关于高分,我选择将这一设置储存在PlayerPrefs中。我选择“keyshot.input”去储存设置,并带有有关数值的简单“keyboard”或“touchscreen”字符串。如果你并未设置数值,那么它便会默认为“keyboard”(如果未检测到加速器的话),或者“touchscreen”。在主菜单添加了一个Settings按键后,你便能够轻松地添加另一个屏幕以及更多按键去支持这一功能。虽然这并不是最美的UI,但是我们总算完成了设置任务。
2.jpg)
button(from gamasutra)
面向iOS和Android的Unity创建设置
我包含了有关iOS和Android的创建设置截图,因为在面向这些平台创造时需要基础一些内容。需要注意的是“使用32-bit显示缓冲器”和“使用24-bit色彩深度”是未经核对的。当我选中这些内容时,我遇到了屏幕重绘问题,并且看起来很糟糕。我设置了默认方向为朝向左边,并如下在每个脚本上进行设置:
void Start() {
Screen.orientation = ScreenOrientation.LandscapeLeft;
}
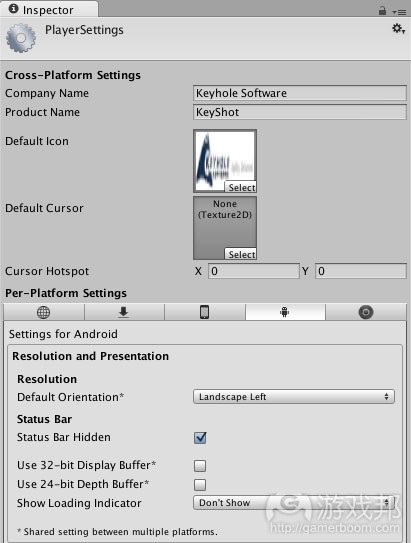
inspector(from gamasutra)
接下来我选择了Android API的最低级别,如此即使是在我儿子的DroidX上也能够运行了。我也基于同样原因选择了OpenGL ES 1.x。我认为这很有趣,因为我不能禁止互联网连接,尽管我知道自己并不需要这么做。
你需要安装一个ADT(Android开发工具包)。然后你只需要在Unity询问时告诉它ADT在哪里便可。尽管Build Settings为Android提供了“创建并运行”的选择,但是它却不能找到我的设备。相反地,我将自己的Android设备作为大容量储存器,将APK复制到下载文件夹中,然后使用内嵌文件应用(三星)或已安装的ES File Explorer去找到应用并安装它。你将能够从未知的资源中安装应用并允许它安装游戏。
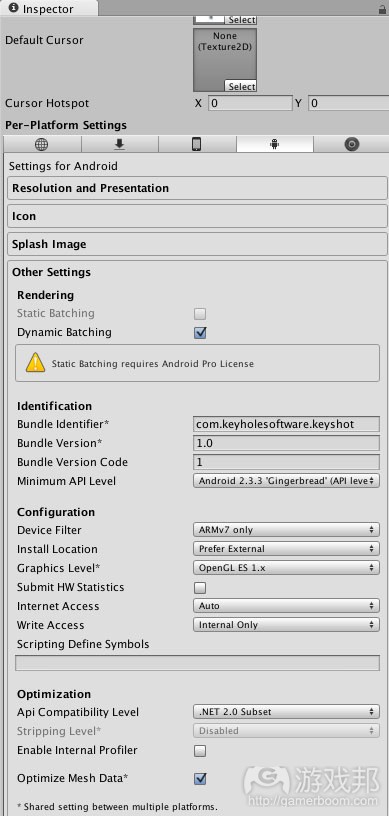
inspector(from gamasutra)
对于iOS,我将iPhone和iPad作为目标设备和原生分辨率,因为这些应用都支持它们。需要注意的是,面向iOS进行编译你需要使用Mac,安装最新版本的XCode,并注册你的应用和设备。
当经历了严格的考验后,你可以从Unity中选择“创建并运行”,Unity将独自处理XCode并将你的应用安装到设备上。这真的超级方便,能够帮助你节省时间。

inspector(from gamasutra)
结论
Unity为我们面向不同平台创造游戏提供了一个很棒的环境。基于所有社区支持以及Unity优秀的文件,我们能够轻松地创造出人们所喜欢的游戏。
在过去,我需要花费数个月的时间从头开始编写游戏引擎,并伴随着许多有关游戏引擎编写的书籍,并且只有新技术才能指出它们是过时的。Unity担心是否能够跟上技术的更新,而我则担心是否能创造出最优秀的游戏。不过我真的很高兴能够与儿子一起创造一款多人游戏。我也有自信在Unity的支持下,我们能够成功地创造出深受玩家喜欢且类型多变的有趣体验。
(本文为游戏邦/gamerboom.com编译,拒绝任何不保留版权的转载,如需转载请联系:游戏邦)
Writing Games With Unity 3D, Part 3 – Mobile!
by John Boardman
Part 3 of this blog series is going to be a fun one because we’re going beyond PC/Mac and beginning to support iOS and Android! Unity 4 made this possible by altering the basic version of the license for these platforms to be free (THANK YOU!). I learned a lot through this process and wanted to share it with all of you.
We will be building on Part 1 and Part 2 in this Unity 3D tutorial – so if you haven’t read them yet, head on over there first. One thing you will notice here is that I’ve dropped the JavaScript that we covered before. I found that for what I am doing, the syntax is so similar that it is trivial to convert from one language to another. So, I’m just including my language of choice for Unity which is C#.
In Part 3, we’ll cover the following items:
Changes to the game from the conference version detailed in Parts 1 & 2
Supporting accelerometers, touch screens, and keyboards
Using dynamic fonts to make resolution-independent UIs that work on handhelds and traditional computers
Gathering input when no keyboard (virtual or otherwise) will work
Unity build settings for iOS and Android
Implementing settings
The code has been updated on GitHub, so you are free to download it and alter it in any way you want to make your own game!
The game has been tested successfully on:
1.PC
2.Mac
3.iPad (4th Gen)
4.iPhone 5
5.Kindle Fire (1st Gen)
6.Samsung Galaxy S2
7.Samsung Galaxy S3
8.Samsung Galaxy Nexus
9.HTC Desire
10.DroidX
Changes to the game from the conference version
The conference version of the game was primarily created for marketing purposes. Therefore, before the user played the game, a screen would appear asking for information. The game would also only save the player’s score the first time they played it. Neither of those work very well for general use and game playing fun! So, in this version, the information screen is gone and as long as the score is in the top 10 it will be saved. Also, instead of all the marketing information it now just asks for initials (loosely defined, as I threw in some punctuation characters and numbers just to make it interesting).
Supporting accelerometers, touch screens, and keyboards
When the free versions of the mobile licenses were first announced, I wanted to see how close my game could come to running on mobile with no changes at all. So, I brought up the build settings and compiled for Android, then copied the file to my Samsung Galaxy S3 (SGS3) to try it out. I tapped the Start Game button, then on the entry fields and entered my information. So far so good!
Everything was fine until the screen that stated “Press Space to Start.” But of course, there was no space bar and no way to get to the virtual keyboard. “This should be easy” I thought… and went to figure out how to make a tap act like a key press. Looking at the docs for Input.touches along with TouchPhase.Stationary led me to my first attempt at using touch as a keypress. I used Stationary because I thought “yah I only want it to tell me if the user’s finger hasn’t moved.”
I also hunted around for a generic way to know if the code was running on a mobile device. The most useful thing I could come up with was to test for an accelerometer to avoid getting into checking operating system strings and getting too specific. While this may not account for 100% of the mobile devices out there, it has worked for everything I have tried, and in lieu of something like “supportsTouch” it is close enough for me.
bool touched = false;
bool space = false;
if (SystemInfo.supportsAccelerometer) {
foreach (Touch touch in Input.touches) {
if (Input.touchCount == 1 && touch.phase == TouchPhase. Stationary) {
touched = true;
break;
}
}
} else if (Input.GetKeyDown(KeyCode.Space)) {
space = true;
}
if (touched || space) {
// fire weapon
}
This worked…sort of! It turns out that Stationary means “keep returning yes for every frame while the user’s finger is on the screen and hasn’t moved” which meant I had accidentally implemented autofire without meaning to. I ended up using that as a power up after the user scores 10,000 points. To limit the firing to “once per tap,” use TouchPhase.Began instead.
Okay, so touch is working for fire. Simply testing for Input.touchCount = 2 gave me a way to support turning on the shield where ‘S’ did before. The other “touch” addition was that if 3 fingers are held down on the main screen, the “Reset Data” button will appear. This is instead of typing “key” to show it like it did before (that still works in the keyboard version).
Now then, we can fire and have a shield, but we still can’t move. That’s where the accelerometer comes in. I wanted my transformation position to end up the same whether the user was using tilt or the arrow keys. This was accomplished by first checking to see if the keyboard is in use (discussed later in Settings). If it is not, then ask Unity what the current X and Y acceleration is. These values change based on how tilted the screen is from level on the horizontal and vertical axes. The farther the tilt, the higher the value.
After some experimentation, I determined that the default values didn’t provide enough sensitivity. I played around with the “fudge factor” until 10.0f felt about right (I’ve bolded this value in the code below). This value probably should be exposed to Unity and also made a Setting so the user can adjust the sensitivity, but after testing with 10 different devices all of them felt about the same with that value. Further, this value made it feel similar to using the keyboard arrows.
So anyway, once the X and Y transform values were normalized, I told the transform for the player to move to that position, then clamped the position to the playfield so the user couldn’t move off of the screen.
// From scriptPlayer.cs lines 38-61
void Update () {
float transH = 0;
float transV = 0;
Vector3 dir = Vector3.zero;
if (!useKeyboard) {
dir.x = Input.acceleration.x;
dir.y = Input.acceleration.y;
transH = dir.x * (playerSpeedH + 10.0f) * Time.deltaTime;
transV = dir.y * (playerSpeedV + 10.0f) * Time.deltaTime;
} else {
// calculate x and y movement based on time
transH = Input.GetAxis(“Horizontal”) * playerSpeedH * Time.deltaTime;
transV = Input.GetAxis(“Vertical”) * playerSpeedV * Time.deltaTime;
}
transform.Translate(transH, transV, 0);
float z = transform.position.z;
// ensure movement does not go outside playfield
transform.position = new Vector3(Mathf.Clamp(transform.position.x, playerPosHMin, playerPosHMax), Mathf.Clamp (transform.position.y, playerPosVMin, playerPosVMax) , z);
With this code in place, the player can now move, fire, and invoke the shield. With this simple game that’s all there is to change for the game to be playable.
Unity is an awesome cross-platform tool for game development! These changes only took a few hours to get going thanks to great documentation and a few Google searches for examples. When you get stuck, remember that someone else has too, and the answer is likely only a search or two away because of the fantastic community using and sharing information about Unity. With gameplay fixed, I next turned my focus to the UI, because there was definitely something amiss…
Using dynamic fonts to make resolution-independent UIs that work on handhelds and traditional computers
Designing a UI using basic Unity is a bit of a challenge. There are definitely libraries in the Asset Store that can help, but for this simple game I wanted to use only base Unity to remove the reliance on any libraries that would cost money. When I did the UI for the conference, I only had one screen resolution to worry about. Now, I had an unknown range of resolutions.
When testing the game, I noticed that the font was very small on the mobile devices, because they had very large screen resolutions in a very small display. So, I did what I always do in these situations, I started searching Google to see what other people had done before me.
In this case, I found solutions geared for Unity 3, which did not support dynamic fonts in mobile. I remembered reading about dynamic fonts for mobile in Unity 4, but I couldn’t find any examples of it. Finally, I tried this script which uses Screen.dpi to determine the font size for a particular screen. I’m sure it would work great if Unity could return a value other than zero for displays that do not report their DPI. I needed something that would work on any platform and any screen, so that would not cut it.
Instead, I chose to base my font size on the screen resolution, because Screen.width always returns the width of the current window the game is running in, or the screen width if it is fullscreen. I only base the font size on screen width because I always run the game in landscape. Below are two screenshots to display the problem that I am solving.
The first screenshot is how the game looked without dynamic fonts. Squeeze this picture onto a mobile device and you can get a feel for just how small the default fonts rendered on the screen. The buttons were so small it was tricky to choose the right one.
The second screenshot shows what the screen looks like with dynamic fonts. I could fix up the vertical size of the box a little more, but the point is that the display is now consistently large no matter what screen resolution is being used.
The calculation for font size is based on the width of the screen times another fudge factor (which again could be exposed to Unity and made a Setting for the user to control). I tried to use the same code for laptop/desktops and mobile, but due to the large discrepancy in DPI between the two, I ended up using different factors. If the font size ends up being less than 5, I force it to 5.
These two fudge factors have a lot of power, because changing them just a little scales the UI a lot. Be sure to try it out to see what I’m talking about. Keep in mind that only by deploying to devices can you see the dramatic difference due to the DPI differences.
This is the first method in my class scriptFont.cs:
public static int GetSizeFromResolution() {
int size = (int)(Screen.width * .016);
if (SystemInfo.supportsAccelerometer) {
size = (int)(Screen.width * .024);
}
if (size < 5) size = 5;
return size;
}
Now we know what font size to use, but how do we tell Unity about it? Well…in my experience the answer is “it depends” and I’ll show you why. Unity now supports using XML-like tags to specify properties about a font.
Let’s see how that works by looking at another method in scriptFont called MakeString(). I created this method as a shortcut to building the tagged string for displaying the font I wanted. I’ve shortened the method here to conserve screen space, but I always recommend using brackets around all if statements to keep from unintended side effects such as the example below, where callMethod2() is always called no matter what “blah” is set to. However, due to formatting, it is very difficult to see the problem and it can be very frustrating to track down depending on what the code is doing.
BAD CODE:
if (blah == true)
callMethod1();
callMethod2();
do something else…
So, don’t do it, okay? ![]() Anyway, the following method is an easy shortcut for making a tagged string a certain size, a certain color, bold, and/or italic. I also have other shortcut methods that leave out various parameters.
Anyway, the following method is an easy shortcut for making a tagged string a certain size, a certain color, bold, and/or italic. I also have other shortcut methods that leave out various parameters.
public static string MakeString(string text, int size, string color, bool bold, bool italic) {
string newText = “”;
if (color != null) newText += “”;
if (bold) newText += “”;
if (italic) newText += “”;
newText += text;
if (italic) newText += “”;
if (bold) newText += “”;
if (color != null) newText += “”;
newText += “”;
return newText;
}
Cool, now we can make interesting strings, but two more gotchas are waiting! First, in GUIStyle is an instance variable called richText. If it is not set to true, the XML won’t work! Second, GUIStyle can only be used inside of OnGUI. If you try to use it outside of that method Unity will complain.
There is a style for each type of UI control. In most cases, we just want to augment the style with our font information and go with it. However, for Label we want to create a brand new style and use that. I tried a variety of things to use the existing style, but it wouldn’t accept my changes. This might be a bug in Unity or an error on my part, but when I used a brand new style it resolved the issue. So let’s bring this all together with one of the UI screens to see how it works. The easiest is the actual gameplay screen, where the score and other information are shown in the upper left corner. The following is from scriptSceneManager.cs.
void OnGUI() {
GUIStyle style = new GUIStyle();
style.richText = true;
style.normal.textColor = Color.white;
int size = scriptFont.GetSizeFromResolution();
int y = size;
GUI.Label(new Rect(size, y, size * 10, size), scriptFont.MakeString (“Time : ” + gameTime), style);
y += size + 1;
GUI.Label(new Rect(size, y, size * 10, size), scriptFont.MakeString (“Score : ” + score), style);
y += size + 1;
GUI.Label(new Rect(size, y, size * 10, size), scriptFont.MakeString (“Lives : ” + lives), style);
if (!shieldOff) {
y += size + 1;
GUI.Label(new Rect(size, y, size * 10, size),
scriptFont.MakeString(“Shield : ” + shieldStrength), style);
}
if (score >= bonusScore) {
y += size + 1;
GUI.Label(new Rect(size, y, size * 10, size),
scriptFont.MakeString(“AUTOFIRE”, “red”, true, true), style);
}
I’m setting the text color to white because the background is black. Notice that the position and size of all of the UI elements are determined by using the calculated font size and a few offsets for space. Having the font size turns the screen into a virtual set of rows and columns to use instead of pixels. All strings utilize the MakeString method to build the XML-like text for the controls to use, making it so we don’t have to see all those messy tags. Creating a new style works for Label, but for Button and Box we have to take a different approach and alter the built-in style. Why? Hmm, I wish I could answer that logically, but I figured it out from coding and testing. This code is from scriptScreenMainMenu.cs.
void OnGUI () {
int size = scriptFont.GetSizeFromResolution();
GUIStyle boxStyle = GUI.skin.box;
boxStyle.richText = true;
boxStyle.normal.textColor = Color.white;
GUIStyle buttonStyle = GUI.skin.button;
buttonStyle.richText = true;
buttonStyle.normal.textColor = Color.white;
buttonStyle.fontSize = size;
GUI.skin contains the built-in styles, which we are free to retrieve and alter however we want. For Box, it is just a matter of turning on richText and setting the textColor. Buttons were more stubborn. Despite everything I tried, unless I set the fontSize in the Button’s style it would not work. It always seemed to ignore the richText setting.
Gathering input when no keyboard (virtual or otherwise) will work
Sometimes, devices or operating systems do things that make no sense at all. I ran into two situations like that and I found other developers that have run into these as well. Just to spread the wealth, one was iOS and the other an Android device, so understand that I’m not favoring one environment over another – I would just like them all to work equally well!
HTC (Desire) – The Desire refuses to lend Unity its virtual keyboard. Nothing I tried would display it. Others have reported the same problem on other HTC devices here and here and I’m sure other places.
iOS – with Android devices, you can pair a bluetooth keyboard (I used a Zagg), choose the keyboard setting (see the next section) and play using the keyboard instead of the touch screen & accelerometer. iOS on the other hand refuses to relay the keyboard events to Unity, so this does not work. I don’t know if it is iOS or Unity’s fault, but the end result is the same – iOS users are locked out of this useful feature.
So, in these cases, what recourse is there? For iOS the user is relegated to just using touch, but the HTC problem is more severe because even the virtual keyboard doesn’t work. For my high score screen I wanted to allow the user to enter their initials (this is a change from the conference version which asked for more information). With no keyboard, I decided that buttons would be a better option. Since this was a retro-style game it worked to have a retro-style high score screen. Other games that rely more on the keyboard may need to explore other options for getting around this limitation.
Even with the choice of using buttons, I still have to make several iterations over the design in order to create a UI that was easy to use with touch. For example, don’t put the current initials below the buttons, or the user won’t be able to see them because their finger will be in the way! Also make the buttons big enough that the user can feel confident about which button they are pressing. Finally, I spaced the SAVE button down far enough that it wouldn’t accidentally be hit.
Implementing Settings
When I realized that there was an option for Android devices to use a paired bluetooth keyboard, I was left with a quandary. I couldn’t find anything in Unity for detecting the presence of a “real” keyboard, so I couldn’t automate it. Many (if not all) games have a Settings area for configuring environmental factors such as sound effects, music, and sensitivity, so I decided this would be a good option for supporting the keyboard.
As with the high scores, PlayerPrefs is the place I chose to store this setting. I chose the key “keyshot.input” to store the setting, with simple “keyboard” or “touchscreen” strings for the value. If nothing has been set for the value, the default is “keyboard” if no accelerometer is detected, or “touchscreen” if one is. After adding a Settings button to the main menu, it was simple to add another screen and a few more buttons to support this functionality. It isn’t the prettiest UI, but it gets the job done ![]()
Unity Build Settings for iOS and Android
I’m including screenshots of my build settings for iOS and Android, because there are a few things to keep in mind when building for these platforms. Notice the “Use 32-bit Display Buffer” and “Use 24-bit Depth Buffer” are unchecked. When I had these checked, I had screen redraw issues and it looked terrible. I set the default orientation to landscape left and also set this on each of my scripts like this:
void Start() {
Screen.orientation = ScreenOrientation.LandscapeLeft;
}
Next, I chose the lowest level of the Android API I could so that devices like my son’s DroidX would work. I also chose OpenGL ES 1.x for the same reason. I thought it was interesting that I could not disable Internet Access even though I knew I didn’t need it.
You will need to install an ADT (Android Development Toolkit) to build with. I used the one here and followed the instructions. Then you just tell Unity where the ADT is when it asks. Even though Build Settings has a “Build and Run” option for Android, it never seemed to be able to find my devices. Instead, I connected my Androids as mass storage devices, copied the APK to the download folder, then used either the built-in file app (Samsung) or installed ES File Explorer to find the app and install it. You will have to enable installing apps from unknown sources to allow installing the game.
For iOS, I chose iPhone + iPad for the Target device and the native resolution since this app supports them all. Note that to compile for iOS you have to use a Mac, have the latest version of XCode installed, be an Apple developer, and have your app and device registered.
Once that ordeal is finished, from Unity you can choose “Build and Run” and Unity handles XCode all by itself and installs your app onto the device. This is super convenient and saves time switching to XCode to finish the builds.
Conclusion
Unity provides a wonderful environment to build games (and many other applications!) for every major platform out there, with more coming all the time. With all of the community support, along with Unity’s excellent documentation, it is possible to achieve the goal of creating games for people to enjoy.
In the past, I spent months writing game engines from scratch (one was a 90 degree turning dungeon crawler on a Commodore Amiga, another was a Doom-style ray caster in Windows 95 with a Pentium 60), along with a bookshelf full of books on writing game engines, only to have new technology render them obsolete. Unity provides a platform in which they worry about keeping up with technology and I worry about creating the best game I can. I am truly excited about moving on to create a multiplayer game with my son that we have designed together. I am confident that with Unity having our back we will be successful in implementing a genre-changing fun experience that many people will enjoy.
Thank you so much for following along with my blogging. If you have questions please contact me. I’m learning along with everyone else but I will help in any way I can!(source:gamasutra)
上一篇:每日观察:关注2013年全球平板电脑市场规模(7.4)
下一篇:关于游戏易用性测试的5个常见问题

")
")
")
")


