分享使用Unity 3D免费版本编写游戏的教程(一)
作者:John Boardman
Unity是一个制作专业级游戏的开发环境。它创建于MonoDevelop的基础之上,并用它来实现将同个代码部署到多个平台的目标。Unity有两个版本,但本文关注的是无附加件的免费版本。(请点击此处阅读本文第二、第三部分)
Unity免费版(我目前使用的版本)支持开发者向Mac、Windows、Linux、Web和Google Native(游戏邦注:这是一个无插件的Chrome部署技术)部署内容。现在开发者还可以下载针对Android和iOS平台的免费部署版本。如果你是以团队身份使用该工具,可以花500美元获得更多功能和资产的使用授权。免费版本支持多人游戏、物理、3D音频、动画、Direct3D 11、着色器、光照贴图以及地形等实用功能。如果你是Xbox 360、PS 3或Will开发者,你也可以向这些平台部署内容,只是我并不清楚这一用法的授权情况。
Unity Pro收费标准是1500美元,拥有许多高端性能,例如细节层次(LOD)、自动寻径、高端音频过滤器、视频回放、流媒体、IK动画、3D纹理、即时阴影及其他专业功能。这个Pro的Android和iOS授权费都是1500美元,可以支持那些400美元版本所不具备的功能。
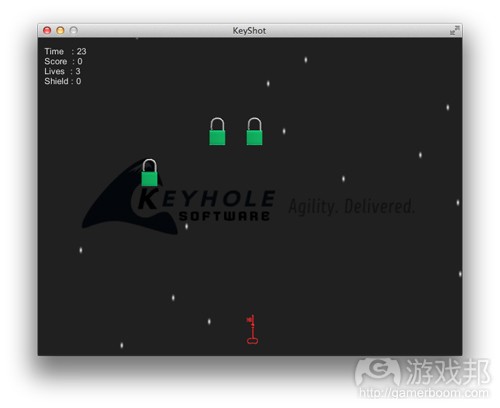
介绍《KeyShot》
这是我遵循来自Walker Boys Studio的免费教程后自己创造的一款游戏。Walker Boys Studio网站有长达70多分钟的视频,教授用户如何用JavaScript编写代码,并逐步分解如何创造4种不同类型的游戏。《KeyShot》是基于本教程第二款游戏所制作的游戏,但也扩展了许多内容。除此之外,我还将所有的JavaScript类转变成了C#。这个项目包括面向两个语言的同个功能,它们在Unity中很容易切换。
《KeyShot》是极为初级版的《大蜜蜂》。其目标是尽量在30秒内不死的情况下获得最高分。系统将保存前10项最高分,以便创造让玩家打败高分的动力。
执行
这里我建议你直接上Walker Boys Studio网站下载游戏的基础资产。
以下是我对Walker Boys教程内容的扩展功能:
*使用多个摄像机运行背景logo
*执行JavaScript和C#,包括如何使用JavaScript中的嵌套术语以及如JavaScript中调用C#脚本
*如何使用带有不与Unity的标准Y-up对齐轴线的3D模型
*使用PlayerPrefs呈现高分排行榜(详见本文第二部分)
*如何使用带有文本域的对话搜集用户数据(详见本文第二部分)
*如何在Unity中执行作弊码(详见本文第二部分)
使用多个摄像机执行背景logo
好,现在让我们看看如何展现游戏区域之外的logo。
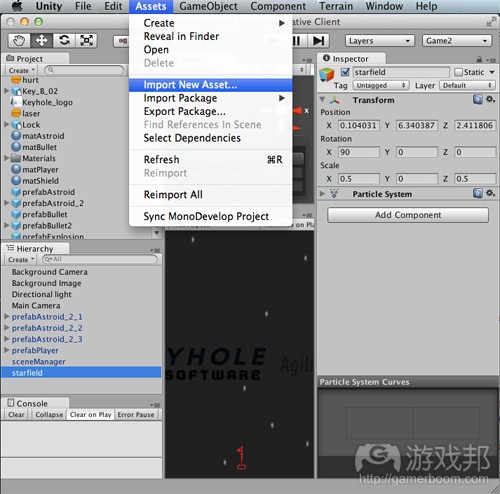
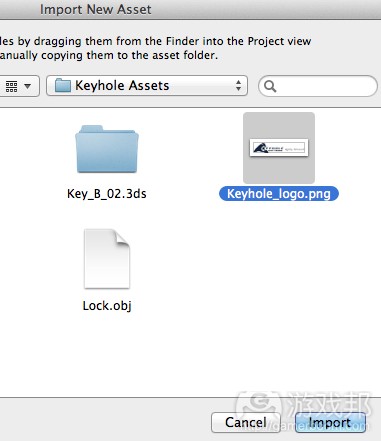
1.从Assets进入Import New Asset菜单,我先择输入PNG。这可以将资产拖入Unity令其处于可用状态。
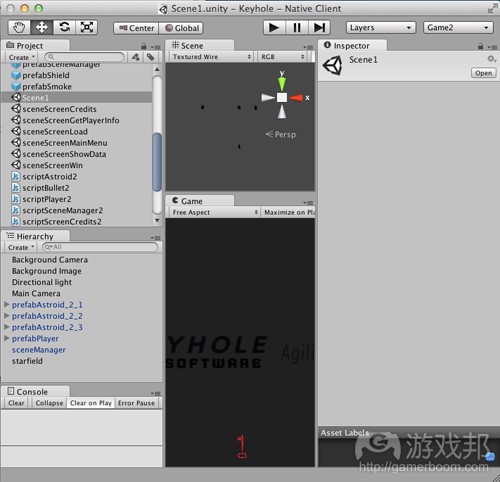
2.接下来双击载入Scene1:
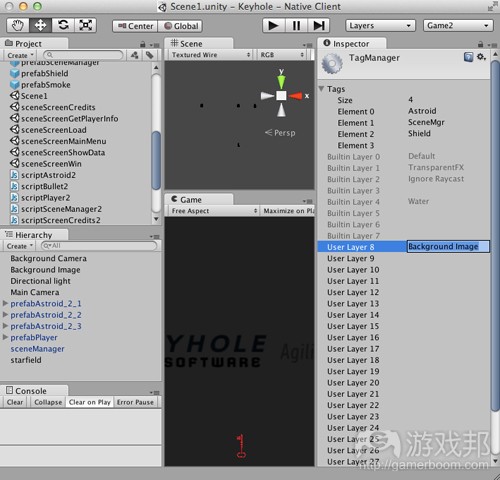
3.在Unity右上方的窗口中有一个Layers下拉单菜。选择“Edit Layers”,可以看到一个标签列表,之后是Builtin Layers,然后是User Layers。
4.如果点击User Layer 8右边,就可以设置该图层的名称。我为图片选择了“背景图片”这个名称。
5.在Hierarchy的下拉菜单中,使用Create菜单并选择“GUI Texture”,将其命名为“背景图片”。
6.将logo资产拖到GUI Texture的Texture属性(游戏邦注:以便告知我们将使用这个logo作为纹理)。
7.现在在Hierarchy中选择“背景图片GUI Texture”查看其属性列表。要获得准确的大小,使用Pixel Insert设置。我从属性中看到这张图片大小是512X128。为了将图片置于中间,我将X轴设为-256,Y轴为-64,然后将宽度设为512,高度为128。
8.将背景图片的图层设为“背景图片”。
(为准确展现图片,我们需要创造第二个摄像机)
9.在Hierarchy视图中点击“Main Camera”。然后在Hierarchy中选择“Creat”下拉菜单并选择“Camera”。我将其命名为“背景摄像机”。在默认状态下,我们创造自己的新摄像机时,其视口会和之前所选择的一样,所以不需要再进行调整。
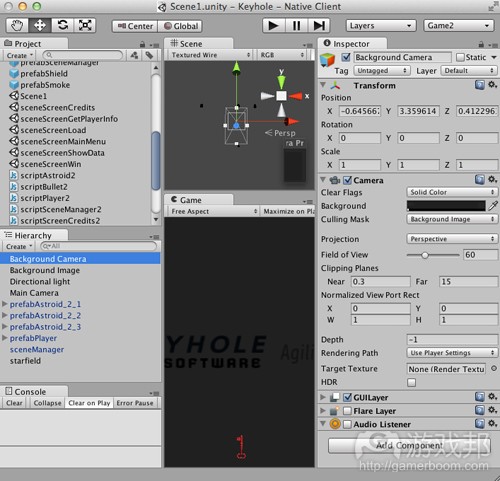
10.现在点击背景摄像机,设置它的Culling Mask,以便仅使用背景图片这个图层。
这可以点击Culling Mask,选择Nothing。然后选择Background Image。此时我还设置了背景摄像机的背景颜色,以匹配Keyholel logo的背景。
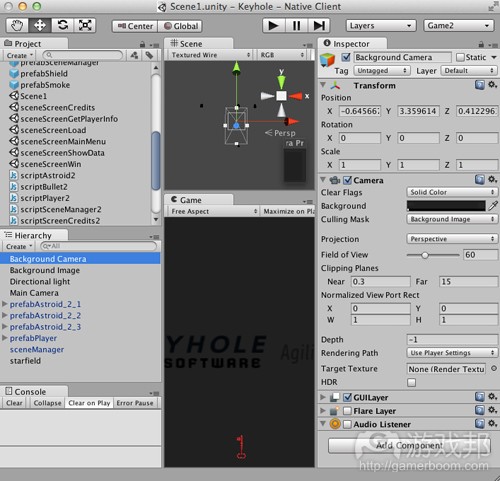
11.最后,我们要让主摄像机去忽略背景图像这个图层。
执行这一操作,点击Main Camera,然后再点击Culling Mask。然后取消选择背景图像这个图层。
(这个过程要经历数个步骤,但结果十分可观,它会在游戏中所有其他元素之后显示水印)
执行JavaSCript和C#
包括如何在JavaScript中使用嵌套通用术语,以及如何从JavaSCript中调用C#脚本
在Walker Boys教程中,他们选择JavaScript为所有游戏编码,这方法还行。但如果你也和我一样,你可能会更喜欢用C#而非JavaSCript编码。所以,我将所有的JavaSCript转换为C#,我的项目源代码中将同时运用到这两者(详见第二部分)。
在使用Unity开发游戏并选择编程语言时需注意:
1.如果你用JavaScript编码,那就会在编辑之前转变为C#。这是为何你用JavaSCript编码时必须用到#pragma strict的原因。每个JS文件都是像C#类一样用同个名称执行。所以,既然C#就是目标语言,为何不直接使用C#来编码?
2.你也可以从JS调用C#,或者从C#调用JS,但不可在一个项目中同时调用两种语言。这是因为一个文件组要先于另一文件组进行编缉。在“Standard Assets”这一特定文件夹中的文件编辑要先于分布在别处的文件。在我的项目中,我所有的C#文件都在Standard Assets文件夹,所有的JS文件都在基础文件夹。这意味着我可以从自己项目的JS文件中调用C#。但出于本文需要,我没有这么做,但我将进行示例,这样你的项目有此需求时就可以派上用场。注意,在这个示例中,我所有的JS文件都以2结束,而其对应的C#文件都有相同的名称,但没有2这个数字。要调用C#版本而非JS版本,只要从scriptSceneManager2和scriptAstroid2移除2就行。文件归到合适位置时,事情就比较简单了。
function OnTriggerEnter(other:Collider) {
if (other.gameObject.tag == scriptSceneManager2.TAG_ASTROID) {
var astroidScript = other.GetComponent(scriptAstroid2);
astroidScript.ResetPosition(); } …}
3.JavaScript中的通用术语使用了一个时髦的术语。这在如下嵌套通用术语中尤其令人抓狂:
C#: List<KeyValuePair<int, string>> highScores = new List<KeyValuePair<int, string>>();
JS: var highScores:List.<KeyValuePair.<int, String> > = new List.<KeyValuePair.<int, String> >();
要尤其注意JS中右方括号之间的空隙,因为如果没有它,文件就无法编辑。
4.C#中的字符串类型名称是string,而在JavaScript则是String。
5.你可以在JavaSCript代码中直接调用C#,通常也只能如此。这是在编辑过程中将JS转换为C#时要注意的另一点。
6.即使已经完成转换,也要在转换前检查JS术语。其检查范围在JS中与在C#并不相同。
例如,在C#中:
for (int i = 0; i < 10; i++) {
print(“i = ” + i); }
// i was only in scope during the for loop, so i must be redefined for the next for loop for (int i = 0; i < 10; i++) {
print(“another i loop. i = ” + i); }
在JS中则是:
for (var i:int = 0; i < 10; i++) { print(“i = ” + i ); } // in JS, once a variable is defined it stays defined. Scope is at the function level for (i = int 0; i < 10; i++) { print
(“another i loop. i = ” + i); }
7.JavaScript可强制转化许多值,而C#即使在JS严格模式中也做不了到。强制转换(自动从一种类型切换到另一种)会产生大量副效应,从而催生难以发现的漏洞。为此,在使用JS编码时,我格外注意指定的参数类型,并确保使用的是自己预期的类型。
8.JavaScript函数是一直可存取的,但C#遵循的是域规则。如果一个脚本将调用另一者,在C#中就要确保这些将被其他脚本调用的方法处于公开状态。
如何使用带有不与Unity的标准Y-up对齐轴线的3D模型
从其他程序(游戏邦注:例如Blender、3D、Lightwave等)导入3D模型时,许多此类模型的轴线设置中Y并非处于“up”状态,而Unity却有此要求。因此你若不掌握这一方法,就不太可能在Unity中使用这些模型。
你可以通过以下网站了解情况,但其中内容对我来说有点费解了:
http://docs.unity3d.com/Documentation/Manual/HOWTO-FixZAxisIsUp.html
因此,我将通过截图进行讨论。
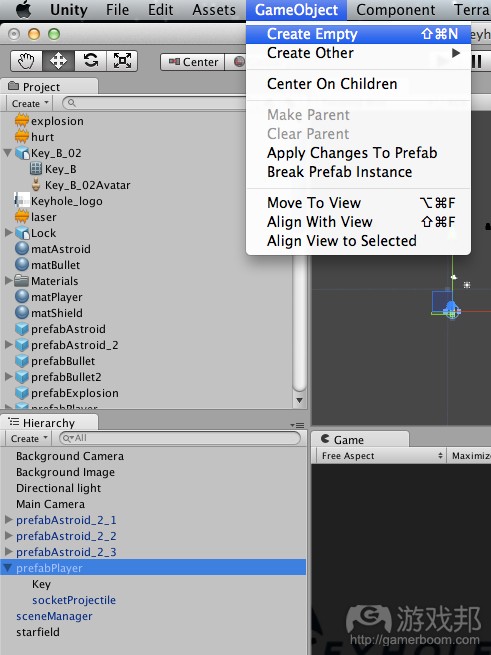
1.创造一个空白的GameObject
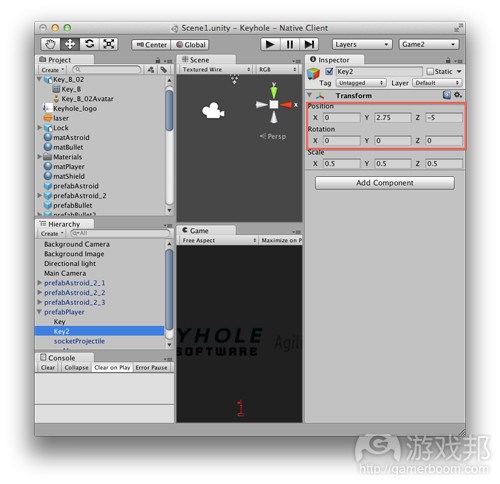
2.将GameObject重命名为“Key2”,将其将拖拽到prefabPlayer,令其成为后者的下属文件。因为我是复制自己的key来解释如何操作,所以我将不再使用当前的Key,向你展示如何进行匹配。
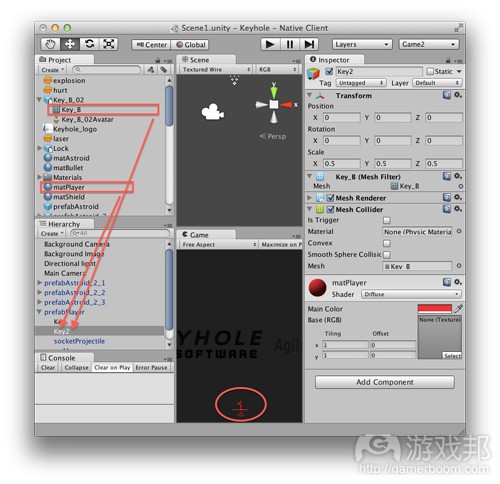
3.注意Unity如何在相当随机的位置中放置对象。将位置更改为0,0,0,这样它就会很接近原先的Key。现在将Key_8网格和matPlayer拖拽到Key2对象。
你将得到以下结果:
注意新的Key处于其默认方向,这样会出现旋转错误的情况。因为我们有一个GameObect把持网格,而不是直接将其添加到prefabPlayer对象,我们可以重置Key2 GameObject的旋转,而不会影响prefabPlayer的旋转。
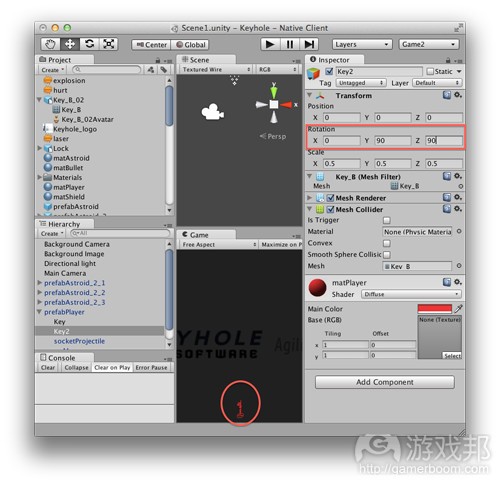
将Key GameObject的Y和Z旋转位置分别设为90和90,更正Key的旋转方向,这样我们就有一个可用于玩家的垂直、侧视图的Key。
感谢阅读,第二部分内容敬请期待!(本文为游戏邦/gamerboom.com编译,拒绝任何不保留版权的转载,如需转载请联系:游戏邦)
Writing Games With Unity 3D in JavaScript and C# – Part 1
by John Boardman
The following blog was, unless otherwise noted, independently written by a member of Gamasutra’s game development community. The thoughts and opinions expressed here are not necessarily those of Gamasutra or its parent company.
Want to write your own blog post on Gamasutra? It’s easy! Click here to get started. Your post could be featured on Gamasutra’s home page, right alongside our award-winning articles and news stories.
Unity is a development environment for creating professional-level games. It is built on top of MonoDevelop, and utilizes it to achieve the deployment of the same code to many platforms. Unity comes in two versions, but this post will focus on the free version with no add-ons.
The free version (which is the one I use) supports out-of-the-box deployment to Mac, Windows, Linux, Web, and Google Native (a Chrome technology for deploying without plugins). Additionally (as of this writing), for $400 each free (free price announced 5/21/13) deployment to Android and iOS (both iPhone and iPad) is available. If you are part of a team, a team license that adds collaboration capabilities to share assets is available for $500. The free version supports multiplayer games, physics, 3D audio, animation, Direct3D 11, shaders, light mapping, and terrains among other useful features. If you happen to be an XBox360, PS3, or Wii developer, you can deploy to those platforms as well, although I don’t know the licensing details.
Unity Pro is a $1,500 license and extends Unity with many high-end capabilities like level of detail (LOD), automatic path finding, high end audio filters, video playback and streaming, IK animation, 3D textures, realtime shadows, and many other professional features. The Android and iOS licenses for the pro version are $1,500 apiece and support features that the $400 versions do not.
Introduction to KeyShot
My creation, KeyShot, came about when I showed the guys I work with a game I created following the excellent free tutorials available from the Walker Boys Studio. There are 70+ hours of video training available covering the basics, writing code in JavaScript, and step-by-step instructions on how to create four different genres of games. KeyShot is based on the second game in this tutorial series, although it extends it a lot. Additionally, I converted all of the JavaScript classes to C#. The project includes the same functionality for both languages, which are easily swappable inside Unity.
So, I was asked if I could make a game for the Kansas City Developer Conference. The reasons for this are currently shrouded in secrecy, and will only be revealed on this blog after the conference is over. ![]() Incidentally, after the conference, you can come back to this blog to download the zipped project and try it out for yourself. You can now check it out on GitHub.
Incidentally, after the conference, you can come back to this blog to download the zipped project and try it out for yourself. You can now check it out on GitHub.
KeyShot is a (very) basic Galaga clone. The objective is to get the highest score possible in 30 seconds without running out of lives. The top 10 scores are saved, which gives players motivation to beat the high score.
Implementation
I’m going to cheat a bit here and send you straight to the tutorials to find out how to implement the base of the game. The Walker Boys Studio does a fantastic job of covering these details in their video tutorials, so if you are interested, head on over here for some great instruction!
Features that I will cover that aren’t in the Walker Boys Tutorial:
Using multiple cameras to implement a background logo
JavaScript and C# implementations, including how to use nested generics in JavaScript and how to call C# scripts from JavaScript
How to use 3D models with axes that don’t line up with normal “Y-up” Unity standards
Implementing a high score table using PlayerPrefs (check it out in Part 2!)
How to implement a dialog with text fields to collect user data (check it out in Part 2!)
How to implement cheat codes in Unity (check it out in Part 2!)
Using multiple cameras to implement a background logo
Alright, let’s find out how to display that Keyhole logo behind the playfield.
1. From the Assets –> Import New Asset… menu, I selected the PNG to import. This pulls the asset into Unity and makes it available for use.
2. Next, load Scene1 by double-clicking on it:
To get the image behind the other assets, we will use a layer and a camera.
3. In the upper right of the Unity window, there is a Layers drop down. Select “Edit Layers” from that drop down. You’ll see a list of Tags, then Builtin Layers, then User Layers.
4. If you click to the right of User Layer 8, you can set a name for that layer. I chose Background Image for my layer name (possibly a confusing choice…but we’ll work with it).
5. In the Hierarchy drop-down, use the Create menu and select “GUI Texture.” Name it Background Image.
6. Drag the logo asset to the Texture property of the GUI Texture (in order to tell it that we want to use the logo as the texture).
7. Now select the Background Image GUI Texture in the Hierarchy to see its property sheet. To get the size correct, use the Pixel Insert fields. I looked at the properties of the image to find it is 512×128. To center the image, set X to -256 and Y to -64, then set width to 512 and height to 128.
8. Set the Layer of the Background Image to…Background Image.
To display the image properly, we need to create a second camera.
9. Click on “Main Camera” in the Hierarchy view. Then select the “Create” drop down on the Hierarchy and choose “Camera.” I named mine Background Camera. By default, the new camera will have the same viewport as the camera that was selected when we created our new one, so we don’t have to adjust that.
10. Now click on the Background Camera and set the Culling Mask of the Background Camera to use only the Background Image layer.
To do this, click on the Culling Mask, select Nothing. Then select Background Image. At this point I also set the background color of the Background Camera to match the background of the Keyhole logo.
11. Finally, we need to tell the main camera to ignore the Background Image layer.
To do this, click on the Main Camera, then the Culling Mask. Then un-select the Background Image layer.
It is quite a few steps, but the results are pretty cool, with a watermark showing behind all the other elements in the game.
JavaScript and C# Implementations
Including how to use nested generics in JavaScript and how to call C# scripts from JavaScript
In the Walker Boys tutorials, they chose JavaScript to code all of their games, which works just fine. However, if you’re like me, you might like to code in C# rather than JavaScript. So, I converted all of the Javascript to C# and I’ll include both in the source code for the project, which again will be available after Part 2.
There are a few things to point out when choosing the language for your games in Unity:
1. If you code in JavaScript, it will be converted to C# before compilation. This is why you must use #pragma strict when coding in JavaScript. Each JS file is implemented as a C# class with the
same name as the JS file. So, why not go with C# since that is the target language anyway?
2. You can call C# from JS or vice versa, but not both in the same project. This is because one set of files is compiled before the other. The files in the special folder “Standard Assets” are
compiled before the files that are located anywhere else. In my project, I have all of my C# files in the Standard Assets folder, and all of my JS files in the base folder. This means I can call C# from JS in my project. For tutorial purposes I don’t, but I’ll give an example so you know what to do if this is necessary for your project. Note for this example all of my JS files end with 2, whereas their equivalent C# files have the same names but without the 2. To call the C# version instead of the JS version, just remove the 2s from scriptSceneManager2 and scriptAstroid2. Once the files are located in the proper places, it really is that easy.
function OnTriggerEnter(other:Collider) {
if (other.gameObject.tag == scriptSceneManager2.TAG_ASTROID) {
var astroidScript = other.GetComponent(scriptAstroid2);
astroidScript.ResetPosition(); } …}
3. Generics in JavaScript use a funky syntax. This can be especially frustrating with nested generics such as the following:
C#: List<KeyValuePair<int, string>> highScores = new List<KeyValuePair<int, string>>();
JS: var highScores:List.<KeyValuePair.<int, String> > = new List.<KeyValuePair.<int, String> >();
Take special note of the space between the closing brackets in JS, because if this is not present it will not compile.
4. The type name of string is “string” in C# and “String” in JavaScript.
5. You can make C# calls directly inside your JavaScript code, and often you have to. This is just another reminder that JS is converted to C# at compile time.
6. Even though the conversion is made, the JS syntax is checked before the conversion. Therefore, scope is different in JS than C#.
For example, C#:
for (int i = 0; i < 10; i++) {
print(“i = ” + i); }
// i was only in scope during the for loop, so i must be redefined for the next for loop for (int i = 0; i < 10; i++) {
print(“another i loop. i = ” + i); }
JS:
for (var i:int = 0; i < 10; i++) { print(“i = ” + i ); } // in JS, once a variable is defined it stays defined. Scope is at the function level for (i = int 0; i < 10; i++) { print
(“another i loop. i = ” + i); }
7. JavaScript coerces a lot of values that C# will not, even in JS strict mode. Coercion (automatically converting from one type to another) causes a lot of side effects that can cause bugs that are not easy to find. For this reason, when coding in JS, I pay very close attention to the specified parameter types and ensure that I specifically use the types that are expected.
8. JavaScript functions are always accessible, but C# obeys scope rules. If one script is going to call another, in C# make sure those methods that will be called by other scripts are public.
How to use 3D models with axes that don’t line up with normal “Y-up” Unity standards
When importing 3D models from other programs (Blender, 3Ds, Lightwave, etc), many of these models do not have their axes set with Y being “up”, which is what Unity expects. Using these models can be seemingly impossible until you learn how to wrap them so that their axes are not getting in the way.
You can read this and look at the pics, but it was a bit confusing for me: http://docs.unity3d.com/Documentation/Manual/HOWTO-FixZAxisIsUp.html
So, I’ll show you with some screen shots and discussion. Follow along now, then after Part 2 is release (with the source code), you can try it out.
1. Create an empty GameObject
2. Rename the GameObject “Key2” and drag it to be a child of prefabPlayer. Since I’m duplicating my Key to illustrate how to do it, I’ll leave the current Key alone and show you how to match what is there.
3. Note how Unity places the object in the scene at a fairly random location. Change the location (i.e. the Transform) to 0, 0, 0 so it will be fairly close to the existing key. Now drag the Key_B
mesh and matPlayer to the Key2 object.
You’ll end up with something like this:
Note that the new key is in its default orientation, which has the rotation wrong. Since we have a GameObject holding the mesh instead of adding it directly to the prefabPlayer object, we can reset the rotation of the Key2 GameObject without affecting the rotation of the prefabPlayer (which would create havoc-like bullets shooting the wrong way, “left” and “right” moving anything but left and right, and so on).
Setting the Y and Z rotation of the Key2 GameObject to 90 and 90 respectively (for this particular mesh) corrects the orientation of the key so we have an upright, side-viewed key that we can use for the player.
I hope you have enjoyed Part 1 of this post. Definitely feel free to ask any questions you may have and I’ll try to answer as best I can. Also, check out Part 2 of this series to download the project and check out high scores, dialogs, and cheat codes!(source:gamasutra)





 闽公网安备35020302001549号