使用Unity 3D开发iOS游戏入门教程(1)
作者:Christine Abernathy
Unity是目前最热门的游戏引擎之一,理由很充分——Unity具有强大的视觉编辑器,新手容易入门;功能丰富且强大;使用者多,价格便宜……
如果你想自学Unity,那就从本教程开始吧!在本教程中,你将学到如何使用Unity制作一款简单的iOS游戏——以前没经验也可以!
这款游戏的主要玩法就是:玩家要在某段时间内冲到终点,途中要避开障碍。
在制作游戏的过程中,你将逐渐了解Unity的开发环境和流程,并且学习(或复习)到游戏设计的基本概念。
本教程将分为三部分:
在第一部分,你将学习使用Unity制作简单的角色操作机制。你还会了解如何在iOS上配置项目。
在第二部分,你将学习如何使用预制的控制器对象和一些在标准软件包中建立的脚本来改进角色的移动;如何使用Unity Remote调试;如何自定义场景。
在第三部分,你将学习如何给项目中添加玩法和创建游戏设计概念,如预制件、计时器、菜单和声音等,以丰富游戏体验。
准备好学习新技能了吗?那就开始吧!
入门
沿着这个系列的教程,你会慢慢熟悉Unity开发流程,包括以下四个基本组件:
1、用Unity Editor中装配游戏场景
2、用MonoDevelop Editor编写脚本
3、用Unity Remote进行远程调试
4、通过Unity Editor发布到你的iOS设备上
在教程的第一部分,安装好Unity后,你将学习Editor界面的基本知识,然后创建一个项目,以便了解基本的游戏概念。
到第一部分的结尾,你的游戏中应该有一个可以通过触摸触发器来移动的角色。你还要在Unity Editor中和你的iOS设备中测试你的项目。
本教程使用的是第4版Unity,如果你没有的话,就先下载吧。
Unity提供30天内免费的完整试用版Unity Pro。这个版本已经足够开发出一款能在iOS上运行的游戏了。Unity在Mac和Windows系统上都可用,但本教程使用的是Mac系统。
注:Unity软件包相当大,接近1GB,下载可能需要一些时间,看你的网速了。所以如果你想马上制作本教程的游戏,那就提前下载好吧。
创建项目
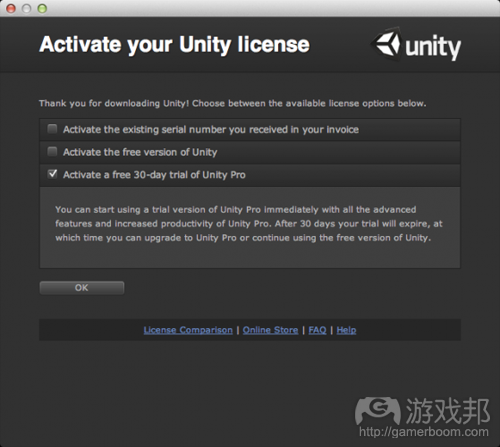
下载、安装、启动Unity。如果这是你第一次启动Unity,那么软件会提示你激活版本。勾选激活免费30天试用版的Unity Pro,如下图所示:
然后你必须创建一个Unity帐号(如果你没有的话),确认你的邮箱地址,然后通过Unity登录帐号。
登录后,你会看到几个问题。移到列表的底部点击“Not Right Now”就可以全部跳过了。然后的最后,你就可以开始使用Unity了。
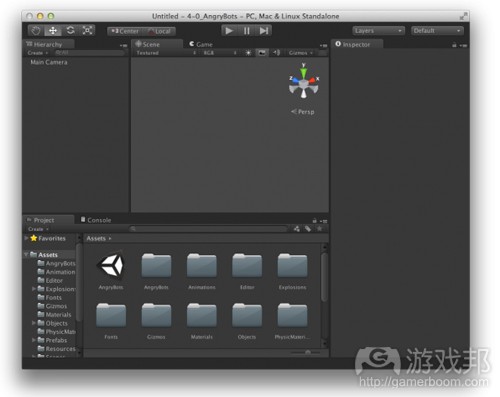
现在你看到的是Unity的界面,其中已经有一个默认项目了。如下图所示:
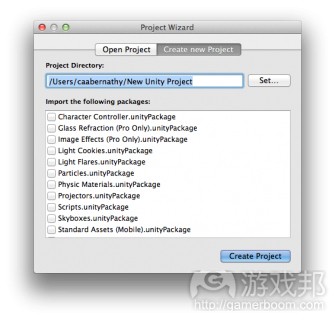
丢掉那个项目,从菜单中选择File\New Project创建新项目。你会看到如下图所示的Project Wizard(项目向导):
在Project Wizard上,点击Set然后选择一个存放项目的文件夹。输入“DashAndZag”作为项目的名称并点击Save,然后再点击Create Project(创建项目)(游戏邦注:你会看到对话框提示你是否保存之前打开的默认项目,没有必要的话就选择不保存。)
注:Project Wizard包含一些标准程序包,你可以在初始项目制作时导入。不过现在还用不上。到本教程的后期,你可以导入任何你需要的程序包。
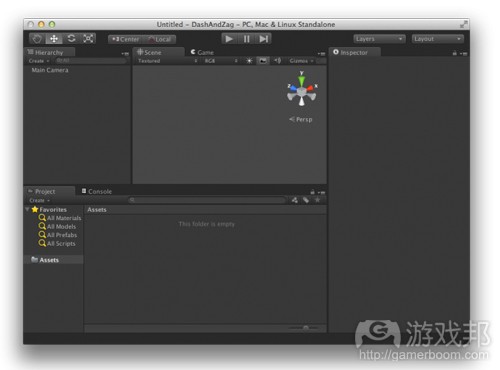
Unity会关闭当前项目并重启新项目:
新画布出来了!但那些控制键、窗口和选项是怎么回事?从哪入手?
初识UI
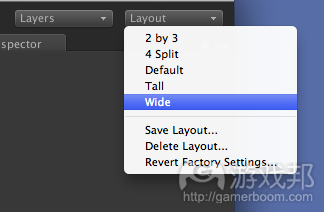
完全习惯Unity Editor的UI确实要花上一段时间,所以多看看吧。首先要看的是右上角的Layout(布局)选项。将视图变成Wide模式:
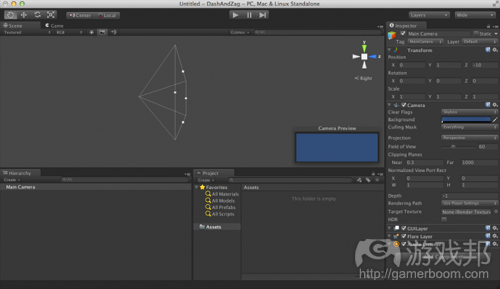
以下是整个界面的分解图:
Project View(项目视图):你的Unity包含一个Assets文件夹,它包含的内容就显示在这个视图里。你制作的脚本、场景、预制件等Unity对象就显示在这里。
Hierarchy View(层级视图):包含当前场景中的GameObjects(游戏对象)。在Unity游戏中的所有物品都叫作一个GameObject;可以是从GameObject菜单中或导入的资源中制作出来的简单物品。你的初始项目只包含一个游戏对象:主摄像机。
Toolbar(工具条):你可以通过toolbar在场景视图或游戏视图中操作对象、改变编辑器视图的显示方式,以及预览游戏。
Scene View(场景视图):你可以在这个视图中放置游戏对象。场景视图的右上角处有一个Scene Gizmo(场景小座标),它显示了场景摄像头的当前方向。
Game View(游戏视图):这是从游戏的摄像头看游戏的视图。点击工具条的上Play按钮就进入这个视图了。另外,也可以通过点击视图上方的选项卡在场景视图和游戏视图之间切换。
Inspector(检查器): 可以通过Inspector观察游戏对象的细节,然后调整对象的属性如大小或位置等,或附加脚本调整对象的行为。
使用工具条转换工具来调整游戏对象的位置和查看场景视图,会更舒服。所以我们要先熟悉工具条的使用。
Hand工具的使用
使用Hand工具(手工具)可以控制场景的视野。
想下一下你自己落入一个3D场景中,里面有许多游戏对象;你能看见你面前的游戏对象,在你身后的则看不见。
你可能希望能看到更多对象(缩放),或者从左边右边观察其他对象,或者转过身看到后面的对象。这时候,你就要使用手工具了。
因为游戏对象会越来越多,为了在场景中布置对象,你会更加频繁地使用这个工具。
手工具的使用方法是,首先选中它,然后从层级视图中选择主摄像机(这样你才能在场景视图中看到东西);然后在场景中拖曳画布。
缩放视图时,可以使用鼠标滚轮或按键拖曳。按下选项同时拖曳可以旋转视图。点击右上方的场景小坐标的箭头之一,可以随时重置视图。
多练习,熟悉一下如何使用这个工具缩放/旋转场景。
因为你会经常在手工具和其他工具之间切换,所以最好能记住它的快捷键。各个工具的快捷键默认分别对应键盘上的Q(手)、W(移动)、E(旋转)和R(缩放)。
注:手工具不能移动对象,它只能改变场景的视野,看起来就好像是对象在移动。多练习用手工具操作场景视图吧。
Move工具的使用
你可以使用Move工具(移动工具)在3D空间中移动游戏对象。
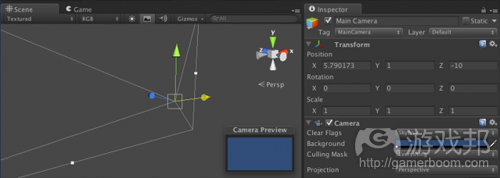
选择主摄像机(游戏邦注:如果在场景视图中找不到,就在层级视图中双击它),然后点击移动工具。你应该会看到主摄像机处出现一个三个箭头的小座标。三个箭头就表示物品可以移动的方向。
红箭头表示X轴,绿箭头表示Y轴,蓝箭头表示Z轴。选中对象后左击,然后朝小坐标内部(白线框)拖曳,就可以转换或移动游戏对象了。
选择主摄像机,然后移动。看看检查器的转换组件。X、Y、Z值就表示游戏对象的位置。移动对象时,你可以看到这些值在变化。
使用移动工具或输入XYZ值都可以改变游戏对象的位置。
想把游戏对象朝某个方向移动时,只要选择小座标上的对应箭头,左击并拖曳就可以了。将游戏对象往X轴方向的移动,你会发现在检查器中,只有X值发生变化。请在Y轴和Z轴方向做相同的测试。
现在,你已经知道如何移动场景视图,以及如何移动对象。干得不错!
Rotate工具的使用
你可以使用Rotate工具(旋转工具)在3D空间中旋转游戏对象。
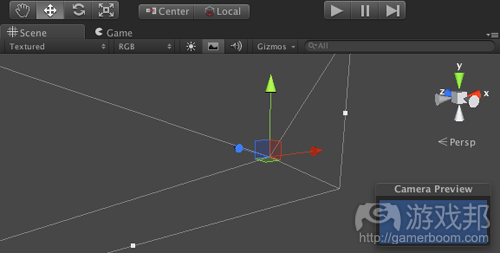
为了学习旋转工具的用法,我们应该更加详细地了解场景小座标。场景小座标就在场景视图的右上角,它有不同的模式。
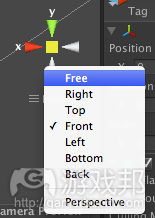
其中一个模式(见下图的右半边)是自由视图,你可以从3D透视图中察看场景。如果你想知道游戏在3D空间中的样子,这个模式是非常管用的。
点击小座标下方的字就切换到等角视图(见下图的左半边)。旋转游戏对象时比较适合使用这个模式。
另一个模式是X轴视图,也就是从X轴观察场景。如果你想沿着Y轴或Z轴移动游戏对象,同时保持X轴不变,就可以使用这个模式。
类似的,还有Y轴视图和Z轴视图。原理同X轴视图。
选择主摄像机,右击小座标选择“Free”就切换到自由透视模式了。
点击小座标下的字可以在等角模式和透视模式之间切换。依次点击X、Y、Z轴模式,看看场景小座标和场景视图的变化。
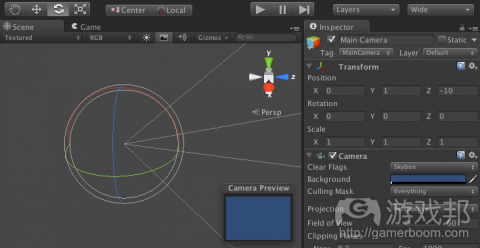
再次选择自由视图,然后测试旋转效果。在主摄像机仍然选中的情况下,点击旋转工具。你应该会看到如下图所示的三个不同颜色的圈,分别代表三个旋转轴向。
左击主摄像机的中心,然后用鼠标拖曳。注意,当你旋转对象时,你会发现检查器的Transform\Rotation属性在变化。你也可以手动修改这些属性值。
在旋转时点击主摄像机的中心,就是在所有轴向上做自由旋转。你还可以绕着一个轴旋转游戏对象,比如,点击红色圆圈选中它,然后拖曳对象,就是在X轴上旋转对象了。对绿色和蓝色圆圈做同样的测试。
视野
现在,你有必要学习一下局部视野和全局视野之间的差别。
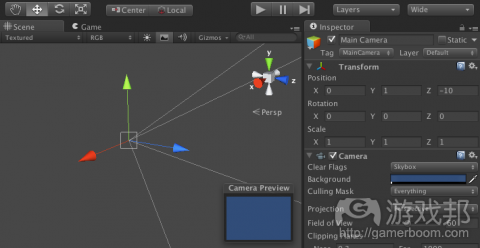
通过Inspector\Transform\Rotation将主摄像机的旋转属性值重置为0,0,0,点击工具条上的“Local”按钮。然后选择移动工具,这样你就可以看到场景小座标了:
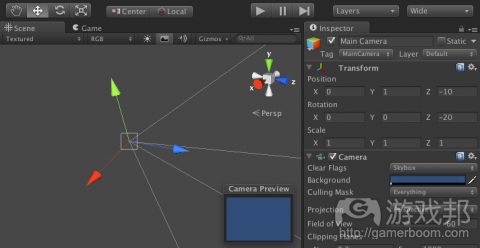
注意,场景小座标和主摄像机的小座标是类似的,两个小座标的三个轴都分别代表相同的方向。现在,在检查器中设置Transform\Rotation的值为0,0,-20,就是沿着Z轴旋转主摄像机。
注意,主摄像机的小座标现在是沿着Z轴旋转的——这就表示这个对象的这个轴处于它的本地坐标。这与场景小坐标是不同的,因为场景小坐标代表的是整个空间的方向。切换到全局视图,看看有何不同。
在教程的后半部分,你将学习移动游戏对象和发现它与不同空间(局部或全局)的关系。
看一下旋转后的主摄像机,如果你现在想在局部空间视图中把它朝X轴方向移动,最终结果会不同于在全局空间中把它朝X轴移动。记住这一点,以后会用到!
再学习下面的内容以前,请再次将旋转值重置为0,0,0。
Scale工具的使用
你可以使用Scale工具(缩放工具)调整游戏对象的大小。
与其他游戏对象操作工具一样,你只能在三个轴向收改变对象的大小。你也可以选择在Inspector\Transform面板中修改属性值来调整对象的大小。
选择主摄像机,注意,缩放小座标是由位于各轴末端的方形控点和中心的方形控点组成的。
沿着所有轴自由缩放的方法就,选择对象中心的方块后保持左击,然后朝外移让对象变大,朝内移让对象变小。看一看Inspector\Transform\Scale属性,你会发现当你缩放对象时,属性值会发生变化。
选择代表X轴的红色控点,按下同时朝外移动,这样对象就变大了。你会发现在检查器的Inspector\Transform面板上,只有X值改变了。在Y轴和Z轴上做同样的测试。
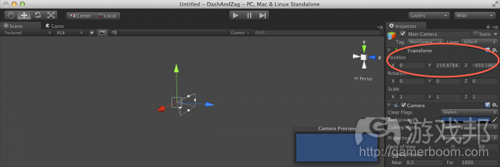
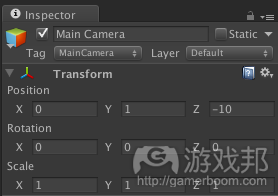
在Inspector\Transform面板中重置主摄像机的设置,输入如下值:
Position(位置): 0,1,-10
Rotation(旋转): 0,0,0
Scale(缩放): 1,1,1
结果如下图所示:
本教程之后还将介绍其他编辑器界面的组件,包括使用Play按钮预览游戏,和使用Unity调试器。
添加游戏对象
你已经学习了基本概念,现在可以开始添加游戏对象了——摄像机已经寂寞好久了。
目前摄像机面对的世界还是空荡荡的。添加一个表示角色的方块,再添加一个表示地面的平面(角色将在上面移动)。
当你使用Unity设计游戏时,最好先思考游戏玩法,而不要考虑角色是怎么样的。这样你才能集中精神优化玩法和角色的移动方式,而不是分心思考角色的外观。
另外值得注意的是,虽然Unity是一个非常好的游戏引擎,但你不应该用它制作图形资源。有许多工具非常适合制作图形部件,而Unity更擅长导入各种工具制作的资源。
游戏开发的分工通常是这样的:游戏开发人员使用Unity开发玩法,同时,图像设计师使用他们最拿手的图像工具制作图像。当图形资源能够达到美化游戏的目的时,二者就可以融为一体了。
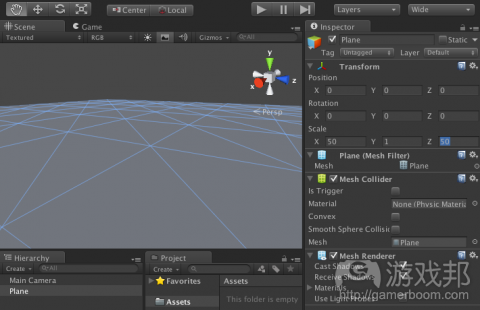
选择Game Object\Create Other\Plane,添加一个表示地面的平面。
这个新平面游戏对象会出现在层级视图中。在层级视图中选择平面,然后设置Transform\Position值为0,0,0。在检查器中将它的大小设置为50、1、50。你的场景应该接近下图:
接下来是添加一个角色游戏对象,用方块表示。对啦,就是方块英雄!
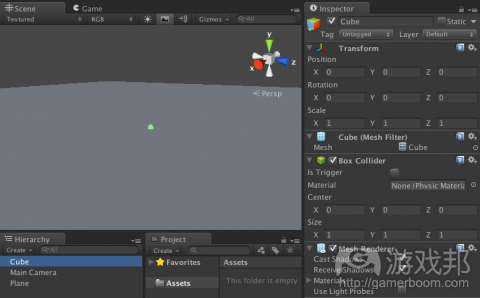
选择Game Object\Create Other\Cube,这样层级视图中就出现一个方块游戏对象了。在层级视图中选中方块,然后在检查器中设置Transform\Position值为0,0,0。结果如下图所示:
点击移动工具,然后在场景小座标上点击Y轴,将对象的移动限制在Y轴上。移动方块,使它位于平面(地面)之上。你还可以通过设置位置属性值为0,1,0达到相同的效果。
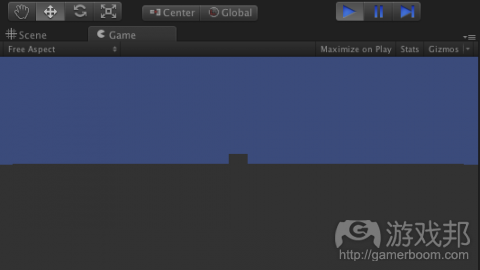
现在我们迎来激动人心的时刻了——点击工具条上的Play按钮,预览你的游戏:
你现在就是在用Unity Editor测试你的游戏。你应该换到游戏视图,结果如下图所示:
你现在看到的是通过场景的主摄像机看到的游戏。你的角色,这个方块英雄就站在地面的远处——多么孤独而勇敢的存在啊!
这个游戏还没有什么看点,因为你还没添加任何组件来调整角色的行为。并且,场景有点暗了。我们先来解决场景问题,也就是给场景添加一个光源。
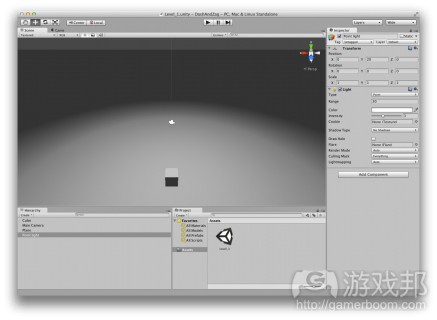
再次点击Play按钮,退出游戏预览。回到场景视图,添加光源:选择Game Object\Create Other\Point Light。像平常一样,移动光源到合适的地方,然后进一步调整位置。在检查器中设置transform position属性值为0,0,0。
现在调整光源的高度和亮度,以便看清场景。给你提示一下:使用移动工具,只沿着Y轴移动。
高度调好后,就可以调亮度了:在Light组件中修改Range(范围)和Intensity(强度)设置。如果想看得更清楚一点,可以利用手工具来环转场景。
有了足够的光之后,点一下Game选项卡(不是点击Play按钮)切换到游戏视图,你就可以看清场景了。来回移动光源,直到你可以看到角色。
调整完后,点击Play按钮检查修改效果。当你切换到游戏视图时,你看到的结果应该如下图:
恭喜你啦,你已经添加完教程现阶段要求的所有游戏对象了。记住,你应该先设计游戏玩法,然后再考虑图像。
既然你已经做好一些有意义的东西了,那就将结果作为场景保存到项目中吧。项目可以由一个或多个场景组成。你可以把一个场景等同于游戏的一个关卡。
在这个教程中,你可以将各个部分当作一个场景。这是一个仿造的游戏关卡的概念,但你可以重复利用一个场景的资源。
保存场景的方法是选择File\Save Scene,然后在Save Scene的对话框中输入场景名称为Level_1。你的项目视图将更新成你刚做好的场景。
事件函数
游戏现在还是静态的。我们必须让它“活”起来。
你可以通过制作自己的脚本或使用已打包的脚本,附加到相应的游戏对象上,从而让对像活动起来。例如,在本教程的第一部分,你做了一个“通过触摸移动角色”的脚本。你制作的这个脚本应该响应触摸事件,以改变方块英雄的位置和旋转情况。
Unity支持的脚本语言有:JavaScript、C#和Boo。本教程使用的是JavaScript。Unity的脚本语言包括预定义的事件函数,你可以用它定义游戏对象的行为。
最常用的事件函数是Update()。如果你在脚本中定义这个函数,每一帧它就会被调用一次。每一帧游戏显示就会绘制一次,所以Update函数就负责帧中的显示。
游戏以每秒某数量的帧运行,记住,这个速率根据游戏运行的平台、其他应用占用的系统资源会有所不同。这意味着,你不应该把东西做得太密集,并且你不可能估计到那个速率到底是多少。
另一个预定义事件函数FixedUpdate()不同于Update(),它是个固定的帧速。如果你的脚本定义了这个方式,它就会每隔一段固定的时间调用一次(相比之下,Update方式的每一次调用可能各不相同)。
因为物理是非常讲究时间的,所以更适合使用FixedUpdate()函数处理任何物理相关的活动。例如,现在有一个使用物理的游戏对象,如刚体(之后会学习到)。当这个对象与另一个对象相撞时,你必须计算作用到对象上的力量,这就要通过FixedUpdate()函数来实现。
至于像改变对象的位置或旋转之类的操作,最好使用Update()函数。
第三个实用的函数是Start(),在第一帧update发生以前调用。一般会把初始化放在这里。
最后是Awake(),它在游戏开始时调用。也是放初始化代码的好地方。
触摸
我们来尝试一下。创建一个新脚本:选择Assets\Create\Javascript。这样,一个带默认名称“NewBehaviorScript”的新脚本就出现在你的项目视图中。点击脚本名称,重命名为“MoveSimple”。
双击脚本打开它。它应该出现在附带的MonoDevelop编辑器里,包含以下代码:
#pragma strict
function Start () {
}
function Update () {
}
Start()和Update()函数已经帮你写好了,因为它们是常用的事件函数。如果你不需要Start()函数,那就去掉它。添加如下变量,它们是用来控制方块英雄的移动和旋转速度:
var speed : float = 3.0;
var rotateSpeed : float = 10.0;
用如下代码替换空白的Update():
function Update () {
// Detect mouse left clicks
if (Input.GetMouseButtonDown(0)) {
// Check if the GameObject is clicked by casting a
// Ray from the main camera to the touched position.
var ray : Ray = Camera.main.ScreenPointToRay
(Input.mousePosition);
var hit : RaycastHit;
// Cast a ray of distance 100, and check if this
// collider is hit.
if (collider.Raycast (ray, hit, 100.0)) {
// Log a debug message
Debug.Log(“Moving the target”);
// Move the target forward
transform.Translate(Vector3.forward * speed);
// Rotate the target along the y-axis
transform.Rotate(Vector3.up * rotateSpeed);
} else {
// Clear the debug message
Debug.Log(“”);
}
}
}
保存修改。
这份代码首先寻找鼠标点击事件,特别是鼠标左键的点击。当使用GetMouseButtonDown函数时,参数“0”表示左键单击,“1”表示右键单击,“2”表示中键单击。如果检测到单击事件,代码就会使主摄像机生成一道光束(想一下激光笔),移到鼠标点击的位置。
collider.Raycast()函数会检测脚本中的碰撞器是否被光束击中。如果碰撞器被击中,collider.Raycast()就会返回“true”。这个函数调用有3个参数:
1、你构建的光束
2、RaycastHit对象,如果碰撞器被击中,还包含更多细节
3、光束的长度参数
假设结果是“true”,接下来的代码就会让角色向前移动,speed变量决定它的速度,rotateSpeed变量决定它的旋转。transform.Translate()函数将游戏对象按它的Vector3输入指定的方向和距离进行移动。
Vector3是代表一个具有方向和长度或大小的对象的3D矢量。这个矢量可以分解成X、Y和Z组件。
在代码中,你的方块英雄向前移动,距离增加器是根据speed变量计算的。Vector3.forward与Vector3(0,0,1)一样,速度增加器为3就是把方块按Vector3(0,0,3)移动。
角色的移动方向与角色的本地座标有关。选择方块,然后使用移动工具,你看到的Z轴方向就是角色将前进的方向。
transform.Rotate()函数会根据由Vector3输入指定的角度旋转游戏对象。Euler角就是用来描述游戏对象的方向的。Euler角Z度就是绕着Z轴旋转,Euler角X度就是绕着X轴旋转,Euler角Y度就是绕着Y轴旋转。
在以上代码中,角色使用Vector3.up或Vector(0,1,0)作旋转动作,表示绕着Y轴移动。旋转角度按rotateSpeed增加。旋转与角色的本地座标有关。所以你的方块英雄将绕着它的Y轴旋转,你知道的,这与全局的Y轴是不一样的。
注:真正的游戏绝对不会使用这类移动方式来控制角色。本教程是为了介绍关于移动游戏对象的基本概念才使用的。教程后面使用的将是更真实的移动方式。
这份代码包含两个Debug.Log()语句。当游戏在运行时,log输出就会在Unity控制器中打印。在Unity Editor的底部,你可以看到最后一次的log输出。你还可以通过选择Window\Console看到前一次log输出,或清除log记录。
你应该时时注意Unity Editor底部的log输出,因为那就是显示脚本错误的地方。
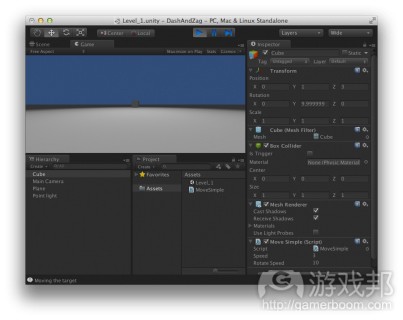
通过代码定义行为后,就可以把行为赋给游戏对象了。在层级视图中选择方块,然后选择Component\Scripts\Move Simple。这个步骤就是添加一个脚本行为给游戏对象,你也可以简单地选择你已经做好的脚本(名称为MoveSimple)。
注意,检查器现在包含一个MoveSimple的脚本段落。你可以在检查器视图中看到你在脚本、speed和rotateSpeed中定义的公共变量。你现在可以只调整这些公共变量,而不必变更基础脚本。
这意味着如果在场景中有两个角色带有MoveSimple脚本,那么只要增大Inspector\Move Simple\Speed的数值,就可以让其中一个角色移动得比另一个更快。
点击Play预览游戏。点一下角色让它移动,注意检查器中的位置和旋转属性的变化。
注意,位置从0,1,0变成0,1,3了——换句话说,根据速度增加器,角色在Z轴上移动了3。旋转也从1,1,1变成1,10,1,这是旋转速度增加器造成的结果。
游戏在运行时,你可以在检查器中调整速度和旋转速度的变量。点击角色后,增加速度值,观察角色位置的变化。
停止游戏,注意速度和旋转速度变量会恢复到初始值。在游戏运行中你做的任何调整都是暂时的。这有助于你尝试不同的数值,结束预览后回到初始设置。如果你决定改变设置,那就要在测试游戏以前进行。
注意,当你运行游戏时,控制器记录正确的排错声明,这取决于角色是否被点击。
摄像机的设置
你应该已经注意到,当你移动方块英雄时,它就会离摄像机越来越远——感觉不太好。就像无微不至的父母照看刚学会走路的孩子,你希望让主摄像机在角色后面一直跟着。这是第三人称射击游戏的典型做法。
选择Assets\Import Package\Scripts,在Items to Import窗口中选择SmoothFollow脚本,然后点击Import:
注:如果当你选择Assets\Import Package\Scripts时没有看到导入选择的对话框,那么就试一下退出Unity后重新启动。这么做对我来说是有效的。
在你的项目视图中应该可以看到新的Standard Assets文件夹。浏览它的下级文件夹可以看到SmoothFollow脚本。双击这个脚本,在MonoDevelop中打开,这样你就看到了代码的关键部分。
var target : Transform;
以上表示被追踪目标的公共变量。使用目标的转变信息来设置追踪者(主摄像机)的位置和旋转。
追踪者的位置和旋转在LateUpdate()中设置,这是另一个预定义事件函数。这个函数是在Update()函数完成后调用的,一般你会把与发生在Update()中的操作有关的代码放在LateUpdate()中。
当方块英雄的位置和旋转在MoveSimple脚本定义的Update()中改变了,摄像机就会在SmoothFollow脚本的LateUpdate()函数中更新它自己的位置和旋转。
..
var wantedRotationAngle = target.eulerAngles.y; // 1
var currentRotationAngle = transform.eulerAngles.y;
..
currentRotationAngle = Mathf.LerpAngle (currentRotationAngle, wantedRotationAngle, rotationDamping * Time.deltaTime);
..
var currentRotation = Quaternion.Euler (0, currentRotationAngle, 0);..
transform.position = target.position; // 2
transform.position -= currentRotation * Vector3.forward * distance;
transform.position.y = currentHeight;
..
transform.LookAt (target); // 3
以上代码段落有几个关键点:
1、找到追踪者必须旋转的角度,以匹配目标的旋转。旋转是绕着Y轴进行的。
2、追踪者在目标之后沿着Y轴移动,距离由距离变量决定。追踪者还根据目标的旋转绕着Y轴旋转。最后,确保追踪者在目标上方的高度固定。
3、确保追踪者总是面向目标。
现在将脚本赋给主摄像机。在层级视图中选择主摄像机,然后选择Component\Camera Control\Smooth Follow:
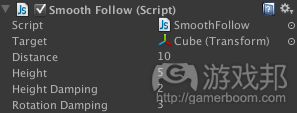
检查Smooth Follow的新段落是不是添加到主摄像机的检查器中。
注意,Target变量现在还没赋值。你要把方块这个游戏对象指定给这个输入。在主摄像机仍然选中,Smooth Follow脚本在检查器中可见时,将方块游戏对象从层级视图中拖曳到Target变量。或者,你也可以点击Target值旁边的带小点的圆圈,从对象列表中选择。
现在,Target变量已经与方块(角色)连系起来了。
点击Play按钮。你应该可以马上看到视野的变化,你现在是从给定的高度观察角色。点击角色移动它,观察摄像机如何追踪角色。注意主摄像机在检查器中的转变信息会随着方块英雄的移动而发生变化。
停止游戏,保存后再进行下一步。
在iOS上部署
你一定等不及想看看游戏在iOS设备上的运行情况。好消息是,Unity Pro试用版允许你在iOS上测试你的项目!
最好能在真正的设备上测试你的Unity项目。你总不希望仅在模拟器上测试吧,即使你可以做到。因为游戏开发严重依赖基础硬件,所以只有在真正的设备上测试,才能更容易发现性能问题。
在iOS设备上测试以前,你必须是已注册的苹果应用开发者,具有设备部署能力。如果你不是,那么就花99美元注册一下吧。
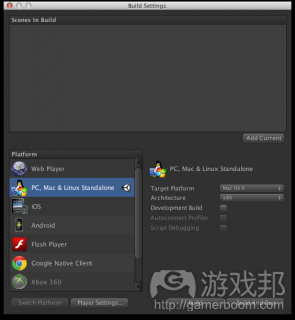
Unity可以把你的游戏建成X代码项目,使你可以在iOS设备上部署。选择File\Build Settings:
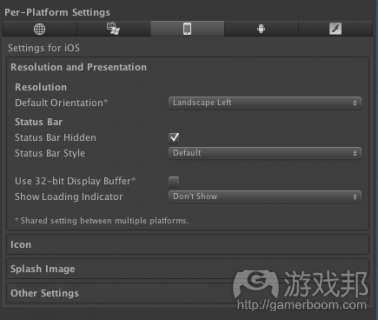
选择iOS平台,然后点击Switch Platform。再点击Build Settings对话框底部的Player Settings按钮。Unity Editor的检查器会显示Player Settings,你可以自定义你的iOS部署。请做以下调整:
默认方向:横版向左
其他设置
捆绑标识符:这样你的应用才能顺序部署到设备上。
SDK 版本: Device SDK
瞄准的iOS版本:4.3
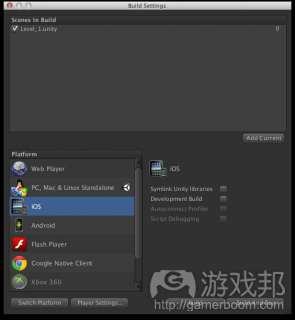
返回到Build Settings对话框。在Scenes In Build窗口添加场景。因为你的项目只有一个场景,所以很容易添加。点击Add Current按钮就可以添加Level_1 scene了。
点击Build按钮,启动创建进程。你可以指定某个地方保存X代码项目:在Save As中输入DashAndZag,然后选择Save。
Unity现在就建立了一个项目,打开包含X代码版本的文件夹。这个项目的名称是Unity-iPhone.xcodeproj。
打开X代码的项目,确保scheme设置成Unity-iPhone,选择你的设备,然后建立项目。
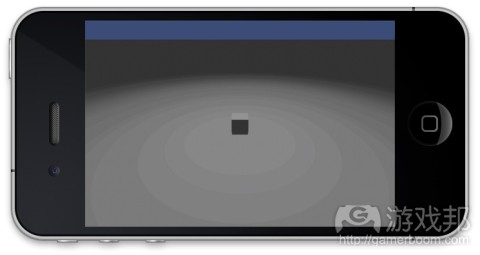
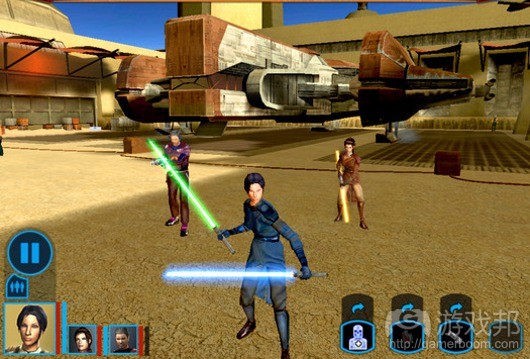
运行应用。你首先会看到带Unity默认标志的画面。然后,你的游戏就出来了:
触碰方块英雄,观察它的移动。你已经将你的第一个Unity项目部署到iOS上了!
操作
等等,事情还没完呢!
如果你玩得更久一点,你会注意到一件奇怪的事。你可以通过一根手指触摸方块来移动它。但是,当你用两根手指放在离它等距离的地方时,方块也会移动。这是怎么回事?
从MoveSimple脚本中调出这行代码:
var ray : Ray = Camera.main.ScreenPointToRay
(Input.mousePosition);
这行代码就是让摄像机发出的光束移到触摸点。Input.mousePosition就表示触摸点。当项目在iOS设备上运行时,Input.mousePosition是按当前所有触摸的平均位置计算的,所以当你的手指那么放时,角色就移动了。
你应该修复这个问题,以免困扰用户。你可以使用Unity中的触摸相关函数来检测触摸事件,以便找到更准确的触摸位置。
开打MoveSimple脚本。在顶部(其他变量所在的地方)添加一个标记,表示你可以使用触摸输入:
private var isTouchDevice : boolean = false;
你可以在iOS和Unity Editor中测试。如果你只在iOS上测试,那么你就可以忽略触摸检查逻辑,只使用触摸相关的函数。
下一步是添加一个Awake()函数,它会执行运行期检查,以检测游戏是否在iOS环境下运行。Awake()函数只调用一次,也就是在游戏载入的时候:
function Awake() {
if (Application.platform == RuntimePlatform.IPhonePlayer)
isTouchDevice = true;
else
isTouchDevice = false;
}
Application.platform返回游戏正在运行的平台。RuntimePlatform.IPhonePlayer表示游戏正在iOS上运行。
最后,将你的Update()函数作如下修改:
function Update () {
var clickDetected : boolean;
var touchPosition : Vector3;// Detect click and calculate touch position
if (isTouchDevice) {
clickDetected = (Input.touchCount > 0 && Input.GetTouch(0).phase == TouchPhase.Began);
touchPosition = Input.GetTouch(0).position;
} else {
clickDetected = (Input.GetMouseButtonDown(0));
touchPosition = Input.mousePosition;
}// Detect clicks
if (clickDetected) {
// Check if the GameObject is clicked by casting a
// Ray from the main camera to the touched position.
var ray : Ray = Camera.main.ScreenPointToRay
(touchPosition);
var hit : RaycastHit;
…
保存修改。
你正在使用两个新本地变量,clickDetected和touchPosition,检测点击和保存点击位置。如果是在iOS上运行,那么就是通过查看触摸来检测点击。然后,根据第一次触摸的位置来计算点击位置。如果你不是在iOS上运行,那么逻辑如之前的一样。
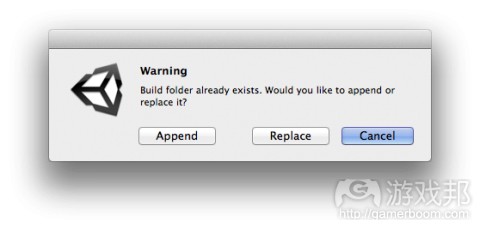
在重建项目以前,请关闭X代码项目。现在,从Build Settings对话框中重建。如果出现以关于Build文件夹已存在的警告,那就选择Replace。
X代码项目重建好后,在iOS设备上运行游戏。检验是否能移动方块英雄,以及用两根手指移动它的问题是否解决。
结尾
恭喜啦,你已经初步掌握Unity的基本概念和在iOS上部署!
在本教程的下一部分中,你将学习如何改进方块英雄的移动和完善场景。另外还要做一点调试工作!
(本文为游戏邦/gamerboom.com编译,拒绝任何不保留版权的转载,如需转载请联系:游戏邦)
Beginning Unity 3D for iOS: Part 1/3
by Christine Abernathy
Unity is one of the most popular game engines these days. And for good reason – Unity has a powerful visual editor that makes it very easy to get started, a ton of power and functionality, a great community, attractive pricing, and more!
If you’ve been eager to try out Unity for yourself, look no further than this tutorial! In this tutorial you’ll learn how to create a simple iOS game with Unity – and no prior experience is required!
The simple game you’ll create in this tutorial will challenge the player to get to a finish line within a certain time limit while avoiding obstacles along the way.
Along YOUR way, you will be introduced to the Unity development environment and workflow, and learn (or review) the basic concepts of game design.
The tutorial will be split into three parts:
In Part 1, you’ll learn the basics of using Unity by creating a game with a simple player control mechanism. You’ll also learn how to deploy your project on iOS.
In Part 2, you’ll learn how to enhance the player’s movements using pre-built controller objects and some scripts found in the standard packages, how to debug using Unity Remote, and how to customize the scene.
In Part 3, you’ll add gameplay to your project and build on game design concepts that include adding prefabs, timers, menus and sounds to enrich the game experience.
Ready to add a powerful new framework to your skillset? Keep reading on! :]
Getting Started
As you move through this tutorial series, you’ll start to become familiar with the Unity development workflow, which has four basic components:
Assembling your game scene in the Unity Editor.
Scripting using the MonoDevelop Editor.
Remote debugging with Unity Remote.
Publishing to your iOS device through the Unity Editor.
In this first part of the tutorial, you’ll install Unity, learn the basics of the Editor interface, and create a project that introduces you to the basic game concepts.
By the end of Part 1, your game will have a player that is able to move via touch triggers. You’ll also test your project in the Unity Editor and with an iOS device.
This tutorial uses Unity version 4 – so go ahead and download Unity if you don’t have it already.
Unity’s doffers a free 30-day trial of the full version of Unity Pro. This version of Unity will allow you to develop games and build them to run on iOS. Although Unity is available for both Mac and Windows, this tutorial is written based on the Mac environment.
Note: The Unity software package is a fairly hefty one at close to 1GB and, depending on your Internet connection, it might take a while to download. So download the file in advance if you want to get going immediately.
Create the Project
Once you’ve downloaded Unity and installed it, launch the Unity application. If this is your first time launching Unity, you will be prompted to activate your copy. Select the option to activate the free 30-day trial of Unity Pro, as shown in the screenshot below:
Then you will need to create a Unity account if you do not have one, confirm your e-mail address, and login to your account via the Unity app.
Once you login, you’ll be asked to answer a few questions. You can skip them if you scroll to the very bottom of the list and tap “Not Right Now.” :] And then, finally, you can start using Unity.
At this point you should be presented with the Unity interface with a default project already in place – something like the following:
Discard that project and create a fresh project by selecting File\New Project from the menu. You’ll be presented with the Project Wizard:
In the Project Wizard, click Set and navigate to the folder where you wish to save your project. Enter DashAndZag for the project name and click Save, then Create Project. (You will be asked whether you want to save the previously open default project, but you can opt not to do so, unless of course you want to save it for some reason…)
Note: The Project Wizard includes some standard packages you can import during the initial project creation. Ignore this for now. You’ll import any packages you need for this tutorial later on.
Unity will close the current project and re-launch with your new project:
Ah, a fresh canvas! But what are all these controls, windows and tabs? Where to start?
Getting to Know UI…
It’s worth taking some time to get real cozy with the Unity Editor interface, so take a look around. The first stop on your tour is the Editor Layout tab in the upper-right corner. Change the view to Wide mode:
Here’s a breakdown of what you see, with the various sections highlighted:
Project View: Your Unity project contains an Assets folder whose contents are shown in this section. This is where the scripts, scenes, prefabs and other Unity objects that you create show up.
Hierarchy View: This contains the GameObjects that are in the current scene. Every object that shows up in a Unity game is known as a GameObject. These could be simple objects that you create from the GameObject menu or assets you import. Your initial project will contain one GameObject: the Main Camera.
Toolbar: The toolbar allows you to manipulate objects in the Scene View or Game View, to control how your Editor views are displayed and to control the game preview in the Editor.
Scene View: This view is where you position your GameObjects to set up your game. The Scene View contains a Scene Gizmo (the thing in the top-right corner with the marked axes) that displays the scene camera’s current orientation.
Game View: This is the view of your game from the camera(s) in your game. You’ll be brought to the Game View when you hit the Play button in the toolbar. Alternatively, you can switch between the Game and Scene views using the tabs at the top of the window.
Inspector: This provides further details about a selected GameObject. You can then modify the object’s properties such as its size or position, or attach scripts to modify the GameObject’s behavior.
You’ll want to be very comfortable using the toolbar transform tools to position GameObjects and navigate around in the Scene View. So let’s dive into that next.
Getting a Hand
The Hand Tool allows you to manipulate your view of the scene.
The best way to understand the Hand Tool’s use is to imagine yourself dropped into the 3D scene with many GameObjects. Some objects in front of you are visible, while others that are behind you are not.
You may wish to step back in the scene (zoom out) to see more of the view, move to the left or right to see other objects, or swivel and pan around to see what’s behind you. The Hand Tool can do this for you.
As you start to add more GameObjects, you’ll find yourself using this tool more and more to establish your view in the scene before positioning GameObjects.
To see the Hand Tool in action, first select it (left-most choice on the toolbar), then select the Main Camera from the Hierarchy View (just so you have something to look at in the Scene View). You can then drag the canvas to move around the scene.
To zoom, you can use your mouse wheel or hold down Control and drag. You can rotate by holding down option and dragging. If you want to reset your view at any time, you can click on one of the axes on the Scene Gizmo in the upper right.
Play around with the hand tool a bit and get comfortable with moving around and using the Control and Option combinations to zoom/rotate.
You’ll be switching between the hand tool and other tools a lot, so it helps to remember its shortcut keys. By default, the keys are bound to the keys on the upper left of your keyboard – Q, W, E, and R for Hand, Move, Rotate, and Scale, respectively.
Note: The Hand Tool does not move objects. It only alters your view of the scene, so it may appear as if the objects are moving. Practice moving around the scene using the various Hand Tool options.
Move It Or Lose It
With the Move Tool, you can move GameObjects in 3D space.
Select the Main Camera (double-click it in the Hierarchy View if you don’t see it in the Scene View) and click on the Move Tool. You should see a gizmo around the Main Camera with arrows representing the three axes. These point to where you can move the object:
The red arrow represents the x-axis, the green arrow the y-axis, and the blue the z-axis. You can translate or move a GameObject by first selecting the object, left-clicking, and then dragging inside the gizmo (the cube portion).
Select the Main Camera and move it around. Take a look at the Inspector’s transform component. The Position section has x, y, and z values representing the GameObject’s position. As you move the object around, notice that these values change.
You can change a GameObject’s transform position using either the Move Tool or by typing the position you want directly into these fields.
If you wish to move a GameObject in only one direction, select the relevant axis in the gizmo, left-click and drag that axis. Test this with the Main Camera object by moving in only the x direction and checking that only the x-position value changes in the Inspector. Repeat the same test with the y and z axes.
At this point you know how to move your personal view of the scene around, as well as how to move objects around. So far so good!
You Spin Me Right Round
The Rotate Tool allows you to rotate GameObjects in 3D space.
To understand the Rotate Tool and how to use it, it’s useful to discuss the Scene Gizmo in more detail. The Scene Gizmo is found on the top-right of the Scene View and has different modes for different views.
One mode (shown in the below right image) is the free-form view that enables you to view your scene in a 3D perspective.
This is useful if you want to get a better representation of what your game looks like in 3D space.
You can click on the text under the gizmo to switch to an isometric view (shown in the below left image). This mode is useful in visualizing a GameObject when it’s being rotated.
Another mode is the x-axis view, which enables you to view your scene as if you’re looking down the x-axis. This is useful if you want to move a GameObject along either the y- or z-axis while keeping the x-axis unchanged:
In a similar fashion, you have the y- and z-axis view modes to enable the view of the scene from those respective axes:
Select the Main Camera. Switch to the free-form perspective mode by right-clicking on the gizmo and selecting Free.
Then click on the text below the gizmo to switch between the isometric and perspective modes. Click on the x-, y-, and z-axis modes in turn to see how the Scene Gizmo and Scene View change.
Select the free-form view once more to test out rotation. With the Main Camera still selected, click the Rotate Tool. You should see a gizmo around the Main Camera containing circles with colors representing the three rotation axes:
Left-click in the center of the Main Camera and use your mouse to drag-rotate it around. Note that the Inspector’s Transform\Rotation properties change as you rotate the object. Note that you can manually edit these values in the Inspector if you’d like.
By clicking in the center of the Main Camera during rotation, you are doing a free-form rotation around all axes. You can also rotate the GameObject around one axis by clicking on one of the colored circles representing that axis. For example, to rotate only around the x-axis, click the red circle to select it, then hold and drag to rotate the object. Repeat the same process to rotate around just the y or z axis.
It All Comes Down to Point of View
Another key concept worth learning at this point is the difference between the local and global (or world) view.
Reset the Main Camera’s rotation to 0,0,0 through the Inspector\Transform\Rotation fields. Click the button so the toolbar says “Local”. Then select the Move Tool so you can see the Scene Gizmo:
Notice that the Scene Gizmo and the Main Camera’s Gizmo line up, in the sense that the x-axes point in the same direction, as do the y- and z-axes. Now rotate the Main Camera around on the z-axis using the Inspector by setting the Transform\Rotation value to 0,0,-20.
Notice that the Main Camera’s Gizmo is now rotated around the z-axis – this represents the axis of the object in its local coordinates. This is different compared to the Scene Gizmo, which shows the global space orientation. Switch to Global view to see the difference.
Later in the tutorial, you’ll learn about moving GameObjects and find that it matters which space (world or local) you specify for the movement to use.
Taking a look at the rotated Main Camera, if you were to now move it in the x-direction based on its local space view, it would end up in a different place than if you were to move it in the x-direction based on the global space orientation. Keep that nugget tucked in your mind for later use!
Before you move on, reset the rotation to 0,0,0 to get back to a clean slate.
Scale Tool
The Scale Tool allows you to, you guessed it, scale GameObjects up or down in size.
As with the other GameObject manipulation tools, you can make your changes along only one of the three axes, and you have the choice of modifying the Inspector\Transform component instead of using the tool.
Select the Main Camera and note that the Scale Gizmo consists of cube handles at the end of each axis and one at the center.
To scale freely across all axes, select the cube at the center of the object and left-click, then move up to make the GameObject bigger and move down to make it smaller. Take a look at the Inspector\Transform\Scale properties. You should see the numbers go up or down as you grow or shrink the object.
Test scaling along the x-axis by selecting the red gizmo handle for the x-axis, and holding and then moving the handle outward. Verify using the Inspector that the Transform\Scale x-value is the only one that changes. Try this with the y and z axes as well.
Once you’re done playing around with the controls, reset the Main Camera to the following settings using the Inspector\Transform section:
Position: 0,1,-10
Rotation: 0,0,0
Scale: 1,1,1
Your Transform menu should look like this:
You will learn about the other Editor interface components as you walk through the tutorial. This includes previewing a game using the Play button and using the Unity debugger.
Lonely No More: Adding GameObjects
Now that you’ve run through the basic concepts, you’re ready to begin adding GameObjects to keep the camera company – it’s been pretty lonely all by itself :]
Right now the camera is looking out on a very desolate world. Never fear – get ready to add a cube GameObject that represents the player, as well as a plane GameObject that represents the floor the player will move upon.
When you’re designing a game with Unity, a best practice is to first develop the gameplay without any fancy assets that represent the player. That way, you can concentrate on optimizing gameplay and player movements without being distracted by graphics.
Another point to note is that Unity is a very good game engine, but you don’t want to use it to create graphic assets. There are many tools out there that are wonderful in the graphics department and Unity is adept at importing assets from a wide range of tools.
Often, the typical division of game development labor is that the game developer works on the gameplay using Unity while the graphics designer creates assets in parallel using their favorite graphics tool. The two converge down the line when it makes sense to bring in the graphical assets to polish up the game.
Now that you’ve got that to think about, let’s get shaking! Add the floor GameObject, represented by a plane, by selecting Game Object\Create Other\Plane.
The new plane GameObject should appear in the Hierarchy View. Select the plane in the Hierarchy View and set Transform\Position to 0,0,0 using the Inspector. Also use the Inspector to scale it up to 50,1,50. Your scene should look something like this:
Next you’ll add the player GameObject, which in your game will be represented by a cube. That’s right, the Heroic Cube!
Select Game Object\Create Other\Cube, and the new cube GameObject should appear in the Hierarchy View. Select the cube in the Hierarchy View and set the Transform\Position to 0,0,0 using the Inspector. Your scene should look like this:
Click on the Move Tool, then click the y-axis in the Scene Gizmo to constrain the object’s move to only the y-axis. Move the Heroic Cube up a little so it’s above the plane (floor). You can also set the transform position to 0,1,0 to move the Cube up a little.
Now comes an exciting moment – click the Play button on the Unity Editor toolbar (at the top) to preview your game thus far:
You’re now testing your game using the Unity Editor. The Editor should switch to the Game View and you should see something like this:
What you’re seeing is a view of the game through the Main Camera in your scene. Your player, the Heroic Cube, is shown in the distance, above the floor – alone in the world, but bravely present!
There’s not much going on in the game because you haven’t added any components to modify the player’s behavior. It’s also a little dark in this scene. You can take care of the latter issue first by adding a light source to your scene.
Stop the game preview by clicking on the Play button again. Back in the Scene View, add a light source. Select Game Object\Create Other\Point Light. As usual, move the light to the origin before making further adjustments to its position. Set the transform position to 0,0,0 using the Inspector.
Now adjust the light’s height and brightness so you can see more of the scene. Here’s a hint: use the Move Tool and constrain movement along the y-axis only.
To adjust the brightness, modify the Range and Intensity settings in the Light component. Make use of the Hand Tool to swivel around if you need to get a better view of the scene.
A good way to see if you have enough light is to switch to the Game View using the Game tab (rather than hitting the Play button). Go back and forth until it looks like you can see your player:
After you’ve made your adjustments, hit the Play button again to verify your changes. Your view should be similar to the following when you switch to the Game View:
Congrats, you’ve added all the GameObjects you need for this stage of the tutorial! Remember, as a good practice you are focusing on gameplay first, then adding graphics later.
Since you’ve done something meaningful, go ahead and save your work as a scene in the project. A project can be made up of one or more scenes. You can think of a scene as the equivalent of a level in a game.
In this tutorial, you’ll represent each part of the tutorial as a scene. This is an artificial concept of a game level, but it allows you to reuse assets from one scene in the next.
To save the scene, select File\Save Scene and in the Save Scene dialog, name your scene Level_1. Your Project View should update with the scene you’ve just created.
Get Moving: Event Functions
The game is currently way too static! It’s in dire need of movement to make it come alive.
You can add movement by creating your own scripts or using pre-packaged scripts that you attach to the relevant GameObject to perform an action. For example, in Part 1 of this tutorial, you’ll create a script that moves the player when touched. The script you create needs to respond to touch events to change the Heroic Cube’s position and rotation.
Unity supports these languages for scripting: JavaScript, C#, and Boo. In this tutorial you’ll be using JavaScript. Unity’s scripting language includes pre-defined event functions that you can use to help define the GameObject’s behavior.
The event function that you’ll use the most is the Update() function. If you define this function in your script, it will be called once per frame. Your game display is drawn once per frame and the Update function will therefore be responsible for the display during a particular frame.
A game runs at a certain amount of frames per second and one thing to keep in mind is that this rate may vary depending on the Platform on which the game is being run, and on how tied up the OS resources are by other applications. This means you shouldn’t do anything very time intensive here, and you can’t assume that it is called at any particular rate.
Another pre-defined event function, FixedUpdate(), is called at a fixed rate independent of the frame rate. If your script defines this method it will be called at a fixed interval (in comparison to the Update method which can vary quite a bit from call to call).
You’ll want to process any physics-related work inside of a FixedUpdate() function, since physics work is very time sensitive. For example, you may have a GameObject that uses physics, such as RigidBody (you’ll learn more about this later). When this object collides with another object you may want to calculate the force to apply to the object, and you should do it in a FixedUpdate() function.
For operations like changing an object’s transform position or rotation, it’s perfectly fine to do this inside of an Update() function.
A third useful function is Start(), called before the first frame update happens. You’ll typically put initialization operations here.
Finally, the Awake() function is called when the game begins. It’s another good place to put initialization code.
The Right Touch
Let’s try this out. Create a new script by selecting Assets\Create\Javascript. A new script with the default name NewBehaviorScript should show up in your Project View. Click inside the script’s name in the Project View and rename it to MoveSimple.
Double-click on the script to open it. It should open in the bundled MonoDevelop Unity Editor and should contain the following code:
#pragma strict
function Start () {
}
function Update () {
}
The Start() and Update() functions have been stubbed out for you, as they are commonly used event functions. You won’t be needing the Start() function, so remove it. Add the following variables that you’ll use to control the Heroic Cube’s movement and rotation speed below the #pragma line:
var speed : float = 3.0;
var rotateSpeed : float = 10.0;
Replace the empty Update() function with the following:
function Update () {
// Detect mouse left clicks
if (Input.GetMouseButtonDown(0)) {
// Check if the GameObject is clicked by casting a
// Ray from the main camera to the touched position.
var ray : Ray = Camera.main.ScreenPointToRay
(Input.mousePosition);
var hit : RaycastHit;
// Cast a ray of distance 100, and check if this
// collider is hit.
if (collider.Raycast (ray, hit, 100.0)) {
// Log a debug message
Debug.Log(“Moving the target”);
// Move the target forward
transform.Translate(Vector3.forward * speed);
// Rotate the target along the y-axis
transform.Rotate(Vector3.up * rotateSpeed);
} else {
// Clear the debug message
Debug.Log(“”);
}
}
}
Save your changes.
This code first looks for mouse click events, specifically from the left mouse button. A parameter of “0″ signifies a left-click, “1″ a right-click and “2″ a middle-click when used with the GetMouseButtonDown function. If a click is detected, then the code constructs a ray (think of a laser pointer) from the Main Camera to the mouse click position.
The collider.Raycast() function detects if the collider attached to this script is hit by the ray. If the collider is hit, the collider.Raycast() call returns true. The function call takes in three arguments:
The ray you constructed.
A RaycastHit object, which will contain more details if the collider is hit.
A ray length argument.
Assuming a true result, the follow-on code then nudges the player forward based on the speed variable, as well as rotates the player based on the rotateSpeed variable. The transform.Translate() function moves the GameObject transform in the direction and distance specified by its Vector3 input.
Vector3 is a 3D vector representation of an object that has direction and a length or magnitude. The vector can be broken down into x, y and z components.
In the code, your Heroic Cube is moved in the forward direction at a distance multiplier calculated based on the speed variable. Vector3.forward is the same as Vector3(0,0,1) and a speed multiplier of 3 will move the Cube by Vector3(0,0,3).
The direction in which the player moves is relative to the player’s local space. To get a sense of this direction, select the Cube, then the Move Tool and view the z-axis direction. That’s the direction in which the player will move.
The transform.Rotate() function rotates the GameObject transform based on an angle specified by the Vector3 input. Euler angles are used to describe the orientation of a GameObject. In the case of a rotation, the object will be moved Euler angles z degrees around the z-axis, Euler angles x degrees around the x-axis, and finally Euler angles y degrees around the y-axis.
In the code above, the player is being rotated using Vector3.up or Vector(0,1,0), which represents movement around the y-axis. The rotation angle is multiplied by rotateSpeed. The rotation is relative to the player’s local space. So your Heroic Cube will rotate around its y-axis, which, as you know, could differ from the global y-axis.
Note: A real game would never control a player using these types of movements. They are used here simply to illustrate the basic concepts involved in moving GameObjects and will be replaced with more realistic movements in the upcoming parts of the tutorial.
The code contains two Debug.Log() statements. The log output is printed in the Unity console when the game is running. You can see the last log output at the bottom of the Unity Editor. You can also open up the console by selecting Window\Console to see previous log output, as well as clear the logging.
You’ll want to keep an eye on log output at the bottom of the Unity Editor, as that’s where any script errors you have are displayed.
Now that you’ve defined a behavior via code, you can assign it to a GameObject. Select the Cube in the Hierarchy View, then select Component\Scripts\Move Simple. This step is called adding a script behavior to a GameObject and you are simply selecting the script (named MoveSimple) that you already created.
Notice that the Inspector now contains a Move Simple script section. The public variables you defined in code, speed and rotateSpeed, are visible in the Inspector View. You can now modify these public variables for just the attached GameObjects without changing the underlying script.
This means if you had two players in the scene with the MoveSimple script attached to them, you could make one player move faster than the other by increasing the speed value via the Inspector\Move Simple\Speed field.
Click Play to preview the game. Touch the player one tap at a time and pay attention to the changes in the transform position and rotation properties in the Inspector.
Notice that the transform position that started at 0,1,0 has changed to 0,1,3 – in other words, there’s been a translation movement in the z direction of 3 due to the speed multiplier. The rotation has also changed from 1,1,1 to approximately 1,10,1, which closely matches the rotateSpeed multiplier.
While the game is running, you can change the speed and rotate speed variables in the Inspector. Increase the speed and watch the transform position after clicking on the player.
Stop the game and notice that the speed and rotate speed variables are reset to their original values. Any changes you make while playing the game are temporary. This allows you to tinker around with various settings and come back to the original settings when you’ve completed your preview. If you then want to make lasting changes, you can do so before testing the game again.
Note that as you play the game, the console logs the correct debug statement, depending on whether or not the player is clicked.
Get It All On Camera
You’ll likely have noticed that as you move the Heroic Cube, it moves further and further away from the camera – not a good feeling. Like a well-meaning parent with an ambitious toddler, you’ll modify your game to have the Main Camera track the player at a fixed position from behind. This is typical modus operandi for third-person shooter games.
Select Assets\Import Package\Scripts and in the Items to Import section, choose only the SmoothFollow script and click Import:
Note: If you don’t get the import selection dialog when you select Assets\Import Package\Scripts, then try quitting Unity and restarting. That worked for me. :]
A new Standard Assets folder should show up in your Project View. If you navigate through its subfolders you should eventually see a SmoothFollow script. Double-click the script to open it in MonoDevelop so you can look through the key portions of code.
var target : Transform;
The above represents the public variable for the target being tracked. The target’s transform info is used to set the follower’s (or Main Camera’s) position and rotation.
The follower’s position and rotation are set in LateUpdate(), another pre-defined event function. This function is called just after the Update() function completes, and is typically where you would put code that has a dependency on operations that happen in Update().
Once the Heroic Cube’s position and rotation are changed in the Update() defined in the MoveSimple script, the camera can update its own position and rotation in the LateUpdate() of the SmoothFollow script.
..
var wantedRotationAngle = target.eulerAngles.y; // 1
var currentRotationAngle = transform.eulerAngles.y;
..
currentRotationAngle = Mathf.LerpAngle (currentRotationAngle, wantedRotationAngle, rotationDamping * Time.deltaTime);
..
var currentRotation = Quaternion.Euler (0, currentRotationAngle, 0);
..
transform.position = target.position; // 2
transform.position -= currentRotation * Vector3.forward * distance;
transform.position.y = currentHeight;
..
transform.LookAt (target); // 3
..
Here are the key points for the above code sections:
Find the angle to which the follower needs to rotate, to match the target rotation. The rotation is around the y-axis.
Move the follower behind the target by an offset corresponding to the distance variable. Also rotate the follower around the y-axis using the results from #1. Finally, make sure that the follower ends up at a fixed height above the target.
Ensure that the follower is always facing the target.
Now attach this script to the Main Camera. Select the Main Camera in the Hierarchy View, then select Component\Camera Control\Smooth Follow:
Verify that a new section for Smooth Follow is added to the Main Camera’s Inspector.
Note that the Target variable is unassigned at this point and has None next to it. You’ll want to assign the Cube GameObject to this input. While the Main Camera is still selected and the Smooth Follow script visible in the Inspector, drag the Cube GameObject from the Hierarchy View to the Target variable. Alternatively, you can tap the little circle with a dot in the center next to the Target value to get a list of objects from which to select.
The Target variable should now be linked to Cube (the player).
Click the Play button. You should immediately see a change in the view, as you’re now looking down at the player from a given height. Click on the player to move it, and watch how the camera tracks the player. Pay attention to the Main Camera’s transform info in the Inspector and observe it change as the Heroic Cube moves.
Stop the game, and save the scene before moving on to the next step.
Deploying on iOS
If you’re like me, you can’t wait to see how this works on an iOS device. The good news is that the trial version of Unity Pro allows you to test your project on iOS!
It’s a best practice to test your Unity projects on an actual device (i.e. not the Simulator). You don’t want to limit your testing to just the Simulator, even though you can do that. Since game development relies so much on the underlying hardware, you want to test on a real device as soon as you can to find any performance issues early.
To deploy to an iOS device, you need to be a registered Apple developer with device deployment capabilities. If you haven’t already, go ahead and fork over the $99 – we’ll be right here waiting for you.
Unity can build your game as an Xcode project that you can deploy to an iOS device. To set this up, select File\Build Settings:
Select the iOS platform and click Switch Platform. Then click on the Player Settings button found at the bottom of the Build Settings dialog. Unity Editor’s Inspector should now display Player Settings that you can customize for your iOS deployment. Make the following changes:
Resolution and Presentation
Default Orientation: Landscape Left
Other Settings
Bundle Identifier: the Bundle Identifier needed so that your app can be properly built on your device.
SDK Version: Device SDK
Target iOS Version: 4.3
Go back to the Build Settings dialog. Add the scenes that will be part of the iOS build in the Scenes In Build section. Since you only have one scene in your project, this is a no-brainer. Add the Level_1 scene by clicking the Add Current button.
Click the Build button to initiate the build process. You’ll be asked to specify a location to save the Xcode project. Navigate to where you want to save your Xcode project, enter DashAndZag in the Save As field, and select Save.
Unity will now build the project and open the folder that contains the Xcode version. The project will have the name Unity-iPhone.xcodeproj.
Open the project using Xcode, make sure that the scheme is set to Unity-iPhone, select your device, and build the project.
Run the app. You should first see a splash screen with the default Unity logo. Then, your game should come up:
Touch the Heroic Cube and watch it move around. You’ve just built and deployed your first Unity project on iOS!
One Finger to Rule Them All
But wait, you’re not done yet!
If you play the game a bit longer, you’ll notice something odd. You can move the Cube by touching it with one finger. However, the Cube will also move when you use two fingers placed at an equal distance from it. What’s going on?
Recall this line of code from your MoveSimple script:
var ray : Ray = Camera.main.ScreenPointToRay
(Input.mousePosition);
This casts a ray from the camera to the touch point. The touch point is represented by Input.mousePosition. When running on an iOS device, Input.mousePosition is calculated as an average position of all current touches. Placing your fingers so that the average falls on the player makes the player move!
You should fix this to avoid confusing the user. You can use touch-related functions available in Unity to detect touch events and find the position of a touch more accurately.
Open your MoveSimple script. Add a flag at the top (where the other variables are) that will indicate that you can use touch input:
private var isTouchDevice : boolean = false;
You’re doing this so you can test on both iOS and the Unity Editor. If you’re only going to test on iOS, then you can bypass the touch check logic and simply use the touch-related functions.
Next add an Awake() function that will perform a runtime check to detect if the game is running in an iOS environment. The Awake() function is called only once, when the game is loaded:
function Awake() {
if (Application.platform == RuntimePlatform.IPhonePlayer)
isTouchDevice = true;
else
isTouchDevice = false;
}
Application.platform returns the platform on which the game is running. RuntimePlatform.IPhonePlayer indicates that the game is running on iOS.
Finally, modify your Update() function as follows to handle touch input:
function Update () {
var clickDetected : boolean;
var touchPosition : Vector3;
// Detect click and calculate touch position
if (isTouchDevice) {
clickDetected = (Input.touchCount > 0 && Input.GetTouch(0).phase == TouchPhase.Began);
touchPosition = Input.GetTouch(0).position;
} else {
clickDetected = (Input.GetMouseButtonDown(0));
touchPosition = Input.mousePosition;
}
// Detect clicks
if (clickDetected) {
// Check if the GameObject is clicked by casting a
// Ray from the main camera to the touched position.
var ray : Ray = Camera.main.ScreenPointToRay
(touchPosition);
var hit : RaycastHit;
…
Save your changes.
You are using two new local variables, clickDetected and touchPosition, to detect clicks and save the click position. If running on iOS, you detect the click by checking that a touch has just begun. Then you calculate the click position based on the position of the first touch. If you’re not running on iOS, the logic is the same as before.
Before rebuilding the project, close the Xcode project. Now, rebuild in Unity from the Build Settings dialog. If presented with a warning about the Build folder already existing, select Replace.
Once the Xcode project is rebuilt, open it and run the game on your iOS device. Verify that you’re able to move the Heroic Cube and that the wrinkle allowing you to move it with two fingers is now gone.
Where to Go From Here?
Congratulations, you’ve just finished learning the basics of developing with Unity and deploying on iOS! Here are some downloads with all of the code from the project up until this point: Unity Project, Xcode Project.
In the next part of the tutorial, you’ll build on this rudimentary game by enhancing the Heroic Cube’s movement and improving the scenery. You’ll also do a bit of debugging!
In the meantime, if you have any questions or comments about what you’ve done so far, jump into the conversation in the forums!(source:raywenderlich)




















 闽公网安备35020302001549号