分享制作基于web的3D建模工具的简要方法
作者:Daniel Cook
我沉迷于对用户生成内容的研究,尤其是美术工具。近期,我在《Realm of the Mad God》中感受到了非凡的体验。Alex Carobus在游戏中添加了简单的像素编辑器,允许任何人制作可能用于游戏中的精灵。很快,玩家们便制作出成千上万个讨人喜欢的美术内容。
这给我带来了灵感,我为自己确定了一个设计挑战。
1、浏览器中的3D。以浏览器为平台的简易3D模型工具会是什么样子?
2、独特的风格:我希望使用这个工具制作出来的东西能够立即被人们识别。这意味着需要对工具进行彻底的限制。《Land-a Panda》中的挤压3D风格给我带来了很大的灵感。
3、最低要求:是否还有简化3D模型的方法?何种像素编辑器能够等同于3D模型工具?
4、专业结果:我们能否构建出可制作绝妙结果的东西?可以将其视为Instagram(照片分享应用)效应。我会以休闲游戏为目标,但我认为其他人会发掘出更多的用途。
我要注意的事情包括:
1、不复制现有工具。诚然,目前已经有许多成熟的3D模型或矢量编辑工具,但是这些都显得过于简单。让我们回到这些复杂层次的设计本源,构建出简洁且不同凡响的东西。
2、不使用立体像素。我不想要使用立体像素。《Minecraft》已经采用了这种做法,所以我想要选择新的方向。
我能够找到的最接近上述限制条件的工具是TinkerCad,这是个简单稳定的模型工具。它很棒,但并不满足我的所有需求。
以下就是我制作的东西。如果有人对这个想法感到好奇,想要用这个工具在数周内构建出原型,我很乐意提供帮助。这是个反常、不完善和实验性想法。但是,如果只分享完美的想法,还有何乐趣可言呢?
Model Toy
Model Toy是个“回到本源”的想法,目标在于看看能否仅通过操控单一曲线上的点来制作模型工具。该工具由以下基本元素组成:
1、基于格子的绘图平面:所有绘图都在平面上进行。这感觉起来更像是2D工具,而不是3D工具。
2、形状:关键基元是由平面上4个点确定的独特挤压矢量形状。99%的时间里,美术设计师都是在移动点。
3、形状调色板:可用的基元形状列表。
4、形状属性:当前形状的颜色、挤压等属性列表。
形状
工具的核心是这些基于2D路径的基元。你可以在http://apps.blois.us/Drawing上尝试体验范例:
1、形状是由3到4个点组成的2D矢量。
2、每个顶点都是一个圆角、半圆或直角。
3、顶点只捕捉格子上的点。
4、形状可以被挤压和斜切。
上述结论来源于大量不同的实验,我意识到了许多很明显的东西。
1、工程师趋向于制作拥有大量小块和小部件的美术基元,它们是带有复杂界面的高变量对象。
2、但是,许多美术人员不一定会从复杂对象的方向思考。反之,他们使用易于操控的简单东西,然后重复相同的修改动作,直到最终结果满意。在绘制时,没有明确的“旋转”或“缩放”操作。但是,结果依然很棒。
3、所以,这种设计偏爱的是在“单次设定变量的复杂对象上”进行“成千上万次的调整”。
基础移动、缩放和转换操作
这些基元的有趣层面在于,它们没有明确的缩放、旋转或转换基体供用户操作。反之,所有的操作都通过移动点来实现。在这个工具中,你要做的所有事情就是:移动点。
1、移动形状:点击形状将其选中。拖动形状将其四处移动。所有的点也会随之移动。注意,所有的点都总是固定在格子上。
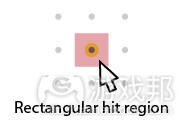
2、变形:你可以通过在3D平面上移动点来使基元变形。拖动点周边的正方形,将其移动到新的格子点上。
3、旋转:要实现旋转,可以挨个移动点,直到新形状看起来已经发生转动。这不是真正的旋转,因为点固定在格子上,所以不会出现真正的旋转。但是,结果看起来确实已发生旋转,这正是美术想要的效果。确实很有效。
形状的限制
我们允许屏幕上呈现数千个此类对象。但是,低分辨率像素艺术的简洁给我带来的灵感是,美源自于限制条件。
1、所有点都被限制在16 X 16的方形格子中。这使得点的旋转和形状的接合更加简单。
2、在任意模型中都只有32个形状。这鼓励美术设计师进行简洁的创作。
3、每个形状都采用固定调色板16种颜色中的一种。
形状工具栏
使用这种方法可以创建4中基本形状。点击工具栏上的基元按钮,形状就会添加到屏幕中。
1、圆:4个圆角点
2、矩形:4个直角点
3、半圆:1个弧线点和2个半弧/半直角点
4、三角:3个直角点
确定隐藏控制柄的系统
以下是使用贝塞尔柄获得目标曲线的方法。直角较为容易,但圆角和半圆角就较为困难。
1、对于圆角来说,柄只由邻近的点确定(游戏邦住:点2和3都邻近于1)
2、柄与线段“a”平行
3、柄的长度与线段“a”成比例。
4、对于半圆和半角点来说,计算与点1相邻点可以得到弓形形状。
5、点2以线段A对称得到新店。这会产生“假A”,方向是正确的。
6、点1的新曲线柄现在平行且与“假A”成比例。
这个工具缺乏的东西
1、2D缩放和旋转:有了可如此简单重新布置的基元,我们已经不需要这些操作。
2、全色采集器:你无法主观确定颜色。
3、层次和群组:共有32种形状,形状列表就是层次列表。
4、线:现在只有形状颜色。随后,我们会拥有可运用于对象上的效果。
5、空白形状:形状总是有个填充颜色。
扩展至3D
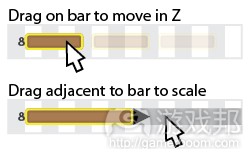
左侧是侧视图调色板。这有点像photoshop中的层次调色板,但是它还允许你控制Z深度。这不是我最喜欢的设计部分,但是值得尝试。
1、拖动形状实体,将其左右移动。这会改变对象的深度。
2、拖动形状左侧向前挤压。这会将其固定在格子上。
3、拖动右侧向前挤压。这会将其固定在格子上。
4、形状的轮廓展示其倾斜。
其他形状属性
你可以选择形状并编辑其属性
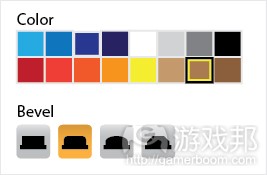
1、颜色:点击形状,点击颜色,然后形状就会变成这种颜色。
2、倾斜:为对象选择倾斜。无倾斜、圆角、圆屋顶或平面倾斜。
3、挤压:选择对象的受挤压程度。
开放问题
1、这样的表达是否清晰?
2、是否存在更好的表现3D挤压的方法?
3、如何才能更加简单化?
近期的目标
挑战的首个部分在于建立基础编辑器并运行。对于这些新的绘制工具,你通常需要在构建后改良5到10次,这样程序感觉起来才会更加稳定。
基于web的编辑、保存和视图
模型可在浏览器窗口中编辑。你可以保存到数据库中,然后加载。你可以同其他用户分享模型,他们可以参考并编辑出自己的版本。
3D视图
获得3D视图后,你可以旋转绘制平面,从不同的角度查看对象。
可以尝试以下试验:
1、释放后平面总是会回到前端视图。
2、如果你将对象旋转90度,它会转向侧视图,然后在其他调色板上交换侧视图和前视图。
导出选项
1、3D模型:导出静态3D模型,可以导入到Maya、3DS或Unity中。
2、位图:以一系列围绕某个中心点旋转的图片的形式导出,包括Alpha。
长远的目标
*阴影器设置
用户可以加载不同的阴影器设置,替换基础16色。比如,可以使用不同的木制纹理或者金属纹理效果。
*后期处理和光照预设
你可以运用各种预设后处理过滤器,类似于Instagram的做法。坦诚地说,这就是该工具真正的魅力。想法是,这些高质量的专业过滤器能够让你的简单模型有个与众不同的风格。
1、轮廓:为图片添加轮廓,这样它看上去就类似于《Land-a-panda》中的样子。
2、流行艺术:点阴影。
3、Sepia:颗粒状的老式图片。
*状态
为每个模型确定状态,每个状态都对32个形状进行不同的配置。比如,你可以为某个角色设计行走状态和攻击状态。
如果你将这些状态接合成模板,你就可以向用户提供“角色模板”,他们可以再其中自行填充内容,创造出原理相同的不同角色。
*状态间的动画
允许在状态间设立动画。添加基础动画的淡入和淡出。
总结
这不是个完美的工具,它只是呈现了一系列的限制。我所坚持的理论是,这些限制在富有创造力的美术设计师手中能够产生出有趣的艺术。我们之前已经见过这样的事情。矢量艺术来源于印刷技术的限制。像素艺术来源于早期计算机显示的限制。这些都是在限制条件下衍生出来的绝妙产品。
就我个人想法而言,我只是想要分享这些想法。对于那些喜欢古怪方法和对象的人来说,这或许可以玩上一两个周末的时间。这确实是个学习曲线和3D挤压的有效方法。我希望能够看到其他人的反馈和用此方法做出的原型。
如果这种方法可以长期存在下去,或许我可以看到某些带有这种艺术风格的精致游戏,其中每个角色、墙、门和树都以这些形状构建而成。这才是对方法真正的测试。如果有美术设计师愿意用新的艺术工具来构建真实的内容,那么反馈循环便会产生。美术人员会要求工具添加某些你此前可能从未想到的功能。经过多次反复试验和测试后,简单的工具也可以让美术人员制作出绝妙的作品。(本文为游戏邦/gamerboom.com编译,拒绝任何不保留版权的转载,如需转载请联系:游戏邦)
Prototyping challenge: Make a web-based 3D modeling toy
DANIEL COOK
I’m rather obsessed with user generated content, particularly art tools. Recently, I had a wonderful experience with Realm of the Mad God. Alex Carobus added in a simple pixel editor that allowed anyone to create sprites that might be used in the game. Very rapidly, players created thousands of truly delightful pieces of art.
Inspired by this, I set a design challenge for myself.
3D in a browsers. What is an easy-to-use 3D modeling tool that lives in the browser?
Unique style: I want the output to be instantly recognizable as being created in this toy. That means radically constraining the tools. Instead, I was particularly inspired by the extruded 3D style of Land-a Panda.
Minimalism: Are there any ways of simplifying 3D modeling? What is the pixel editor equivalent of a 3D modeling tool?
Professional results: Can we build something where you look at the results and think “Wow, that is really nice.” Think of it as the Instagram effect. I’m particularly targeting casual games, but I suspect if that is nailed, people will find all sorts of uses for the toy.
What I’m avoiding:
No copying an existing tool. Sure there are well established paths for 3D modeling or vector editing, but that is too easy. Lets go back to the design roots of these complex monstrosities and build up something elegant and different.
No voxels: I don’t want to use voxels. Minecraft already does this so let’s push in a wacky new direction.
The closest I’ve found that fits these constraints is the amazing TinkerCad, which is a simplified solid modeling tool. It is very nice, but only really ticks the first checkbox.
Here’s what I’ve come up with. If anyone find the idea curious enough and wants to build a prototype over a few weekends, I’m happy to collaborate. This wacky, broken and experimental. But what is the fun in sharing only perfect ideas?
Model Toy
Model Toy is a ‘back to the roots’ effort that asks if you can make a modeling tool by only manipulating vertices on simple curves. The tool is made of several basic elementsGrid-based drawing plane: All drawing occurs on a plane. This can feel more like a 2D tools than a 3D tool.
Shapes: The key primitive is a unique extruded vector shape defined by 4 points on a plane. 99% of the time, the artist is moving around vertices.
Shape Palette: A list of available primitive shapes.
Shape Properties: List of the current shape’s color, extrusion, etc.
Shapes
The heart of the tool are these odd 2D path-based primitives that Pete Blois and I have been experimenting with. You can play with an example of it here: http://apps.blois.us/Drawing
The shape is a 2D vector composed of 3 to 4 vertices.
Each vertex is either a rounded corner, half rounded or straight corner.
Vertices only snap point on the grid.
The shape can be extruded and beveled.
These actually came out of a lot of different experiments and I realized something really obvious.
Engineers tend to make art primitives that have lots of knobs and widgets…they are highly parametric objects with a complex interface.
Yet, many artists don’t necessarily think in terms of complex objects. Instead, they use simple things that are easily manipulated and then repeat the same tweaking action thousands of times until the composite result is interesting. There are no explicit ‘rotation’ or ‘scale’ operation when painting. Yet the results are still impressive.
So this design preferences ‘tweaking thousands of times’ over ‘a complex object where you set variables once’.
Basic move, scale and translate operations
One interesting aspect of these primitives is that they don’t have an explicit scale, rotation or translation matrix for the user to manipulate. Instead, all those operations are performed by moving vertices around. That’s all you really do in this tool…move vertices about.
Move shape: Click on a shape to select it. Drag on the body to move it around. This moves all vertices together. Note that all vertices always snap to the grid.
Deformation: You can deform a primitive by moving its vertices in a 3D plane. Drag on the square surrounded a vertex to move it to a new grid point.
Rotate: To rotate, move vertices one by one until the new shape looks rotated. This is not true rotation since the snapping to the grid will not allow true rotation. However, the result will look
rotated and that is all that matters in art. This works surprisingly well.
There are big limits on the shapes
We could allow thousand of these objects on the screen. But instead I’m inspired by the elegance of low resolution pixel art where beauty comes from working within limitations.
All vertices are constrained to a 16×16 square grid. This allows for easy selection of vertices and accurate adjoining of shapes.
There are only 32 shapes in any one model. This encourages the artist to create elegant compositions.
Each shape is one of 16 colors in a fixed palette.
Shape Toolbar
There are four basic shapes you can create with this method. Click one of the primitive button on the toolbar and the shape is added to the scene.
Circle: 4 rounded vertices
Rectangle: 4 straight vertices
Half Circle: 3 vertices: 1 curved and 2 half curve / half straight
Triangle: 3 straight vertices
One system for defining hidden control handles
The follow is one method of getting the desired curves using bezier handles. Straight corners are a trivia case, but round and half round need to be tweaked to allow for aesthetically pleasing circular geometries.
For round corners, handles are defined only by adjacent vertices (vertex 2 and 3 are adjacent to 1)
Handles are parallel to the line segment ‘a’
Length of handle is proportionate to segment ‘a’ (Note that the .27 in the diagram is a value that results in 4 round corners arranged in a square yields a perfect circle. There is likely a mathematical means of deriving this as well, but that is beyond me. ![]()
For half round, half corner points, calculating the normal based off the points adjacent to vertex 1 (in the picture above) results in a bowed out shape.
Instead, mirror point 2 across the line segment A. This creates a new ‘Fake A’ that goes in the correct direction.
The new curve handle for point 1 is now parallel and proportionate to ‘Fake A’
What this toy lacks
2D scale and Rotation: With such simple primitives that are easily rearranged, we don’t need these operations.
Full color picker: You can’t define arbitrary colors.
Layers and grouping: With 32 shapes, a shape list is the layer list.
Lines: There is only the shape color. Later on, we can have effects that apply to the object as a whole.
Empty shapes: Shapes always have a fill color.
Extending to 3D
To the left is the side view palette. This is a bit like a layer palette in photoshop, but it also lets you control Z-depth. This is a bit geeky and isn’t my favorite part of the design, but worth trying.
Dragging on the body of the shape moves it left or right. This is changing the depth of the object.
Dragging on the left side of the shape extrude backwards. This snaps to the grid.
Dragging on the right side extrudes forwards. This snaps to the grid.
The profile of the shape shows its bevel.
Other shape Properties
You can select a shape and edit its properties.
Color: Click a shape, click a color and the shape becomes that color.
Bevel: Select the bevel for the object. No bevel, rounded corners, dome, flat bevel
Extrusion: Select how far you want the object to be extruded.
Open questions
Is this expressive enough?
Is there a better method of expressing the 3D extrusion?
How might it be simplified even further?
Near Future
The first part of the challenge is to get a basic editor up and running. For these new drawing tools you usually need to build it and then iterate on it 5 to 10 times so that the feel of the program is solid.
Web-based editing, saving and viewing
The model is editable in a browser window. You can save to a database and load. You can share the model with another user and they can make a copy of it and edit their own version.
3D view
Once you have a 3D view you can rotate the drawing plane to see the object from various angles. Some experiments to try:
The plane always snaps back to the frontal view when you release.
Alternatively if you rotate the object 90 degrees, it snap to the side view and swap the side view for the front view in the other palette.
Export options
3D model: Exports a static 3D model for import into something like Maya, 3DS or Unity.
Bitmap: Export as a series of X (64?) images rotated around a center point. Includes Alpha
Far future
Shader sets
Users can load in different shader sets as alternates to the base 16 colors. For example, there is a wood set that has different types and tones of wood. Or there is a metal set that has pitted bronze, steel and copper.
Post processing and Lighting Presets
You can apply a variety of preset post processing filters much like Instagram. Honestly this is where the magic occurs. The idea is that these are incredibly high quality professional filters that give your simple model a distinct style.
Outline: Add an outline to the image so that it looks like Land-a-panda.
Pop art: Dot shading.
Sepia: Grainy, old timey image.
States
Define states for each model with each state have a different configuration of the 32 shapes. For example, you could have a walk state and an attack state for a character.
Now if you bundle these states into templates, you could provide users with a ‘character template’ that they can fill out to their heart’s content to create a thousand unique characters that all ‘work’ the same.
Animations between states
Allow for tweening animations between states. Add ease in and ease out for basic timing.
Conclusion
This odd art toy is not a perfect tool. Having made art for a few decades now, I’m not sure there is such at thing. Instead it is series of constraints. The theory is that these constraints will yield interesting art when placed in the hands of motivated artists. We’ve seen this happen before. Vector art is a style that emerged from the limits and strengths of printing technology. Pixel art emerged from the constraints of early computer displays. There is an exuberant creativity within carefully chosen walls. Is it possible to artificially foster that?
Mostly I wanted to share these ideas. For the folks that love an oddball project, this might be fun to play around with for a weekend or two. It is certainly a way to learn about curves, 3D extrusions (and the exquisite pain of iterating on an artist-centric UI.) I’d be delighted to give feedback and try out prototypes if any emerge.
Long term if the basics works out, I could see making an entire professionally polished game in this art style with every single character, wall, door and tree built out of these shapes. This is the real test. Once you get artist trying their hardest to build real things with a new art tool, a feedback loop is born. The artist asks for tiny yet critical features you could have never imagined. After a few dozen iterations, the simple odd tool begins enabling amazing artists to create a certain kind of masterpiece. (Source: Lost Garden)


 闽公网安备35020302001549号