


分步演示如何将iPhone应用移植至iPad平台
作者:Ray Wenderlich
我最近刚将自己的几款应用从iPhone平台移植到iPad平台,因此想要在此分享自己的几点经验收获。
在本指南中,你将动手实践如何将应用从iPhone移至iPad平台。文章将谈论一个呈现系列棋盘游戏,供大家进行评级的简单应用,然后我们会将其移至iPad平台。
在此过程中,我们将谈及如何测试内容所搭载的设备,以及如何自动调整大小和方向,如何针对iPad制作不同版本的XIB,还有就是如何及何时运用新iPad元素。
你将从本指南中有所收获,在着手移植工作前学习如何运用UISplitView和UIPopoverController,但这并非硬性要求。

PortFinalSmall from raywenderlich.com
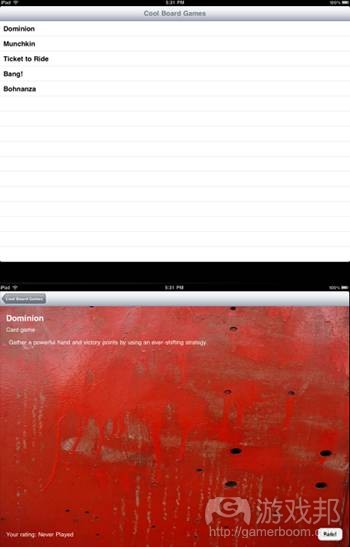
将要移植的iPhone应用
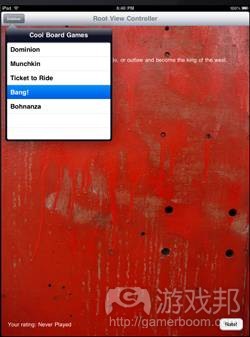
我们即将移植的是名为“PortMe”的简单应用,其包含些许体现在许多iPhone应用中的元素(游戏邦注:表格视图、标准视图控制器及编辑性能)。
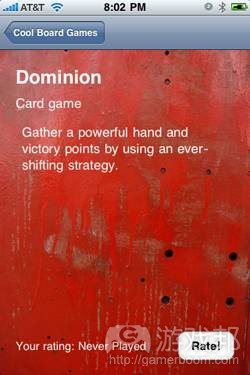
Before from raywenderlich.com
所以要攫取即将移植的iPhone应用副本,然后进行查看。
你会看到其中包含3个视图控制器。第一个是系列棋盘游戏的表格视图。第二个是包含XIB的视图控制器,旨在呈现棋盘游戏的具体细节内容。第三个是供玩家评论棋盘游戏的表格视图。
查看应用,确保自己熟悉把握其结构。完成这些之后,你就能够着手移植工作。
基于iPad升级目标内容
将应用从iPhone移植到iPad平台的初始步骤相当简单。只需扩展Target,选择“PortMe”,然后点击“Project\Upgrade Current Target for iPad”。

UpgradeCurrentTarget from raywenderlich.com
这里你有两个选择——一个是通用应用,或是两个针对特定设备的应用。若你选择“一个通用应用”(One universal application),那么你就能够制作出用户只需购买一次,能够同时于iPhone或iPad运行的应用。若你希望用户单独购买应用,那么你多半会选择“两个瞄准特定设备的应用”(Two device-specific applications)。
这里,我们要制作的是一款通用应用,所以请点击这一选项,选中OK。
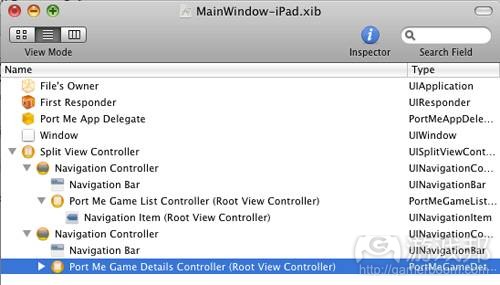
下面就来看看这所带来的结果。首先就是在“Resources-iPad”文件夹中创建名为“MainWindow-iPad.xib”的新文件。
打开文件后,双击窗口,你将看到一个iPad尺寸的窗口。这一XIB还包含出现在原始XIB中的对象——以PortMeGameListController作为基础视图控制器的导航控制器。
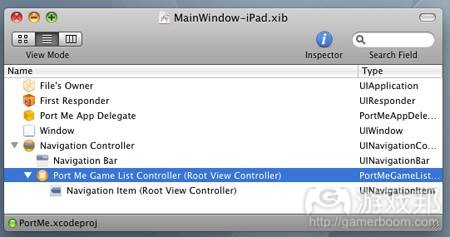
MainWindowiPad from raywenderlich.com
再来就是将项目同3.2 SDK连接起来。你会发现进行3.2 SDK编辑不再是个选项:

Link 3.2 SDK from raywenderlich.com
这点也体现在Target Info中;它将Base SDK调整成“iPhone Device 3.2”,将Targeted Device Family变更成iPhone/iPad:
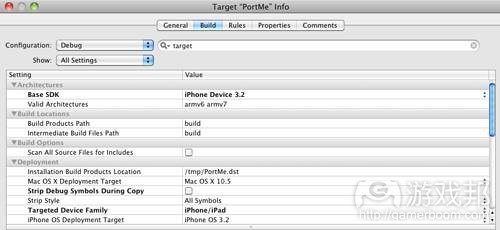
TargetInfo from raywenderlich.com
现在来看看应用的具体形态。确保选中“Simulator–3.2”,然后运行吸盘。你会发现第一个屏幕看起来不会很糟,因为表格视图自动调整屏幕的尺寸,但我们的第二个屏幕就没有进展得这么顺利。
PortMe1 from raywenderlich.com
所以我们从iPad移植过程中学到第一课——这不像选择“Upgrade Current Target for iPad”(基于iPad升级当前目标内容)选项那么简单。现在我们进入最有趣的部分——重新调整应用,以配合更大尺寸规格和新标准/新机会。
下面就来修复这一混乱视图。
自动调整尺寸
开始创建这一试样项目时,我将若干UI元素拖到视图中,完全没有留意自动调整尺寸属性——在没有循环支持的前提下制作iPhone应用属于常见情况。
但现在我们希望应用支持大、小屏幕规格,且支持循环模式,那么自动调整尺寸就变得特别重要。通过自动调整尺寸,我们可以告知各UI元素当母视图发生变化时要如何做出反应。
查看这一操作过程最简单的方式是亲自进行试验。打开PortMeGameDetailsController.xib,双击视图。
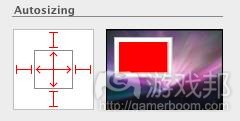
关于顶部的两个标签,我们希望其宽度会随视图宽度的扩大而扩大。所以选择这两个标签,然后切换到检验器中的第三个标签。在自动调整尺寸版块下方,点击浅红色区域,直到其呈现如下画面:

Autosizing1 from raywenderlich.com
右侧动画向你呈现选择的最终反应;在这种情况下,这意味着标签的宽度应随视图的扩大而扩大,它们应同上、左、右边界保持当前距离。
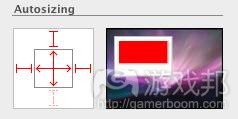
现在就来着手剩下的内容。按照如下方式设置UIImageView:
Autosizing2 from raywenderlich.com
这意味着UIImageView的宽度和高度应随视图的扩展而扩展,稳固附着在视图边缘。
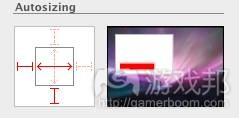
按照如下方式设置文本视图:
Autosizing3 from raywenderlich.com
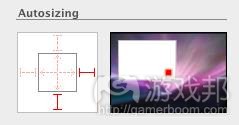
按照如下方式设置标签:
Autosizing4 from raywenderlich.com
最后是将按键设置成如下样式:
Autosizing5 from raywenderlich.com
下面就来看看最终结果!确保保存XIB,然后编译和运行项目,你将看到一个完善后的新视图:
AutoresizingResult from raywenderlich.com
这无疑有所改善!
但这里依然存在一个重要问题:若你希望模拟器的循环属性是“Hardware\Rotate Left”——iPad旋转,但应用没有旋转!由于支持所有情况是iPad应用的必要条件,因此这意味着我们需要在此形成即刻抵制。
幸运的是,由于我们正确设定视图的自动调整尺寸属性(游戏邦注:还有UITableViewController已支持循环模式),我们可以通过几行代码进行修复。
将下述代码添加至PortMeGameListController.m、PortMeGameDetailsController.m和PortMeGameRatingController.m末尾:
- (BOOL)shouldAutorotateToInterfaceOrientation:
    (UIInterfaceOrientation)toInterfaceOrientation {
    return YES;
}
编译和运行应用,现在你应该能够将手机旋转至任何方向,且各元素能够正确移动:
OrientationResult from raywenderlich.com
到目前为止一切进展顺利!但此时我们的主要问题是,我们依然基于iPhone模式进行思考。iPad存在广阔的屏幕空间,我们希望充分利用这些元素,而不是迫使玩家深入钻研各种层级。
这就是UISplitViewController和UIPopoverController的用途所在。所以现在就来看看我们如何在应用中发挥这些工具——同时重复利用我们既有的视图控制器。
整合UISplitViewController
UISplitViewControllers旨在让你在左侧浏览条目,然后在右侧查看条目细节。
这非常适合我们的应用!我们可以将棋盘游戏列表放在左侧,将棋盘游戏细节内容放在右侧。
所以我们将接着把UISplitViewController植入我们的项目中。打开MainWindow-iPad.xib,将Split View Controller拖到窗口中,取消原始Navigation Controller。
扩展Split View Controller树形图,直到发现Table View Controller。锁定Inspector的第4个标签,将Class设置成PortMeGameListController。
现在我们需要设置右侧内容。不妨先思考片刻。当用户点击“Rate This”时,我们通常会将另一视图控制器推向堆栈中。这意味着右侧视图控制器也必须属于UINavigationController类。
所以将View Controller之上的Navigation Controller拖到右侧,深入其中,将基础视图控制器设置成“PortMeGameDetailsController”。完成这些操作后,获得的最终结果如下:
SplitView 2 from raywenderlich.com
现在我们需要将此同代码连接起来。目前Application Delegate把navController属性添加为主窗口的子视图。但在iPad中,我们希望其把分离视图控制器添加到窗口中。
这意味着我们需要分离视图控制器输出端口。我们也许倾向将其称作标准模式——但记住这个应用需要同时运作于iPhone(运行iPhone OS 3.0-3.1.3)和iPad(运行iPhone OS 3.2)平台。顺便说下,iPhone OS 3.2只针对iPad平台。
所以这意味着原始OS版本将不具备UISplitViewController类,试图声明这一类型的变量会带来问题。因此,我们需要更加谨慎地运用这些类型,通过运行时间检查新符号文件。
查看如何进行操作的最简单方式就是进行尝试。打开PortMeAppDelegate.h,添加下述代码:
// In the class interface
id _splitViewController;// Afterwards
@property (nonatomic, retain) IBOutlet id splitViewController;
这里我们将SplitViewController标注成普通ID,所以我们可以在运行时间加载各类别,避免3.0 OS存在的问题。
然后将下述内容添加至PortMeAppDelegate.m:
// In synthesize section
@synthesize splitViewController = _splitViewController;// In didFinishLaunchingWithOptions, replace window addSubview line with:
if (UI_USER_INTERFACE_IDIOM() == UIUserInterfaceIdiomPad) {
UIView *view = [_splitViewController view];
[window addSubview:view];
} else {
[window addSubview:_navController.view];
}// In dealloc
self.splitViewController = nil;
第一行旨在测试代码是否在iPad上运行。若它在iPad上运行,我们就无法将分离视图控制器添加成窗口的子视图。
由于我们将分离视图保存成普通对象(游戏邦注:而不是UISplitViewController类),因此我们需要通过向其发送信息获得视图。
这就是有关代码部分的内容。最后就是回到MainWindow-iPad.xib,将其从“Port Me App Delegate”拖动到“Split View Controller”,然后同“splitViewController”输出口连接起来,然再从“Port Me App Delegate”拖到“Port Me Game List Controller”,将其同“gameListController”输出口连接起来。
记得保存XIB,然后编译和运行应用,接着切换到横屏模式。游戏列表会在左侧呈现OK标识,但当你点击游戏时,它就会出现在同个浏览控制器中,而非右侧边:
SplitView 3 from raywenderlich.com
所以现在就来着手下部分内容!
连接细节视图
就如在UISplitView指南中提到的,连接分离视图左右侧的方式多种多样,但表现最为突出的一个方式是授权(delegation)。
所以我们将遵循在上个指南中采用的方式,设定“选定游戏”的协议,其中我们通过落实细节视图对视图进行更新。
事实上,这是个不错的想法,这里你可以尝试独立进行这一操作,务必记住操作流程。若你成功独立将此落实到位,那么不妨跳到下个版块。否则,你需要继续按步操作。
若你选择继续按步操作,转移到File\New,选择Objective-C类,确保“Subclass of”的状态是“NSObject”,点击“Next”。将文件命做“Next”,然后点击“Finish”。
在PortMeGameDetailsController.h中做出如下调整:
// Add UISplitViewControllerDelegate to the list of protocols
@interface PortMeGameDetailsController : UIViewController
<GameSelectionDelegate, UISplitViewControllerDelegate> {// Inside the class definition
id _popover;// In the property section
@property (nonatomic, retain) id popover;
这和我们在上个指南中所进行的操作类似,不同之处在于我们将UIPopoverController标识作通用对象,旨在避开3.0-3.1.3 OS所存在的问题。
在PortMeGameDetailsController.m添加下述内容:
// In synthesize section
@synthesize popover = _popover;// In dealloc and viewDidUnload
self.popover = nil;// In gameSelectionChanged
if (_popover != nil) {
[_popover dismissPopoverAnimated:YES];
}// New functions
- (void)splitViewController: (UISplitViewController*)svc
willHideViewController:(UIViewController *)aViewController
withBarButtonItem:(UIBarButtonItem*)barButtonItem
forPopoverController: (UIPopoverController*)pc {
barButtonItem.title = @”Sidebar”;UINavigationItem *navItem = [self navigationItem];
[navItem setLeftBarButtonItem:barButtonItem animated:YES];self.popover = pc;
}- (void)splitViewController: (UISplitViewController*)svc
willShowViewController:(UIViewController *)aViewController
invalidatingBarButtonItem:(UIBarButtonItem *)barButtonItem {UINavigationItem *navItem = [self navigationItem];
[navItem setLeftBarButtonItem:nil animated:YES];self.popover = nil;
}
然后将下述内容添加至PortMeGameListController.m中,旨在将Popover调小,而非采用屏幕的全高度:
// In viewDidLoad
if (UI_USER_INTERFACE_IDIOM() == UIUserInterfaceIdiomPad) {
[self setContentSizeForViewInPopover:CGSizeMake(320.0, 300.0)];
}
注意若是搭载iPad平台,我们只能运行这些内容,因为我们多半是采用3.0 OS版本。
最后一点——回到MainWindow-iPad.xib,将其从“Split View Controller”拖至“Port Me Game Deetails Controller”,以将右侧的视图控制器设置成分离视图控制器授权类。
编译和运行应用,若一切进展顺利,你应该在导航控制器上设置条目,这样你就能够点击呈现棋盘游戏列表。
SplitView 5 from raywenderlich.com
运用UIPopoverController
另一我们还过于基于iPhone模式进行思考的应用元素是速度按键。我们在此不应采用完全独立的屏幕,而是应该在iPad中运用UIPopoverController。
这类似于我们在UIPopoverController中所采用的方式,但同时还是存在些许差异。
将下述内容添加至PortMeGameDetailsController.h中:
// Inside class declaration
id _ratingPopover;// In property section
@property (nonatomic, retain) id ratingPopover;
同时注意这里采用普通对象,因为这是个通用运用。
然后将下述内容添加至PortMeGameDetailsController.m中:
// In synthesize section
@synthesize ratingPopover = _ratingPopover;

// In dealloc AND viewDidUnload
self.ratingPopover = nil;

// In rateTapped, replace pushViewController with the following:
if (UI_USER_INTERFACE_IDIOM() == UIUserInterfaceIdiomPad) {
    UIButton *button = (UIButton *)sender;
    if (_ratingPopover == nil) {
        Class classPopoverController = NSClassFromString(@"UIPopoverController");
        if (classPopoverController) {
            self.ratingPopover = [[[classPopoverController alloc]
                initWithContentViewController:_ratingController] autorelease];
        }
    }
    [_ratingPopover presentPopoverFromRect:button.frame inView:self.view
        permittedArrowDirections:UIPopoverArrowDirectionAny animated:YES];
} else {
    [self.navigationController pushViewController:_ratingController animated:YES];
}
这里我们再次根据是否运作于iPad进行切换,或呈现一个Popover,或和往常一样推到导航控制器中。
但注意我们需要通过查找类名称创造Popover控制器,然后对其进行建构。这又是另一我们无法运用实际类名称的情况,因为我们也许搭载3.0设备。
这里我们还通过不同的方式呈现popover控件,这让我们得以指定popover箭头将指向的矩形。
接着切换到PortMeGameRatingController.m,添加如下内容:
if (UI_USER_INTERFACE_IDIOM() == UIUserInterfaceIdiomPad) {
[self setContentSizeForViewInPopover:CGSizeMake(320.0, 300.0)];
}
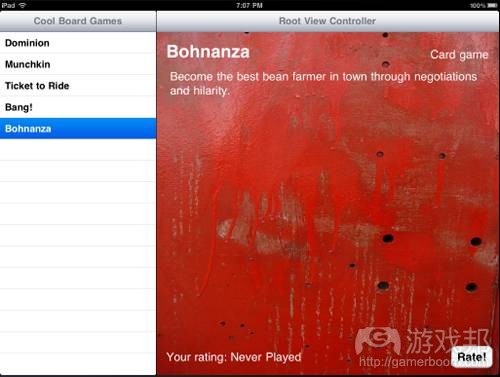
编译和运行运用,若你选择游戏,点击速度后你将看到如下内容:

Rate from raywenderlich.com
获得更优质的细节视图
目前我们的端口进展得非常顺利,其表现更像是iPad风格。但我的细节视图依然可以进行更多雕琢。
首先,背景图像主要针对iPhone平台,只是被扩大至更大的屏幕中。所以这在更高分辨率的情况下会显得有些粗糙。
其次,我们可以更充分地利用强化版屏幕空间,主要通过扩大某些文本,或移动某些标签以更充分利用空间。
当你开始做出众多调整以期出现预期视图时,你可以通过修改代码UI元素和接入UI_USER_INTERFACE_IDIOM()有计划地完成操作,但通常给iPad制作定制视图XIB要简单得多。
所以现在就来动手尝试!打开PortMeGameDetailsController.xib,点击“File\Create iPad Version Using Autosizing Masks”。这会生成一个Untitled XIB——在项目文件夹中保存XIB,将其命做“PortMeGameDetailsController-iPad.xib”。
然后下载更高分辨率的背景图像副本,将UIImageView图像设置成“bg-iPad.jpg”。
然后对界面进行完善。我建议将棋盘游戏类型移至游戏名称右侧,靠右对齐。确保适当调整自动调整尺寸掩码。此外,你还需要完善所有内容的字体大小。
保存XIB。最后一个步骤就是确保加载iPad XIB。打开MainWindow-iPad.xib,选择“Port Me Game Details Controller”,切换到Inspector的首个标签。将NIB名称设置成“PortMeGameDetailsController-iPad.xib”。
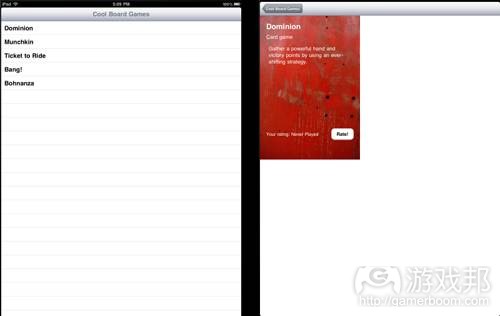
保存XIB,编译和运行项目。若一切进展顺利,你应该会看到如下新视图:
PortFinal from raywenderlich.com
在iPhone上进行测试
我们的应用在iPad看起来非常不错。下个步骤就是在iPhone上进行测试,确保所有内容都能够顺利运作。
但我们还面临一个小问题。模拟器会默认直接发送到iPad模拟器(游戏邦注:而不是iPhone模拟器)。
那么我们该怎么做?我采取的变通方法是,只在这一设备上进行测试。
切换至“Device–3.2”,尝试编译和运行应用。我们收到如下错误消息:

iPhone3.2 from raywenderlich.com
这没什么问题。我们可以通过设置Target Info解决这一问题。基本来说,虽然我们基于3.2 SDK进行编辑,但我们依然能够采用不同的SDK。
这就是为什么我们谨慎对待所有运行检验——我们拥有3.2头文件,但这也许不是我们运行于设备上的实际代码。
所以现在转移到Target Info,按照如下方式将iPhone OS Deployment Target设置成iPhone OS 3.0:

DeploymentTarget from raywenderlich.com
再次运作内容,这次它们要能够合理地在iPhone上呈现——由于我们非常注重运行时期的检验,因此所有内容都正常运作。

Munchkin from raywenderlich.com
总结
以上就是本指南的全部内容,但在将内容提交至App Store平台前,你还需要完成如下操作:
* 给iPad添加默认图片。你将需要常见的Default.jpg图片。但现在除此之外,iPhone尺寸的Default-Landscape.jpg和Default-Portrait.jpg图片也必不可少。这些图片的尺寸必须是1024×748(横屏)和 768×1004(竖屏)规格——基本上是屏幕尺寸扣除状态栏。
* 将UISupportedInterfaceOrientations添加至你的info.plist中,同时插入应用支持的所有方向。
* 在项目中添加72×72图标,主要运用于iPad平台,给你的info.plist创造新的核心CFBundleIconFiles,然后将两个图标的名称整组放入其中。OS将基于尺寸选择适当的图标。
若干建议
关于移植iPhone应用的一点建议是,注意不要同时显示两个popover控制器——这会令用户感到迷惑,若你这么做你的应用将遭到抵制。
简单的解决办法就是在呈现另一popover控制器的时候关闭当前控制器。但有时候,你需要从分离视图左侧启动popover控制器(游戏邦注:因为左侧内容本身在竖屏模式中就是个popover)。
关于这点,一个很好的解决办法就是在既有popover上调用setContentViewController,按照如下方式将其中内容替换成你将在新popover中填充的内容:
[_sidebarPopoverController setContentViewController:
wasGonnaBeInMySecondPopoverViewController animated:YES];
下步操作
现在你已把握将iPhone应用移植至iPad平台的操作要点。
这里我建议你阅读苹果的《iPad Programming Guide》,其中谈及众多我们前面谈到的内容,但同时还包含很多更丰富的信息。
游戏邦注:原文发布于2010年5月24日,文章叙述以当时为背景。(本文为游戏邦/gamerboom.com编译,拒绝任何不保留版权的转载,如需转载请联系:游戏邦)
How To Port an iPhone Application to the iPad
I recently ported several of my apps from the iPhone to the iPad, and thought it would be useful to share some of what I learned along the way.
In this tutorial, you’ll get hands on practice porting an iPhone app to the iPad. We’ll take a simple app I wrote that displays a list of board games and lets you rate them, and we will port it to the iPad.
Along the way, we will cover how to test the device you’re running on, how to handle autosizing and orientation, how to make different versions of a XIBs for the iPad, how and when to use the new iPad elements, and more!
You may find it helpful to go through the tutorials on How to use UISplitView and How to use UIPopoverController before you start, but it is not required.
The iPhone App We’ll Port
The app we’ll be porting is a simple app called “PortMe” that contains some of the elements found in many iPhone apps – table views, standard view controllers, and editing capability.
So grab a copy of the iPhone app we’ll port and check it out!
You’ll see that there are three view controllers. The first is a table view of the list of board games. The second is a view controller with a XIB to show the details for a board game. The third is a table view that lets the user rate a board game.
Look over the app and make sure you’re familiar with the structure. Once you’re done – let’s get to porting!
Upgrade Target for iPad
The initial step to port an iPhone to the iPad is almost misleadingly easy. Simply expand Targets and select “PortMe”, then click “Project\Upgrade Current Target for iPad”.
You have two options here – one universal application, or two device-specific applications. If you choose “One universal application”, that will allow you to make an app that customers can buy once, and have it work on both the iPhone or the iPad. If you want customers to purchase them separately, you may wish to choose “Two device-specific applications.”
In our case we’re going to make a Universal application, so click that and click OK.
Let’s take a look at what this did for us. The first thing it did was to create a new file called “MainWindow-iPad.xib” inside the “Resources-iPad” folder.
If you open it up and double click the Window, you’ll notice a big iPad sized Window. The XIB also contains the objects that were in the old XIB – the navigation controller with the PortMeGameListController set as the root view controller.
Another thing this did was to set our project to link against the 3.2 SDK. You’ll notice that compiling for the 3.2 SDK isn’t even an option anymore (at least once you switch off of the old SDK for the first time):
We can see this in the Target Info as well; it changed the Base SDK to “iPhone Device 3.2″ and the Targeted Device Family to iPhone/iPad:
Well, let’s see what it looks like! Make sure “Simulator – 3.2″ is selected, and run the sucker. You’ll see the first screen doesn’t look too bad because the table view auto-resizes to the screen, but our second view controller doesn’t fare nearly so well.
So we learned our first lesson of iPad porting – it’s not as simple as selecting the “Upgrade Current Target for iPad” option! Now we get to the fun and interesting part – reworking our app to work with the larger screen size and new requirements/opportunities.
Let’s start by fixing that messed up view!
Autosizing
When I set up the sample project, I just dragged over several UI elements into the view, and paid no attention whatsoever to the autosizing attributes – as could be a common case when an iPhone app is made without rotation support.
But now that we want our app to support both the small and big screen as well as (eventually) be able to support rotation, autosizing becomes very important. With autosizing, we can tell each UI element how it should react when the size of its parent view changes.
The easiest way to see this working is by trying it out ourselves! Open up PortMeGameDetailsController.xib, and double click the view.
For the top two labels (board game name and type), we want the labels grow in width as the view grows in width. So select those two labels and go to the third tab in the inspector. Down in the Autosizing section, set click on the light red areas until you get it looking like the following:
The animation to the right shows you the behavior based on your selection; in this case, it means that the labels should grow in width as the view expands, and they should maintain their current distance from the top, left, and right.
Now let’s take care of the rest. Set the UIImageView like the following:
This means that the UIImageView should grow in both width AND height as the view expands, and stay anchored to the edges of the view.
Set the text view like the following:
Set the label like the following:
And finally, the button like the following:
Let’s see how it looks! Make sure you save the XIB, then compile and run the project and you’ll see a new and improved view:
Definitely an improvement!
However there’s one major problem: if you try to rotate the simulator with “Hardware\Rotate Left” – the iPad rotates but the app doesn’t! And since supporting all orientations is a requirement for iPad apps, that would mean instant rejection at this point.
Luckily, since we’ve set our autosizing attributes correctly for our view (and since UITableViewController already supports rotation), we can fix with just a couple lines of code.
Add the following code to the end of PortMeGameListController.m, PortMeGameDetailsController.m, and PortMeGameRatingController.m:
Compile and run the app, and now you should be able to rotate the phone to any direction and have the elements move correctly:
So far so good! However, our major problem at this point is we’re still thinking in an iPhone mindset. On the iPad, there is so much screen real estate, that we want to make the most use of it rather than forcing users to drill down to multiple levels unnecessarily.
And this is exactly what the UISplitViewController and UIPopoverController are for! So let’s see how we can use these in our app – while reusing our existing view controllers along the way.
UISplitViewController Integration
UISplitViewControllers are designed so that you navigate to an item on the left hand side, and then see the details of the item on the right hand side.
This would be perfect for our app! We can put the list of board games on the left, and put the board game details on the right.
So let’s go ahead and integrate a UISplitViewController into our project. Open up MainWindow-iPad.xib, and drag a Split View Controller into the window, and delete the old Navigation Controller.
Expand the Split View Controller tree until you find the Table View Controller. In the Inspector, go to the fourth tab and set the Class to PortMeGameListController.
Now we have to set up the right hand side. Let’s think about this a minute. When the user taps “Rate This”, we currently push another view controller onto the stack. This means that we need the right side view controller also to be a UINavigationController (at least for now until we change that).
So drag a Navigation Controller on top of the View Controller for the right hand side, dig down and set the root view controller to “PortMeGameDetailsController.” When you’re done it should look like this:
Ok now we need to hook this up to the code. Currently, the Application Delegate is set up to add the navController property as a subview to the main window. However, for the iPad, we want it to add the split view controller to the window instead.
This means that we need an outlet for the split view controller. We might be tempted to just declare it as normal – however keep in mind this app needs to work on both the iPhone (running iPhone OS 3.0-3.1.3) and the iPad (running iPhone OS 3.2). iPhone OS 3.2 is iPad only btw.
So this means that the older OS versions will not have the UISplitViewController class, and trying to declare variables of that type will cause problems. Therefore, we need to be much more careful about how we use those clasess, and use runtime checks for new symbols.
The easiest way to see how to do this is to try it out. Open up PortMeAppDelegate.h and add the following code:
Here we declare the SplitViewController as a generic id so we can load up the class at runtime and avoid problems on the 3.0 OS.
Then add the following to PortMeAppDelegate.m:
The first line is the test you can use to see if your code is running on the iPad or not. If it is running on the iPad, we want to add the split view controller’s view as a subview of our window.
Since we have stored the split view as a generic object (rather than as the UISplitViewController class), we need to get the view by sending a message to it (rather than using dot notation).
That’s it for code! Last thing is to go back to MainWindow-iPad.xib and Control-drag from “Port Me App Delegate” to the “Split View Controller” and connect it to the “splitViewController” outlet, and Control-drag from “Port Me App Delegate” to the “Port Me Game List Controller” and connect it to the “gameListController” outlet.
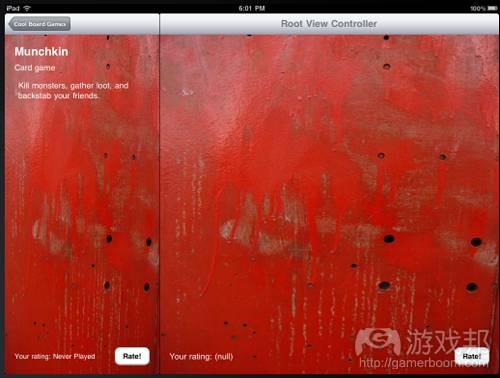
Make sure you save the XIB, then compile and run the app, and switch to landscape mode. The list of games shows up OK on the left, but when you tap a game it shows up in the same navigation controller instead of on the right hand side:
So let’s fix that next!
Linking up the Detail View
As mentioned in the UISplitView tutorial, there are many good ways to hook the left and the right sides of a split view together, but one approach that works particularly well is delegation.
So we’ll follow the same approach we did in that tutorial and set up a protocol for “game selected” that the detail view will implemenet to refresh the view.
Actually, this is a good point where you can practice doing this on your own and make sure you remember how to do it. If you successfully implement it on your own, just skip to the next section. Otherwise, you can keep following along!
If you choose to continue following along, go to File\New, choose Objective-C class, make sure “Subclass of” is “NSObject”, and click “Next”. Name the file “GameSelectionDelegate” and click “Finish”.
Replace GameSelectionDelegate.h with the following:
Then delete GameSelectionDelegate.m, since we don’t need it for a protocol.
Now, let’s modify the PortMeGameListController to take a GameSelectionDelegate. And add the following to PortMeGameListController.h:
And add the following to PortMeGameListController.h:
Then, we’ll modify PortMeGameDetailsController to implement the delegate. Make the following changes to PortMeGameDetailsController.h:
Then add the following to PortMeGameDetailsController.m:
And for the final step, we can actually connect the delegate using Interface Builder since we marked the delegate as an IBOutlet. Open up MainWindow-iPad.xib and Control-drag from “Port Me Game List Controller” to “Port Me Game Details Controller” and connect it to the delegate outlet.
That’s it! Compile and run the app, and you now should be able to select between the board games like the following:
Adding a Popover List
Just like we did in the UISplitView tutorial, it’s standard practice to have a way to bring up the left hand side when you’re in portrait mode by tapping a button in the toolbar.
Although what we are about to do is similar to the way we did in the last tutorial, there are a few changes due to this being a Universal app, and since the right side is a navigation controller rather than a view with a toolbar, so you may want to keep following along here.
Make the following changes to PortMeGameDetailsController.h:
Then add the following to PortMeGameListController.m to make the popover be a bit smaller rather than the full height of the screen:
Note we have to be careful to only run this if we’re on the iPad (and use message passing rather than dot notation) since we may be running on the 3.0 OS.
One last thing – go back to MainWindow-iPad.xib and control-drag from “Split View Controller” to “Port Me Game Deetails Controller” to set the right view controller as the delegate of the split view controller.
Compile and run the app, and if all goes well you should have an item on your nav controller bar that you can tap to bring up the list of board games!
Using UIPopoverController
There’s still another area in our app where we’re thinking too much in iPhone terms – the rate button. Rather than going to a completely separate screen, this would be much better served by using a UIPopoverController on the iPad.
This is similar to the method we used in the UIPopoverController tutorial but again with some slight differences.
Add the following to PortMeGameDetailsController.h:
Again note the use of the generic objects here since this is a Universal app.
And the following to PortMeGameDetailsController.m:
Here we again switch based on whether we’re running on the iPad or not, and either present a popover or push onto the navigation controller as usual.
However note we have to create the popover controller by looking up the class name from a string, and then constructing it. This is again a case where we can’t use the actual class name since we may be running on a 3.0 device.
We also use a slightly different method to present the popover here, which lets us specify a rectangle which the popover will point to with an arrow.
Next switch over to PortMeGameRatingController.m and add the following:
Compile and run the app, and if you select a game and tap rate you should see the following:
Getting a Better Detail View
So far, our port is coming along quite well, and is behaving much more iPad like. However, our detail view could still use some work.
First, the image in the background was actually made for the iPhone, and is just being scaled to the larger screen. So it looks a bit grainy at the larger resolution.
Secondly, we could make better use of the increased screen real estate by making some of the text bigger, or moving around some of the labels to make better use of the space.
When you start to get a lot of changes you’d like to make to the view like this, you COULD do everything programatically by modifying the UI elements in code and switching on the UI_USER_INTERFACE_IDIOM(), but it’s often easier to just make a custom view XIB for the iPad.
So let’s give that a shot! Open up PortMeGameDetailsController.xib, and click “File\Create iPad Version Using Autosizing Masks”. It will create an Untitled XIB – save the XIB in the project folder and name it “PortMeGameDetailsController-iPad.xib”.
Then download a copy of a higher resolution background image and set the UIImageView’s image to “bg-iPad.jpg”. (Image credit: szajmon).
Then, have some fun improving the interface a bit. I’d recommend the moving the board game type to the right of board game name, aligned right. Make sure to fix the autosizing masks appropriately! Also, you should probably improve the font size of everything.
Save the XIB. The last step is to make sure that the iPad XIB is the one that is loaded. Open up MainWindow-iPad.xib, select the “Port Me Game Details Controller”, and go to the first tab of the Inspector. Set the NIB name to “PortMeGameDetailsController-iPad.xib”.
Save the XIB, compile and run the project. If all goes well you should see the new view like the following:
Testing on the iPhone
Ok, our app is looking pretty good on the iPad. The next step is to try it again on the iPhone and make sure we didn’t break anything!
Erm, but we have a small problem. By default the simulator launches directly into the iPad simulator (not the iPhone simulator).
So what do we do? The workaround I used was to just test on the device. However if that is annoying, Noel from Games from Within has written a nice post about Universal Apps that includes a workaround to run in the iPhone simulator.
Switch to “Device – 3.2″ and try to compile and run the app. Oops – we get an error message like the following:
That’s OK. We can fix this by a setting in our Target Info. Basicaly, even though we’re compiling against the 3.2 SDK, we can deploy to a different SDK.
This is why we were being so careful about using all of those runtime checks – we have the 3.2 headers available to us but maybe not the actual code when we run on the device.
So go to Target Info and set the iPhone OS Deployment Target to iPhone OS 3.0 as follows:
Try running again and this time it should show up just fine on our iPhone – and since we were careful about runtime checks, everything works like normal!
Final Notes
That’s all we’re going to do for this tutorial, but for your reference, before you’d be able to submit this to the App Store, you’d need to do a couple more things:
* Add default images for the iPad. You’ll need the Default.jpg like you normally would (this will be used on the iPhone). But now you’ll also need Default-Landscape.jpg and Default-Portrait.jpg for the iPhone screen size. The sizes of these images needs to be 1024×748 (landscape) and 768×1004 (portrait) – basically the size of the screen minus the status bar.
* Add UISupportedInterfaceOrientations to your info.plist and add in all the orientations the app supports (for us, all of them!)
* Add a 72×72 icon into the project to be used on the iPad, and create a new key CFBundleIconFiles to your info.plist, and put the names of both icons inside as an array. The OS will pick the appropriate icon based on size.
Gratuitous Tip
A tip for those of you porting your iPhone apps out there. Be really careful never to have two popover controllers visible at the same time – it’s confusing to users and your app will get rejected if you do (I know from experience, heh!)
The easy fix is just to dismiss any current popover controllers when you display another. But there’s a tricky case where you need to launch a popover controller from the left side of a split view – since the left side could itself be a popover in portrait mode!
For this case, a good fix is to call setContentViewController on your existing popover to replace its contents with what you *would have* put in the new popover such as follows:
Where To Go From Here?
By this time you should have a firm grasp on the major tasks you’ll come across while porting an iPhone app to the iPad.
From here I’d recommend reading through Apple’s iPad Programming Guide, if you haven’t already. It discusses a lot of what we just covered above, as well as much more useful information!
Here is the sample project with the completed iPad port!
I’d be curious to hear about your experiences porting iPhone apps as well!(Source:raywenderlich)

")
")
")
")


 闽公网安备35020302001549号