解析手机游戏《Tiny Wings》开发步骤(一)
相信很多人都不会对《Tiny Wings》感到陌生,都知道它是一款由Andreas Illiger开发的热门手机游戏,其玩法就是控制一只小鸟,让它借助坡度在日落前飞向终点。
乍一看,这游戏的设置非常简单,但这只是一种表象,该游戏的实际制作过程可有不少讲究。游戏中的小山丘及其纹理会动态变化,它使用的是Box2D物理引擎来模拟小鸟的动作。
许多开发者都对这款人气游戏及其开发技巧抱有极大兴趣,本文是根据由Sergey Tikhonov编写的样本对象而撰写的开发教程,主要包括三个环节:
1.必备条件:首先要查看《How To Creat Dynamic Textures with CCRenderTexture》这篇教程,掌握创建山丘及背景纹理的方法。
2.第一部分:本篇将教您创建《Tiny Wings》运行过程中的动态小山丘。
3.第二部分:本篇将教您添加Box2D游戏设置的方法。
当然,领会本教程的前提条件是您已经精通Cocos2D开发技术,假如您还是新手,可能得首先熟悉Cocos2D新手教程的有关内容才行。
开始动工
请先下载Sergey Tikhonov创建的样本对象有关资料。
然后根据File\New\New File的路径创建一个山丘分类,选择iOS\Cocoa Touch\Objective-C class路径,并点击“Next”,创建一个CCNode的子类,点击“Next”,将其命名为Terrain.m,
然后再点击“保存”。
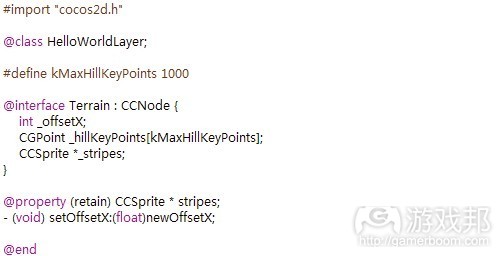
随后打开Terrain.h,将其用以下内容来代替:
这里要说明一下,有个名为 _hillKeyPoints 的阵列代表我们过后将保存的所有小丘顶峰,以及一个用于控制山丘滚动距离的偏移。
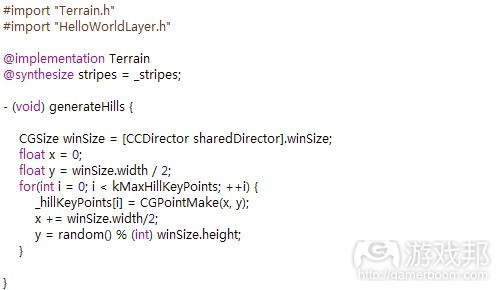
下一步就是开始执行Terrain.m,我们将逐一讲述其中步骤。首先把Terrain.m所有现存内容删除,并逐段添加以下代码:
这是让一些随机性小山丘生成关键点的方法,也是一个极为简单的操作过程,由此我们可以得到一个起点。
第一个点位于屏幕左侧,位于Y轴的中间。随后的每一点都会沿着X轴以屏幕一半宽度的距离移动,并且沿着Y轴设置从0至屏幕顶端的数值:
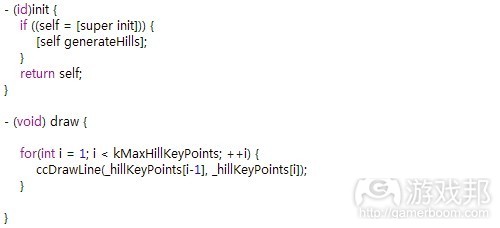
用初始化方法调用generateHills创建山丘,以绘图方式简单画出需要调试的每一个点之间的线段,以便我们从屏幕上看到效果:
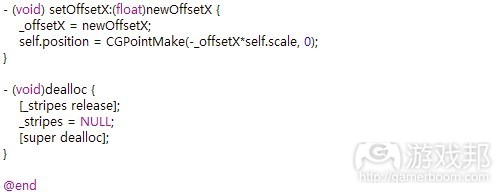
这时候就该考虑山丘的移动方式了——随着小鸟沿着X轴的坡度前行,这些坡度会向左滑移。所以我们就得以-1来增加偏移,切记控制好比例。
这时候基本上可以开始测试效果了。切换到HelloWorldLayer.h以做如下改变:
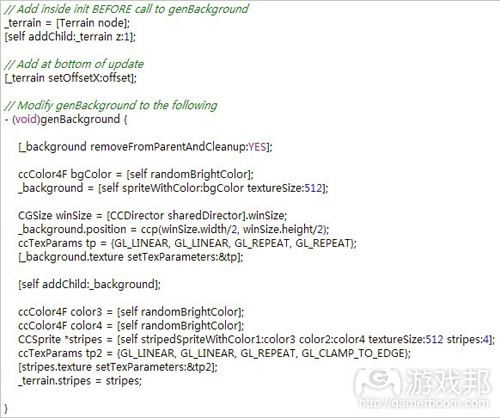
然后切换到HelloWorldLayer.m,再做如下改变:
注意你每次敲进代码时,都会将Terrain原来的条纹转变成新的随机性条纹,这可以让测试更加顺手。
另外,当你在更新时调用setTextureRect on _background时,就意味着你想以0.7的数值增加偏移,以便让背景滚动速度比山丘更慢。
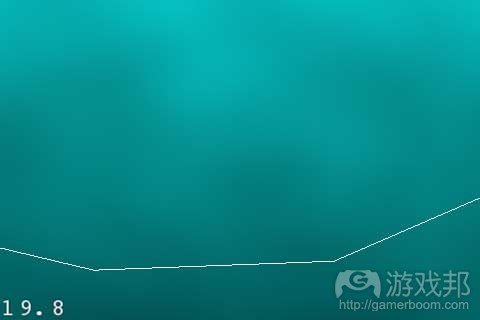
这就对了,现在可以编译并运行代码,观察屏幕中线段的走势,它代表山丘顶峰移动的位置:
看到山丘滚动方式,你可能就会发现这并不是理想的《Ting Wings》游戏运行效果。由于我们是随机性选择Y轴,所以这些山丘有时不是太大就是太小。而且X轴也缺乏足够的变化。
但现在你只需通过采用更好的算法,就可以让测试码顺利运行,提高山丘视觉效果,并有效对其进行调试。
你可以稍费点功夫用自己的山丘运行算法,替换generateHills中的代码,也可以选择使用Sergey的操作方式,也就是下文要体现的内容。
更优化的算法
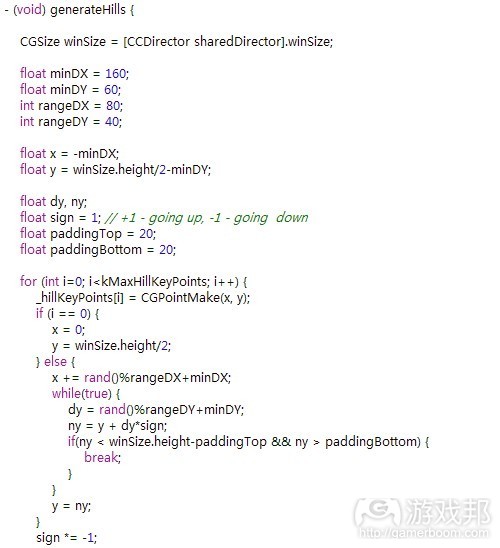
如果你选择Sergey的执行方式,那就请按以下内容替换Terrain.m中的generateHills:
具体操作方式如下:
·X轴的增量范围是160+0至40间的随机性数字
·Y轴的增量范围是60+0至40间的随机性数字
·不可时常反相Y轴的偏移
·勿让Y轴数值过于接近顶点或底端(paddingTop,paddingBottom)
·从屏幕最左侧开始,将第二个点硬编至(0, winSize.height/2),这样山丘就会从屏幕左侧开始呈现
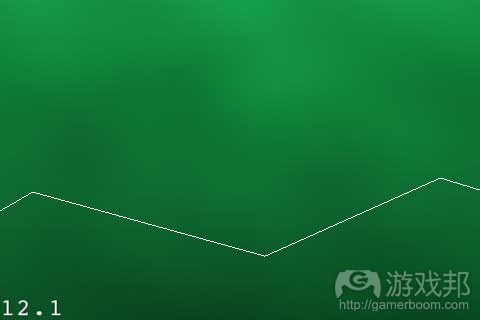
现在编译并运行代码,然后就可以看到一个更优化的山丘演示效果,如下图:
绘制线段
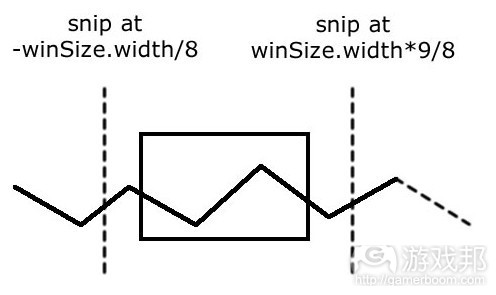
在执行更多操作之前,我们得先做一个主要的运行性能优化。现在我们要画出所有山丘的1000个顶点,虽然我们在屏幕上一次只能看到其中一小部分。
我们可以根据屏幕显示面积简单计划每次需展示多少个顶点,这样有助于节省大量时间,如下图所示:
先试试在Terrain.h中添加两个实体变量:
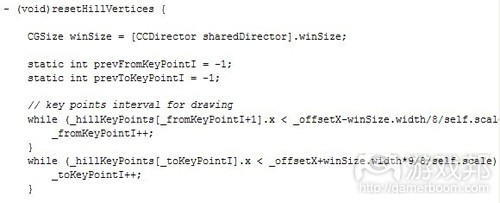
然后在Terrain.h的初始化方法之上增加一个新函数resetHillVertices,如下图所示:
现在我们可以依次通过每个关键点(从0开始)查看它们的X轴。
当前的偏移会将视图指向屏幕左侧边缘,这样我们就可以减去winSize.width/8。如果所得数值更小,我们就得继续执行操作直到找到更大一点的数值为止。从keypoint开始至toKeypoint都要以此操作。
现在让我们看看实际成效,请按以下操作修改绘图函数:
我们不需要画出所有的点,只需使用之前计算的目录画出可视的关键点即可。我们还将这些线条改成红线以使其更加清晰可辨。
下一步就是针对Terrain.m做出更多修改以调用resetHillVertices:
为了让这些改变更加明显,现在得到HelloWorldLayer初始化方法的底端添加如下内容:
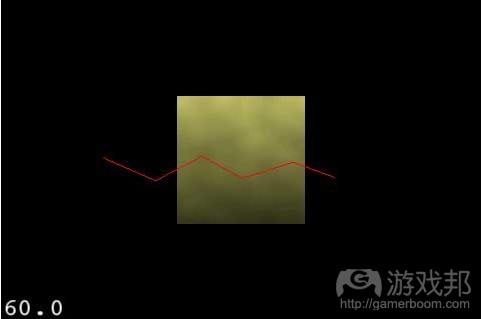
编译并运行代码,你将看到这些线段已经各就其位:
绘制平滑的斜坡
目前一切进展顺利,但还有一个大问题——这些线段看起来根本不像山丘。现实生活中的山坡绝不会这样棱角分明,它们毕竟存在一定坡度。
如何画出山丘曲线呢?我们在高中所学的余弦在这个时候就可以派上大用场了!
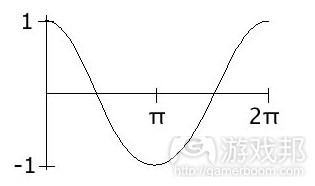
这里需要先快速回顾一下余弦曲线的知识,如下图:
曲线的起点是1,曲线下落的极点就是-1。
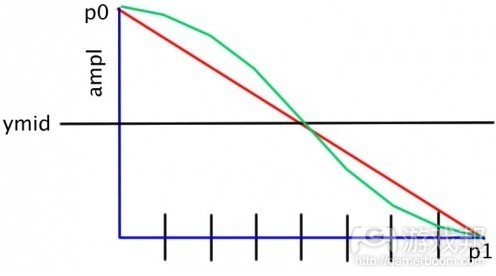
怎样才能将这一原理运行用创建一个将关键点相连接的平滑曲线呢?在此我们仅考虑其中两个顶点的情况,见以下图表所示:
首先,我们需要画一条分段的线,每10点分为1段。同样地,我们还需要一条完整的余弦曲线(绿线),这样我们就根据段数把PI等分,从而在每个点上取得直角三角。
然后,Y坐标上的P0映射为COS(0),P1映射为COS(P1)。每个映射称为COS(角)。在P0和P1之间取中点,得到结果(在图中标为ampl)。
因为COS(0)=1,COS(P1)=-1,据此我们可以得到ampl在p0时和在p1时的值。所以ampl在P0与P1之间取中点时所对应的Y坐标点就是我们需要的。
让我们再看看这些代码的情况,先在Terrain.h添加一个线段长度定义:
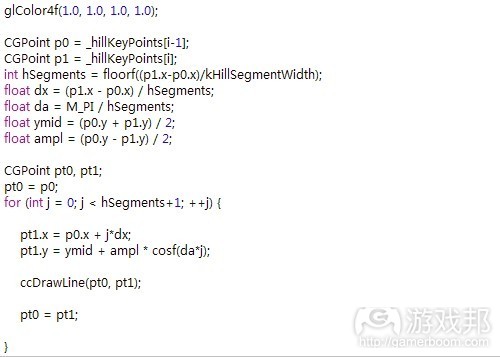
然后将以下数值添加到绘图函数中,也就是在调用ccDrawLine之后:
花点时间确认你了解这些代码的运行原理,因为我们过后还要在这个基础上创建内容。
最后需要注意的是,我们不需要再放大比例,所以这里要返回HelloWorldLayer.mm,将初始化比例调整回原来的1.0:
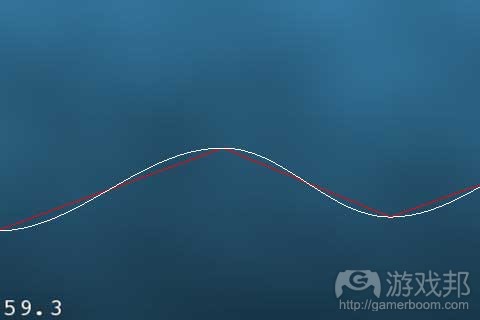
编译并运行代码,你会看到如下图连绵起伏的曲线:
绘制山丘
既然我们已经明白如何显示出山顶曲线,接下来就很容易使用之前生成的纹理编写画出山丘的代码。
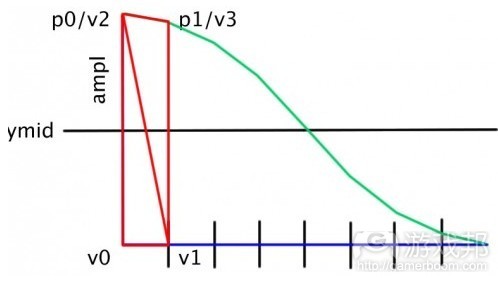
每一段山丘都可以使用这种方法,我们将计算渲染山丘所需的两个三角形数值,如下图所示:
我们还在每一点设置了纹理坐标轴。在X轴上,我们将根据纹理宽度(游戏邦注:这些纹理是重复的)进行划分;在Y轴我们则将山丘最低点映射为0,最高点为1,根据条状分配纹理高度。
为执行这一命令,首先得对Terrain.h做出一些修改:
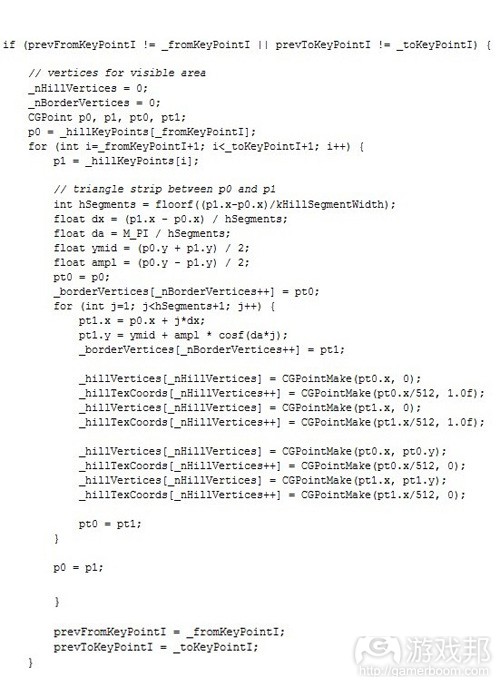
然后在Terrain.m中的resetHillVertices添加以下代码:
多数操作看起来都很眼熟,因为我们之前用余弦定理画山丘曲线时已经包含这些内容。
这里的不同之处在于我们要为各段山丘用顶点添加一个阵列,每一个条状都需要四个顶点和四个同等的纹理。
执行完这些操作后,现在可以在绘图函数中添加如下代码:
将条状纹理绑定在一起使用,进入由顶点组成的阵列和之前制作的纹理坐标轴,画出一个三角形条状的阵列。
除此之外,如果你想看到真正出色的效果,不想因调试绘图而搞砸一切,那就应该为画出山丘线段和曲线的代码添加注释。
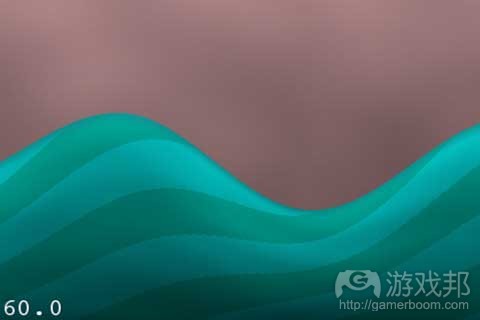
编译和运行代码,你就可以看到如下图所示的理想效果:
进一步完善
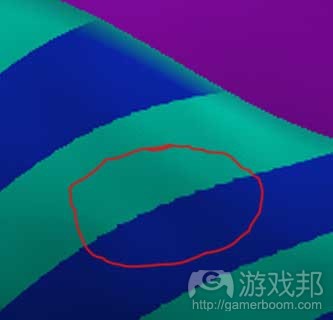
如果细看这张图,就会发现它仍然有点小瑕疵,那就是纹理线条有点粗糙:
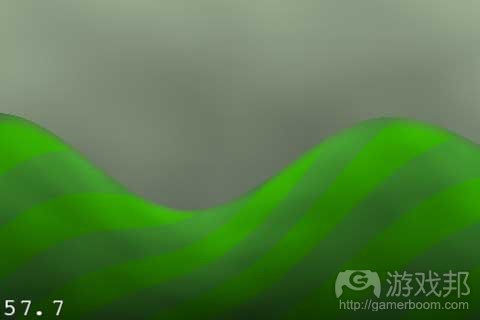
Cocos2D论坛上有些人认为只要添加一些垂直片段就可以解决这个问题,但我自己发现这处操作其实无助于提高图像质量,但增加水平片段却可以达到效果。打开Terrain.h,根据如下内容修改kHillSegmentWidth:
再次运行代码,你会发现这些山丘看起来更加完美了!请继续关注本文第二部分:添加Box2D游戏设置的方法!(本文为游戏邦/gamerboom.com编译,如需转载请联系:游戏邦)
How To Create A Game Like Tiny Wings Part 1
If you’re new here, you may want to subscribe to my RSS feed or follow me on Twitter. Thanks for visiting!
Learn how to create a game like Tiny Wings!
Tiny Wings is an extremely popular game by Andreas Illiger involving a bird who tries to fly by catching a ride on hills.
At first glance, the gameplay of Tiny Wings looks very simple, but there are a lot of tricks going on under the hood. The hills and their textures are dynamically generated, and the game uses Box2D physics to simulate the movement of the bird.
Due to the popularity of the game and the cool technical tricks within, a lot of developers have been curious about how things are implemented.
Including you guys! You guys said you wanted this tutorial in the sidebar vote a few weeks back – well you want it, you got it! :]
This tutorial series is based on an excellent demo project written by Sergey Tikhonov that demonstrates how to implement some of the trickiest features of Tiny Wings. Thanks Sergey!
This tutorial series is split into three parts:
Prerequisite: First review the How To Create Dynamic Textures with CCRenderTexture tutorial, which shows you how to create the hill and background textures you’ll be using in this tutorial.
Part 1: You are here! This part will show you how to create the dynamic hills that you’ll need for a game like Tiny Wings.
Part 2: Coming soon! This part will show you how to add the Box2D gameplay that you’ll need for a game like Tiny Wings.
This tutorial assumes you are familiar with Cocos2D. If you are new to Cocos2D, you should check out some of the other Cocos2D tutorials on this site first.
Getting Started
If you don’t have it already, download the sample project where we left it off in the previous tutorial.
Next, create a class for the terrain by going to File\New\New File, choosing iOS\Cocoa Touch\Objective-C class, and clicking Next. Make the class a subclass of CCNode, click Next, name the class Terrain.m, and click Save.
Then open up Terrain.h and replace its contents with the following:
This declares an array called _hillKeyPoints where we’ll store all of the points representing the peak of each hill, and an offset for how far the terrain is currently being scrolled.
Next we’re going to start implementing Terrain.m. I’m going to explain it step by step, so go ahead and delete everything currently in Terrain.m and add the following code section by section.
This is a method to generate the key points for some random hills. This is an extremely simple implementation just so we can have a starting point.
The first point is the left-side of the screen, in the middle along the y-axis. Each point after that moves half the width of the screen along the x-axis, and is set to a random value along the y-axis, from 0 up to the height of the screen.
The init method calls generateHills to set up the hills, and the draw method simply draws lines between each of the points for debugging, so we can easily visualize them on the screen.
Think about how the terrain moves – as our hero advances along the x-axis of the terrain, the terrain is sliding to the left. So we have to multiply the offset by -1 here – and don’t forget to take into consideration the scale!
Almost time to test this. Switch to HelloWorldLayer.h and make the following changes:
Then switch to HelloWorldLayer.m and make the following changes:
Note this sets the stripes texture on the Terrain to a new random stripes texture each time you tap, which is handy for testing.
Also, when calling setTextureRect on _background in update, you might wish to multiply the offset by 0.7 to get the background to scroll slower than the terrain.
And that’s it! Compile and run your code, and now you should see some lines drawn across the scene representing where the tops of your hills will eventually be:
As you watch your hills scroll by, you’ll probably realize pretty quickly that these wouldn’t work very well for a Tiny Wings game. Due to picking the y-coordinate randomly, sometimes the hills are too big and sometimes they are too small. There’s also not enough variance in the x-axis.
But now that you have this test code working and a good way to visualize and debug it, it’s simply a matter of dreaming up a better algorithm!
You can either take a few moments and come up with your own hill algorithm, replacing the code in generateHills, or you can use Sergey’s implementation, shown in the next section!
A Better Hills Algorithm
If you choose to use Sergey’s implementation, replace generateHills in Terrain.m with the following:
The strategy in this algorithm is the following:
Increment x-axis in the range of 160 + a random number between 0-40
Increment y-axis in the range of 60 + a random number between 0-40
Except: reverse the y-axis offset every other time.
Don’t let the y value get too close to the top or bottom (paddingTop, paddingBottom)
Start offscreen to the left, and hardcode the second point to (0, winSize.height/2), so there’s a hill coming up from the left offscreen.
Compile and run, and now you’ll see a much better hill algorithm, that looks like maybe a properly motivated seal might be able to fly off these!
Drawing Part at a Time
Before we go much further, we need to make a major performance optimization. Right now, we’re drawing all 1000 key points of the hills, even though only a few of them are visible on the screen at once!
So we could save a lot of time by simply calculating which key points to display based on the screen area, and display just those, as you can see below:
Let’s try this out. Start by adding two instance variables to Terrain.h:
Then add a new method called resetHillVertices above the init method in Terrain.h that looks like the following:
Here we loop through each of the key points (staring with 0) and look at their x-coordinates.
Whatever the current offset is set to maps to the left edge of the screen. So we take that and subtract the winSize.width/8. If the value is less than that, we keep advancing till we find one that’s greater. That’s our from keypoint, and we follow a similar process for the toKeypoint.
Now let’s see if this works! Modify your draw method like the following:
Now instead of drawing all of the points, we only draw the visible ones by using the indices we calculated earlier. We also change the color of the line to red to make it a bit easier to see.
Next make a few more mods to Terrain.m to call resetHillVertices:
One more thing – to make this easy to see, go to the bottom of your init method in HelloWorldLayer.mm and add the following:
Compile and run your code, and you should see the line segments pop in when it is time for them to be drawn!
Making Smooth Slopes
So far so good, but we have one big problem – those don’t look like hills at all! In real life, hills don’t go up and down in straight lines – they have slopes.
But how can we make our hills curved? Well one way to do it is with our friend cosine that we learned about back in high school!
As a quick refresher, here’s what a cosine curve looks like:
So it starts at 1, and every PI it curves down to -1.
But how can we make use of this function to create a nice curve connecting the keypoints? Let’s think about just two of them, as shown in the diagram below:
First, we need to draw the line in segments, so we’ll create one segment every 10 points. Similarly, we want a complete cosine curve, so we can divide PI by the number of segments to get the delta angle at each point.
Then, we want to map cos(0) to the y-coordinate of p0, and cos(PI) to the y-coordinate of p1. To do this, we’ll call cos(angle), and multiply the result by half the distance between p1 and p0 (called ampl in the diagram).
Since cos(0) = 1 and cos(PI) = -1, this gives us ampl at p0 and -ampl at p1. We can add that to the position of the midpoint to give us the y-coordinate we need!
Let’s see what this looks like in code. First add the definition of the segment length to the top of Terrain.h:
Then add the following to your draw method, right after the call to ccDrawLine:
This runs through the strategy we outlined in the diagram above. Take a minute and think through the code and make sure you understand how this works, because we’ll be building on this from here.
One last thing – we don’t need to zoom out anymore, so back in HelloWorldLayer.mm replace the scale in init back to 1.0:
Compile and run, and now you should see a curvy line connecting the hills!
Drawing the Hill
Now that we know how to get the curve representing the top of the hill, it’s fairly simple to write the code to draw the hill using the striped texture we generated in the last tutorial!
The plan is for each segment of the hill, we’ll compute the two triangles needed to render the hill, as you can see in the diagram below:
We’ll also set the texture coordinate at each point. For the x-coordinate, we’ll simply divide it by the texture’s width (since the texture repeats). For the y-coordinate though, we’ll map the bottom of the hill to 0 and the top of the hill to 1, distributing the full height of the texture along the strip.
To implement this, first make a few modifications to Terrain.h:
Then add the following code at the bottom of resetHillVertices in Terrain.m:
Much of this will look familiar, since we already covered it in the previous section when drawing the hill curve with cosine.
The new part is we’re now filling up an array with the vertices for each segment of the hill, as explained in the strategy part above. Each strip requires four vertices and four texture coords.
With that in place, you can now add the following code to the top of your draw method to make use of it:
This binds the stripes texture as the texture to use, passes in the array of vertices and texture coordinates made earlier, and draws the arrays as a triangle strip.
Also, you should comment out the lines of code that draw the hill lines and curve, since you’re about to see something awesome and don’t want debug drawing to spoil it! :]
Compile and run your code, and you should now see some awesome looking hills!
Imperfections?
If you look closely at the hills, you may notice some imperfections such as this:
Some people in the Cocos2D forums seem to indicate that you can get this problem to go away by adding more vertical segments (instead of the 1 segment we have now).
However, I’ve personally found that while adding vertical segments doesn’t help the quality, increasing the horizontal segments does. Open up Terrain.h and modify kHillSegmentWidth like the following
Run again, and you’ll see your hills look much better! Of course, the tradeoff is processing time.
Where To Go From Here?
Here is a sample project with all of the code from the above tutorial.
Stay tuned for part 2 of this tutorial, where finally we’ll add some gameplay code so you can make one lucky seal start to fly! (source:raywenderlich)










 闽公网安备35020302001549号