


创造一个优秀关卡的完整过程
作者:James Buckle
身处一支开发团队意味着我需要更快速有效地工作。我创造了一个制作游戏关卡的过程,并且该过程也适用于其他人身上。我是从作为《幕府将军2》的测试员便开始创造这一过程,那时候的QA团队将为多人游戏和定制战斗设计一些地图。我发现使用可行的游戏玩法能够帮助我更快速地创造出关卡,就像在《幕府将军2》中,我只需要一个多小时便能够设计出一张2平方千米的地图。或许对于一名资深关卡设计师来说这里的内容没有什么帮助。但如果你发现自己需要设计一系列关卡并且你之前从未做过这些事,或者你只是对我如何设计自己的关卡感兴趣的话,你都可以从本文中找出答案。
了解规则
在我完成了《Captain Kaon》的简单游戏原型后,我创造了一个“初步可游戏”关卡。这是关于一个尝试着再现潜在的最终游戏的垂直切面。关于团队为什么要创造一个“初步可游戏”关卡存在各种原因,但是在本文中我们将只专注于其中的一个原因。即比起同时辗转于多个关卡中,专注于一个关卡并将其做好会更有帮助。
一旦你明确了乐趣与问题所在,你便可以在这个关卡上进行迭代并扩展。而如果你正同时创造多个关卡,你可能会浪费许多时间去维护它们。每次当你在你的关卡设计中发现一些问题,并且你需要使用一些全新规则时,你便需要贯穿所有关卡去使用新规则。这就像在一定间距内不会放置两个同样类型的内容或设置一个最小走廊宽度而为游戏玩法留出足够空间一样简单。如果能在第一个关卡便明确所有这些规则的话,你便能够避免之后繁琐的重复工作。
使用初步可游戏关卡我便能够创造一组严格的规则和灵活的指南帮助自己之后的关卡创造。这是我在设计关卡时必须牢记的重要事宜,否则我将会在游戏测试时发现一些基本问题并且需要浪费时间去解决这些问题。例如:
房间的边缘必须铺设三个更宽的砖块以确保摄像机是连接着房间的边缘。
玩家期待能够与无人机对抗的区域至少应该是基于2×2的砖块,如此玩家才能在此自由移动。
除此之外,我还能够为游戏关卡创造一个技术要求清单。这是我在确保关卡第一次运行时需要经历的一些步骤。虽然很多内容看起来很明显,但这也是我们很容易忘记的内容:
设置一个玩家生成对象
设置物理属性
在前端添加简介
一旦你决定了你的指南和规则,你便需要在此进行迭代去创造可行关卡的变量。到目前为止《Captain Kaon》将经历42个关卡和19个任务,并且每个关卡都是不同且非常有趣的。而最棒的地方在于创造这些关卡是一个顺畅且轻松的过程。
建立一个组件面板
伴随着你创造关卡的规则,你还需要一个基础组件面板。一款游戏其实也是一个不断升级的挑战系列,并且这些挑战都是伴随着不同组件组合所创造的。让我们举个例子来说吧,假设存在一系列房间,每个房间中都有一个敌人。如果你只设置一种敌人类型,那么很快的你的游戏便会开始具有重复性。敌人是你用于创造关卡的一种组件类型。通过使用不同类型的敌人,基于不同数量和组合,你便能够创造出不同的游戏体验。然后你可以使用其它游戏玩法组件,如障碍或升级道具,并结合它们去创造更多游戏玩法变量。
游戏同样也是一种视觉体验。你需要将你的“最初可游戏”关卡分解成不同的视觉组件并为它们创造变量。最终你将拥有一个小小的组件面板能够用于创造你的关卡。
电子表格
我创造了一个带有关卡信息的电子表格,它让我能够追踪自己所处的关卡设计和创造的不同阶段。它还让我能够看到自己组合了什么类型的关卡,而这能够有效地阻止重复性的出现。
不管你在游戏中添加什么类型的关卡,你都必须避免它们都是相同的,或出现连续两个相同类型的关卡。在《Captain Kaon》中我便添加了不同任务类型。在某些任务中你可以摧毁一些关键目标,偷偷执行一些任务,或者从基地中运载某些东西到其它地方。当我在规划自己的关卡时,我始终确保不会连续出现两个相同类型的任务。我同样也设置了关卡所处的视觉环境,以防止频繁出现视觉重复。
有时候你必须基于宏观层面去看待你的游戏。你需要思考不同关卡间的体验是如何发生改变。而在电子表格中了解这些情况便是一种不错的方法。这同样也让你能够基于任何顺序去处理关卡,或者将其递交给其他团队成员,并确保在完成关卡创造时它们仍然能够有效地组合在一起。
纸上计划
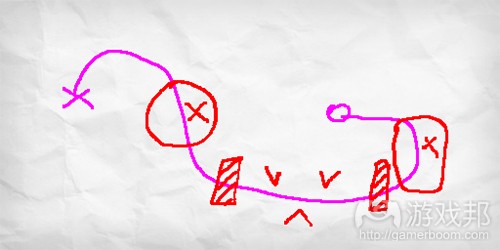
不管何时当我开始设计关卡时,我总是能通过电子表格清楚地看到自己需要做什么,然后我便会拿起笔和纸去写下一个基本计划。在此你并不需要使用一张完整的A4纸,因为如果你使用的纸张空间越大,你便需要想出更多东西去填满它。当我在设计《幕府将军2》的战斗时,我便先绘制了一张一英尺的方形地图,并且它最终将变成2千平方米的地图。
开始时我会使用一根浅颜色的铅笔(通常的粉色)去画出一条抽象的路线,通常情况下这都是一条扭曲的线。而这条路径将会组成关卡的基本框架,即从玩家的诞生点延伸到关卡目标。而这条路线主要包含4个要点:
它不能太直,这样很容易变得无聊。
它不能太曲折且过度重叠。
它不能与你之前画过的线相似。如此你便只是在重复一个关卡。
它不能原路折回,这会让玩家迷失方向。

level(from gamasutra)
一旦你明确了玩家的前进方向,你便能在路线上标记一些关键功能点。从抽象意义上看,一个关卡便是玩家所做出的一系列决定。如向左走,捡起钥匙,爬上楼梯。你需要思考哪些内容将出现在你的关卡的哪个部分。并准确地在路线上标记出这些点。
level2(from gamasutra)
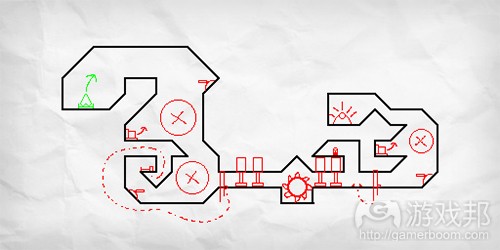
随着框架的就位,你可以开始思考该在关卡的每个部分放置哪些组件。它们该如何分配,并且该如何进行彼此间的互动?你可以使用一支2B铅笔去绘制这些组件并围绕着它们画出墙的轮廓。
level3(from gamasutra)
这将提供给你一个基本计划。但是在此之前你应该先在脑子里运行一遍关卡。你可以着眼于纸上的内容并基于“最初可游戏”关卡的运行而尝试着想象它是如何运行的。从中找出问题所在。比起删除一堆关卡内容,擦掉用铅笔画出来的线肯定轻松很多。
砖块,组块等等内容
当你第一次创造一个关卡时,你必须避免在创造出完整内容后才首次运行它。你已经将你的计划写在了纸上,并且你应该对它能够创造出一个功能性强且可游戏的关卡充满自信。这时候的你将能更轻松地继续下去并创造出一个完整的内容。但需要记得的是,即使一个理念在纸上看来很出色,但是当你开始执行它时它却不一定还是那么出色。你需要基于不同阶段去创造关卡,并及时审查它们的功能性与乐趣。
我是在GameMaker上创造《Captain Kaon》,而关于关卡我使用的是内部编辑器。
我是通过tileset创造背景,然后使用无形的物理对象作为碰撞对象。我遵循了自己在纸上写的计划并只放置了基本组件去构建关卡;我也因此得到了一个关卡的基本框架。这时候你需要再次开始思考玩家将如何玩这个关卡。如果你已经玩过你的“最初可游戏”关卡,你便会清楚玩家角色及其敌人是如何移动的。你应该着眼于你正在创造的关卡并在脑子里构思它是如何运行的。这将帮助你看清这个关卡所存在的潜在问题以及完善方法。这时候你应该将你的想法记下来,并亲自运行关卡去验证这些问题和方法。
测试与调整
一旦你拥有一个基本的关卡版本,你便能看到它是如何运行的。潜在问题是如何呈现出来?所有组件是否能够有效运行?你需要尽早做好这些,如此你便能够尽快找出任何根本问题并解决它们。当我在做这些时,我总是喜欢降低AI的生成率,并减慢危险出现的速度。而当我准备好进行测试时我会再次将它们放回原位。
如果你对功能的运行感到满意,那么关卡的创造便算完成了,你可以开始思考如何确定关卡的逻辑。玩家完成关卡需要经历的行动序列是否仍然有效?是否存在任何内容会让他们感到困惑或混乱?
基于一个功能性关卡,你可以开始一个游戏与调整的循环。你可以想办法在玩家体验中梳理解决方法。邀请一些朋友前来游戏并在旁边观看他们游戏,观察他们是否会做一些你并未猜到的想。甚至直到戏发行时你也可能仍在调整一些古怪的内容,
优化它并整合它
一旦你对关卡的运行感到满意,你便可以开始担心它的外观了。在创造一个真正吸引人的关卡时,优化它的外观是非常重要的一步,如果缺少了这一步,你的游戏便不会完整。不幸的是你也需要为此花费更多时间。就拿我来说,为了执行这一步,《Captain Kaon》关卡的开发时间增加了一倍,即从2天增加到了4天。如果你在一个关卡中优化了更多内容,你便必须在剩下的关卡中优化更多内容。
而合理安排优化时间却是一个很容易被遗忘或低估的方法。作为计划一个任务的常见法则,你应该将任务一分为二。第一部分是计划和执行,第二部分则是修改和优化。明确你需要花费多长时间进行计划与执行,然后再思考需要多长时间进行优化。
一旦完成了关卡创造,你便需要将其带到游戏中,并让其他团队成员尝试它并提供有价值的反馈。我便遇到过需要手动复制关卡并使用脚本去执行它的情况。这将在你的关卡和能够提供给你反馈的人员之间创造一道障碍。所以你必须确保团队中的所有人都能够直接切轻松访问到你的关卡。
(本文为游戏邦/gamerboom.com编译,拒绝任何不保留版权的转发,如需转载请联系:游戏邦)
Level design; from paper to screen
by James Buckle
Being a dev team of one means I need to work quickly and efficiently. I’ve developed a process for producing my levels that will hopefully be useful to someone else out there. I first developed it back when I was a tester on Shogun 2, when the QA team got to do some map designs for multiplayer and custom battles. I found it helps me quickly produce levels with viable gameplay, for Shogun 2 it took me a little over an hour to design and create a 2km2 map this way. There might not be anything for an experienced level designer to learn here. But if you find yourself having to design a bunch of levels and you haven’t done it before, or you’re just interested in how I design my levels, I hope this is useful.
If you’d like to see the fruits of my level design labours you can have a go on the Alpha build of Captain Kaon, there is a download link to the latest version on my Greenlight page available via the web, or on the Steam App.
Get Some Rules
After I had made a simple prototype of the game that would become Captain Kaon I made a ‘first playable’ level. This is a vertical slice of the game that tries to represent the potential final game. There are lots of reasons why a team does a ‘first playable’ level, but for this blog there is only one thing to focus on. It’s better to work on one level and concentrate on making it good, than to juggle several levels at once.
Once you figure out where the fun is and spot problems, you can then then iterate and expand on this level. If you’re building several levels at once you will have to waste a lot of time just maintaining them. Every time you figure out something with your level design, a new rule that needs to be applied, you will have to go through all your levels and apply it. It could be something simple like not placing two objects of the same type within a certain distance of each other, or having a minimum corridor width that allows enough space for gameplay. It’s better to figure out all these rules on one level first, otherwise you’re just redoing every level all the time.
Using my first playable I was able to establish a set or rigid rules and flexible guidelines for creating levels. These would be important things that I would have to bear in mind when designing the levels, otherwise there was a risk that playtesting would expose basic problems I would have to waste time fixing. For example
The edge of the room must have a border of three tiles to ensure the camera does butt up against the edge of the room.
Areas where the player is expected to fight drones should be at least 2×2 tiles in size to allow the player to manoeuvre.
In addition to this I was able to create a checklist document of technical requirements for the level to function in the game. These were steps I would go through to ensure the level ran first time. They were mostly obvious things that were easy to forget about, such as:
Place a player spawn object
Set the physics properties
Add the briefing and hook up to the frontend
Once you’ve determined your guides and rules you have something to iterate within to produce variations of working levels. So far Captain Kaon has 42 levels across 19 missions, each one different and fun. But the best part, creating them was a fluid and painless process.
Building a component palette
Along with your rules for building a level you need a palette of components to build it from. A game is a series of escalating challenges, each built with a different combination of these components. Imagine a series of rooms, each one has an enemy in. If you only have one enemy type to place in your rooms, your game will rapidly become repetitive. Enemies are one type of component you use to build your levels. By taking different variations of enemies, in different quantities and mixes, you will be able to build different gameplay experiences. You can then take other gameplay components, such as obstacles and power ups, and mix those in to create further variations in gameplay.
A game is also a visual experience. You need to break your ‘first playable’ level up into different visual components and create variations of these as well. In the end you’ll have a nice little component palette from which to build your levels.
The evil of spreadsheets
I created a spreadsheet with level information, it allowed me to keep track of which stages of designing and creating the levels I was at. It also allowed me to see what kinds of levels I was stringing together, which was important in preventing repetition.
Whatever types of levels you have in a game it’s important that they aren’t all the same and that no two of the same type are consecutive. I have several different mission types in Captain Kaon. In some you are destroying key targets, some are sneaky recon missions, and in others you could be carrying stuff to or from your base. Within each of these there are sub-mission types. When I planned out my levels I ensured that no two missions of the same type followed each other. I also set which visual environment the level will take place in, too prevent too much visual repetition.
It’s important to take this kind of macro-level look at your game sometimes. You need to think about how the experience changes from one level to the next. Keeping track of it in a spreadsheet is a great way to do this. It also allows you to tackle the levels in any order you like, or spread them around the team, and ensure they all still come together when they’re finished.
Paper planning
Whenever I start designing a level I get a basic feel for what it needs to do from my spreadsheet, then I get a pencil and paper to draw out the basic plan. You don’t need to use a whole A4 sheet for this, the more space you have, the more you will try to fill it. When I designed Shogun 2 battles I started by drawing a one inch square for a map that would end up 2km across.
I start by using a light coloured pencil (usually pink) to draw an abstract flow line, essentially it’s a wiggly gesture line. This path forms an underlying skeleton to the level, going from the players spawn point to the levels objectives. There are four important things with this flow line:
It can’t be too straight, straight is boring.
It can’t be too wiggly, windy, and over-lapping. It needs to flow.
It mustn’t look like one you’ve already drawn. You’ll just be repeating a level.
It can’t double back on itself, the player could get lost.
Once you have an idea of the direction the player will be going in, you can start marking points on the flow line for key features of the level. In an abstract sense a level is a series of decisions that the player makes. Walk left, pick up key, climb ladder. You need to think about what, and where, these will be on your level. Mark these out evenly on the flow line.
With the framework in place you can start to think about which components you’ll put together in each section of the level. How will they be arranged, how will they interact with each other? Using a nice 2B pencil you can draw in these components and then draw the wall outline around them.
This will give you the basic plan that you can sit in front of an editor with. But before you do that, you should run through the level in your mind. Look at your piece of paper and try to visualise how it will play, based on how the ‘first playable’ level played. Try and spot problems. It’s a lot easier to erase a pencil line than delete a bunch of level content.
Tiles and blocks and other things
When you first create a level it’s important that you not try to create the entire thing before you run it for the first time. You’ve got your plan on paper and you should be confidant of it producing a functioning, playable, level. At this point it would be easy to just plough on and create the whole thing. But remember, great ideas on paper aren’t always great ideas when you execute them. You need to build you level in stages, checking each for functionality and fun.
I’m making Captain Kaon in GameMaker, for the levels I’m using the internal editor. Some people have used GameMaker to create a level editor for their games, which seems like a pretty smart thing to do. If I’d thought of that I might have tried doing it as well.
I build the background from a tileset and then use invisible physics objects as collision. I follow the paper plan and construct the level placing only the most basic components required; this gives me the bare bones of a level. At this point you need to start thinking, again, about how the player will play the level. If you’ve played your ‘first playable’ level enough you should have a feel for how the player character and enemies move. You should be able to look at the level you are constructing and build a picture in your mind of how it plays. This will give you an idea of potential problems and improvements. But don’t make them yet. Write your thought s down on a pad, you need to run the level and confirm them.
Test and Tweak
Once you have a basic version of a level you can see how it plays. How do the potential problems pan out? Are all the components hooked up and working correctly? You need to do this early so you can find and fix any fundamental problems. I usually like to reduce the spawn rates of the Ai and slow down the speed of the hazards when I do this. I then dial it back up once I’m ready for playtesting.
If you’re happy that the functionality works and that the level can be completed, you can think about how the level logic holds up. Does the sequence of actions the player has to go through to complete the level still make sense? Is there any point they might become confused or disoriented?
With a functioning level you can begin a cycle of playing and tweaking. Find little ideas to tease out improvements in the players’ experience. Sit some friends down and watch them play the game, see if they do anything unexpected. You’ll probably still be tweaking the odd thing right up until release.
Polish it up and plug it in
Once you’re pretty happy with how the level plays and feels you can finally worry about how it looks. Polish is an important step in creating a level which is alive and engaging, without it your levels will be sterile. Unfortunately it will also massively increase the amount of time it takes to create your level. In my case it doubled the time a Captain Kaon level took from 2 to 4 days. This can mean you’re creating a rod for you own back. The more you polish one level, the more you have to polish the rest.
Factoring polish time into your game is an easy thing to forget or underestimate. As a general rule for planning a task you should divide it in two. The first part is planning and executing, the second is fixing and polishing. Figure out how long it will take you to plan and execute and then add it again for polish.
Once your level is done it needs to be properly plugged in and accessible in the game, for the sake of the rest of your team and their valuable feedback. I’ve worked in situations where levels needed to be manually copied and then executed by fiddling with scripts. This creates a barrier between your level and the first people who can give you feedback. Your level needs to be immediately and easily accessible to everyone on the team.(source:gamasutra)
下一篇:付费手机游戏是否真的能够回归?

")
")
")
")


 闽公网安备35020302001549号