分享2D平台游戏寻径方法(1)
作者:Yoann Pignole
引言
我在思考自己所开发的游戏项目中的敌人应该具备的行为时,我只是在设计文档中简单地输入“跟随玩家”这几个字。而这4个字却足以令我抓狂。我知道部署包括跳跃在内的寻径系统的难度,但我却只是一名业余程序员,实在处理不了这种棘手问题。
但我最后还是成功了,所以撰写此文与各位分享我的方法。
我的项目是一个基于贴砖的游戏,所以这个方法适用于“贴砖”主题。我使用的是Unity 3D,C#语言,但我会尽量用“伪码”举例。
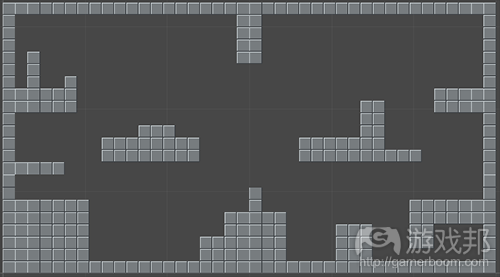
以下是我所使用的原型贴图:
导航网格:如何进入关卡?
首先我要做的是创造一个“地图”,它会标注关卡中每个可以通过的点,每个点又带有“链接信息”(即由此可以到达哪个点)。
作为已经接触不同游戏引擎的关卡设计师,我习惯使用这种被称为“导航网格”的“地图”。有两种方法可以创造这种导航网格:
*手动创建,标注不同点,令链接直接落在关卡碰撞之处——这更适合关卡设计师。
*从关卡碰撞处自动生成——更适用于程序员。
对于不含跳跃机制的上下视角的游戏来说,第一种方法是个不错的选择,关卡设计师只需要用颜色标注出可以通行的“方块”即可。
但在我的项目中,索引所有可能的跳跃和下落链接对于设计师来说是一项极为棘手而耗时的任务。当然也可以“限制”链接数量,但我并不想让游戏中所有的敌人都出现相同的行为:我认为这会破坏游戏的“神秘感”。
基上以上原因,以及我对挑战性的追求,我决定选择第2个方案:自动生成导航网格!
基础类
为了计算我的导航网格并在游戏循环中与之“沟通”,我首先要定义地图中所有的贴砖。
所以,我先创造了一个新的navPoint类,储藏了4个值:
*贴砖坐标(使用一个具体类部署其本身的X和Y坐标和一些方法):定义相关贴砖。
*平台索引:用于确定两个导航点是否属于同一个“平台”。
*导航点类型:含5个可能值的列举
none——自由导航点
platform——平台导航点(在地面贴砖之上的贴砖)
leftEdge——平台左侧导航点
rightEdge——平台右侧导航点
solo——只有一个导航点的平台
*导航链接(见下文)
接下来我就要创造一个导航链接类。导航链接总会在导航点中引用,并且保存其导向的其他导航点的信息:
*目的地坐标:找到目的地导航点
*链接得分:在本文第二部分将会提到
*跳跃轨道值:在被关联时执行跳跃所需要的数值(例如高度,速度,加速等)
导航网格生成
为实现这一点,我在编辑器中令一个特殊类生效。
这个方案强加了一个“静态导航网格”,但其计算相当缓慢并且无法在游戏中执行。所以它忽略了寻径的进化/移动碰撞的一切可能性(我会在总结中讨论这一点)。
让我们看看它的运行方式……
参数
生成器函数只采用两个参数:
*导航网格所采用的贴图
*导航网格所生成的“跳跃”AI
我需要针对每个AI的特殊导航网格,因为它们具有特殊的跳跃技能和不同的碰撞机尺寸。
这些跳跃AI包含4个重要的移动常量:
*奔跑加速
*最大奔跑速度
*基本跳跃速度
*最大跳跃高度
初始化
第一个步骤就是针对各个贴图创造一个2维导航点阵列。在默认情况下,导航点属于none类型,这意味着它们不可用于导航。
定义“可通行”导航点
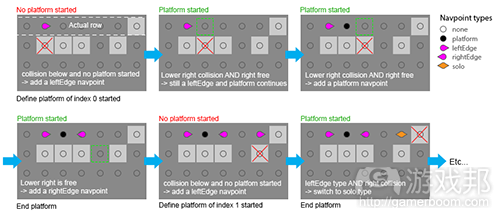
这个过程相当简单,始于逐行分析所有贴砖。如果平台开没有启动,就要对碰撞贴砖之上的自由贴砖增加一个leftEdge导航点。之后,查看平台是否在相同导航点结束,如果是就将导航点切换至solo类型,如果不是就继续进入下一个导航点;如果平台继续运行(右下方的贴砖是碰撞状态而右侧贴砖是自由的),那就增加一个平台导航点,如果平台没有继续运行,那就增加一个rightEdge导航点并结束实际的平台运行。
让我们用伪码写下这个过程:
actualPlatformIndex = 0
platformStarted = falseFOR EACH tile row
platformStarted = false
FOR EACH tile in row
IF NOT platformStarted
IF target tile is free AND lower one is
add a leftEdge navpoint related to target tile
navpoint platform index = actualPlatformIndex
platformStarted = true
actualPlatformIndex = actualPlatformIndex + 1ENDIF
ENDIFIF platformStarted
IF lower right tile is a collision AND right tile is not AND navpoint type is not leftEdge
add a platform navpoint related to target tile
navpoint platform index = actualPlatformIndexENDIF
IF lower right tile is free OR right tile is a collision
IF navpoint is a leftEdge
navpoint type = solo
ELSE
navpoint type = rightEdge
ENDIF
platformStarted = false
ENDIF
ENDIF
ENDFOR
ENDFOR
现在所有的“可通行”导航点定义完毕:
我们可以处理这些导航点之间的链接生成了。
奔跑链接
有些简单的链接可以用伪码处理:
FOR EACH navpoints
IF target navpoint is not a none type AND is not at the extreme right
IF the next right navpoint type is not none
add a new floor link from target navpoint to next right navpoint
ENDIF
ENDIF
ENDFOR
现在我们要讨论一些更为复杂的操作:掉落链接。
掉落链接
为了简化掉落链接的计算,我选择只从一个平台边缘考虑“直线”垂直掉落的问题,而非(以初始水平速度的)“对角线”掉落。
这个方法就是针对每个边缘导航点,查看下一个纵列(左边对应leftEdge类,右边对应rightEdge类,左右两边都对应solo类),从边缘高度开始往下,一直达到一个可通行的导航点(属于none类)为止。
FOR EACH navpoints
IF target navpoint type is leftEge OR righEdge OR solo
CASE navpoint type OF
rightEdge :
a = 1
b = 1leftEdge :
a = 0
b = 0solo :
a = 0
b = 1ENDCASE
FOR i from a to b
IF i = 0
sideTile = next left tile
ELSE
sideTile = next right tile
ENDIF
IF sideTile not a collision
targetRow = sideTile row – 1
WHILE targetRow > 0
navPointToCheck = navpoint at sideTile column and targetRow row
IF navPointToCheck type is not none
add a new fall link from target navpoint to navPointToCheck
BREAK WHILE LOOPENDIF
targetRow = targetRow – 1
ENDWHILE
ENDIF
ENDFOR
ENDIF
ENDFOR
这样,奔跑和掉落链接就完成了:
现在我们就来讨论跳跃链接,也就是平台游戏寻径的核心所在!
跳跃链接
定义跳跃轨道
跳跃轨道是一个包含3个变量的类:
*跳跃高度:用于计算我跳跃垂直速度冲力
*跳跃速度:在跳跃时达到的水平速度(最大速度)
*点阵:即分散轨道点坐标的阵列
这个类的构造函数(即创造类时的一个执行方法)有一个起始点值,上文提到的头2个值以及2个AI移动常量则用于计算轨道点阵:
jumpTrajectory(start point, jump height, jump speed, AI base speed, AI acceleration)
轨道的长度和点之间的间隔取决于另外2个常量:跳跃持续时间和每点的时间间隔。较大的常量居首,较小常量次之,这样就需要更多时间来计算轨道,所以我们要在游戏所需复杂度和运行表现之间取得平衡(这可以在编辑器中进行计算,更适用于设计师)
在此我不打算赘述计算的问题,因为这并非本文的主旨。
计算所有可能来自导航点的跳跃轨道
我选择计算一系列可能的跳跃:分别向右向左计算每个导航点可能产生的一系列不同高度和水平速度的跳跃轨道。
我使用了高度分类和速度分类这2个常量。这些常量将分别定义“跳跃”AI的最大跳跃高度和最大奔跑速度属性,其结果将运用于计算可能的跳跃。需要强调的是,更多分类意味着更很多复杂性。
以下是生成所有可能跳跃列表的伪码:
jumpTrajectoriesToValidate = new list of jump trajectories lists
FOR EACH navpoints
IF target navpoint is not a none type
navpointTrajectories = new list of jump trajectories
FOR i from 1 to jump height divisions
jumpHeight = Ai jump height * (i / jump height divisions)
FOR j from 1 to jump speed divisions
jumpSpeed = AI max speed * (j / jump speed divisions)
rightTrajectory = new jumpTrajectory
(start point, jumpHeight, jumpSpeed, AI base speed, AI acceleration)leftTrajectory = new jumpTrajectory
(start point, jumpHeight, jumpSpeed, – AI base speed, – AI acceleration)add rightTrajectory to jumpTrajectories
add leftTrajectories to jumpTrajectoriesENDFOR
ENDFORadd navpointTrajectories to jumpTrajectoriesToValidate
ENDIF
ENDFOR
抛弃无效的跳跃轨道
结束导航网格生成的最后一个步骤就是仅保留有效的跳跃轨道。
为此,我针对每个轨道连续测试了它从开始到最后的所有点。首个测试用于了解某个点是否达到了有效的目的地平台,也就是说:
*该点在地面之上(不在none类导航点)
*该轨道处于其下降阶段
*该点与地面距离够近(使用distanceMax常量)
*地面有足够空间容纳AI碰撞器(使用特殊定制函数isEnoughSpace返回boolean)
*该点位于一个不同于起始点的平台之上
*该点位于一个从起始点开始出发但尚未到达的平台之上
如果该点匹配以上所有条件,那就是一个有效的目的地,所以其跳跃轨道也是有效的,就可以在两个导航点之间添加一个跳跃链接。
如果该点并不匹配上述所有条件,我只需查看是否有足够容纳AI碰撞器的空间。如果是,该轨道仍然有效(不受阻碍),我就可以移到下一个轨道点。如果不是,我就会中断这一过程,不添加跳跃链接。
以下就是所有轨道生效过程的伪码:
FOR EACH navpointTrajectories in jumpTrajectoriesToValidate
platformsReached = new list of platform index
startNavpoint = related navpointFOR EACH jumpTrajectory in navpointTrajectories
FOR EACH point in jumpTrajectory
pointNavpoint = navpoint related to the point position
IF pointNavpoint different from startNavpoint
IF relatedNavpoint different from none type
AND point y coordinates < previous point y coordinates
AND point y coordinates – relatedNavpoint y coordinates <= distanceMax
AND isEnoughtSpace(AI collider, relatedNavpoint)
AND startNavpoint platform index different from relatedNavpoint platform index
AND pointNavpoint platform index not in platformsReachedadd a new jump link from startNavpoint to pointNavpoint
reference the 4 jumpTrajectory values for this jump link
(jump height, base speed, acceleration, max speed)add pointNavpoint platform index to platformsReached
ELSE IF isEnoughtSpace(AI collider, relatedNavpoint) is false
OR point is the last one of the trajectoryBREAK FOR LOOP
ENDIF
ENDIF
ENDFOR
ENDFOR
ENDFOR
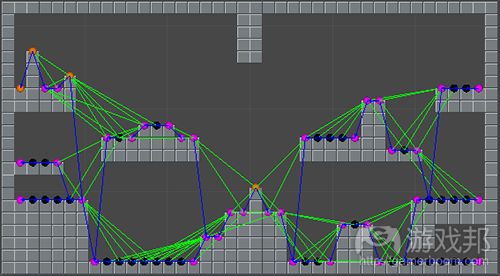
现在所有导航网格都准备就绪了,它们之间已经具备所有的导航点和链接:
(本文由游戏邦编译,转载请注明来源,或咨询微信zhengjintiao)
The Hobbyist Coder #3 : 2D platformers pathfinding – part 1/2
by Yoann Pignole
This is the first part of the article, centered on creating the “navmesh”, the matrix on which the AI will move. The move itself will be approach in the second part, coming soon !
Introduction
When I was thinking about the enemies behavior of the game project I’m working on, I just typed in my design document “follow the player”. And these 3 words almost drove me crazy ! I had an idea about the difficulty of implementing a pathfinding system including jump, but I was really far from the complexity I ran into as a hobbyist coder.
But I finally succeeded and I write this article to show you the way I did it and, maybe, have some feedbacks about my method.
My project is a tile-based game so all this method is based on “tiles”. I used Unity 3D, in C# language, but I’ll try to give “pseudo-code” examples to stay “generic”.
This article is also linked to the custom platformer controller I use. So, I encourage you to read my previous article about it here.
For the exercise, I’ll use this prototype tilemap :
The navmesh or where and how to move inside the level ?
First thing I had to do was to create a “map” of the walkable points of the level with “link information” on each points (which points are reachable from this one and how ?).
Having worked as a level designer in the industry with different game engines, I use to work with this “map”, which is called a “navmesh” (abbreviation for “navigation mesh”). Basically, they are two methods to create this navmesh :
construct it manually, placing the different points and making the links directly on the level collisions → more (all) work for the Level Designer
generate it automatically from the level collisions → more (all) work for the coder work
In the case of a top-down view game with no jump, the first method can be a good option, the Level Designer just having to colorize walkable “squares” for example.
However, in my project, it would be very tricky and time-consuming for the designer to reference all the possible jump and fall links. Of course, it was possible to “limit” the links number but I didn’t want to have all my enemies taking obviously the same way : I think it breaks the “magic”.
For all these reasons, and because it was an exciting challenge for me, I decided to chose the second option : generate the navmesh automatically !
Base classes
To compute my navmesh and “communicate” with it in the game loop, I first had to define all the tiles of my map.
So, I first created a new navPoint class, stocking 4 values:
Tile coordinates (using a specific class implementing itself x and y coordinates and some methods) : to define the related tile
A platform index : useful to define if two navpoints are a part of the same “platform”.
A navpoint type : an enumeration with 5 possible values
none → a free navpoint
platform → a platform navpoint (on the tile above a ground tile)
leftEdge → the left navpoint of the platform
rigthEdge → the right one
solo → a only one navpoint platform
Navlinks (see just below)
Next, I created a navlink class. The navlinks are always referenced in a navpoint(see above) and keeps informations about the other(s) navpoint(s) it can lead to :
Destination coordinates : to find the destination navpoint
Link score : we will see that later, in the second part of this article.
Jump trajectory values : if relevant, the needed values to perform the jump (height, speed, acceleration, etc..). We’ll come back to this later.
Navmesh generation
For this purpose, I made a specific class in function which generate it inside the editor.
This solution impose a “static navmesh” but the computation is quite slow and can’t be performed ingame. So it dismiss all possibility of evolutive/moving collisions for the pathfinding (but I’ll talk about that later in the conclusion).
Let’s see piece by piece how it works…
Parameters
The generator function takes only two parameters :
The tilemap the navmesh will be based on
The “jumping” AI from which the navmesh is generated
I need a specific navmesh for each kind of AI as they could have specific jump skills and different collider sizes.
These jumping AI contain 4 important move constants:
run acceleration
run max speed
jump base speed
jump max height
These values are related to the custom platformer character controller I made previously (one again, you can reach the related article here). To make it short, the AI have a base speed at jump start (jump base speed) and accelerate (run acceleration), but with a maximum speed (run max speed) during a jump which can exceed a certain height (jump max height).
Initialization
The first step is to create a 2 dimensional navpoints array, one for each map tile. By default, the navpoint are none types, which means there are not use to navigate.
Define “walkable” navpoints
The process is quite simple and start by parsing all the tiles row by row. If a platform is not started, for a free tile with a collision tile juste below, add a leftEdge navpoint. Then, check if the platform ends on the same navpoint, if it does switch the navpoint to a solo type, if it doesn’t continue to the next navpoint : if the platform continues(lower right tile is a collision and right tile is free), add a platform navpoint, if it doesn’t, add a rightEdge navpoint and end the actual platform.
Let’s write this in pseudo-code :
actualPlatformIndex = 0
platformStarted = false
FOR EACH tile row
platformStarted = false
FOR EACH tile in row
IF NOT platformStarted
IF target tile is free AND lower one is
add a leftEdge navpoint related to target tile
navpoint platform index = actualPlatformIndex
platformStarted = true
actualPlatformIndex = actualPlatformIndex + 1
ENDIF
ENDIF
IF platformStarted
IF lower right tile is a collision AND right tile is not AND navpoint type is not leftEdge
add a platform navpoint related to target tile
navpoint platform index = actualPlatformIndex
ENDIF
IF lower right tile is free OR right tile is a collision
IF navpoint is a leftEdge
navpoint type = solo
ELSE
navpoint type = rightEdge
ENDIF
platformStarted = false
ENDIF
ENDIF
ENDFOR
ENDFOR
Now all the “walkable” navpoints are defined :
We can now move to the generation of the links between these navpoints.
Run links
There are the easy ones. The pseudo-code should be clear enough :
FOR EACH navpoints
IF target navpoint is not a none type AND is not at the extreme right
IF the next right navpoint type is not none
add a new floor link from target navpoint to next right navpoint
ENDIF
ENDIF
ENDFOR
Are you still following ? OK, let’s talk about a little bit more complicated ones : the fall links.
Fall links
To simplify the fall links computation, I chose to consider only the “straight” vertical falls from a platform edge, and not the “diagonal” ones (with an initial horizontal speed).
The idea here is, for each edge navpoints, check the next column (left one for leftEdge type, right one for rightEdge type and both for solo type), going down from the edge height, until reaching a walkable navpoint (any not “none” type).
fall_process.png
Here is the pseudo-code :
FOR EACH navpoints
IF target navpoint type is leftEge OR righEdge OR solo
CASE navpoint type OF
rightEdge :
a = 1
b = 1
leftEdge :
a = 0
b = 0
solo :
a = 0
b = 1
ENDCASE
FOR i from a to b
IF i = 0
sideTile = next left tile
ELSE
sideTile = next right tile
ENDIF
IF sideTile not a collision
targetRow = sideTile row – 1
WHILE targetRow > 0
navPointToCheck = navpoint at sideTile column and targetRow row
IF navPointToCheck type is not none
add a new fall link from target navpoint to navPointToCheck
BREAK WHILE LOOP
ENDIF
targetRow = targetRow – 1
ENDWHILE
ENDIF
ENDFOR
ENDIF
ENDFOR
OK, done for run and fall links :
Let’s talk about jump links now, the essence of a platformer pathfinding !
Jump links
Define a jump trajectory
A jumpTrajectory is a class containing 3 variables:
jump height : as it’s used to compute my jumps vertical speed impulsion
jump speed : the horizontal speed to reach (max speed) while jumping
points array : it’s an array of the discrete trajectory points coordinates
The constructor (for non-coders, a constructor is a method executed when a class is created. Better explanations here if you want.) of this class takes a start point value, the first 2 values mentioned above and 2 of the AI move constants to compute the trajectory points array :
jumpTrajectory(start point, jump height, jump speed, AI base speed, AI acceleration)
The length of the trajectory and the interval between points depends on 2 other constants : jump duration and time between point. Bigger is the first and smaller is the second and more time it will take to compute a trajectory, so it’s a balance between needed complexity and performance (this being computed in the editor, it’s more a designer’s work comfort).
I won’t explain in detail (pseudo-code) the computation itself because I think it’s not the purpose here.
Compute all possible jump trajectories from navpoints
Then, I chose to compute a set of possible jumps : the idea is to compute, for each navpoint, a series of jump trajectories with different heights and horizontal speeds, to the right and to the left.
I use 2 constants, height divisions and speed divisions. These constants will define respectively the divisions of the “jumping” AI jump max height and run max speed properties which will be used to compute possible jumps. Again, more divisions means more complexity but more computation time.
jumpDivisions.png
Here the pseudo-code to generate the list of all the possible jumps :
jumpTrajectoriesToValidate = new list of jump trajectories lists
FOR EACH navpoints
IF target navpoint is not a none type
navpointTrajectories = new list of jump trajectories
FOR i from 1 to jump height divisions
jumpHeight = Ai jump height * (i / jump height divisions)
FOR j from 1 to jump speed divisions
jumpSpeed = AI max speed * (j / jump speed divisions)
rightTrajectory = new jumpTrajectory
(start point, jumpHeight, jumpSpeed, AI base speed, AI acceleration)
leftTrajectory = new jumpTrajectory
(start point, jumpHeight, jumpSpeed, – AI base speed, – AI acceleration)
add rightTrajectory to jumpTrajectories
add leftTrajectories to jumpTrajectories
ENDFOR
ENDFOR
add navpointTrajectories to jumpTrajectoriesToValidate
ENDIF
ENDFOR
Discard non valid jump trajectories
Last step to finish the navmesh generation is to only keep valid jump trajectories.
For this purpose, for each trajectory, I test successively all its points from start to end. The first test being to know if the point reaches a valid destination platform, that’s to say :
the point is above a ground (not none type navpoint)
the trajectory is in its falling phase
the points is enough close to the ground (using a distanceMax constant)
there is enough place on the ground for the AI collider (using a specific custom function isEnoughSpace(collider, position in world) returning a boolean)
the point is above a different platform than the start point
the point is above a platform not already reached from the start point
jumpDestination_process.png
If the point matches all these requirements, there is a valid destination, so the jump trajectory is valid and a jump link can be added between the two navpoints.
If a point doesn’t matches all these requirements, I just check if there’s enough place for the AI collider. If yes, the trajectory is still ok (not blocked) and I move on to the next trajectory point. If no, I break the process and no jump link will be added.
jumpValid_process.png
Here all the trajectory validation process in pseudo-code :
FOR EACH navpointTrajectories in jumpTrajectoriesToValidate
platformsReached = new list of platform index
startNavpoint = related navpoint
FOR EACH jumpTrajectory in navpointTrajectories
FOR EACH point in jumpTrajectory
pointNavpoint = navpoint related to the point position
IF pointNavpoint different from startNavpoint
IF relatedNavpoint different from none type
AND point y coordinates < previous point y coordinates
AND point y coordinates – relatedNavpoint y coordinates <= distanceMax
AND isEnoughtSpace(AI collider, relatedNavpoint)
AND startNavpoint platform index different from relatedNavpoint platform index
AND pointNavpoint platform index not in platformsReached
add a new jump link from startNavpoint to pointNavpoint
reference the 4 jumpTrajectory values for this jump link
(jump height, base speed, acceleration, max speed)
add pointNavpoint platform index to platformsReached
ELSE IF isEnoughtSpace(AI collider, relatedNavpoint) is false
OR point is the last one of the trajectory
BREAK FOR LOOP
ENDIF
ENDIF
ENDFOR
ENDFOR
ENDFOR
And that’s it, the navmesh is now ready, with all the navpoints and the links between them (source:gamasutra)
上一篇:分享《Star Driller Ultra》图像制作经验
下一篇:如何创造富有沉浸感的游戏入口


 闽公网安备35020302001549号