如何为小型游戏创造简单的GUI系统(1)
作者:Martin Prantl
如果你正在编写自己的游戏,迟早会用到一些用户界面(或者图像用户界面,即GUI)。我们有一些现成的库可以借用。也许最著名的当属CEGUI,它也很容易整合到OGRE 3D引擎中。行业中有许多关于如何处理“我应该使用什么GUI?”这个永恒问题的讨论。(请点击此处阅读本系列第2、3部分)
不久前我遇到了一个相同的问题。我需要一个用C++编写,并且能够与OpenGL和DirectX共存的库。另一个条件就是支持经典的鼠标控制模式以及点触输入。CEGUI看似一个良好的选择,但其问题在于复杂性,以及不是很出色的点触支持。多数时候,我只需要一个简单的按钮,复选框,文本字幕以及“图标”或图像。用这些内容,你几乎可以创造任何东西。你可能知道,GUI并不仅局限于你所能看到的东西。它还包括功能,比如我点击一个按钮会发生什么情况,如果我在某个元素之上移动鼠标又会发生什么等等。如果你选择自己编写系统,你就需要植入这些,并考虑到其中某些东西仅适用于鼠标控制,有些元素仅能支持点触控制(例如一次点触多个地方)。
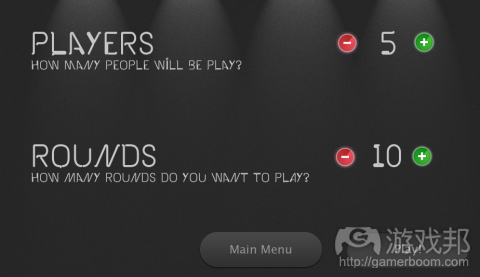
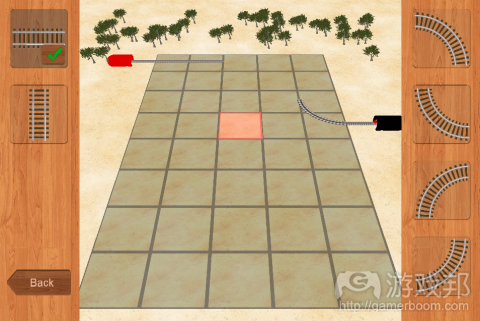
从头编写GUI并非易事。我将创造一些复杂而能够处理一切的系统。我们设计的GUI将用于静态游戏菜单控制和游戏内部菜单。你可以用这个系统展示得分,生命和其他信息。图1和图2就是用这个简单系统所创造的例子。这些是我所创造的引擎和游戏截图。
我们的GUI将用C++来创造,可用于OpenGL或DirectX。我们并不使用任何特定的API。除了简单的C++,我们还需要一些库令操作更便捷。FastDelegate是最棒的“库”之一,将可用于功能指针(我们将用它作为触发器)。至于字体渲染,我决定使用FreeType2库。这有一点复杂,但却值得一试。它可以满足你所有的需求。如果你愿意,还可以添加一些不同图像格式(如jpg、png……)的支持。为了简便起见,我使用了tga和png(虽然没有那么快,但容易使用LodePNG库)。
现在让我们来讨论细节内容吧。
本文分为以下三个章节:
第1部分:定位
第2部分:控制逻辑
第3部分:渲染
坐标系统和定位
每个GUI系统最重要的东西都是屏幕上的元素定位。图像API使用范围为[-1, 1]的屏幕空间坐标。它并无不妥,但如果我们是要创造/设计GUI就没有那么好了。
该如何决定一个元素的定位?有一个选择是使用一个绝对系统,设置元素的真正像素坐标。这很简单但并不实用。如果我们更改了分辨率,我们的整个设计美观的系统就会被搞砸。第二个方法是使用一个相对系统。它效果更好,但也不是100%完美。如果我们想让一些控制元素位于屏幕下方,带有一点位移。如果使用了相对坐标,其空间就会因分辨率而产生变化,而这并非我们想要的结果。
最后我结合使用了两种方法。你可以在相对和绝对坐标中设置位置。这与CEGUI中所用的解决方案有点相似。
以上所描述步骤适用于整个屏幕。在GUI设计中,只有极少数元素能够满足这个条件。多数情况下,我们要创造一些面板,并将其他元素布置在这个面板上。为什么?答案很简单。如果我们移动了面板,所有元素都会随之移动。如果我们隐藏面板,所有元素也会随之隐藏。
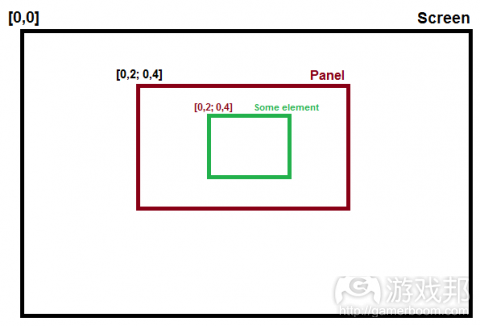
目前我所编写的定位内容正适合这种情况。结合使用了相对与绝对定位,但这一次相对起点并非整个屏幕的[0,0]角落,而是我们“面板”的[0,0]。这个[0,0]点在屏幕上已经有一些坐标,但对我们来说并没有什么意义。用一张图就足以说明一切了:
(图3:元素定位。黑色代表屏幕(主窗口)及其内部元素。面板位于屏幕内部。绿色元素位于面板内部。其位置在面板范围之内。)
除了移位困难之外,这也是我有意将每个位置以像素而非相对[0, 1]坐标存储的主要原因。我曾经计算过像素位置,我并不需要根据一个元素的母元素和真正的像素位移进行数次的百分比重复计算。这种方法的缺点在于如果屏幕大小变了,整个GUI都得重新载入。说实话,我们的确需要频繁更改图像应用分辨率。
如果我们使用一些图像API(OpenGL或者DirectX),就是在屏幕空间而非像素中进行渲染。屏幕空间与百分比相似,但具有[-1,1]的范围。在向GPU上传数据之前,我们最后一个步骤就是转换屏幕空间坐标。以下三个等式呈现了转换点到屏幕空间坐标的管道。根据屏幕分辨率,通过简单的划分像素位置可以将输入像素转化为[0, 1]中的点。在[0, 1]中的点,我们将其映射到[-1, 1]。
pixel = [a, b]
point = [pixel(a) / width, pixel(b) / height]
screen_space = 2 * point – 1
如果我们想使用没有图像API的GUI,那就要使用Java,C#……并将元素绘成图像,你可以继续使用象素。
锚定系统
现在开始情况会更有趣一点。GUI设计的一大好处就在于使用锚定。如果你曾创造过GUI,你就知道什么是锚定了。如果你想让自己的元素无论屏幕大小都能坚守屏幕的某个部分,那就必须进行锚定。我决定使用相似但略微不同的系统。我所拥有的每个元素都有其自身起源。这可能是四个角落之一(游戏邦注:左上角-TL,右上角-TR,左下角BL,右下角-BR)或者它的中心-C。你所进入的位置与这个起源有关。默认系统是TL。
假设你想让自己的元素总是居于屏幕右下角。你可以用TL起源模拟这个位置及其元素大小。一个更好的解决方法就是倒退。在一个带有变化起源的系统中定位元素,并在之后将其转化到TL起源(详见代码)。这有一个优势:你将保持GUI定义的统一性,并且它更易于维护。
<position x=”0″ y=”0″ offset_x=”0″ offset_y=”0″ origin=”TL” />
<position x=”0″ y=”0″ offset_x=”0″ offset_y=”0″ origin=”TR” />
<position x=”0″ y=”0″ offset_x=”0″ offset_y=”0″ origin=”BL” />
<position x=”0″ y=”0″ offset_x=”0″ offset_y=”0″ origin=”BR” />
统一
在以下代码中,你将看到来自用衣输入内部元素坐标系统的完整计算和转换,它使用的是象素。首先,我们要计算由我们GUI用户所提供的象素位置角落。我们还必须计算元素宽度和高度(我们将在之后的章节讨论元素比例的问题)在此,我们需要母体的比例——即它的大小和TL角落象素坐标。
float x = parentProportions.topLeft.X;
x += pos.x * parentProportions.width;
x += pos.offsetX;float y = parentProportions.topLeft.Y;
y += pos.y * parentProportions.height;
y += pos.offsetY;float w = parentProportions.width;
w *= dim.w;
w += dim.pixelW;float h = parentProportions.height;
h *= dim.h;
h += dim.pixelH;
现在,我们已经计算了指定角落的象素位置。但是,我们系统人内存必须统一,所以一切都要转换到TL中含有[0,0]的系统。
//change position based on origin
if (pos.origin == TL)
{
//do nothing – top left is default
}
else if (pos.origin == TR)
{
x = parentProportions.botRight.X – (x – parentProportions.topLeft.X); //swap x coordinate
x -= w; //put x back to top left
}
else if (pos.origin == BL)
{
y = parentProportions.botRight.Y – (y – parentProportions.topLeft.Y); //swap y coordinate
y -= h; //put y back to top left
}
else if (pos.origin == BR)
{
x = parentProportions.botRight.X – (x – parentProportions.topLeft.X); //swap x coordinate
y = parentProportions.botRight.Y – (y – parentProportions.topLeft.Y); //swap y coordinate
x -= w; //put x back to top left
y -= h; //put y back to top left
}
else if (pos.origin == C)
{
//calculate center of parent element
x = x + (parentProportions.botRight.X – parentProportions.topLeft.X) * 0.5f;
y = y + (parentProportions.botRight.Y – parentProportions.topLeft.Y) * 0.5f;
x -= (w * 0.5f); //put x back to top left
y -= (h * 0.5f); //put y back to top left
}//this will overflow from parent element
proportions.topLeft = MyMath::Vector2(x, y);
proportions.botRight = MyMath::Vector2(x + w, y + h);
proportions.width = w;
proportions.height = h;
根据以上代码,你可以使用几乎相同的用户代码轻松在母元素的每个角落定位元素。我们使用float而不是int来代表象素坐标。这是可以的,因为最终我们会把它转变为屏幕空间坐标。
比例
当我们确立一个元素的坐标时,我们还必须知道它的大小。你可能还记得,我们需要计算比例来计算元素的位置,现在我们就来深入讨论这个话题。
比例与定位极为相似。我们再次使用相对和绝对衡量方法。相对数字会给你一个相当于母元素百分比的大小以及象素补偿。我们必须记住一件重要的东西——纵横比(AR,也称屏幕宽高比)。我们想让自己的元素任何时间都保持原样。如果我们的图标在一个系统上是正确的,但在另一系统上却变样了,那就不妙了。我们可以通过指定一个维度(宽度或高度)以及这个维度的相对纵横比来修复这个问题。
查看以下例子的不同之处:
a) <size w=”0.1″ offset_w=”0″ ar=”1.0″ /> – create element of size 10% of parent W
b) <size w=”0.1″ h=”0.1″ offset_w=”0″ offset_h=”0″ /> – create element of size 10% of parent W and H
这两者都可创造一个相同宽度的元素。a)选择将总含有正确的AR,而b)选择的大小总是与其母元素相同。
在使用相对大小时,最好是以象素设置一种最大限度的元素大小。我们想让一些元素在小屏幕上尽量更大一些,但在大屏幕上又不能过大。这方面的典型例子就是手机和平板电脑。没有必要让一个元素在平板电脑上显得过大(例如100*100象素)。它可以选择50*50,这个大小就够了。但在更小的屏幕上,就要尽量根据用户输入的相对大小来选择。
字体
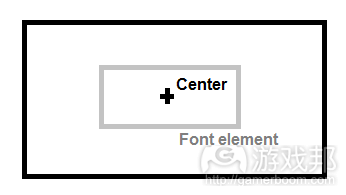
我们要特别注意字体的问题。这里的定位和比例与典型的GUI元素有所不同。首先,字体定位通常最好将起源放置于中央。这样,我们就可以轻松将母元素内部的字体放置在中间,例如按钮。正如之前所言,要重新计算来自二手系统进入含TL起源系统的位置,我们就必须知道元素的大小。
(图5:为中间字体定位的母元素中间起源)
这是一个棘手的环节。当我们处理文本时,我们只设置高度,而宽度则取决于多种因素——例如已用字体、字体大小、印刷文本等。当然,我们可以手动计算大小并在过后使用,但这种做法并不正确。在运行时间中,文本可能发生变化(例如我们游戏中的积分),那么之后会发生什么情况呢?一个更好的方法就是重新计算基于文本变化的位置(文本、字体或字体大小等因素的变化)。
我之前曾提到,我针对字体使用的是FreeType库。这个库可以根据已用字体为每个字母产生单张图片。这无关我们是否事先在字体集纹理中生成这些图像,也无关我们是否在忙碌中创造了这些图像。要计算文本比例我们并不需要真正的图像,只需要其大小。问题在于我们想展示的整个文本大小。这必须通过迭代每个字符和累加比例,及其它们每一者的空间来计算。我们还必须注意新的线段。
在处理文本时你必须考虑一件事情。请看下图及其字幕。有人可能会认为其问题的答案很明显,但我在设计和编码时却没有及时注意在这一点,所以它给我带来了很大麻烦。
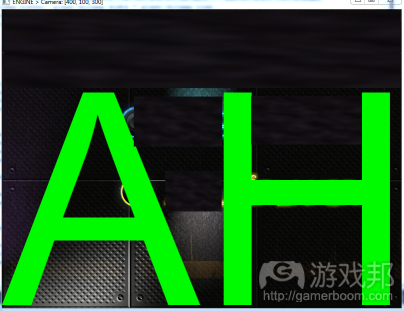
(图6:文本渲染背景:起源在TL,高度设置为100%的母高度。你可能会注意到,文本并没有布满整个空间,为什么?)
答案很简单。文本中有一些很容易辨识并且计算到整体大小中的标记。这里还应该为派生者保留空间,但它们并不用于我所使用的大写字母。你所需要注意的一切都已呈现在下图中:
(图7:字体规则)
总结
我已经描述了自己设计过程所运用的定位和设置GUI元素大小的基本要领。也许还有更好或更复杂的操作方法。这里只是一个简单的方法,并且我在运用的过程中没有遇到任何问题。(本文为游戏邦/gamerboom.com编译,拒绝任何不保留版权的转载,如需转载请联系:游戏邦)
Creating a Very Simple GUI System for Small Games – Part I
By Martin Prantl
If you are writing your own game, sooner or later you will need some sort of user interface (or graphic user interface = GUI). There are some existing libraries lying around. Probably the most famous is CEGUI, that is also easy to integrate into OGRE 3D engine. A good looking system was also LibRocket, but its development stopped in 2011 (but you can still download and use it without any problem). There are a lot of discussion threads that deal with the eternal problem “What GUI should I use?”.
Not so long ago I faced the very same problem. I needed a library written in C++ that would be able to coexist with OpenGL and DirectX. Another requirement was support for classic (mouse) control as well as touch input. CEGUI seems to be good choice, but the problem is in its complexity and not so great touch support (from what I was told). Most of the time, I just need a simple button, check box, text caption and “icon” or image. With those, you can build almost anything. As you may know, GUI is not just what you can see. There is also functionality, like what happens if I click on a button, if I move mthe ouse over an element etc. If you choose to write your own system, you will have to also implement those and take into account that some of them are only for mouse control and some of them are only for touch (like more than one touch at a time).
Writing a GUI from scratch is not an easy thing to do. I am not going to create some kind of super-trooper complex system that will handle everything. Our designed GUI will be used for static game menu controls and in-game menus. You can show scores, lives and other info with this system. An example of what can be created with this simple system can be seen in figures 1 and 2. Those are actuals screen-shots from engines and games I have created with this.
Our GUI will be created in C++ and will work with either OpenGL or DirectX. We are not using any API-specific things. Apart from plain C++, we also will need some libraries that make things easier for us. One of the best “library” (it’s really just a single header file) – FastDelegate – will be used for function pointers (we will use this for triggers). For rendering of fonts, I have decided to use the FreeType2 library. It’s a little more complex, but it’s worth it. That is pretty much all you need. If you want, you can also add support for various image formats (jpg, png…). For simplicity I am using tga (my own parser) and png (via not so fast, but easy to use LodePNG library).
Ok. You have read some opening sentences and it’s time to dig into details.
You can also look at following chapters:
Part I – Positioning
Part II – Control logic
Part III – Rendering
Coordinate System and Positioning
The most important thing of every GUI system is positioning of elements on your screen. Graphics APIs are using screen space coordinates in range [-1, 1]. Well… it’s good, but not really good if we are creating / designing a GUI.
So how to determine the position of an element? One option is to use an absolute system, where we set real pixel coordinates of an element. Simple, but not really usable. If we change resolution, our entire beautifully-designed system will go to hell. Hm.. second attempt is to use a relative system. That is much better, but also not 100%. Let’s say we want to have some control elements at the bottom of the screen with a small offset. If relative coordinates are used, the space will differ depending on resolution which is not what we usually want.
What I used at the end is a combination of both approaches. You can set position in relative and absolute coordinates. That is somewhat similar to the solution used in CEGUI.
Steps described above were applied on the entire screen. During GUI design there is a very little number of elements that will meet this condition. Most of the time, some kind of panel is created and other elements are placed on this panel. Why? That’s simple. If we move the panel, all elements on it move along with it. If we hide the panel, all elements hide with it. And so on.
What I write so far for positioning is perfectly correct for this kind of situations as well. Again, a combination of relative and absolute positioning is used, but this time the relative starting point is not [0,0] corner of entire screen, but [0,0] of our “panel”. This [0,0] point already has some coordinates on screen, but those are not interesting for us. A picture is worth a thousand words. So, here it is:
Figure 3: Position of elements. Black color represents screen (main window) and position of elements within it. Panel is positioned within Screen. Green element is inside Panel. It’s positions are within Panel.
That is, along with hard offsets, the main reason why I internally store every position in pixels and not in relative [0, 1] coordinates (or simply in percents). I once calculated pixel position and I don’t need to have several recalculations of percents based on an element’s parent and real pixel offsets. Disadvantage of this is that if the screen size is changed, the entire GUI needs to be reloaded. But let’s be honest, how often do we change the resolution of a graphics application ?
If we are using some graphics API (either OpenGL or DirectX), rendering is done in screen space and not in pixels. Screen space is similar to percents, but has the range [-1,1]. Conversion to the screen space coodinates is done as the last step just before uploading data to the GPU. A pipeline of transforming points to the screen space coordinates is shown on the following three equations. Input pixel is converted to point in range [0, 1] by simply dividing pixel position by screen resolution. From point in [0, 1], we map it to [-1, 1].
pixel = [a, b]
point = [pixel(a) / width, pixel(b) / height]
screen_space = 2 * point – 1
If we want to use the GUI without a graphics API, lets say do it in Java, C#… and draw elements into image, you can just stick with pixels.
Anchor System
All good? Good. Things will be little more interesting from now on. A good thing in GUI design is to use anchors. If you have ever created a GUI, you know what anchors are. If you want to have your element stickied to some part of the screen no matter the screen size, that’s the way you do it – anchors. I have decided to use a similar but slighty different system. Every element I have has its own origin. This can be one of the four corners (top left – TL, top right – TR, bottom left – BL, bottom right – BR) or its center – C. The position you have entered is than relative to this origin. Default system is TL.
Figure 4: Anchors of screen elements
Let’s say you want your element always to be sticked in the bottom right corner of your screen. You can simulate this position with TL origin and the element’s size. Better solution is to go backward. Position your element in a system with changed origin and convert it to TL origin later (see code). This has one advantage: you will keep user definition of GUI unified (see XML snippet) and it will be more easy to maintain.
<position x=”0″ y=”0″ offset_x=”0″ offset_y=”0″ origin=”TL” />
<position x=”0″ y=”0″ offset_x=”0″ offset_y=”0″ origin=”TR” />
<position x=”0″ y=”0″ offset_x=”0″ offset_y=”0″ origin=”BL” />
<position x=”0″ y=”0″ offset_x=”0″ offset_y=”0″ origin=”BR” />
All In One
In the following code, you can see full calculation and transformation from user input (eg. from above XML) into internal element coordinate system, that is using pixels. First, we calculate pixel position of the corner as provided by our GUI user. We also need to calculate element width and height (proportions of elements will be discussed further in the next part). For this, we need proportions of the parent – meaning its size and pixel coordinate of TL corner.
float x = parentProportions.topLeft.X;
x += pos.x * parentProportions.width;
x += pos.offsetX;
float y = parentProportions.topLeft.Y;
y += pos.y * parentProportions.height;
y += pos.offsetY;
float w = parentProportions.width;
w *= dim.w;
w += dim.pixelW;
float h = parentProportions.height;
h *= dim.h;
h += dim.pixelH;
For now, we have calculated the pixel position of our reference corner. However, internal storage of our system must be unified, so everything will be converted to a system with [0,0] in TL.
//change position based on origin
if (pos.origin == TL)
{
//do nothing – top left is default
}
else if (pos.origin == TR)
{
x = parentProportions.botRight.X – (x – parentProportions.topLeft.X); //swap x coordinate
x -= w; //put x back to top left
}
else if (pos.origin == BL)
{
y = parentProportions.botRight.Y – (y – parentProportions.topLeft.Y); //swap y coordinate
y -= h; //put y back to top left
}
else if (pos.origin == BR)
{
x = parentProportions.botRight.X – (x – parentProportions.topLeft.X); //swap x coordinate
y = parentProportions.botRight.Y – (y – parentProportions.topLeft.Y); //swap y coordinate
x -= w; //put x back to top left
y -= h; //put y back to top left
}
else if (pos.origin == C)
{
//calculate center of parent element
x = x + (parentProportions.botRight.X – parentProportions.topLeft.X) * 0.5f;
y = y + (parentProportions.botRight.Y – parentProportions.topLeft.Y) * 0.5f;
x -= (w * 0.5f); //put x back to top left
y -= (h * 0.5f); //put y back to top left
}
//this will overflow from parent element
proportions.topLeft = MyMath::Vector2(x, y);
proportions.botRight = MyMath::Vector2(x + w, y + h);
proportions.width = w;
proportions.height = h;
With the above code, you can easily position elements in each corner of a parent element with almost the same user code. We are using float instead of int for pixel coordinate representations. This is OK, because at the end we transform this to screen space coordinates anyway.
Proportions
Once we established position of an element, we also need to know its size. Well, as you may remember, we have already needed proportions for calculating the element’s position, but now we discuss this topic a bit more.
Proportions are very similar to positioning. We again use relative and absolute measuring. Relative numbers will give us size in percents of parent and pixel offset is, well, pixel offset. We must take in mind one important thing – aspect ratio (AR). We want our elements to keep it every time. It would not be nice if our icon was correct on one system and deformed on another. We can repair this by only specifying one dimension (width or height) and the relevant aspect ratio for this dimension.
See the difference in example below:
a) <size w=”0.1″ offset_w=”0″ ar=”1.0″ /> – create element of size 10% of parent W
b) <size w=”0.1″ h=”0.1″ offset_w=”0″ offset_h=”0″ /> – create element of size 10% of parent W and H
Both of them will create an element with the same width. Choice a) will always have correct AR, while choice b) will always have the same size in respect of its parent element.
While working with relative size, it is also a good thing to set some kind of maximal element size in pixels. We want some elements to be as big as possible on small screens but its not neccessary to have them oversized on big screens. A typical example will be phone and tablet. There is no need for an element to be extremly big (eg. occupy let’s say 100×100 pixels) on a tablet. It can take 50×50 as well and it will be enough. But on smaller screens, it should take as much as possible according to our relative size from user input.
Fonts
Special care must be taken for fonts. Positioning and proportions differ a little from classic GUI elements. First of all, for font positioning it is often good to put origin into its center. That way, we can center very easily fonts inside parent elements, for example buttons. As mentioned before, to recalculate position from used system into system with TL origin, we need to know the element size.
Figure 5: Origin in center of parent element for centered font positioning
That is the tricky part. When dealing with text, we are setting only height and the width will depend on various factors – used font, font size, printed text etc. Of course, we can calculate size manually and use it later, but that is not correct. During runtime, text can change (for instance the score in our game) and what then? A better approach is to recalculate position based on text change (change of text, font, font size etc.).
As I mentioned, for fonts I am using the FreeType library. This library can generate a single image for each character based on used font. It doesn´t matter if we have pregenerated those images into font atlas textures or we are creating them on the fly. To calculate proportions of text we don’t really need an actual image, but only its size. Problem is size of the whole text we want to display. This must be calculated by iterating over every character and accumulating proportions and spaces for each of them. We also must take care of new lines.
There is one thing you need to count on when dealing with text. See the image and its caption below. Someone may think that answer to “Why?” question is obvious, but I didn’t realize that in time of design and coding, so it brings me a lot of headache.
Figure 6: Text rendered with settings: origin is TL (top left), height is set to be 100% of parent height. You may notice, text is not filling the whole area. Why ?
The answer is really simple. There are diacritics marks in the text that are counted in total size. There should also be space for descendents, but they are not used for capitals in the font I have used. Everything you need to take care of can be seen in this picture:
Figure 7: Font metrics
Discussion
This will be all for now. I have described the basics of positioning and sizing of GUI elements that I have used in my design. There are probably better or more complex ways to do it. This one used here is easy and I have not run across any problems using it.
I have written a simple C# application to speed up the design of the GUI. It uses the basics described here (but no fonts). You can place elements, change their size and image, drag them to see positions of them. You can download the source of application and try it for yourself. But take it as “alpha” version, I have written it for fast prototyping during one evening.(source:gamedev)




 闽公网安备35020302001549号