分享优化游戏截图的6个简单方法
作者:Alexey Volynskov
优秀的截图可以真正推销你的游戏。在本篇教程中,我将分享一点有助于优化游戏截图质量的一些简单技巧。这些建议适用于多数2D和3D游戏。我将谈谈那些有助于你选择更好的查看位置和角度、用户界面注意事项,以及优化截图色彩、裁剪等问题的工具。
良好截图的重要性
截图的重要性体现在多个方面:
*你可以最大化游戏的曝光度
*分享图片是传播游戏的一个简单而有效的方法
*人们会在查看文章或视频之前先通过截图辩认你的游戏
*你的网站需要截图来推广游戏
*你应该在自己的新闻资料和邮件中加入这些截图,以便评论员方便地使用截图。
*你在向应用商店提交游戏时需要截图。
*它们是你游戏广告和营销材料的美术来源。
当然,优秀截图的好处还远不止如此。
使用你自己的截图机制
虽然我们可以借助一些外部工具来制作截图,但让你的游戏自主截图在某些方面更管用:
*随时可以截图,你不需要记得运行哪个程序来制作截图。你在测试游戏的任何时候都能获取精彩截图,只需要摁下一个按钮就能截下图片。
*你可以保将截图保存成你所需要的任何格式。
*你可以自动隐藏那些不想要的内容(例如在屏幕上的调试信息,指导路线或HUD)。
*你可以自动添加水印或游戏名称、网站URL。
*你可以在必要的时候对图片进行后期处理。
*获得截图后,就更容易添加记录短暂动画等额外功能,或者通过渲染多张图片制作大型海报。
不幸的是,在某些引擎中这可能并不是一个很好的选择(或者说太困难了)。所幸许多引擎已经可以让你完成这一步,你只需要根据自己的需求进行一些调整。
活跃相机中的暂停模式
你想制作一个精美的截图,但敌人逃走或者突然出现,并攻击了你的角色。或者粒子效果影响了你的截图画面。
解决方法?增加一个让游戏立即暂停的按钮(再次摁下按钮则恢复状态),以便你移动相机获得截图的最佳角度。
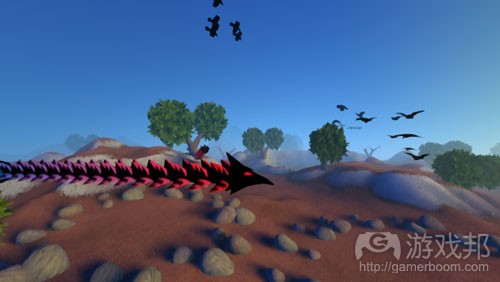
(这是我暂停自己的游戏《Arcane Worlds》的画面。它并不是最佳截图角度)
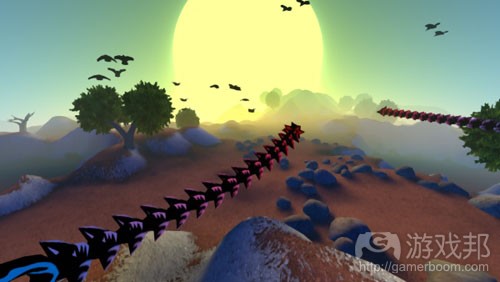
(相同的场景,但角度明显不同)
我发现这个功能极其管用。你可以截取任何图片,无论玩家是否能够游戏中正常看到该画面。你可以截取特定镜头或角色。你还可以用它来调试游戏,暂停游戏来分析情况。
单级或慢动作模式
你可以进一步优化那个暂停模式,添加一个按钮令游戏单级运行,或者以慢动作运行。这有助于你拥不捕捉合适的动画瞬间(除了相机角度之外),并且也非常适用于调试。
构图
以活跃相机设置暂停模式的用意就在于截图的构图。关于构图的话题并非本文讨论的范围,但你可以采取一个简单的方法让自己脱困:增加准线。
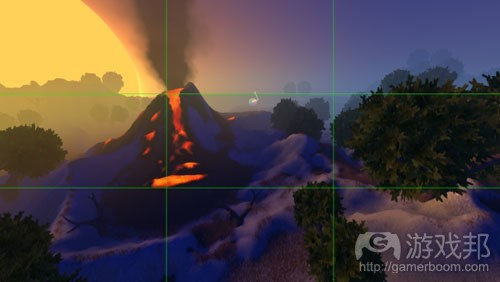
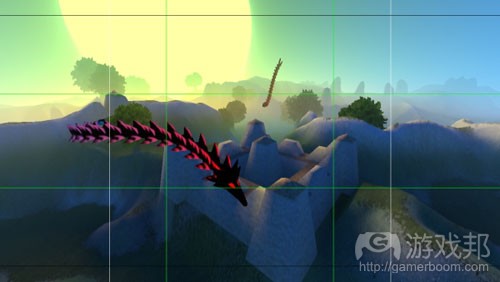
三分之二法则是构图的普遍方式,你可能还会发现黄金比例也很管用。当然,你可以一直盯着某物,但如果你在此存在问题,就可以让准线派上用场。但要确保不要让这些准线出现在真正的截图中!
准线还可用于预览图像切割成不同比例时的样子。
瞬息移动玩家角色
玩家控制角色通常是你截图中的一个重要组成部分。将其移动到任何你所需要的关卡中,可以为你节省大量时间和精力。
但具体的操作方法要视游戏情况而定,但像“点触和摁压一个按钮”或者“摁住一个按钮并指向”这种操作通常是最好的方法。非裁剪涡轮增压移动模式也很有效。你并不需要一下子就跳到任何地方,但却有必要在数秒内移动到任何地方。
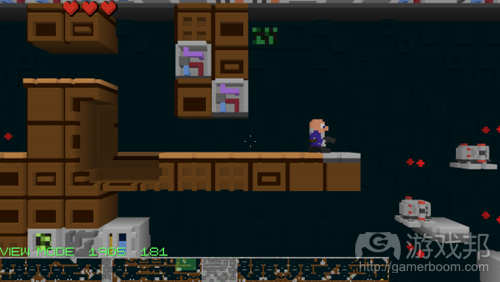
在我的游戏《LEVEL UP!》中,我有一个“浏览模式”(可以用一键按压来激活)。这个浏览视图可以快速用鼠标翻转,角色也可以单键操作瞬息移动到十字路口。
你将再次发现这个功能在其他方面的用途,例如测试你的关卡和机制,或者调试你的游戏。
文本、用户界面和菜单
不要让你的截图中含有太多文本。总而言之,你是在制作图片。如果你想用文本说点什么,最好另外将其写下来。
用户界面投入了大量的制作时间,所以你自然想将它呈现在截图中。但这并不是个好主意。你可以在自己的博客中晒出开发截图,但用户界面和菜单就不应该是你游戏截图的重点了,除非它是一款含有大量电子表格或此类元素的硬核模拟游戏。
但是,还有另一种用户界面:HUD或游戏内界面(后者多属于战略游戏)。你应该考虑下自己的截图中是否需要这些元素。
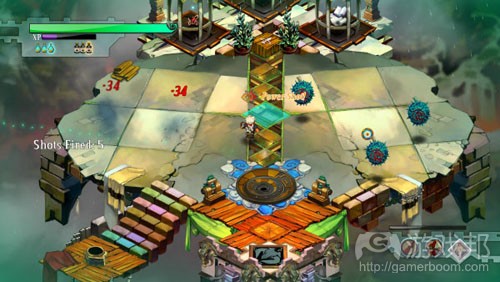
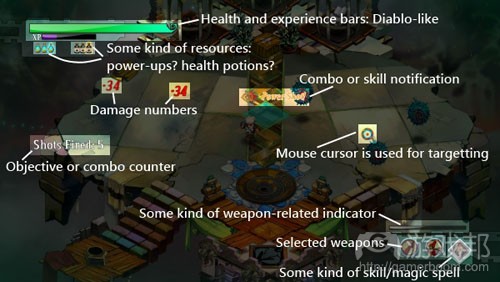
HUD是指提供了关于游戏机制和玩法信息的元素。这意味着它可以提供关于游戏的更多信息。
(这是《Bastion》的HUD截图)
(玩家可以从以上截图中猜出许多玩法)
但是,在多个截图呈现界面是多余之举,想必你也不会将其用于营销途径。它还会隐藏你的美术设计,或者为之添乱。它是玩游戏时的必需元素,但并不一定要以图片形式展示给他人。
正如你所知,选取UI截图的弊大于利,但你应该根据自己游戏的需求掂量一下。
添加按钮隐藏HUD和游戏内GUI
即便你决定保留截图中的HUD,添加按钮来切换也仍然是个好主意。你可能需要游戏美术而不是截图,例如用于网站设计、印刷材料和广告。
当然,你的玩家可能想获得精美的游戏截图以便分享到网络上,或者制作成墙纸,而HUD此时就会成为障碍。
分析你的截图直方图
直方图可以呈现每种亮度水平的像素数量。你可以在Photoshop、GIMP以及Paint.NET中找到这个功能。以下例子使用的是GIMP直方图,为清晰起见采用了对数刻度。
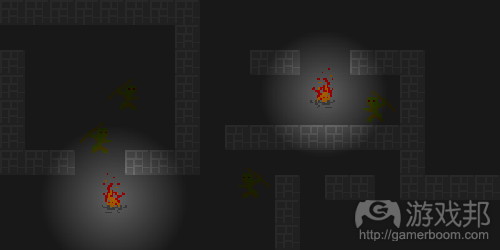
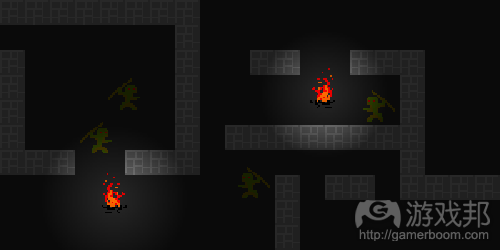
(这是来自一款虚拟游戏的初始截图。其背景是一个地下城,所以很阴暗,能见度较低)
让我们从这个截图入手。你可以看到一些篝火以及一些敌人和墙体。让我们看看以下的直方图:
左侧的缺口代表未使用的暗色——图片中根本就没有用到黑色!右侧的缺口(三分之一的范围)代表未使用的亮色(最亮为白色)。
实际上的图片颜色仅使用了该值域的一半——这很糟糕。让我们用一些后期处理来修复这个问题。我将使用“色阶”调整,这在许多图像处理程序中都很普遍,并设置输入值域以便匹配直方图中已使用的颜色,并稍微调整一下伽马曲线。
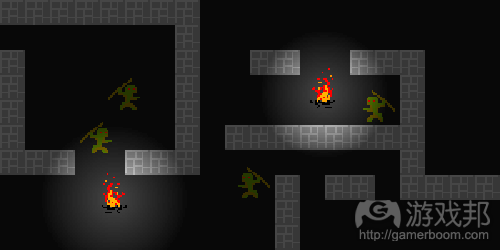
(这是处理过的截图,其处理方法就是使用许多图像处理程序都有的“色阶”)
这个效果并不理想,但却好多了。让我们看看现在的直方图。
正如你所见,已使用的颜色现在填补了整个亮度值域,调整后的“延伸”色值填充了这些范围。这可以在你的后期渲染步骤中自动完成。你还可以你还可以在自己的图像处理程序中尝试其他处理效果,并将其运用到自己的游戏中。
但是,还有另一个方法。
根据直方图调整美术
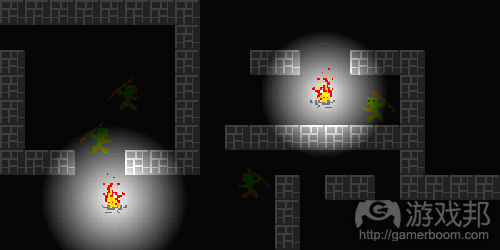
原来的截图直方图缺乏暗色和亮色,所以使用的幅度小于实际所需。让我们通过优化美术内容来修复这个问题。这里的明亮之物是火焰和怪物的眼睛,而暗物则是背景(地面)和灰烬。
(优化后的美术:更明亮的火焰和怪物眼睛,更暗的背景和灰烬。)
这看起来比后期处理的效果更棒了。那么它的直方图又是怎样的呢?
你可以看到,更明亮的值域现在使用得更妥当了。当然,你中以结合调整美术和后期处理这两者的操作。
我压缩了值域的明亮部分,令其妥协了一些细节,以便扩大其余图像的值域:
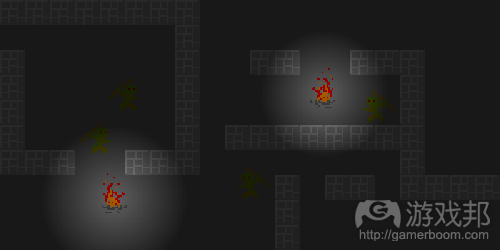
(运用了一点后期处理优化美术内容)
我们可以将它同以下的原图进行对比:
分辨率和纵横比
无论要在哪放置你游戏的截图集(游戏邦注:例如在网站、应用商店等),最好都要保证截图集中的每一张图片像素都保持一致。至少你应该让纵横比(16:9或2:1)保持一致。
这就产生了一个如何为游戏选择最佳屏幕分辨率的问题。要考虑一下你的目标平台是什么,并据此选择合适的分辨率和纵横比。
裁剪
无论你选择了什么分辨率,迟早你就会遇到裁剪的问题。无论是Twitter图片还是Screenshot Saturday,总有些网站会裁剪你的图片令其符合其发布标准。
为此,我建议你确保将最有趣的内容置于截图中心,并查看它裁剪成方形之后的效果。在你的游戏中添加准线也会有所帮助。如果有需要的话,还可以添加关于纵横比的准线。
(构图准线以及裁剪准线)
缩略图
另一个相似的问题出现于你的图片被缩小比例制成缩略图的时候。这会有效移除截图中微小、高频率的细节,只留下较大、低频率的特征。所以要确保你兼顾两者,并使之呈现鲜明对比。这对你的游戏也有好处,因为当屏幕上出现对比鲜明的视觉特征来引导你的视线时,这更容易让人们看出图片的内容。
为此,你可以添加一个预览缩略图,作为引导图与其他截图一起展示。
动画截图
有些游戏在动态情况下更好看,但在截图中看起来效果不明显。有时候,静态图片无法传达关于游戏的足够信息。
可以考虑以GIF格式制作一些动画截图。这里还有其他方法可用,但GIF的支持较为普遍,允许大量用户在不同设备上查看动态图。如果你想获得更现代或有效的格式,不妨试试面向HTML5视频的Gfycat。
你可以录下一段视频,并将其转换为GIF,或者使用类似GifCam或LICEcap等可以直接输出GIF格式的程序来操作。
循环缓冲
这个功能来自FRAPS,你可以将其直接植入自己的游戏中。其理念是该程序会一直记录到一个有限大小的缓冲区——30秒左右的视频。所以,当你玩自己的游戏时,如果认为某物很棒很有趣时,你可以摁下按钮保存之前30秒的视频内容。
总结
你现在应该知道了一些以最佳方式展现游戏的工具和方法:活跃暂停模式以及瞬息移动玩家角色,以便获得最佳角度,隐藏HUD(或者在必要的时候保留它),分析你的截图直方图来优化色彩,以及使用准线来裁剪和构图。
这其中许多技巧可以在开发游戏的时候提供帮助,并提升游戏美术质量和社区制作的截图。(本文为游戏邦/gamerboom.com编译。拒绝任何不保留版权的转载,如需转载请联系:游戏邦)
6 Simple Things You Can Do to Improve Your Screenshots
by Alexey Volynskov
A good screenshot can really sell your game. In this tutorial, I’m going to describe several simple tricks that will improve the quality of your screenshots. These tips are generic enough to be applied to most games, whether 2D or 3D. I’ll talk about tools that help you to choose better view position and angle, user interface considerations, ways of improving screenshot colors, cropping issues, and more.
Why Good Screenshots Matter
Screenshots are important for many reasons:
You can showcase the game in the best light.
Sharing a picture is an easy and effective way to spread the word about your game.
People will recognize your game by screenshots before they’ll look at an article or a video.
You’ll need them for marketing your game on your site.
They should be put into your press kit and emails so reviewers can easily use them.
You’ll need them for store submissions.
They are a good source of your game art for advertisements and marketing materials.
And of course, good screenshots will make all those things better.
Use Your Own Screenshot Mechanism
While there are external tools to make screenshots, making your game capture screenshots by itself is useful in several ways:
It’s always there; you don’t need to remember to run any programs to make screenshots when you need them. Any time you get that “Wow! Great view!” moment while testing your game, you can just press a button to capture it.
You can save screenshots where you want them, in any format you want.
You can automatically hide things you don’t want in your screenshots (like on-screen debugging information, guide lines, or the HUD).
You can automatically add things like watermarks or your game’s name and website’s URL.
You can post-process images if necessary.
Once you’ve got it, it’s easier to add extra features like recording short animations or making huge screenshots for posters by rendering multiple images.
Unfortunately, this might be not an option (or might be too difficult) in some engines. Fortunately, it’s already done for you in many engines; you’ll just need to tune it to your needs.
Pause Mode With Active Camera
You want to make a nice screenshot, but the enemies run away or appear suddenly and attack your character. Or that particle effect you want to capture is just so elusive.
The solution? Add a button that pauses your game instantly (and unpauses it when pressed again) while allowing you to move the camera to get just the right angle for your screenshot.
I’ve just paused my game Arcane Worlds. This is not the best angle for the screenshot.
The same scene, but a different viewpoint.
The same scene, but from a different viewpoint.
I find this feature extremely useful. You can capture any images, whether the player can see them in the game normally or not. You can get close-ups of the scenery or characters. You can also use it to debug your game, pausing it to analyze the situation, which is even more useful if you have visual debugging aids.
Single-Step or Slow-Motion Mode
You can improve that pause mode even further by adding a button to single-step your game or run it in slow motion. This will help you to capture the right moment of the animation (in addition to the camera angle) and is very useful for debugging as well.
Composition
The purpose of having the pause mode with active camera is the composition of your screenshots. The topic of composition is beyond the scope of this article, but there’s one simple thing you can do to help yourself out: add guidelines.
The rule of thirds is a common way to compose images, and you might find golden ratio useful too. Of course, you can always just eyeball things, but if you have trouble with that, guidelines are useful. Make sure not to include these guidelines in the actual screenshot, though!
Using “rule of thirds” guidelines.
Guidelines can also be used to preview how the image will look when cropped to various aspect ratios. More on that below.
Teleport Player Character
The player-controlled character is often an important piece in the composition of your screenshots. Save yourself a lot of time and trouble by making it easy to move it anywhere you want in your level.
The exact method varies depending on your game, but something like “point and press a button” or “hold a button and point” is usually the best. No-clip turbo movement mode works well, too. You don’t need to get to any place in one jump, but getting anywhere in a few seconds is essential.
In my game LEVEL UP! I have a “view mode” which is activated with a single key press. The view can be quickly scrolled with the mouse and the character can be teleported to the cross-hair with a single button press:
“View mode” from my game LEVEL UP!
And, again, you’ll find this feature useful for other things, too, like testing your levels and mechanics or debugging your game.
Text, User Interface and Menus
Avoid putting too much text in your screenshots. All in all, you’re making pictures; if you want to say something with text, you’d better write it separately.
User interface takes a lot of time to make, so you’ll naturally want to show it off in your screenshots (I know I do). But that’s not a good idea. It’s okay as a development screenshot in your blog, but user interfaces and menus shouldn’t be the focus of your game gallery screenshots unless it’s a hardcore simulation with extensive spreadsheets or something like that.
However, there’s another kind of user interface: the HUD (head-up display) or the in-game interface (the latter is mostly for strategy games). You should consider whether you want this in your screenshots.
To anyone interested enough, the HUD provides information about the game mechanics and gameplay. This means that it can offer more info about your game:
A screenshot of Bastion, showing its HUD.
One can guess a lot about the gameplay from the Bastion’s HUD screenshot.
One can guess a lot about the gameplay from the above screenshot!
However, showing the interface often redundant across multiple screenshots, and you might not want to do so for marketing reasons, either (early work, competition, stealing). It also hides and clutters your art. It’s necessary when you play the game, but not when you show its pictures to others.
As you can see, there are more disadvantages than advantages to including the UI, but you should weigh them yourself for your game.
Add a Button to Hide the HUD and In-Game GUI
Even if you decide to keep the HUD in your screenshots, adding a button to toggle it is still a good idea. You might need your game art for things other than screenshots: site design, print materials, and advertisements.
And of course, your players might want to take nice screenshots of your game to share on the web or make into wallpapers, where a HUD will just get in the way.
Analyze Your Screenshot Histogram
A histogram shows the number of pixels for each level of brightness as a bar. You can find it in Photoshop, GIMP (as a separate window), and Paint.NET (in Adjustments > Levels). The examples below use the GIMP histogram, with a logarithmic scale for clarity.
Here’s the original screenshot from a fictional game. It takes place in a dungeon, so it’s dark. Hard to see anything.
Let’s start with this screenshot. You can see some bonfires and likely some enemies and walls if you squint. Let’s take a look at its histogram:
Histogram of the original screenshot.
The gap at the far left represents unused dark colors—there’s no black in the image at all! The gap at the right (which is about a third of the range) represents unused light colors (up to white).
The actual image colors only use about a half of the total range—that’s bad. Let’s fix it with some post-processing. I’ll use the “levels” adjustment, which is available in many graphic processing programs, and set the input range to match used colors in the histogram and adjust the gamma (curve) a bit:
Processed screenshot. The processing method is called “levels” in most image processing programs.
That’s not ideal, but it’s much better. Let’s look at the histogram now:
Histogram of the processed screenshot.
As you can see, the used colors now fill the whole brightness range; the adjustment “stretched” the color values to fill the range. This can be done automatically as a post-processing step in your rendering. You can also try other processing effects in your image manipulation program of your choice, and then apply the ones you like in your game.
However, there’s another way.
Adjust Art Based on Histogram
The original screenshot histogram tells us that there’s lack of both dark and bright colors, so the used range is smaller than it could be. Let’s fix that by improving the art. The bright things here are flames and monster eyes, and the dark ones are the background (floor) and ashes.
Improved art: brighter flames and monster eyes, darker background and ashes.
Okay, that looks even better than the post-processed one. What about its histogram now?
Histogram of the screenshot with improved art.
As you see, the brightness range is used much better now. Of course, you can combine art adjustments with post-processing!
I compressed the bright end of the range (the flames), sacrificing some detail in it to expand the range of the rest of the image:
Histogram of the screenshot with improved art and post-processing.
Improved art with a bit of post-processing applied.
And here’s the original again to compare:
Here’s the original screenshot from a fictional game. It takes place in a dungeon, so it’s dark. Hard to see anything.
The original screenshot from our fictional game.
Resolution and Aspect Ratios
Wherever there’s a screenshot gallery for your game (your site, an online store, and so on) it’s best to keep the screenshot resolution consistent across that gallery. At the very least, you should keep the aspect ratio (like 16:9, 4:3 or 2:1) consistent.
That raises the question of how to choose the best screen resolution for your game. Consider what your primary target platform is and choose the resolution and aspect ratio based on that.
Cropping
Whatever resolution you’ve selected, sooner or later you’ll encounter the issue of cropping. Whether it’s Twitter pictures or Screenshot Saturday, some sites will crop your images to conform to their standards.
To deal with it, I recommend keeping the most interesting things in the center of your screenshot and checking how it’ll be cropped to the square. Adding guidelines in your game can help with that,too. You can also add guidelines for other aspect ratios if you need them.
Composition guide lines (rule of thirds) and cropping guide lines (square and 2:1).
Thumbnails
Another similar issue is when your images are scaled down to create thumbnails. This effectively removes small, high-frequency details from your screenshot, leaving only large, low-frequency features. So make sure you have them, and that they have high enough contrast. That’s good for your game too, since it’s easier to get what is where on the screen when there are large contrast visual features to guide your glance.
To help you with that, add a preview thumbnail which is shown together with other screenshot tools like guidelines.
Animated Screenshots
Some games look good in motion, but not that good in still screenshots. And sometimes, a static image just can’t give enough information about your game.
Consider making animated screenshots with GIFs. There are other ways to do that, but GIFs are widely supported, allowing a lot of people to view them on various devices. If you want to get more modern or efficient, try Gfycat for HTML5 videos.
You can record a video and convert it to a GIF, or use a program that can record to GIF directly like GifCam or LICEcap.
Looping Buffer
This feature is built in to FRAPS, and you could implement it directly in your game. The idea is that the program is always recording to a buffer of limited size—let’s say 30 seconds of video. So, when you play your game, do something, and think “hey, that was awesome” you can just press a button to save a video of the last 30 seconds before you pressed it, as if the recording started 30 seconds ago.
Conclusion
You now know of several tools and methods that will help you to showcase your game in the best way possible: active pause mode and teleporting player character to get the best view, hiding your HUD (or keeping it, and when to do that), analyzing your screenshot histogram to improve its colors, and using guidelines to assist with cropping and composition.
Many of these tips will also help you while developing the game and will improve the quality of your game art and community-made screenshots.(source:gamedevelopment)


