关于以程序生成方法制作地下城的建议
作者:Marcin Seredynski
在本篇教程中,我将分享如何以预制件创造不受2D或3D网格限制的复杂地下城。这会让你的玩家永远都有探索不完的地下城,你的美术人员则会佩服这种创意自由,你的游戏也会有更好的重玩价值。
但运用本文内容之前,你必须已经理解基本的3D变形知识,并且熟悉场景图和实体组件系统。
简介
最早使用程序生成世界的游戏之一就是《Rogue》。它制作于1980年,采用了动态的程序生成、2D网格地下城。由于该游戏中没有任何两个通关攻略是相同的,它迅速衍生出一个新的游戏题材“roguelikes”。这种类型的地下城在之后30多年时间中仍然很普遍。
在1996年,《Daggerfall》发布了。它采用了程序生成3D地下城和城市,允许开发者创造大量独特的地点而无需手动创造这些内容。尽管其3D方法提供了超越经典2D网格地下城的许多优势,它仍然不甚普遍。
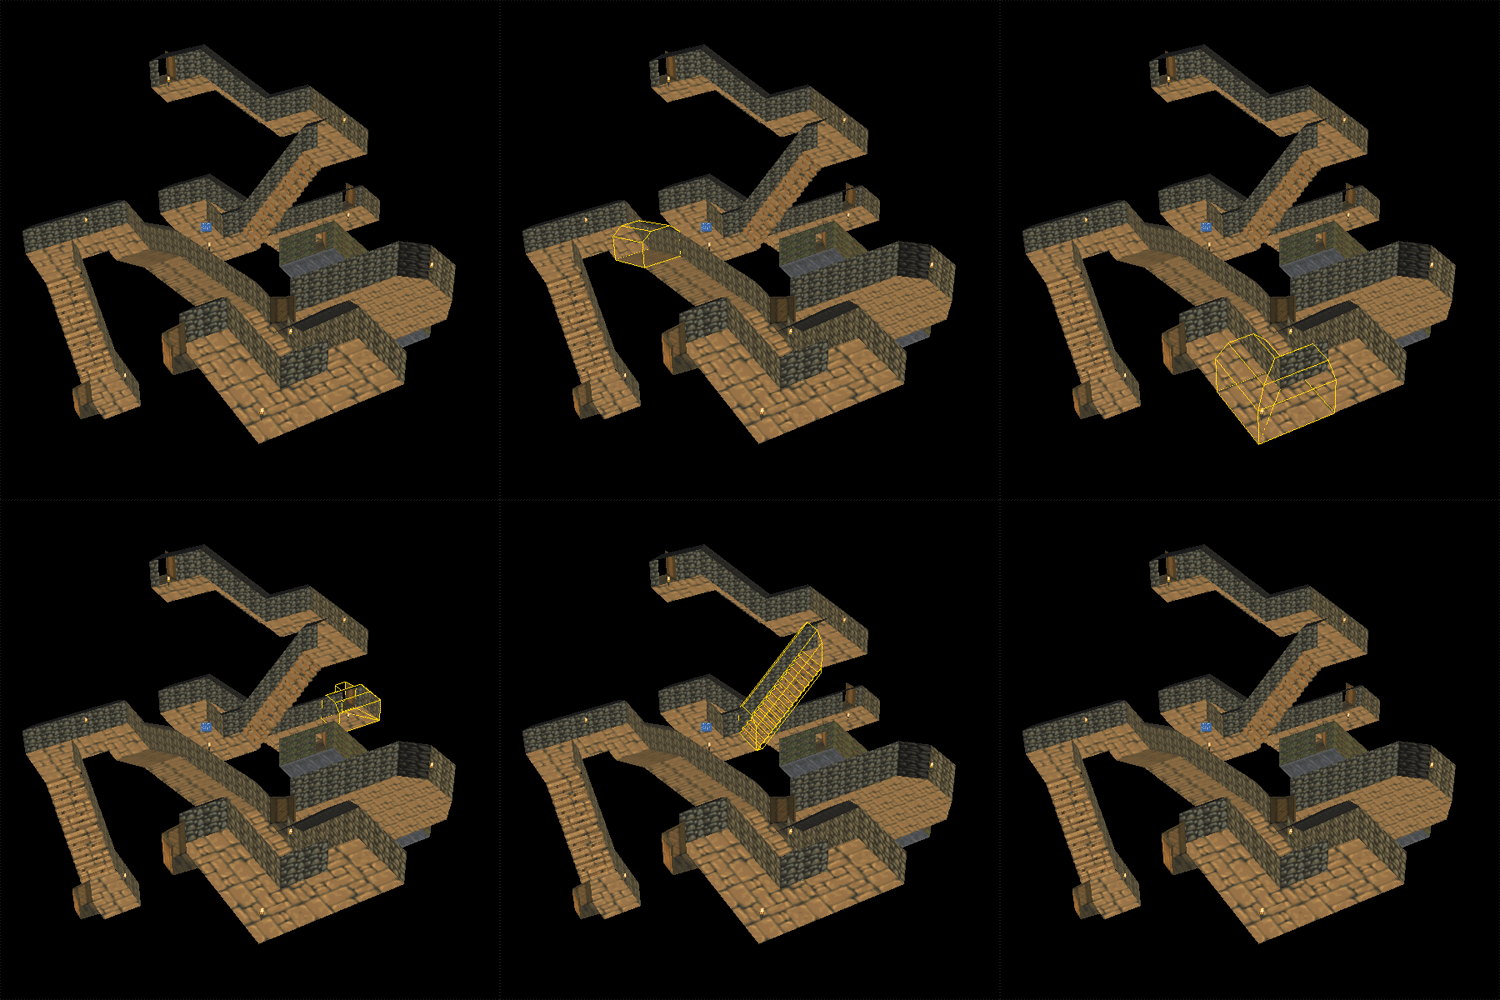
(该图是一个大型地下城的一部分,是由“Daggerfall模型”创造的)
我们将关注与《Daggerfall》相似的程序生成地下城。
如何创造一个地下城?
要创造一个地下城,我们必须先定义什么是地下城。在本篇教程中,我们将把地下城定义为一系列据一定规则彼此相连的模块(3D模型) 。我们将以由走廊和交叉点相连的房间为例:
*一个房间是个拥有一个或多个出口的大型区域
*一个走廊则是一个狭长的区域,它可能有所倾斜并有两个出口
*一个交叉点是拥有至少三个出口的小区域
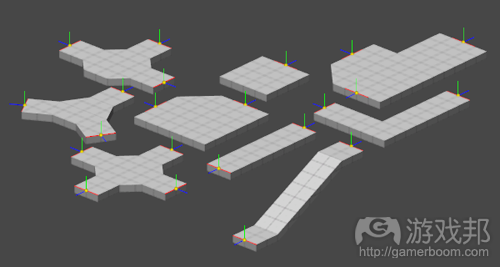
在本篇教程中,我们将为模块使用简单的模型——它们的网眼仅包含地板。我们将用到房间、走廊和交叉点,将退出标记形象化为轴对象,其中-X/+X轴为红色,+Y轴为绿色,+Z轴为蓝色。
注意出口的方向并不局限于90度增量。
在连接模块时,我们会定义以下规则:
*房间可以连接走廊
*走廊可以连接房间或交叉点
*交叉点可以连接走廊
每个模块都包括一系列出口——拥有已知位置和循环的标记对象。每个模块都有备注它是什么类型的标签,每个出口都有一列其连接的标签。
在最高层次,创建地下城的过程如下:
1.举例说明一个起始模块(最好是拥有大量出口的模块)
2.举例说明并将有效模块连接到每个模块的未连接出口。
3.重建目前整个地下城未连接出口的列表。
4.重复这一过程直到足够大的地下城建成为止。
(该算法运行时的迭代过程)
将两个模块连接在一起的详细过程如下:
1.从旧模块选择一个未连接出口。
2.选择一个其标签匹配旧模块标签的新模块预制件。
3.举例说明新模块。
4.选择一个新模块的出口。
5.连接模块:将新模块的出口与旧模块出口相匹配。
6.将两个出口标记为已连接状态,或者直接将它们从场景图中删除。
7.重复旧模块的未连接出口。
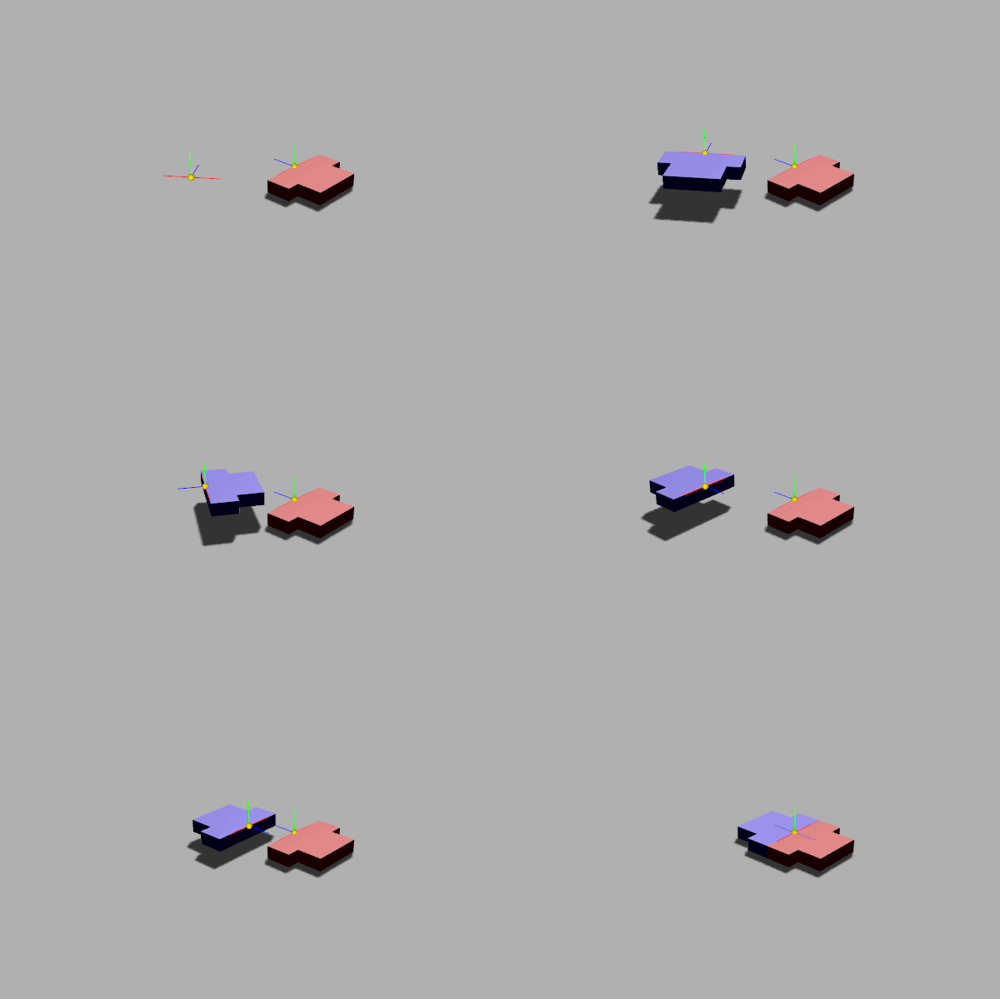
将两个模块连接在一起,我们必须将它们对齐(在3D空间中对其进行旋转和转化),这样首个模块的出口就能匹配第二个模块的出口。出口的位置相同时才能匹配,它们的+Z轴是相反的,而+Y则是相匹配的。
这种算法很简单:
1.在+Y轴上于新出口的位置沿着旋转原点旋转新模块,这样旧出口的+Z轴就会与新出口的+Z轴相反,它们的+Y轴则是相同的。
2.转化新模块,以更新出口的位置与旧出口的位置相一致。
执行
伪代码是Python式的,但它应该对任何人都具有可读性。该样本源代码是一个Unity项目。
假设我们是在一个场景图中的实体组件系统上操作,定义它们的母子关系。含有此类系统的游戏引擎例子就是Unity及其游戏对象和组件。模块和出口是实体,出口是模块之子。模块具有定义其标签的组件,而出口含有定义它们可以连接的标签的组件。
我们将首先处理地下城生成算法。我们将使用的最后约束条件就是地下城生成步骤的迭代次数。
def generate_dungeon(starting_module_prefab, module_prefabs, iterations):
starting_module = instantiate(starting_module_prefab)
pending_exits = list(starting_module.get_exits())while iterations > 0:
new_exits = []
for pending_exit in pending_exits:
tag = random.choice(pending_exit.tags)
new_module_prefab = get_random_with_tag(module_prefabs, tag)
new_module_instance = instantiate(new_module_prefab)
exit_to_match = random.choice(new_module_instance.exits)
match_exits(pending_exit, exit_to_match)
for new_exit in new_module_instance.get_exits():
if new_exit != exit_to_match:
new_exits.append(new_exit)
pending_exits = new_exits
iterations -= 1
instantiate()函数创造了一个模块预制件实例:它创造了模块的副本及其出口,并将它们置于场景中。get_random_with_tag()函数通过所有模块预制件迭代,并随机挑选一个,并附以所提供的标签。
random.choice()函数从一个参数列表或阵列中获得一个随机元素。
match_exits函数正是这一切运行的魔力所在,其细节如下:
def match_exits(old_exit, new_exit):
new_module = new_exit.parent
forward_vector_to_match = old_exit.backward_vector
corrective_rotation = azimuth(forward_vector_to_match) – azimuth(new_exit.forward_vector)
rotate_around_y(new_module, new_exit.position, corrective_rotation)
corrective_translation = old_exit.position – new_exit.position
translate_global(new_module, corrective_translation)def azimuth(vector):
# Returns the signed angle this vector is rotated relative to global +Z axis
forward = [0, 0, 1]
return vector_angle(forward, vector) * math.copysign(vector.x)
一个出口的backward_vector属性就是它的-Z向量。rotate_around_y()函数会以其特定点,沿着特定角度围绕着+Y轴旋转对象。translate_global()函数在整体场景中以其子函数转化对象,无论其子函数关系如何。
vector_angle()函数返回两个任意向量之间的角度,并最终由math.copysign()函数拷贝特定数字的符号:负数为-1,零则记为0,正数则是+1。
扩展生成器
该算法还可以运用于其他类型的世界生成,而不仅仅局限于地下城。我们可以扩展一下模块的定义,令其不单包括房间、走廊和交叉点等地下城部分,还有家具、珍宝箱、房间装饰等。在房间中央或者墙壁上布置一个退出标记,将其标记为战利品、装饰品,或者是怪物。我们可以由此为地下城注入生命力,因为它已经有了你可以偷窃、羡慕或杀戮的东西。
这里只有一个需要完成的调整,所以该算法运行合理:呈现在一个布置道具上的标记应该标注为“默认”,以样它总是能被挑出来与原有场景对齐。
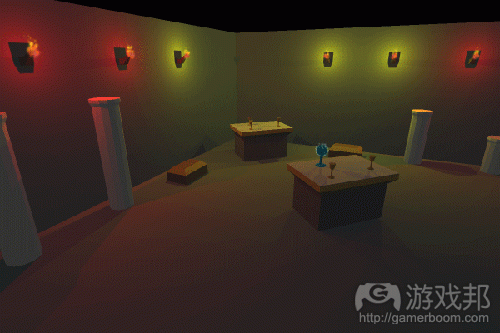
上图创造了一个房间,两个箱子、三根柱子,一个圣餐台,两盏灯,以及两个带有标记的道具。房间含有一系列提及其他模块标签的标记,例如“箱子”、“柱子”、“圣餐台”或“壁灯”。有个圣餐台含有三个“道具”标记。通过将地下城生成技术运用于一个简单的房间,我们可以创造它的大量变体。
同样的臬法也许可用于创造程序生成道具。如果你想创造一把剑,你可以将其手柄定义为起始模块。手柄可连接到圆头和十字防护装置。十字防护装置又可连接到刀刃。只要调整这把剑的每个组件三次,你就可以创造81把不同的剑。
注意问题
你可能注意到的这个算法运行中的一些问题。
第一个问题是创造模块树,以根基为起始模块的地下城的最简单版本。如果你跟随任何地下城的结构分支,你就会陷入死胡同。这些树分支并非彼此交织的,地下城将缺少房间或走廊循环。解决这个问题的一种方法就是为之后的过程预留一些模块出口,而不是为这些出口连接新模块。当生成器经历足够的迭代时,它会随机选择一对出口,并尝试用一系列走廊将其连接起来。为了找到一系列模块和便于创造这些出口之间的可通过路径的连接方法,这里还需要执行一些计算工作。这个问题本身的复杂性就足以让我们另起一文进行讨论了。
另一个问题就是算法不知道其布置的模块的空间特征,它只知道标签出口及其方向和位置。这会导致模块重叠。我们可以在一个新模块放置于现成模块附近时进行一个简单的碰撞检查,从而让算法在创建地下城时不遭遇这个问题。当模块开始碰撞时,它会抛弃本打算放置的模块,并尝试用另一个模块取而代之。
管理出口及其标签则是另一个问题。该算法建议为每个出口实例定义标签,并标注所有的房间——但这需要大量的维护工作,假如你想尝试不同的模块连接方法的话。例如,你可能想允许房间连接走廊和交叉点,而不仅仅只连接走廊,你就必须经过所有房间模块的所有出口,并更新它们的标签。有一个方法就是定义地下成、模块和出口这三个不同关卡的连接规则。地下城关卡将定义整个地下城的规则——它会定义哪个标签可以相互连接。有些房间在处理过程中可能会颠覆连接规则。你可以设置一个“boss”房间,确保“宝藏”房间总是在其之后。特定出口会颠覆两个之前的关卡。定义每个出口的标签可实现最棒的灵活性,但有时候过多灵活性并不是那么好。
浮点数学并不完美,但这一算法对其十分依赖。所有的旋转变化,任意出口方向,以及位置都将增加,并可能产生缝合线或出口连接的重叠性等人工产物,尤其是离该世界中心较远的地方。如果这一点过于明显,你可能要扩展算法以便在模块相接处放置额外支柱,例如门框或门槛。你的美术人员肯定能够找到隐藏这些瑕疵的方法。对于大小合理(小于1万个单个)的地下城来说,这个问题没有那么明显,只要你在布置和旋转模块出口标记时足够谨慎即可。
总结
算法尽管存在其缺陷,但却提供了研究地下城生成的另一种方法。你将不再局限于90度转角和矩形房间。你的美术人员也会欣赏这种方法所提供的创意自由,你的玩家也会喜欢这种更有自然感的地下城。(本文为游戏邦/gamerboom.com编译,拒绝任何不保留版权的转载,如需转载请联系:游戏邦)
Bake Your Own 3D Dungeons With Procedural Recipes
By Marcin Seredynski
In this tutorial, you will learn how to build complex dungeons from prefabricated parts, unconstrained to 2D or 3D grids. Your players will never run out of dungeons to explore, your artists will appreciate the creative freedom, and your game will have better replayability.
To benefit from this tutorial, you need to understand basic 3D transformations and feel comfortable with scene graphs and entity-component systems.
A Bit of History
One of the earliest games to use procedural world generation was Rogue. Made in 1980, it featured dynamically generated, 2D, grid-based dungeons. Thanks to that no two playthroughs were identical, and the game has spawned a whole new genre of games, called “roguelikes”. This type of dungeon is still quite common over 30 years later.
In 1996, Daggerfall was released. It featured procedural 3D dungeons and cities, which allowed the developers to create thousands of unique locations, without having to manually build them all. Even though its 3D approach offers many advantages over the classic 2D grid dungeons, it isn’t very common.
This image shows a part of a larger dungeon, extracted to illustrate what modules have been used to build it. The image has been generated in “Daggerfall Modelling”, downloaded from www.dfworkshop.net
This image shows a part of a larger dungeon, extracted to illustrate what modules have been used to build it. The image was generated with “Daggerfall Modelling”, downloaded from dfworkshop.net.
We will focus on generating dungeons similar to Daggerfall’s.
How to Build a Dungeon?
In order to build a dungeon, we need to define what a dungeon is. In this tutorial, we will define a dungeon as a set of modules (3D models) connected to each other according to a set of rules. We will use rooms connected by corridors and junctions:
A room is a large area that has one or more exits
A corridor is a narrow and long area that may be sloped, and has exactly two exits
A junction is a small area that has three or more exits
In this tutorial, we will use simple models for the modules—their meshes will only contain floor. We will use three of each: rooms, corridors and junctions. We will visualize exit markers as axis objects, with the -X/+X axis being red, +Y axis green, and +Z axis blue.
Modules used to build a dungeon
Modules used to build a dungeon
Notice that the orientation of exits isn’t constrained to 90 degree increments.
When it comes to connecting the modules, we will define the following rules:
Rooms can connect to corridors
Corridors can connect to rooms or junctions
Junctions can connect to corridors
Each module contains a set of exits—marker objects with a known position and rotation. Each module is tagged to say what kind it is, and each exit has a list of tags it can connect to.
At the highest level, the process of building the dungeon is as follows:
Instantiate a starting module (preferably one with a larger number of exits).
Instantiate and connect valid modules to each of the unconnected exits of the module.
Rebuild a list of unconnected exits in the whole dungeon so far.
Repeat the process until a large enough dungeon is built.
A look at the iterations of the algorithm at work
A look at the iterations of the algorithm at work.
The detailed process of connecting two modules together is:
Pick an unconnected exit from the old module.
Pick a prefab of a new module with tag matching tags allowed by the old module’s exit.
Instantiate the new module.
Pick an exit from the new module.
Connect the modules: match the new module’s exit to the old one’s.
Mark both exits as connected, or simply delete them from the scene graph.
Repeat for the rest of the old module’s unconnected exits.
To connect two modules together, we have to align them (rotate and translate them in 3D space), so that an exit from the first module matches an exit from the second module. Exits are matching when their position is the same and their +Z axes are opposite, while their +Y axes are matching.
The algorithm to do this is simple:
Rotate the new module on the +Y axis with the rotation origin at the new exit’s position, so that the old exit’s +Z axis is opposite to the new exit’s +Z axis, and their +Y axes are the same.
Translate the new module so that the new exit’s position is the same as the old exit’s position.
Connecting two modules
Implementation
The pseudo-code is Python-ish, but it should be readable by anyone. The sample source code is a Unity project.
Let’s assume we’re working with an entity-component system that holds entities in a scene graph, defining their parent-child relationship. A good example of a game engine with such a system is Unity, with its game objects and components. Modules and exits are entities; exits are children of modules. Modules have a component that defines their tag, and exits have a component that defines the tags they’re allowed to connect to.
We’ll deal with the dungeon generation algorithm first. The end constraint we will use is a number of iterations of dungeon generation steps.
def generate_dungeon(starting_module_prefab, module_prefabs, iterations):
starting_module = instantiate(starting_module_prefab)
pending_exits = list(starting_module.get_exits())
while iterations > 0:
new_exits = []
for pending_exit in pending_exits:
tag = random.choice(pending_exit.tags)
new_module_prefab = get_random_with_tag(module_prefabs, tag)
new_module_instance = instantiate(new_module_prefab)
exit_to_match = random.choice(new_module_instance.exits)
match_exits(pending_exit, exit_to_match)
for new_exit in new_module_instance.get_exits():
if new_exit != exit_to_match:
new_exits.append(new_exit)
pending_exits = new_exits
iterations -= 1
The instantiate() function creates an instance of a module prefab: it creates a copy of the module, together with its exits, and places them in the scene. The get_random_with_tag() function iterates through all the module prefabs, and picks one at random, tagged with the provided tag. The random.choice() function gets a random element from a list or an array passed as a parameter.
The match_exits function is where all the magic happens, and is shown in detail below:
def match_exits(old_exit, new_exit):
new_module = new_exit.parent
forward_vector_to_match = old_exit.backward_vector
corrective_rotation = azimuth(forward_vector_to_match) – azimuth(new_exit.forward_vector)
rotate_around_y(new_module, new_exit.position, corrective_rotation)
corrective_translation = old_exit.position – new_exit.position
translate_global(new_module, corrective_translation)
def azimuth(vector):
# Returns the signed angle this vector is rotated relative to global +Z axis
forward = [0, 0, 1]
return vector_angle(forward, vector) * math.copysign(vector.x)
The backward_vector property of an exit is its -Z vector. The rotate_around_y() function rotates the object around a +Y axis with its pivot at a provided point, by a specified angle. The translate_global() function translates the object with its children in the global (scene) space, regardless of any child relationship it may a part of. The vector_angle() function returns an angle between two arbitrary vectors, and finally, the math.copysign() function copies the sign of a provided number: -1 for a negative number, 0 for zero, and +1 for a positive number.
Extending the Generator
The algorithm can be applied to other types of world generation, not just dungeons. We can extend the definition of a module to cover not only dungeon parts such as rooms, corridors and junctions, but also furniture, treasure chests, room decorations, etc. By placing the exit markers in the middle of a room, or on a room’s wall, and tagging it as a loot, decoration, or even monster, we can bring the dungeon to life, with objects that you can steal, admire or kill.
There’s only one change that needs to be done, so that the algorithm works properly: one of the markers present in a placeable item has to be marked as default, so that it always gets picked as the one that will be aligned to existing scene.
1 room, 2 chests, 3 pillars, 1 altar, 2 lights, and 2 items have been created and tagged. A room holds a set of markers that reference other models’ tags, such as “chest”, “pillar”, “altar”, “wallLight”. An altar has three “item” markers on it. By applying the dungeon generation technique to a single room, we can create numerous of its variations.
In the above image, one room, two chests, three pillars, one altar, two lights, and two items have been created and tagged. A room holds a set of markers that reference other models’ tags, such as chest, pillar, altar, or wallLight. An altar has three item markers on it. By applying the dungeon generation technique to a single room, we can create numerous variations of it.
The same algorithm may be used to create procedural items. If you would like to create a sword, you could define its grip as a starting module. The grip would connect to pommel and to the cross-guard. The cross-guard would connect to the blade. By having just three versions of each of the sword parts, you could generate 81 unique swords.
Caveats
You have probably noticed some problems with the way this algorithm works.
The first problem is that the simplest version of it builds dungeons as a tree of modules, with its root being the starting module. If you follow any branch of the structure of the dungeon, you are guaranteed to hit a dead-end. There tree’s branches aren’t interconnected, and the dungeon will lack loops of rooms or corridors. One way to address this would be setting aside some of the module’s exits for later processing, and not connecting new modules to these exits. Once the generator went through enough iterations, it would pick a pair of exits at random, and would try to connect them with a set of corridors. There’s a bit of algorithmic work that would need to be done, in order to find a set of modules and a way to interconnect them in a way that would create a passable path between these exits. This problem in itself is complex enough to deserve a separate article.
Another problem is that the algorithm is unaware of spatial features of modules it places; it only knows the tagged exits, and their orientations and locations. This causes the modules to overlap. An addition of a simple collision check between a new module to be placed around existing modules would allow the algorithm to build dungeons that don’t suffer from this problem. When the modules are colliding, it could discard the module it tried to place and would try a different one instead.
The simplest implementation of the algorithm with no collision checks causes modules to overlap.
Managing the exits and their tags is another problem. The algorithm suggests defining tags on each exit instance, and tagging all the rooms—but this is quite a lot of maintenance work, if there’s a different way of connecting the modules you would like to try. For example, if you would like to allow rooms to connect to corridors and junctions instead of just corridors, you would have to go through all the exits in all the room modules, and update their tags. A way around this is to define the connectivity rules on three separate levels: dungeon, module and exit. Dungeon level would define rules for the entire dungeon—it would define which tags are allowed to interconnect. Some of the rooms would be able to override the connectivity rules, when they’re processed. You could have a “boss” room that would guarantee that there’s always a “treasure” room behind it. Certain exits would override the two previous levels. Defining tags per exit allows the greatest flexibility, but sometimes too much flexibility isn’t that good.
Floating point math isn’t perfect, and this algorithm relies heavily on it. All the rotation transformations, arbitrary exit orientations, and positions will add up, and may cause artifacts as seams or overlaps where exits connect, especially further from the world’s center. If this would be too noticeable, you could extend the algorithm to place an extra prop where the modules meet, such as a door frame or a threshold. Your friendly artist will surely find a way to hide the imperfections. For dungeons of a reasonable size (smaller than 10,000 units across), this problem is not even noticeable, assuming enough care was taken when placing and rotating the exit markers of the modules.
Conclusion
The algorithm, despite some of its shortcomings, offers a different way to look at the dungeon generation. You will be no longer constrained to 90-degree turns and rectangular rooms. Your artists will appreciate the creative freedom this approach will offer, and your players will enjoy the more natural feel of the dungeons.(source:gamedevelopment)


 闽公网安备35020302001549号