分享用Maya快速描线的2D美术技巧
作者:Junxue Li
现在,2D游戏美术制作经常借用3D技术。例如,3D模型辅助2D设计,3D渲染加上2D复绘。
我教你们一个在设计过程中非常实用的技巧:用3D模型绘制2D线条。这种方法对于复杂的物品或场景尤其实用,例如,复古的家具、王宫的内部。
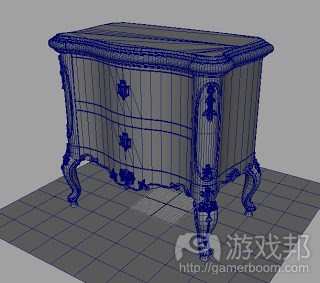
我们先做一个简单的案例吧。下图是一个柜子的模型,我们看看如何用Maya的渲染器把它的线条提出来。
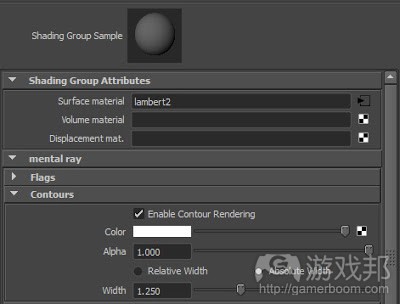
1、创建一个lambert着色器,下图的是lambert2。打开它的shading group node,再打开mental ray/contours标签。
勾选Enable Contour Rendering。这里的Color是指线条的颜色,你可以改成黑色。Width表示线条的粗线程度。注意,这里的单位不是像素。
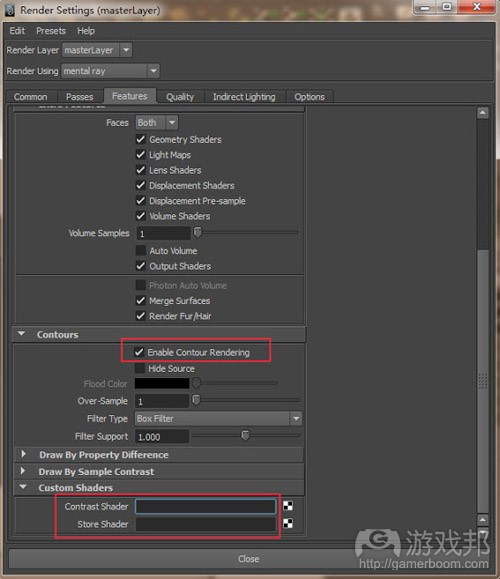
2、打开Render Settings编辑器,再打开Features/Contours标签。勾选Enable Contour Rendering。根据常识,结果将是白纸黑线。所以这里你可以把Flood Color改成白色。
把Over-Sample的数值设得高一些,比如12,这样线条会比较清晰。在底部,连接2个contour shader,名称如下图所示。
这两个着色器可以在Mental Ray contour shader组中的找到。
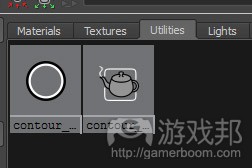
3、如果你已经连接了正确的着色器,那么你应该会在Hypershader的Utilities标签下找到这两个node。如下图所示:
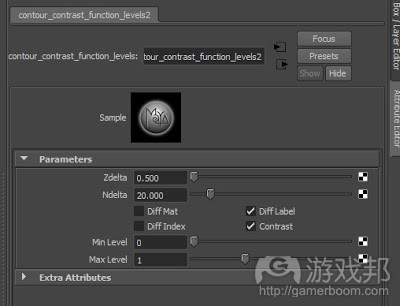
点击contour_contrast_function_levels shader(有圆环图标的那个),打开它的属性栏。
勾选Diff Label和Contrast。
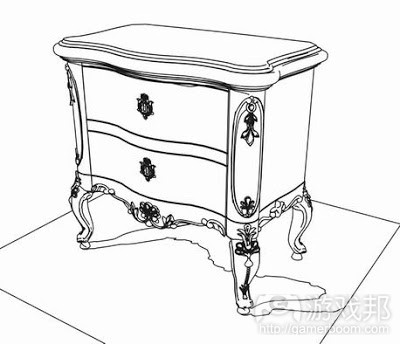
4、把你刚才创建的着色器lambert2赋给柜子。如果你现在点击render,应该会看到如下图所示的结果。
5、这个线稿是根据一个算法(游戏邦注:勾选几何图形的表面属性如曲率、角度等)产生的。有时候可能得不到你想要的线条,那时你可能可调整第3步中的两个参数——Zdelta和Ndelta。很难用数学来解释它们,所以你最好用不同的值实验几次。(本文为游戏邦/gamerboom.com编译,拒绝任何不保留版权的转载,如需转载请联系:游戏邦)
2D Art: Quick Manual for rendering line art in Maya
by Junxue Li
Today, 2D game art production employs lots of 3D procedure. For example, 3D model aided 2D design, and 3D render plus 2D overpainting.
Now I give you a tip, which is useful in the design process: how to render 2D line art out of 3D models. Which is especially helpful for complicated objects or scenes, for example vintage furniture, regal interiors.
Let’s start with a simple example. We have this cabinet model, let’s see how to render its line art with Mental ray in Maya.
1. Create a lambert shader, here is lambert2. Go to its shading group node, open the tag mental ray/contours.
Check the box Enable Contour Rendering. Here the Color is the color of the lines, you may want to change it to black. Width is the width of the lines. Please note it is not measured in pixels.
2. Go to the Render Settings editor, open this tag Features/Contours. Check the box Enable Contour Rendering. In a common sense, line art is black lines on white paper. So here you may want to change theFlood Color to white.
Give a higher number for Over-Sample, for example 12, to produce clear cut lines.
And at the bottom section, link 2 contour shaders, which names are as indicated below.
These two shaders, find them in the Mental Ray contour shader groups.
3. If you have linked the right shaders, you should find these two node in Hypershader, the Utilities tag. As below:
Click the contour_contrast_function_levels shader(the one with the circle icon), open its attributes.
Check the boxes: Diff Label, Contrast
4. Assign the shader you have just created, lambert2, to the cabinet. If you click render now, it should be the line art.
5. The lines are generated based on an algorithm which checks the surface of the geometries(Curvature, angles,etc). Some times there are not lines at the places you want them, you may need to tweak 2 parameters in step #3, Zdelta, Ndelta. It’s complicated to explain them in mathematical terms, so the best way is to experiment different values by yourself. (source:gamasutra)
上一篇:免费游戏成功盈利的4个关键层次







 闽公网安备35020302001549号