分享用Construct 2制作连线消除游戏的教程(6)
作者:David Silverman
在上一部分中,我们对我们的匹配消除游戏的某些系统上做了一些虽小但很重要的改进。我们现在要回到正轨,执行该游戏的最后两大系统之一的方块移动系统。(请点击此处阅读本系列第1、2、3、4、5篇)
本教程将介绍这个系统的整个发展过程(方块从出现上升到屏幕的最顶处),还涉及支持这个移动系统的其他小系统。虽然这些都不算太复杂,但要复习的内容比较多。那么,我们开始吧。
1、方块上移
在我们移动方块以前,我们必须小小地改变一下刷出方块的事件。打开System > On Start of Layout事件,把Y的循环从原来的“0到7”改成“0到3”。
这个事件如下图所示:
我们做这个改变的原因是,我们希望游戏一开始时出现在屏幕上的方块更少,这样游戏就不会结束得太快了。
接着,我们要创建表示方块速度的变量:
Global Variable:
Name = CurrentSpeed
Type = Number
Value = 0.2
现在,我们要创建移动方块的事件:
Event:
Condition: System>Every X Seconds
Interval (seconds) = CurrentSpeed
Action: Block>Move at Angle
Angle = -90
Distance = 1
这个事件如下图所示:
如果你在添加这个事件后运行游戏,你看到的第一个现象是,方块掉落(这是因为我们在前面执行的重力)。之后,方块会慢慢地上升到原来的位置,然后又掉落。如果你不对方块进行任何操作,这个现象将无限重复下去。
这是因为方块经过重力应该生效的点时,发现它们下面没有方块了,所以它们就下落了。虽然这是一个大问题,但它不是我想首先解决的。
2、修复交换系统
运行游戏,执行交换。你会看到方块之间卡在一起,位置也不能与网格对齐。这一般是由两个原因引起的。
第一个问题是,即使我们在移动方块本身,我们也不会移动用它们来移动LeftBlock、RightBlock、TopBlock和BottomBlock对象;也就是说,你用来检测交换事件的方块并没有随着方块格来移动—-当你第一次捡起方块时,它们只是呆原来的位置上。
所以,当你尝试交换时,方块位置出错是因为交换检测方块没有按网格来调整。(这也是我们将来说的第二个问题的原因之一,还有一个原因是我们没有修改保存BlockPositions数组的位置)。
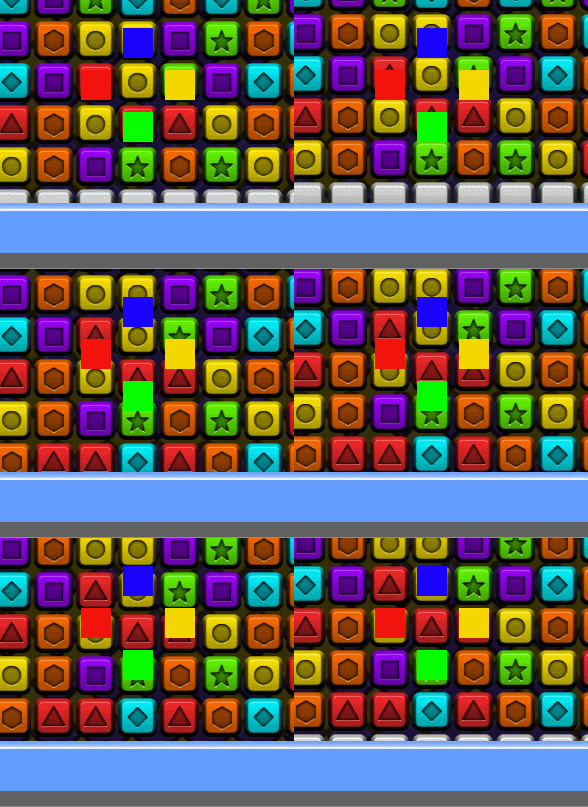
下图显示的就是这个问题:
从上图可知,交换检测方块没有移动,即使方块本身是在移动的。
要解决这两个问题,我们必须在我们刚刚创建的事件中加入更多Action:
Action: BottomBlock>Move at Angle
Angle = -90
Distance = 1
Action: LeftBlock>Move at Angle
Angle = -90
Distance = 1
Action: RightBlock>Move at Angle
Angle = -90
Distance = 1
Action: TopBlock>Move at Angle
Angle = -90
Distance = 1
Action: BlockPositions>Set at XY
X = 0
Y = 1
Value = BlockPositions.At(0,1) – 1
Action: BlockPositions>Set at XY
X = 1
Y = 1
Value = BlockPositions.At(1,1) – 1
这个事件应该如下图所示:
我们刚添加的前面4个Action是调整LeftBlock、TopBlock、RightBlock和BottomBlock对象的位置,这样它们就会与方块网格保持对齐。接下来的2个事件是调整我们存在BlockPositions数组中的Y值,这样它们也与方块网格对齐了。
如果你现在再测试游戏,交换功能应该基本上好了。
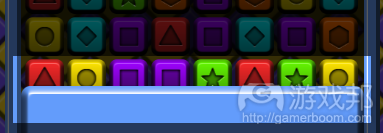
这时,仍然有一个问题必须解决,才能让交换功能正常执行。运行游戏,当最后一排还在操作区域底部时,试一下把一个方坱与这些还没完全露出来的方块交换:
你会发现你无法这样交换方块。如果你等得够久,方块就可以交换了,不过那是因为最后一排方块已经离开边界了。
这个问题很容易理解也很容易解决。如果你看到向下交换的代码,你就会发现原因正是我们在上次文章中添加的事件(游戏邦注:防止玩家把方块放到操作区域的底部之外的地方)。因为当BottomBlock对象低于方块的初始Y位置时,这个声明阻止玩家向下交换,这样就防止方块一出现就被交换,只允许玩家在方块离开初始位置时才能交换。
为了修复这个声明,我们要小小地改变这个条件:
Condition: BottomBlock>Compare Y
Comparison = Less or equal
Y co-ordinate = SPAWNY + ((Block.Width + 2)/2)
现在这个条件应该如下图所示:
这个修改意味着,向下交换只能发生在BottomBlock对象在至多低于方块出现的Y位置半个方块的时候。这也意味着,当新一排方块从屏幕的底部刷出时,必须露出至少一半时才允许交换。
我们还要给交换事件加一个类似的限制,以确保所有交换事件同时可用,且方块不能交换直到露出至少一半时。另外,这也有助于我们整合刷新方块的系统。为此,我们要给剩下的三个交换事件添加新条件。
我们添加的条件与我们刚才在BottomBlock事件中修改的条件是完全一样的,除了它们是作用于TopBlock、RightBlock和LeftBlock对象而不是BottomBlock对象。
TopBlock事件的新条件是:
Condition: TopBlock>Compare Y
Comparison = Less or equal
Y co-ordinate = SPAWNY + ((Block.Width + 2)/2)
LeftBlock事件的新条件是:
Condition: LeftBlock>Compare Y
Comparison = Less or equal
Y co-ordinate = SPAWNY + ((Block.Width + 2)/2)
RightBlock事件的新条件是:
Condition: RightBlock>Compare Y
Comparison = Less or equal
Y co-ordinate = SPAWNY + ((Block.Width + 2)/2)
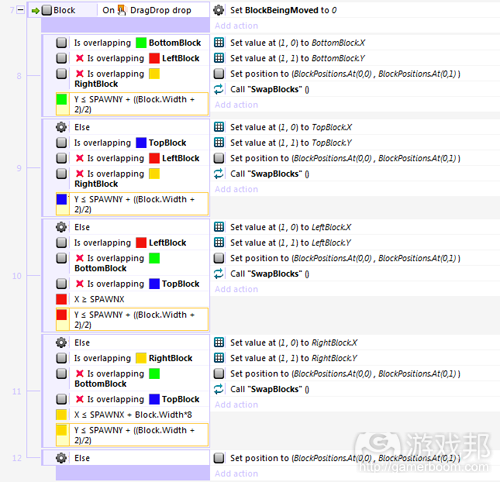
整个On DragDrop事件应该如下图所示:
这些新条件就位后,我们的交换机制就修改好了。我们可以开始准备另一个系统了——刷出新方块的系统。
3、刷出更多方块
现在,我们已经让方块以恒定的速度向上移动了,我们必须让新方块在正确的时间刷出,这样玩家才能继续玩下去。我们要使用一个刷出新方块的功能,还要使用一个检测方块何时刷出的事件来触发那个功能。
首先,我们制作功能本身:
Event:
Condition: Function>On function
Name = “SpawnNewBlocks”
Condition: System>For
Name = “X”
Start Index = 0
End Index = 7
Action: System>Create object
Object = Block
Layer = 1
X = SPAWNX + (loopIndex(“X”))*(Block.Width+2)
Y = SPAWNY + (Block.Width+2)
Action: Block>Set value
Instance Variable = Color
Value = floor(Random(1,7))
Action: System>Add to
Variable = NumBlocks
Value = 1
你的新功能应该如下图所示:
当使用时,这个功能会在操作区域的底部产生新的方块层。但以现在的情况来说,我们还没有使用这个功能,因为我们还没有做好触发它的事件:
Event:
Condition: System>Every X seconds
Interval(seconds) = CurrentSpeed
Condition: Block>Compare Y
Comparison = Equal to
Y = SPAWNY
Condition: Invert: Block>Is Dragging
Action: Function>Call function
Name = “SpawnNewBlocks”
你的新事件应该如下图所示:
我们刚刚创建的事件将检测方块每一次移动的Y位置。如是要它发现满足刷出新方块条件,它就会触发上述SpawnNewBlocks()功能。它还检测以保证它所找到的方块不是玩家正在拖曳的方块。
现在测试游戏,它就管用了,但你应该注意到一个奇怪的问题。这开始游戏的时候,方块会下落,就好像它们下面没有方块似的,但在那之后一切都正常运作,新方块也正常刷出。
会出现这种情况是因为,当游戏开始时,它先运行重力代码,然后再运行刷出新方块的代码。为了解决这个问题,我们要稍微调整刷出初始方块的代码,使方块在低于最后一排的地方刷出。这就避免了立即运行重力代码,使它在现有的方块到达正确的位置时刷出新一排方块。
打开刷出初始方块的事件,修改产生方块的Action如下:
Action: System>Create object
Object = Block
Layer = 1
X = SPAWNX + (loopIndex(“X”))*(Block.Width+2)
Y = SPAWNY – (loopIndex(“Y”))*(Block.Width+2) + 5
这个事件现在应该如下图所示:
这样修改意味着方块会在低于SPAWNY 5象素的地方刷出。也就是说,方块实际上必须向上移动5次,新方块才能刷出。我们的问题就这样解决了。
4、动画
现在,我们的方块能正常刷出了。另外,记住之前我们防止玩家使用任何方块直到至少一半的方块可见时。虽然这是一个好特征,但玩家可能不会理解为什么不能在一看到方块时就立即使用它们。
因为这个潜在的UI问题,我们要让各个处于不可使用状态的方块显示为灰色。这样,玩家就会很清楚什么时候可以使用方块了。
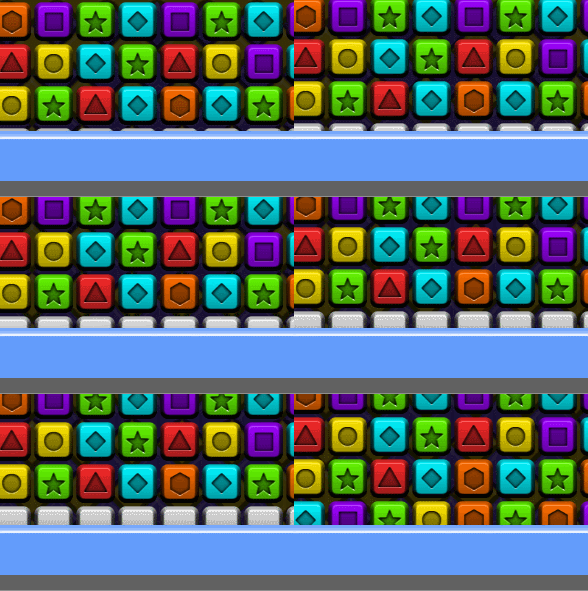
下图显示了方块从不可使用的状态变成激活状态:
我们创建的这个事件还包含第二个条件——检测以保证它所认定的方块不是被玩家拖动的。这个条件保证当玩家拖动处于不可用状态的方块时,方块不会改变图象,也就是仍然显示为灰色。
为了让这个动画生效,我们首先要添加一个新事件:
Event:
Condition: Block>Compare Y
Comparison = Greater than
Y = SPAWNY + ((Block.Width + 2)/2)
Condition: Invert: Block>Is Dragging
Action: Block>Set frame
Frame number = 0
这个新事件如下图所示:
你现在测试游戏应该能看到方块进入可用状态以前是呈灰色。
5、允许和禁用拖曳/掉落
如果你现在运行游戏,你会发现即使方块呈灰色时不能互相交换,但灰色方块仍然可以被拖曳和操作。这是因为当我们防止玩家交换方块时,我们还没有禁用其拖曳/掉落功能。
为了防止灰色方块被移动,我们要修改我们之前创建的事件。首先我们要添加一个新Action,它会在方块低于可使用位置时关闭拖曳功能。
添加这个Action到之前创建的事件中:
Action: Block (DragDrop)>Set enabled
State = Disabled
我们还要添加一个Else声明,使方块一进入可用状态时就开启拖曳功能:
Event:
Condition: Else
Action: Block (DragDrop)>Set enabled
State = Enabled
改变之后,这个事件应该如下图所示:
这时测试游戏,呈灰色的方块应该不能被拖曳了。
6、改变速度
最后要处理的就是改变游戏速度的系统。准确地说,当玩家消除得越来越多时,正是这个系统使方块移动得越来越快。
我们要做的这个系统比较简单:第一次玩家得到一定分数,游戏的速度就会根据我们下面要制作的调节器提高游戏速度,玩家达到下一次提速的得分是根据第二个调节器变化的。
在我们制作这个系统的这个事件以前,我们要为新功能创建若干Global Variables:
Global Variable: SPEEDMOD
Type = Number
Initial value = 0.8
Constant = Yes
Global Variable: PointsForSpeedUp
Type = Number
Initial value = 400
Constant = No
Global Variable: PointsBetweenSpeedUps
Type = Number
Initial value = 400
Constant = No
Global Variable: POINTSFORSPEEDUPMOD
Type = Number
Initial value = 1.4
Constant = Yes
你的新变量应该显示如下:
我要解释一下各个变量的作用:
SPEEDMOD:一旦玩家达到触发提速事件的得分,这个变量就会与当前速度相乘。
PointsForSpeedUp是玩家触发下一次提速必须达到的得分。
PointsBetweenSpeedUps表示当游戏提速时PointsForSpeedUp变量要增加多少(增量), 它的变化使下一次提速需要的得分越来越高。现在它是400,与PointsForSpeedUp相同,当游戏提速时,它会与POINTSFORSPEEDUPMOD相乘,然后加到PointsForSpeedUp中。
POINTSFORSPEEDUPMOD是我们用来修改下一次游戏提速要求玩家达到的得分的变量。
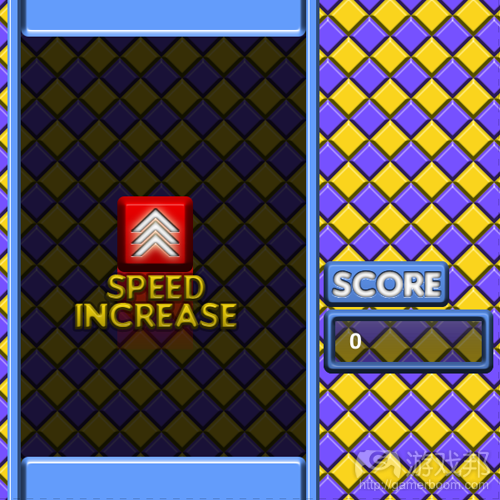
除了设置这些变量,我们还要创建一个新子画面对象,其作用就是提醒玩家游戏速度增加了。
打开Layout 1,根据以下步骤制作新的子画面:
1、在Layout 1中插入新的Sprite对象。
2、用动画编辑器,打开图像SpeedIncImage.png。
1)把Name设置为SpeedIncreaseIndicator。
2)把Layer设置为Game Field。
3)把位置设置为(188, 329)。
4)把Initial visibility设置为Invisible。
(1)添加Fade Behavior到Sprite。
(2)把Active at Start设置为No。
(3)把Fade out time设置为2.5。
(4)把Destroy设置为No。
你的布局应该如下图所示:
现在我们才开始真正地制作改变速度的事件:
Event:
Condition: Function>On function
Name = “CheckForSpeedUp”
Condition: System>Compare variable
Variable = Score
Comparison = Greater or equal
Value = PointsForSpeedUp
Action: SpeedIncreaseIndicator>Set visible
Visibility = Visible
Action: SpeedIncreaseIndicator>Start fade
Action System>Set value
Variable = CurrentSpeed
Value = CurrentSpeed * SPEEDMOD
Action System>Set value
Variable = PointsBetweenSpeedUp
Value = PointsBetweenSpeedUp * POINTSFORSPEEDUPMOD
Action: System>Add to
Variable = PointsForSpeedUp
Value = PointsBetweenSpeedUp
你的事件应该显示如下:
当这个功能被调用时,它会检测玩家得分是否达到提速所需的值。如果是,那么:
它会激活告诉玩家游戏速度已加快的子画面,然后开始Fade行为。
新的游戏速度是原来的速度乘上SPEEDMOD的值。
确定下一次提速所需的得分。
把那个值加到下次提速所需的玩家总分中。
完成这个功能后,我们还要保证它被调用。打开GivePoints()功能,添加下面的Action到主事件和副事件末尾:
Action: Function>Call function
Name = “CheckForSpeedUp”
GivePoints()应该如下图所示:
当这个事件完成后,测试游戏时就能看到速度系统的作用了。
注:多玩了几次游戏后,我发现这些值有点儿不合适,所以我建议你多花些时间实验这个系统,看看什么值最合适。
总结
在本文中,我们谈到许多不同的功能,但都间接或直接与我们期望的移动系统相关。虽然比较费时间且需要的系统比我们一开始设想的还要多,但最终我们得到了非常强大的系统,所以我们的努力是值得的。
本文的内容已经够了,所以我想就到这里吧。在下一篇文章中除了探讨更小的问题外,我们还将重点系统将是这款游戏的最后一个重要的系统,,但最重要的当然是消除游戏自动产生的匹配组。
如果你想知道如何消除,那就看看我们如何检测匹配吧。我们制作的这个消除系统与那个系统非常类似,除了它将使用以不同方式找到的匹配。你先思考一下吧,然后到下一篇文章中验证你的思路。(本文为游戏邦/gamerboom.com编译,拒绝任何不保留版权的转载,如需转载请联系:游戏邦)
Make a Match-3 Game in Construct 2:Block Movement
by David Silverman
In the previous part of this series, we made some small but important changes to many of the systems we created for our Match-3 game. With these improvements implemented, we are now going to get back on track and implement one of the last two major systems for the game: the Block Movement system.
This tutorial will take you through the entire development of the system which allows the blocks to rise to the top of the screen, and will also cover the creation of all the smaller systems we will need to implement to support the movement system. While the topics I cover in this tutorial are not too complex, there is a lot to go over – so let’s get to it.
Final Game Demo
Here is a demo of the game we’re working towards throughout this series:
1. Moving Blocks Up
Before we start moving the blocks, we have to make a small change to the events which spawn the Blocks. Go to the System > On Start of Layout event and change the Y for loop to go from 0 to 3, instead of from 0 to 7 like it originally did.
The event should now look like this:
The reason we made this change is because we want the game to start with fewer blocks on screen, so that it doesn’t end as quickly when we add a Game Over in the next tutorial.
Next, we will create a variable that will represent the speed of the blocks:
Global Variable:
Name = CurrentSpeed
Type = Number
Value = 0.2
Now we’ll create the event that actually moves the blocks:
Event:
Condition: System>Every X Seconds
Interval (seconds) = CurrentSpeed
Action: Block>Move at Angle
Angle = -90
Distance = 1
The event should look like this:
If you run the game after adding this event, the first thing you should see is that the blocks drop, due to the gravity we implemented in a previous tutorial. After that, the Blocks should slowly rise until they are in their original position, and then drop again. This will repeat infinitely as long as you don’t do anything to the Blocks.
This happens because the Blocks are moving past the point where the gravity is supposed to kick in, and they are discovering that there are no blocks underneath them, causing them all to fall. While this is an issue, it’s not the first one I want to look at.
2. Fixing Swapping
Run the game, and try making a swap of any kind. When you do this, you should see that the blocks start getting stuck behind each other, getting stuck in positions that are not aligned with the grid, and just generally misbehaving. There are two reasons for this issue.
The first issue is that, even though we are moving the Blocks themselves, we are not moving the LeftBlock, RightBlock, TopBlock, and BottomBlock objects with them, meaning that the blocks you use to detect swaps are not moving with the block grid – they are just sitting in the position they are set to when you first pick up a block.
So, when you try to make a swap, the blocks are getting put out of place because the swap detection blocks have not adjusted at all to the grid. (This is also the reason for the second issue we are having, which is that we are not modifying the positions we stored in the BlockPositions array either.)
The GIF below demonstrates this problem:
As you can see in the GIF, the swap detection blocks are not moving, even though the blocks themselves are.
To solve both of these problems, we’ll add a few more Actions to the Event we just created:
Action: BottomBlock>Move at Angle
Angle = -90
Distance = 1
Action: LeftBlock>Move at Angle
Angle = -90
Distance = 1
Action: RightBlock>Move at Angle
Angle = -90
Distance = 1
Action: TopBlock>Move at Angle
Angle = -90
Distance = 1
Action: BlockPositions>Set at XY
X = 0
Y = 1
Value = BlockPositions.At(0,1) – 1
Action: BlockPositions>Set at XY
X = 1
Y = 1
Value = BlockPositions.At(1,1) – 1
The Event should now look like this:
The first four Actions we just added adjust the positions of the LeftBlock, TopBlock, RightBlock, and BottomBlock objects so that they stay inline with the block grid. The second two events adjust the Y values we have stored in the BlockPositions array so that they also stay inline with the block grid.
If you test the game again at this point, swapping should be mostly fixed.
At this point, there is still one other issue we need to deal with to make swapping work correctly. Run the game and attempt to make a downward swap with any of the blocks in the bottom row while that row is partially below the bottom area of the game field:
Make the swap while the Blocks are behind the border, like the highlighted ones in the image above.
If you did this correctly, you should see that nothing happened and the blocks did not swap. If you waited too long, the blocks may have swapped because they had moved above the game field’s border again, so if this happened try again once they fall and you should see this issue occur.
This issue is rather simple to solve and to understand. If you look at the code for downward swaps, you should find the Event that we added in the previous tutorial which prevents the player from making downward swaps that cause the Block to fall off the bottom of the game field. Since this statement prevents the player from making downward swaps when the BottomBlock object is lower than the block’s initial Y position, it prevents the blocks from being swapped once they have fallen and only allows you to make swaps again once they have moved past their original position again.
To fix this statement we are going to make one small change to the condition:
Condition: BottomBlock>Compare Y
Comparison = Less or equal
Y co-ordinate = SPAWNY + ((Block.Width + 2)/2)
The condition should now look like this:
This modification means that a downward swap can only occur while the BottomBlock object is at most a half-block below the Y position the blocks start in. This also means that, once we start spawning new rows of blocks and pushing them onto the screen from the bottom, those blocks will only be able to be swapped in this way once at least half of the block is visible.
We are also going to put a similar restriction into all of our swapping Events to ensure that all of them become usable at the same time, and that a block cannot be swapped at all until at least half of it is visible. Again, this will also help when we integrate the system which spawns new rows of blocks. To do this, we’ll add a new condition to each of the remaining three swap Events.
The conditions we add will be exactly the same as the one we just modified in the BottomBlock event, except that they will reference the TopBlock, RightBlock, and LeftBlock objects instead of the BottomBlock object, depending on which event it is in.
The new Condition for the TopBlock Event should be:
Condition: TopBlock>Compare Y
Comparison = Less or equal
Y co-ordinate = SPAWNY + ((Block.Width + 2)/2)
The new Condition for the LeftBlock Event should be:
Condition: LeftBlock>Compare Y
Comparison = Less or equal
Y co-ordinate = SPAWNY + ((Block.Width + 2)/2)
The new Condition for the RightBlock Event should be:
Condition: RightBlock>Compare Y
Comparison = Less or equal
Y co-ordinate = SPAWNY + ((Block.Width + 2)/2)
Your whole On DragDrop drop Event should now look like this:
With these new conditions in place, we have fixed our swapping mechanics and we have started preparing the existing systems for the next system we are adding: the one which will spawn new rows of blocks.
3. Spawning More Blocks
Now that we have the blocks moving up at a constant rate, we need to make the new rows of blocks spawn at the correct time, and allow the player to continue playing for as long as they want. We are going to use a function to spawn the new rows of blocks, and we are going to use an event which detects when the blocks are inline with SPAWNY to trigger that function.
So first, let’s make the function itself.
Event:
Condition: Function>On function
Name = “SpawnNewBlocks”
Condition: System>For
Name = “X”
Start Index = 0
End Index = 7
Action: System>Create object
Object = Block
Layer = 1
X = SPAWNX + (loopIndex(“X”))*(Block.Width+2)
Y = SPAWNY + (Block.Width+2)
Action: Block>Set value
Instance Variable = Color
Value = floor(Random(1,7))
Action: System>Add to
Variable = NumBlocks
Value = 1
Your new Event should look like this:
When used, this function will create a row of blocks below the bottom row of blocks in the game field. As it stands now, though, we don’t actually use this function at any point, so let’s make the Event that does that:
Event:
Condition: System>Every X seconds
Interval(seconds) = CurrentSpeed
Condition: Block>Compare Y
Comparison = Equal to
Y = SPAWNY
Condition: Invert: Block>Is Dragging
Action: Function>Call function
Name = “SpawnNewBlocks”
Your new Event should look like this:
The Event we just created checks the Y position of the blocks every time they are moved. If it finds any blocks that are inline with SPAWNY, it triggers the SpawnNewBlocks() function like we discussed earlier. It also checks to ensure that the block it finds is not the one being dragged by the player.
If you test your game at this point, it will work, but you should notice one strange issue. The moment you start the game, your blocks will fall as if there are no blocks below them, but after that point everything works perfectly, and new blocks are spawned whenever they are needed.
This happens because, when the game first starts, it processes the gravity code before the code which spawns new rows of blocks. To fix this we are going to make a small adjustment to the code that spawns the initial group of blocks so that they are spawned below the point where a new row would be needed. This allows it to avoid running the gravity code immediately, and allows it to create the new row of blocks once the existing blocks are in the right location.
Go to the Event that spawns the initial group of blocks and modify the Action which actually creates the block. Change the Action to this:
Action: System>Create object
Object = Block
Layer = 1
X = SPAWNX + (loopIndex(“X”))*(Block.Width+2)
Y = SPAWNY – (loopIndex(“Y”))*(Block.Width+2) + 5
The Event should now look like this:
This modification means that the blocks will spawn five pixels below SPAWNY. This means that the blocks will actually have to move up five times before a new row will spawn, and solves our problem.
4. A Bit of Animation
At this point our Blocks are moving, and we have new rows being created. On top of that, remember that earlier we prevented the player using any block until at least half of the block is visible. While this is a good feature, the player may not understand why a block cannot be used immediately when it becomes visible, even if not much of it is visible at the time.
Because of this potential UI issue, we are going to make each block use the gray block sprite (at the beginning of the block’s animation frames) when it is in this unusable state. This will make it clear to the player when a block becomes usable, and it will give us a chance to finally use our last block image.
You can see an example of what it will look like when the Blocks go from being inactive to active in the GIF below:
The Event we create will also include a second Condition that checks to make sure the block it’s looking at is not being dragged. This Condition allows us to ensure that when the player drags a block below the point where blocks become usable, it will not change its image so that it is gray, and will stay the color it is supposed to be.
To make this animation work we first need to add a new Event:
Event:
Condition: Block>Compare Y
Comparison = Greater than
Y = SPAWNY + ((Block.Width + 2)/2)
Condition: Invert: Block>Is Dragging
Action: Block>Set frame
Frame number = 0
The new Event should look like this:
You should now be able to test your game and you should see that the blocks are using the gray image when they are below the point they become usable.
5. Enabling and Disabling Drag/Drop
If you run the game now, you’ll notice that even though the blocks cannot be swapped with each other when they are gray, the gray blocks can still be dragged around and manipulated. This is because we never disabled the Drag/Drop capabilities of the block when we prevented the player from swapping with them.
To prevent the gray blocks from being able to be moved, we’ll modify the Event we created in the previous section. First we will add a new Action which turns off the dragging when the Block is below the point it becomes usable.
Add this Action to the Event we created earlier:
Action: Block (DragDrop)>Set enabled
State = Disabled
We are also going to add an Else statement for this Event which lets the block be dragged again once it is above the point that the block becomes usable:
Event:
Condition: Else
Action: Block (DragDrop)>Set enabled
State = Enabled
With both of these changes, the Event should look like this:
If you test the game at this point, the blocks should no longer be usable when they are gray, and should work the same way they always have when they are not.
6. Speed Changes
The final thing I want to cover in this article is the system that will allow us to change the game’s speed over time. Specifically, this is the system that will make the blocks move faster as the player eliminates more of them.
The system we are going to create is relatively simple: every time the player gets some number of points, the speed of the game will increase based on a modifier that we’re going to create, and the number of points the player needs to get the next speed increase will change based on a second modifier.
Before we can actually start making the Events for this system, we’ll create a couple of Global Variables to handle the new features for us:
Global Variable: SPEEDMOD
Type = Number
Initial value = 0.8
Constant = Yes
Global Variable: PointsForSpeedUp
Type = Number
Initial value = 400
Constant = No
Global Variable: PointsBetweenSpeedUps
Type = Number
Initial value = 400
Constant = No
Global Variable: POINTSFORSPEEDUPMOD
Type = Number
Initial value = 1.4
Constant = Yes
Your new variables should look like this:
Now that we have the variables in place, I’ll explain what each does.
SPEEDMOD is the variable we will multiply the speed by to modify it whenever the player reaches the number of points they need to cause a speed increase.
PointsForSpeedUp is the number of points the player needs to hit the next speed up.
PointsBetweenSpeedUps represents how much the PointsForSpeedUp variable will increase when the Player gets a speed up, to adjust it so that the next speed up takes even more points. Right now it is 400, like PointsForSpeedUp, but when the player actually gets a speed up it will be multiplied by POINTSFORSPEEDUPMOD before it is added to PointsForSpeedUp.
Finally, POINTSFORSPEEDUPMOD is the variable we will use to modify the number of points the player needs to get to increase their speed another time past the one they most recently got.
Along with setting up the variables, we also need to create a new sprite object which will act as the alert for the player when the speed increases.
Go to Layout 1 and follow these steps to create the new sprite:
Insert a new Sprite object on Layout 1.
With the Animation Editor, open the image SpeedIncImage.png.
Set the Name to SpeedIncreaseIndicator.
Set the Layer to Game Field.
Set the Position to 188, 329.
Set Initial visibility to Invisible.
Add a Fade Behavior to the Sprite.
Set Active at Start to No.
Set the Fade out time to 2.5.
Set Destroy to No.
Your Layout should now look like this:
Now we will actually create the Event that changes the Speed:
Event:
Condition: Function>On function
Name = “CheckForSpeedUp”
Condition: System>Compare variable
Variable = Score
Comparison = Greater or equal
Value = PointsForSpeedUp
Action: SpeedIncreaseIndicator>Set visible
Visibility = Visible
Action: SpeedIncreaseIndicator>Start fade
Action System>Set value
Variable = CurrentSpeed
Value = CurrentSpeed * SPEEDMOD
Action System>Set value
Variable = PointsBetweenSpeedUp
Value = PointsBetweenSpeedUp * POINTSFORSPEEDUPMOD
Action: System>Add to
Variable = PointsForSpeedUp
Value = PointsBetweenSpeedUp
Your Event should look like this:
When this function is called, it checks to see whether the player has scored enough points to warrant a speed increase. If they have, then:
it activates the sprite which tells the player the speed has increased by making it visible and starting the Fade
it increases the speed by multiplying it by the modifier
it determines the number of points needed before the next speed up, and
it adds that value to the total number of points the player will need to have before the speed increases again.
With this function complete, we just have to make sure that it gets called. Go to the GivePoints() function and add this Action to the end of the primary event and the sub-event:
Action: Function>Call function
Name = “CheckForSpeedUp”
The GivePoints() function should now look like this:
With that Event complete you should be able to test your game and see the speed up system in action.
Tip: As I played with it more, I found that these values felt a little bit off, so I suggest you take some time to experiment with the system, and find the values you feel most comfortable with.
Conclusion
We’ve covered a lot of different topics in this article, but everything we dealt with was directly or indirectly related to getting the movement system to work the way we wanted. While it took some time, and required us to make more systems than we might have anticipated at the beginning, the payoff was worth it and we ended up with a very strong system in the end.
Because of how much we’ve already covered, I think this is a good place to end this article. The next article should be the final tutorial in this series and we are going to cover a lot of smaller topics within it, but the biggest thing we are covering is definitely the elimination of pre-made matches.
If you want to start trying to figure out how we will eliminate them, take a look at how we detect matches to begin with. The system we create will be very similar to that system, except it will use the matches it finds in a different way. Start thinking about it and see what you can come up with, and I will see you back here next time for the last major tutorial in the series.(source:gamedev)
上一篇:成就感并不只是成就型玩家的追求
下一篇:阐述营销人员对手机广告的3个误解










 闽公网安备35020302001549号