教程:如何使用Unity制作3D版iOS游戏(1)
作者:Joshua Newnham
Unity是最流行的iOS游戏开发工具,原因有很多,比如:
发展迅速。用Unity做游戏比用你自己的3D引擎或低级3D框架快得多。
可视的场景布局。Unity带有强大的3D场景编辑器,游戏很大一部分都可以用它完成——通常不需要写代码!
跨平台。如果你的游戏是用Unity制做的,那么它就可以移植到iOS、Android、Windows、Mac和甚至网页!
容易学习。Unity比OpenGL或低级框架更容易学习,这对新手特别有利!
本系列文章将分为三个部分。如果你想学习得更多,不妨将三个部分都学习一下。(请点击此处查看第2部分)
本教程包含注释内容,你会学习到很多东西,毕竟本教程的游戏案例比《Heroic Cube》更复杂。
注:游戏案例是由Unity 3D制作的,所以可能与使用Unity 4有稍许不同。
我们可以开始了吗?
设计游戏
无论是什么应用,在你开始写代码以前,你都应该先决定你要把它做成什么样子——以及为什么这么做。你必须考虑到你的目标受众,你的概念是什么及它为什么吸引受众,你的应用具有什么功能特性。
我们来试试!
在这个教程中,我们假设你的目标受众是年龄介于12-35岁的男性——假设有这么一位玩家玩家名叫Bryan,他是:
*33岁的资深会计师
*有一部iPhone
*对运动有兴趣
*是办公室白领,每天坐公共交通工具上下班,平均用时20分钟。
*与大部分智能手机用户一样,Bryan经常在通勤时间段用iPhone作为娱乐工具,通常不放过任何一点空闲独自的时间,甚至有时候在吃饭时也要玩上一把,他的妻子因此很恼火!
你的目标是针对Bryan这样的玩家制作一款游戏,供他在每天的几分钟空闲时间内玩。你的游戏应该非常简单(但是有趣),有且仅有一个容易学会的机制。这样,玩家在嘈杂混乱的环境,如通勤时段中才能很快上手这款游戏。
因为你的目标受众是年龄介于12-35岁的男性,你的游戏主题最好与运动有关。手机休闲游戏的玩法长度通常是4-8分钟——包含载入和开始部分,完整的游戏环节持续5分钟。
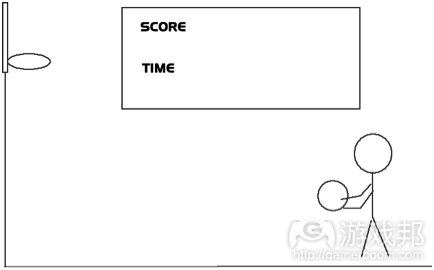
所以,你的游戏应该与一种简单而快速的运动有关。射击或者篮球怎么样?下图是一个篮球游戏的草图:
啊,我们已经有进展了!现在可以开始设计功能和相关组件了!
机制/互动元素:
目标:在一次游戏环节内,尽可能获得高分
投球时,玩家的手指应该按在屏幕上;手指停留的时间越长,球越难投出。并且把球留住的时间太长就算犯规。
特征:
*视觉效果丰富,以吸引玩家眼球
*简单的菜单(在游戏画面的上一层,带有开始游戏的选项)
*仿真物理,允许球反弹
玩家角色在球场上的移动会越来越快,从而增加游戏难度;但玩家会慢慢适应游戏节奏。
游戏资源及其特征:
*环境
篮框
响铃
球场
背景
*计分栏
*玩家角色
停止动画
投球动画
移动动画
好了,现在你已经有了游戏的基本设计,可以开始制作了!
Unity 3D简介
如果你已经有Unity了,那你大概可以跳过这一部分。
如果没有,那么你就得先下载Unity。你可以在Unity的网站上下载免费试用版。运行安装程序,很快就可以用上Unity了。
Unity对于非商业目的是免费的,但为了在你的项目中使用这个软件,你必须先注册——在第一次使用时你会看到“Register”按钮。一旦Unity启动,《AngryBots》的样本项目就会出现。
我们要制作一个新项目,所以从主菜单中选择File\New Project,你可以随时保存。现在不要急着选择要导入的程序包。
当你第一次打开Unity(注册后),你会看到:
注:罗列在这个界面中的介绍视频和手册是非常实用的资源,你学习完这个教程以后,不妨看一看——它们会让你更加了解Unity的功能。
在你正式操作以前,先快速浏览一下Unity的用户界面,这是你制作所有Unity项目的控制中心!
Unity界面
我们先快速浏览一下Unity界面。如果你已经熟悉了,那么不妨跳过这一部分。
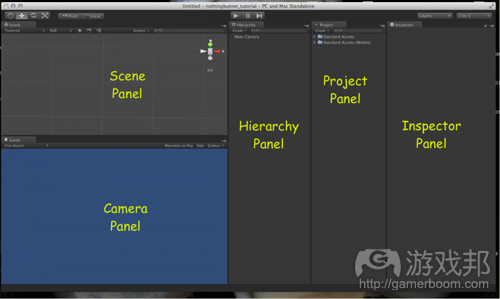
Unity的用户界面由五个独立的面板组成,各个面板都紧密相关,可以让你从不同的视角察看项目。
第一个是Project panel(项目面板),你可以通过它概览项目,并快速获得游戏的所有资源。这里的“资源”是指游戏将使用到的所有材料,如脚本、材质、声音和数据文件等。
注意,在这个面板中会出现某些文件夹名称,与特定的任务有关。例如,当使用“Gizmos”的图像元素时,就是设计时间图标,你必须将它们放在“Gizmos”文件夹下,这样Unity才能搜索到。
第二个是Hierarchy panel(层级面板),显示的是当场场景中的所有资源。你可以通过它快速选择物品,而不必通过3D视图或执行多重选择。一个小技巧:聚焦某个资源,将鼠标悬浮于你想在场景面板中聚焦的物品上,然后按下“F”键。
接下来是Camera panel(摄像面板)!它提供了场景的摄像机视点。注意右上角有三个按钮。Maximize on Play就是当你选择游戏时最大化窗口。当你准备优化游戏时,Stats非常管用,因为它显示了draw calls和其他有用的数值。Gizmos用于将Gizmos显示或隐藏在游戏场景中。
位于摄像面板之上的是Scene panel(场景面板),这是你可视化设计游戏关卡的主要面板。如果你熟悉3D建模工具,那么你应该会使用得相当得心应手。否则,也别着急——Unity是非常直观又容易学会的软件。
选择物品,包括摄像机,可以在窗口顶部的操作工具中执行。
hand工具是用来移动场景的。translation工具会显示被选中物品的其他操作,如在场景中移动或转换物品。Rotation和scale可以用来旋或缩放被选中物品。
注:你应该熟悉这些工作的快捷操作方式。非常容易记住:键盘上最前面的四个字母分别对应这四个工具:hand是Q、translation是W,Rotation是E,scale是R。不要忘记你的好朋友F是用来聚焦被选中物品的——你会经常用到F!
关于scale的一个小提醒:最好不要手动缩放物品,除非你在观察它的视觉效果。通过导入选项缩放模型会更方便,而且效率更高。
最后一个面板是Inspector panel(检查面板),可以借它访问被选中对象的所有公开可获得的属性。这是一个重要的概念,所以花点时间理解它的含意吧。
你游戏中的所用元素都是从GameObject(游戏对象)继承来的。不同的Components(组件)(来自名为MonoBehaviour的组件)与各个游戏对象联系在一起。这些Components决定了GameObject在场景中的行为。
这些Components可以通过Inspector panel看到,你可以在这个面板中调整它们的属性。Components各不相同,可以是从你写的简单脚本中产生的东西,也可以是摄像机、物理属性等。本质上,组件为你提供了一个模块化构建游戏元素的灵活方法。值得注意的是,所有GameObject都有Transform component——它决定了GameObject在3D空间中的位置。
注:如果你熟悉iOS的开发,那就把你的GameObject当作NSObject。不是继承功能,而是将对象归为专门类别——使其具有不同的功能,但作为一个单元捆绑在一起。
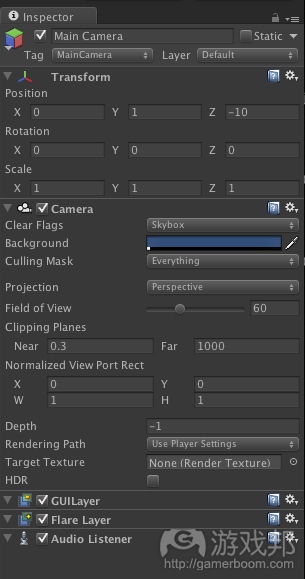
下图是Inspector panel的截图,其中摄像机被选中。
这里的组件包括:Transform (所有游戏对象都有)、 GUILayer、Flare Layer和Audio Listener。这些都是什么?不要着急——我只是想让你看看一个对象具有的组件和设置。
除了这些面板,通过Unity的工具栏还可以用到许多功能。你最感兴趣的两个东西应该是Game Object和Component选项。
Game Object菜单中有一个物品列表,你可以添加到当前场景中。你可能有兴趣的下位菜单选项是Create Empty和Create Other -> GUI Texture。Create Empty就是将一个新的(空的)GameObject放到场景中。Create Other——GUITexture就是制作一个带有UGI材质组件的游戏对象,且当前选中的材质作为它的纹理,如果没有选中材质,软件就会默认。
现在,你已经对Unity界面有一个大致的了解了。在下面一节中,你可以开始制作你的Unity场景了!
游戏资源
在这一节内容中,你将学习如何将资源导入Unity,Unity如何处理资源以及简要了解材料的含意及其在Unity中的作用。
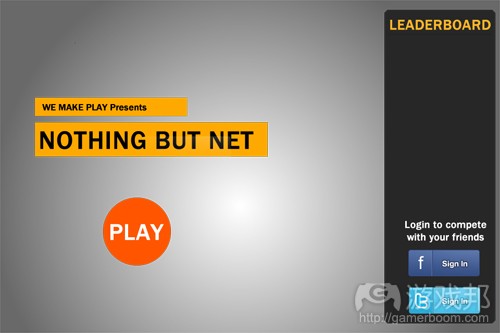
看看本教程在上文中列出的特征,你应该很清楚你需要什么资源。想象你的设计师已经给你制作了那些资源,如制作主菜单画面需要的图像和字体:
在这里,玩家可以快速启动游戏并查看进度。注意,本教程不包含社交网络的执行。
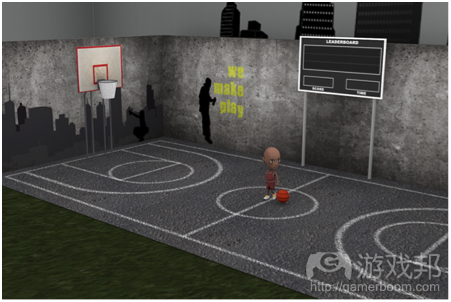
设计师还制作了主关卡的材质和3D模型,例如下图:
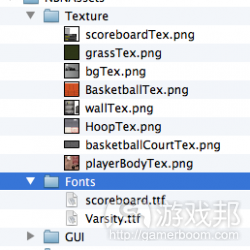
设计师将所有资源打包成zip文件。解压文件后,你可以看到目标包含材质、字体、图像和模型,如下图:
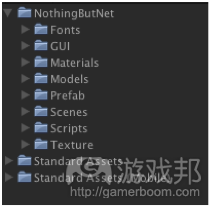
现在我们将一些资源导入项目中。在项目面板,点击Create(创建)按钮,然后选择Folder(文件夹)。制作出如下图所示的结构:
从GUI图像开始。将所有/NBNAssets/GUI folder的文件拖到/NothingButNet/GUI folder中。这些是你的GUI将使用到的图像,如图标和喷溅效果。
Unity将自动检测你导入的资源类型,并添加默认属性。在本教程的案例中,Unity将你导入的.png文件作为3D模型材质,并压缩。当将其作为GUI材质渲染时,会降低图像质量,这是你不想看到的结果!
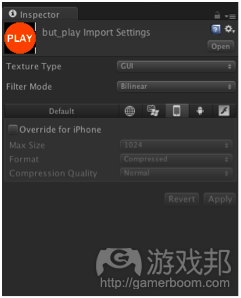
你必须浏览各张图片,设置类型为GUI。做法是选择选项,从Inspector panel中查看,从Texture type下拉菜单中选择GUI选项(如下图所示)。
对所有图像重复以上操作。
下一步,导入模型的材质。从/NBNAssets/Textures folder中将.png文件拖到/NothingButNet/Textures folder中。因为这些是3D模型的材质,所以你不必修改默认设置 。
现在导入字体。将.ttf文件从/NBNAssets/Fonts folder拉到/NothingButNet/Fonts folder中。
最后,导入模型。将.fbx文件从/NBNAssets/Models folder拉到/NothingButNet/Models folder中。
注:本教程所用的模型是用开源免费3D制作工具Blender制作的,用FBX导出。Unity支持多种音频、图像和3D材料格式,除了FBX文件——想了解更多关于Unity支持的文件格式,请参看Unity的导入指南。
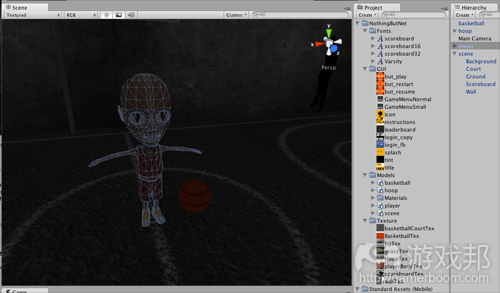
添加模型后,你应该查看材质是否与模型正确对应。方法是,点击各个模型,从Inspect panel的Preview(预览窗口)查看。另外,点击模型,然后移动鼠标,可以旋转模型,以查看其他面。
如果你的模型是灰色的,那么很可能是因为材料和材质之间的链接被破坏了。我将在下面一节内容中解释这些链接的运作和修复方法。
材料和材质
模型与Materials(材料)有关。Materials是一个指定的着色器(游戏邦注:着色器就是图象通道中的一个小程序,与模型顶点的放置和模型栅格化到2D画面有关),决定了Unity如何渲染基于光照、法线映射和象素数据的图像。有些着色器可能是处理加强器,所以最好根据你的材料选择着色器。
打开模型下面的Materials folder(材料文件夹)。你可以找到各个模型的材料。选择列表中的一个材料,将着色器从Diffuse变成Mobile/Diffuse。
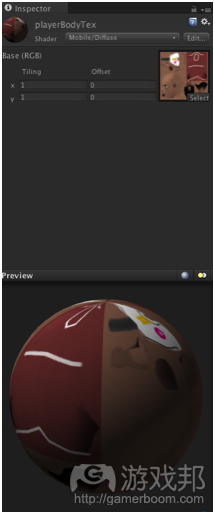
如果你的材质还没与材料建立链接,那么你会看到窗口中的空白灰点,这是图像本来应该在的地方(在右下方有一个Select按钮)。为了对应正确的材质,你可以点击Select按钮,选择材质,或简单地拖一个材质到这个点中。
至于角色,材料应该如下图所示:
你必须对HoopTex Material设置透明度。选择这个材料,然后选择Transparent/VertexLit Shader。
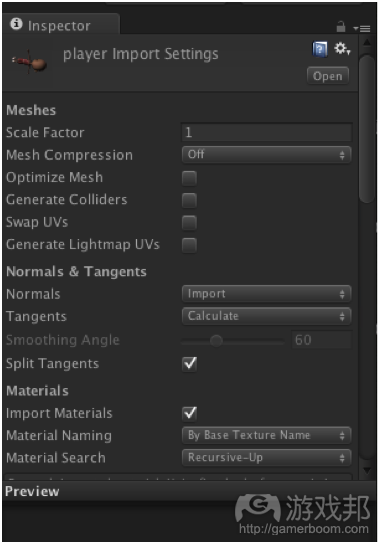
最后还有一点事情要做。在3D建模工具之间,没有标准化的缩放,所以为了将模型调成适合的大小,你要选择各个模型并调整它们的大小
介于0.01到1之间。如下图所示:
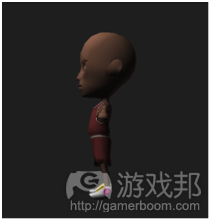
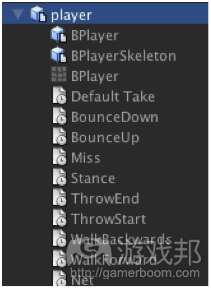
最后,打开角色模型,你会发现一些子项元素,如下图所示:
根据你使用的3D建模工具,有些子项元素可能会有所不同。在Blender中,BPlayer和BPlayerSkeleton是对象,BPlayer(在BPlayerSkeleton之下)是mesh数据,显示的是角色的几何体,最后是动画帧,这个等到给角色画线时再详述。
设置场景
在这一节内容中,你将为游戏设置场景。你的目标是了解Unity场景环境、发现Unity提供的更多Components,最后完成你的游戏场景。
在你设计场景以前,先从设计阶段考虑要求。摄像机应该稍微侧朝球场和角色,以便玩家可以看到其中一个篮框。
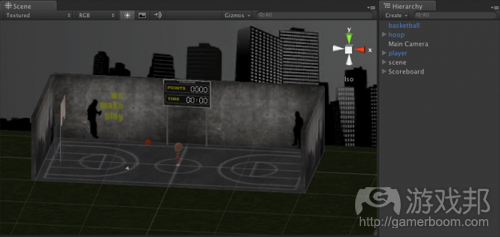
你组合的场景应该类似于下图中的效果:
然而,说得容易做得难!
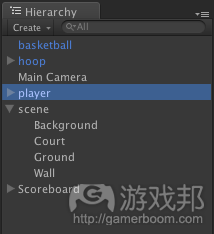
这是你第一次操作Unity中的场景、摄像机和层级面板。执行以下步骤:
选择Hierarchy folder中的Main Camera(主摄像机),设置X=6.5,Y=7,Z=14,Y-rotation=-180
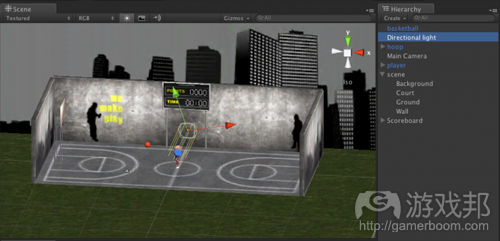
将场景模型拖入Hierarchy panel中,设置X=0, Y=0, and Z=0。你应该看到它显示在摄像机窗口中!
将玩家模型拖入Hierarchy panel中,设置Y-rotation=90。
现在,你已经有了基本对象,试试用场景面板移动角色。选择角色,然后在场景中拖它;当选中角色后,屏幕右上方会出现X、Y、Z箭头,用它们移动角色。你还可以改变观察场景的视角,即使用位于Scene panel右上方的视角切换器。
现在,你可以开始添加剩下的对象了——篮球和篮框。看看你是否能利用场景和Hierarchy panel将其放在正确的位置。如果你失败了,那么就将它们的位置返回中心(X=0, Y=0, Z=0)。
在你操作时,你会发现无论你在Hierarchy中点击什么,都会出现在场景中。你还可以轻易地缩放场景视图中的对象——例如,双击角色可以将它置于镜头的中心。
如果它没有出现在中心,那就用鼠标滚轮来缩放,用鼠标拖窗口中的视图,或按下Alt/Option键,旋转,从另一个角度察看。
注意,这些操作都不会影响对象的实际位置,只是帮助你得到更理想的视图。
既然已经完成场景设置了,现在可以制作计分栏了。
将计分栏与场景分离
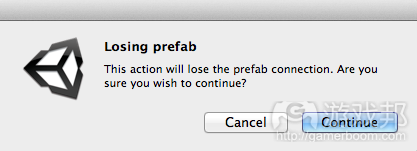
目前,计分栏还只是背景的一部分,但你必须把它做成独立的对象。所以你要在层级视图中将它从场景的子项中拖到层级的根项里。然后会出现下图的对话——点击Continue。
注:GameObject可以有子项,并且这些子项还可以有自己的子项。GameObject的子项不直接继承父项的功能(除非明确脚本),而是使用它们的父级场景空间来放置它们自身。例如,如果父项沿着X轴移动,那么所有这个父项的子项也会如此移动。如果你带着篮球(你的子项)往前走,篮球也会跟着你往前移动。
为了独立子项,使之不继承父项的translation、orientation和scale属性,可以将它拖出其所在父项的文件夹。
之所以将计分栏独立出来,是为了给它添加一些3D Text(3D文本)对象,以显示得分和剩余时间。你不一定要这么做,这只是外观和结构上的一种设计选择。这么做(视觉上)有助于将其与场景的其他部分分离,给你一个制作prefab(预设件)的选择(稍后再说),如果你的游戏有多个关卡的话。
3D Text对象就是,一个在3D环境中渲染文本的对象。
把3D Text对象添加到场景中,方法是选择菜单GameObject -> Create Other -> 3D Text。这样一个叫作New Text的GameObject就被添加到场景中了。
重命名这个3D Text对象为“Point(得分)”,然后把它拖进计分栏对象中。下一步,将计分栏字体与这个3D Text关联起来,请执行如下步骤:
拖Project\NothingButNet\Fonts\Scoreboard font到Hierarchy\Scoreboard\Points\Text Mesh\Font属性。
拖Project\NothingButNet\Fonts\Scoreboard\Font Material material to the Hierarchy\Scoreboard\Points\Mesh Renderer\Materials\Element 0属性。
在3D文本的检查器中,设置默认文本为“0000”,右中对齐。然后使用场景面板来确定计分栏上的右侧的字体位置。注意,你可能得旋转文本,以便显示在右边——我的设置是X=0,Y=0,Z=2.8,RotationX=270, Y=180, Z=0。
现在对Time(时间)文本做相同的操作,即用Cmd-D复制Point文本,然后放在下方。命名对象副本为“Time”,设置默认文本为“00:00”。
你得到的结果应该接近下图:
光照
你有没有注意到场景是黑的?那是因为你还没将灯光添加到场景中。那么我们开始点灯吧!
注:添加光照时你应该考虑到几个问题。添加光照需要付出渲染的代价。如果你过去做过着色器程序,那么你应该理解支持动态光照的渲染需要付出额外的努力。各个光源都需要各自的渲染对象,以计算最后的光照效果,这取决于你使用的着色器/材料,有很高的计算成本。
如果有可能的话,在渲染以前,将所有光照细节“烤”进对象的材质中。烤是一种渲染带静态光照效果的材质的方法,所以达到相同的视觉效果并不需要付出额外的计算成本。另外,使用场景的环境光来控制光照强度;方法是选择Edit -> Render设置面板。
在你的简单场景中,你可以添加一个光源。选择GameObject -> Create Other -> Directional Light,添加一个新的方向光照游戏对象到场景中,这样就点亮场景了。
如果要全面地讨论光照,恐怕就超出本教程的范围了,但可以简单地说一下方向光源。它影响整个场景,取决于光的方向,你可以通过旋转Directional Light GameObject(方向光照游戏对象)来调整它的方向。选择光源,然后用场景面板中的移动和旋转工具,试试将它移到不同的位置。
摄像机位置
现在将你的焦点放在摄像机的正确位置。摄像机定位不是一种科学,而是一种艺术。导演的工作就是通过移动和旋转工具将摄像机对准合适的位置。
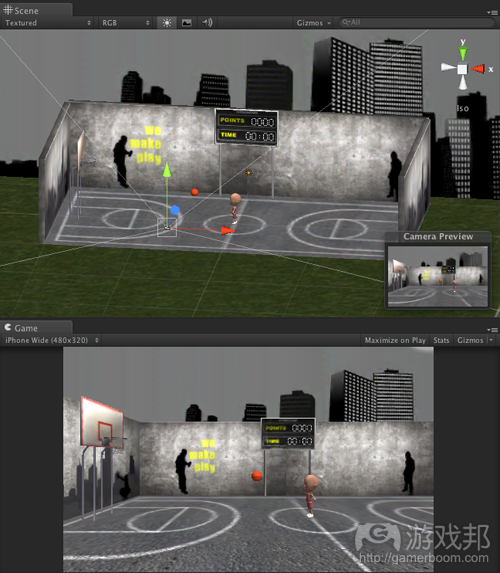
你可以使用位于Scene panel下的Game panel(游戏面板)的预览功能。另外,当你选中Hierarchy view(层级视图)中的摄像机时,会弹出一个小预览窗口。
下一步,你应该将游戏屏幕的尺寸调整到iPhone的480×320,即在Game panel的右上角的下拉菜单中设置。如果你没有找到,那就选择Unity\Build Settings,然后切换平台到iOS。此时,你的视图应该类似下图:
你的场景看起来不错,是吧?觉得有点像真正的导演了?
Unity物理:碰撞器和体
可以给场景的GameObjects添加Component了,这样就能实现对象之间的交互作用。
你的目标是:当对象之间发生碰撞时,你要使对象对这个碰撞作出反应。幸运的是,Unity包含一个集成物理引擎,并且将它打包成一套组件,可以轻松地运用到你的游戏对象上。
在你给对象添加“物理”能力以前,你必须先了解一下“物理”在Unity的含意。
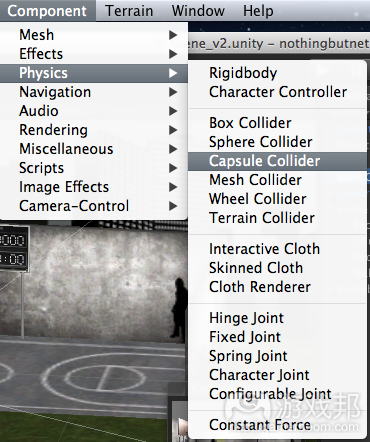
点击Components -> Physics菜单(顶部工具条),快速浏览现成组件的类型。
Colliders(碰撞器)规定了对象的物理大小,可以独立于对象的视觉形状。通常来说,Colliders与复杂度有关,对象越复杂,使用Colliders的性能成本就越高。
使用Box/Sphere压缩你的对象,这样,这些Colliders对你的应用的计算负荷就是最少的。另一种常见的Colliders是Mesh Collider。这是使用3D模型的Mesh来定义对象的边界。在这个情况下,视觉大小会等同于物理大小。
除了与其他对象的物理碰撞,Colliders可以作为检测碰撞的触发器(这样你可以制作一些按程序发生的事件),但其实并不引起任何碰撞反应。这非常有用,因为当球穿过篮网时你就可以检测到。
为了让对象作出反应,除了Colliders外,各个对象必须有一定形式的体。方法就是结对象添加一个Rigidbody(刚体)或CharacterController(特性控制器)。
熟悉物理的最好办法就是多加练习——让篮球反弹起来吧!
反弹篮球
选择篮球,然后给它添加一个刚体,即选择Component > Physics > Rigidbody。然后点击Unity正中上方的“play”按钮,预览游戏——你会看到篮球落到地面以下。
当你点击“play”时,如果你的篮球在场景中间“变形”,那么就选择篮球,不要点击属性中的动画复选框,然后再试一次。现在篮球应该停在正确的点上了。
但如果篮球能飞出场景,那就不是运动了!你必须制作一个边界,防止球跑出游戏场所。
为此,选择场景。墙壁对象是选择Component > Physics > Mesh Collider。对场景重复此动作。地面和场景。背景对象。然后选择场景。球场对象是选择Component > Physics > Box Collider。
如果你再次操作场景,你会看到篮球仍然穿过地面。这是因为你仍然没有为篮球设置碰撞器!
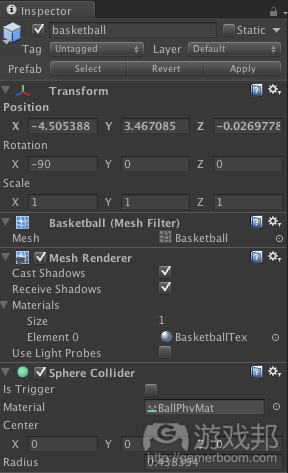
所以选择篮球,然后通过Component > Physics > Sphere Collider给篮球设置球体碰撞器。默认是大小适中,但你可以在检查器的球体碰撞器里调整半径。
篮球能对场景作出响应后,当它撞到其他对象时,还要反弹。为了实现反弹功能,你必须将一种特殊类型的材料赋给篮球,在Unity中,这种材料叫作Physic Material(物理材料)。
材料影响对象的外观,而物理材料决定对象发生碰撞时的行为。这与游戏对象Collider组件的材料属性有关。
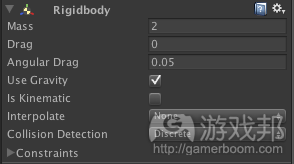
以下图片显示了篮球的刚体属性:
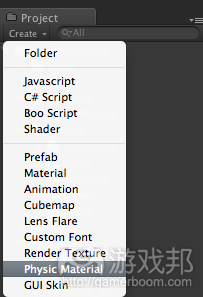
在对象面板中选择Create下拉菜单,然后选择Physic Material,最后将选中的Physic Material命名中为“BallPhyMat”。
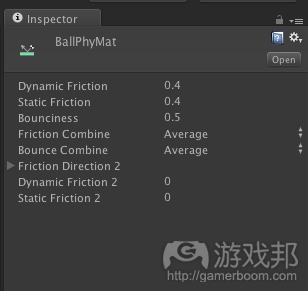
现在设置Physic Material的属性如下图所示。各个属性的功能详情不在本教程的讨论范围之内,你可以查看相关网页。
为了让篮球反弹,摩擦力被调得相当低。
将新创建的Physic Material赋给篮球,选择你刚刚创建的Physic Material,拖到篮球的碰撞材料属性中。
再次点击“play”按钮,这次它一碰到地面就反弹了,太好了!
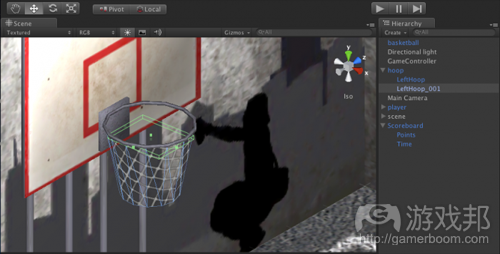
至于篮框,你希望当篮球穿过网时,它能对篮球做出反应。给篮框网格(hoop.LeftHoop).添加一个Mesh Collider。
另外,你还要设置一个传感器或“触发器”来检测篮球穿过篮框的时间,方法就是给篮框(hoop.LeftHoop_001)添加一个Box Collider,但缩短盒子,并将其置于篮网下(方法是调整检查器中的值——我改变中心Z到-1.4和大小Z到0.2)。另外,点击复选框,将触发器的属性设为“true”。
注:用鼠标重设Collider的大小,选择Collider的对象,然后按下Shift。这样Collider的其他选项就会显示出来,你可以用鼠标调整它的大小。
好吧!篮球也搞定了!——我们可以看看角色对象了!
角色
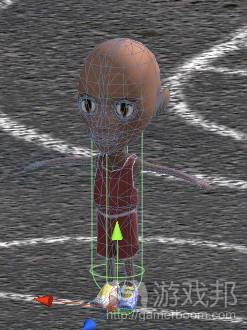
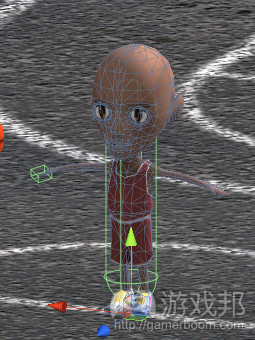
在游戏中,我们希望角色会把球扔出去。使球不在角色身上滚动是很容易实现的;给角色游戏对象添加一个Capsule Collider(压缩碰撞器)。
你还必须调整这个Capsule Collider的位置和大小—-我改变高度到3.8,中心Y到1.8。
注:场景面板中的Collider是带绿色轮廓的——除非它们是Mesh Colliders,在这种情况下,碰撞边界是用网格表现的。
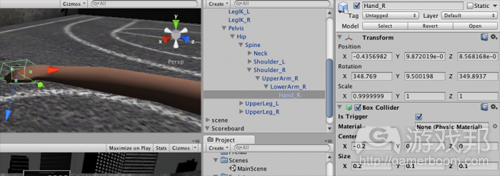
反弹篮球的方法要求游戏可以测试到球撞到角色的手的活动。当这个事件发生时,你将把球拉回地面,就像现实中发生的那样。为了将Collider放在正确的位置,你必须研究一下角色的骨骼,然后在角色的手上添加Collider,用于反弹篮球。
上图显示了角色游戏对象的子项。这些子项从哪来的?问得好!
这些子项来自于使角色活动起来的骨骼——父项是轴,它也有Skeleton Mesh Renderer组件,负责渲染网格。这些子项就是在Blender中建立的骨骼的骨头。在Blender中,ArmIK_L、ArmIK_R、LegIK_L和LegIK_R是其他选项,但在你的游戏中是不可用的。
现在给player\BPlayerSkeleton\Pelvis\Hip\Spine\Shoulder_R\UpperArm_R\LowerArm_R\Hand_R添加Box Collider。然后调整Collider的大小,使之与以下图类似,并将触发器指示器设为“true”。
预设件及其使用方法
这一部分的内容你可能以后会用上,但不强制学习,所以如果你觉得累了,就跳过吧。
游戏应用通常包含大量相同的对象,但使用的次数很多。例如,一个城市可能是通过反复使用相同的建筑做成的。高效的办法是制作一个可以反复利用的标准模板。另外,更新这个模板就能更新所有对象,从而简化过程。
Unity支持这个功能,即使用Prefab(预设件)。你可以使用Prefab制作一个对像的标准副本,然后复制出多个相同的副本。然而,即使你不想制作对象的多个副本,它仍然有助于高效地制作和管理游戏对象。
至于创建Prefab,做法就是从Hierarchy panel中拉一个对象到Project panel,或通过项目下菜单直接创建一个Prefab,然后把Hierarchy panel中的对象拖到这个对象中。
现在,每一次制作这个模板中的另一个对象,你都只需要将这个模板拖到场景中。非常简单,也非常实用!
注:更新模板的方法就是,选择所有你有兴趣的Prefab,制作你的更新,然后从工具条菜单中选择Game Object -> Apply Changes To Prefab。这个调整会自动赋给所有相关对象!
总结
如果你读到这里,那么恭喜啦,你刚刚完成了本教程最困难的部分——入门Unity GUI的使用。以后的学习就简单多了。
这里有一个样本项目,在Unity打开它,选择File\Open Project,点击Open Other,然后浏览文件夹。注意场景不会默载入——打开它,选择Scenes\GameScene。
现在我们来做一个总结,到目前为止,你已经了解了游戏对象可以包含子项,子项存在于它们的空间中。你知道了光照概念和Collider,以及与对象相关的物理概念。你还学会了为篮球添加Physic Material,以影响它的碰撞响应行为,最后你还理解了Collider如何用作触发器以及如何在物理引擎中使用Collider。
这就是本教程的第一部分。在下一分部中,你将学习如何给场景添加互动活动和动画。不过在此之前,你得先了解脚本。那么敬请期待下一部分吧!(本文为游戏邦/gamerboom.com编译,拒绝任何不保留版权的转载,如需转载请联系:游戏邦)
Intermediate Unity 3D for iOS: Part 1/3
by Joshua Newnham
Unity is arguably the most popular 3D game engine for iOS – and for many good reasons!
Rapid development. Writing your game with Unity is far quicker than trying to write your own 3D engine, or than using lower level 3D frameworks.
Visual scene layout. Unity comes with a powerful 3D scene editor that you can use to design a huge part of your app – often without having to write code!
Cross platform. If you write your game with Unity, you can deploy it to iOS, Android, Windows, Mac, or even the web!
Easy to learn. Unity is far easier to learn than straight OpenGL or lower level frameworks. It’s friendly to beginners and is easy to get started!
We just released an epic three-part Beginning Unity 3D for iOS series, but if you’re itching to learn more, we’ve got you covered!
This time, you will create a simple but fun 3D basketball game called “Nothing but Net.” Along the way, you’ll cover the major concepts used in Unity and will be ready to create your own apps!
Some of this tutorial will be review, but you’ll learn a ton along the way since this game is much more complicated than the “Heroic Cube” game.
Note: This tutorial was made with Unity 3, so there may be some slight differences with Unity 4.
Shall we play a game?
Designing the App
As with any app, before you begin coding you should first determine what it is you’re making – and why! You should figure out your target audience, what your idea is and why it appeals to them, and what features the app should have.
Let’s give this a shot!
Introducing your target audience: Bryan!
For this tutorial, let’s assume your target audience is a male between the ages of 12-35 – let’s call him Bryan. Bryan is:
a 33 year old Accountant
owns an iPhone
is interested in sports
is an office dweller with an average commute time of 20 min per day on public transport.
Like most smartphone users, Bryan’s iPhone is a regular form of entertainment during commuting, and in general, every spare moment when he is alone – and even sometimes when he’s bored at dinner, much to his wife’s annoyance!
Your goal will be to create something that offers Bryan a chance to escape for a few minutes during his day. You’ll create a very simple (but fun!) app with just a single and easy to learn mechanic. This way, it can be easily picked up and used in a noisy and disruptive environment, such as commuting.
As your target audience is males between the ages of 12-35, your theme for the game will be sport related. Mobile casual game play typically ranges between 4-8 minutes so aim for a complete gaming session — including loading and starting the game — to last 5 minutes.
So – you want a simple mechanic, and a quick sports-related game. How about shooting a basketball? Here’s a sketch of what it could look like:
Ah – you’re getting somewhere! Time to flesh out the functionality and components you will need!
Mechanic/Interaction:
Goal: score as many points as possible within the time limit
To throw the ball, the player taps and holds their finger on the screen. The longer their finger is held down the harder the ball will be thrown. Leaving it down too long will raise a foul.
Features:
Visually rich and engaging to attract the player
Simple support menu (overlay the game screen with the option to start the game)
Realistic physics to allow for rebounds
Increase the difficulty by moving the avatar around the court more frequently as time passes and the player gets more comfortable with the game).
Game assets and their features:
Environment
Hoop
Ring
Court
Skybox
Scoreboard
Avatar
Idle animation
Throw animation
Move animation
Okay, now that you have the basic design of the app down, it’s time to start creating! :]
Introducing Unity 3D
If you already have Unity, feel free to skip this section.
Otherwise, you need to download Unity before you can proceed! You can download a free trial at the Unity website. Simply run the installer, and you’ll be ready to start using Unity.
Unity is free for non-commercial use, but you do need to register it in order to use it for your projects — hence the Register button you will see on first use. Once Unity is launches, the AngryBots sample project will appear.
You want to start with a new project, so select File\New Project from the main menu and save it wherever you want. Don’t worry about selecting packages to import just now.
Your first time opening Unity (after having registered), you will probably see:
Note: The introductory videos and manuals listed here are helpful resources to check out after you finish going through this tutorial – they will give you a good overview of Unity and what it’s capable of. For a more comprehensive review, check out the official documentation at http://docs.unity3d.com/Documentation/Manual/LearningtheInterface.html.
Before you get started, have a quick look at Unity’s user interface, which will become the command center for all of your Unity projects!
The Unity Interface
Let’s do a quick review of the Unity Interface. If you’re already comfortable with this, feel free to skip to the next section.
Unity’s UI is made up of 5 individual panels, each tightly related, but giving you a different perspective of the project.
First, the Project panel provides you with an overview and quick access to all the assets of your game. “Assets” means any resources that your game will use, such as scripts, textures, sounds, and data files.
Note that some of the folder names that will appear in this panel are used for specific tasks. For instance, when using graphical elements for “Gizmos”, which are design time icons, you need to place them in a “Gizmo” folder so Unity knows where to search for them.
Second, the Hierarchy panel is a view of all assets that are in the current scene. This allows you to quickly select items without having to navigate through the 3D view or perform a multi-select.
A quick tip — to get focus of a particular asset, hover your mouse over the item you want to focus on in the Scene panel and tap the ‘F’ key.
On to the Camera panel! This gives you the point of view of the camera(s) in the scene. Note the three toggle buttons at the top right. Maximize on Play maximizes the window when you select Play.
Stats is handy when you are ready to optimize your app, as it will show you draw calls and other useful stats. Gizmos allows you to show and hide specific Gizmos in the game scene.
The panel above the Camera panel is where you’ll spend most of your time designing your levels. This is the Scene panel which allows you to visually design your level. If you’re familiar with 3D modeling tools, then you should feel pretty comfortable here! :] If not, don’t fret — Unity is pretty intuitive and easy to learn.
The selected item, including the camera, can be manipulated using the manipulation tools at the top of the window:
The hand tool allows you to pan around the scene. The translation tool will show handles on the selected item, allowing you to move, or translate, the item around the scene. Rotation and scale allow you to manipulate the selected item by rotating or scaling it.
Note: It’s worth getting comfortable with the short-cuts to these tools. It’s pretty easy to remember them; they’re the first four letters on the keyboard and they correspond in order to the four tools: Q (Hand), W (Translate), E (Rotate), and R (Scale). Don’t forget your good friend F to focus in on the selected item — you will use F a lot! :]
A quick note about Scale: it’s best not to manually scale things unless you are using it for a visual effect. Scale your models via the import options, which you’ll get into shortly, and leave the scaling to 1.0. This ends up being a lot more efficient.
The final panel is the Inspector panel – this gives access to all the publicly accessible properties of the selected object. This is an important concept to understand so take some time explaining what this means.
All elements in your game inherit from GameObject. Different Components, which derive from a component called MonoBehaviour, are attached to each GameObject. These Components determine how the GameObject will behave in your scene.
Each one of these Components is visible via the Inspector panel where you can tweak their properties. Components vary widely, and can range from anything from a simple script that you write, to a camera, physic properties, and more. Essentially, a Component provides you with a flexible way to build up your game elements in a modular fashion. It’s worth noting that all GameObjects have a Transform component – the Transform component determines where the GameObject lives in 3D space.
Note: If you’re familiar with iOS development think of your GameObject as an NSObject. Rather than inheriting functionality, you attach specialized classes to the object – each gives it different functionality but they are bundled together as one unit.
Below is a screenshot of the Inspector panel when the camera is selected.
The components here include: Transform (attached to all GameObjects), Camera, GUILayer, Flare Layer, and Audio Listener. Don’t worry about what they mean yet – I just wanted to show an example of how you can see components on an object and configure its settings.
Along with the panels, Unity exposes a host of functionality via the toolbar. The two items you’ll be most interested in are the Game Object and Component items.
The Game Object menu item provides you with a list of items you can add to the current scene. The submenu items you’ll be interested in are Create Empty and Create Other -> GUI Texture. Create Empty places a new (empty) GameObject onto the scene. Create Other -> GUI Texture creates a GameObject with the GUITexture component attached and the currently selected texture as its texture, or the default Unity logo if a texture is not selected.
At this point, you have a basic understanding of the Unity interface. You’ll get a chance to start playing around with it in the next section, where you’ll start creating your Unity scene!
Game Assets
In this section, you’ll walk through the process of importing an asset into Unity, discover how Unity handles assets, and quickly cover what Materials are and what role they play in Unity.
Looking at the list of features from the design section of this tutorial, you have a pretty good handle on what Assets you’ll require. Imagine your designer has created the assets for you, including the images and fonts necessary to create the main menu screen:
Here the user can quickly initiate a game and see their progress. Note that social networking is not implemented in this tutorial.
Your designer has also created some textures and 3D models for the main level, which will look like this:
He has delivered all of these assets as a zip file, which you can download here. After you unzip the file, you should see a directory of textures, fonts, images, and models like this:
Now let’s import a few of the assets into your project. On the Project panel in Unity, click on the Create button and select Folder. Create the structure as shown below:
Start with the GUI graphics you’lll be using in this tutorial. Drag all the files in the /NBNAssets/GUI folder into the /NothingButNet/GUI folder. These are the graphics that you will be using for your GUI, including the icon and splash screen.
Unity will automatically detect the type of asset you’re importing and set some default properties. In this case, Unity assumes that the .png files you’re importing will be used as 3D model textures and apply compression to them. This will result in a reduction in image quality when rendering them as GUI Textures, which you don’t want! :]
You’ll need to go through each image and set the type to GUI. To do this, select an item, navigate to the Inspector panel and select GUI option from the Texture type dropdown (as shown below).
Repeat the above for each of your images.
Next, import the textures for your models. Drag the .png files from the /NBNAssets/Textures folder into the /NothingButNet/Textures folder in Unity. Since these are textures for your 3D models, you can leave the default settings as they are.
Now import the fonts. Drag the .ttf files from the /NBNAssets/Fonts folder into the /NothingButNet/Fonts folder in Unity. These fonts come from www.dafont.com (http://www.dafont.com/score-board.font by Bou Fonts, and http://www.dafont.com/varsity.font by Unknown).
Finally, import the models. Drag the .fbx files from the /NBNAssets/Models folder into the /NothingButNet/Models folder in Unity.
Note: The models for this game were created in the open source (free) 3D creation tool Blender and exported as FBX. Unity provides extensive support for a wide array of media formats for audio, graphics, and 3D assets beyond just FBX files – for more information on the file formats supported by Unity, please refer to Unity’s importing guide.
After adding the models, you should check the textures are correctly associated with your models. To do this, click on each model and inspect in the Preview pane of the Inspect panel. If you click on the model and move the mouse around, you can rotate the model to inspect it from all sides.
If your models are grey, then it’s most likely that the link between the Material and Texture is broken. I’ll explain how this linking works and how you can fix it in the next section – materials and textures!
Materials and Textures
Models are associated with Materials. Materials are assigned a Shader (Shaders are small prgrams in the graphics pipeline that determine how the models vertices are positioned and how the model is rasterized to the 2D screen) which determines how Unity renders the image based on lighting, normal mapping, and pixel data. Some Shaders can be processor intensive, so the best idea here is to assign Shaders specifically for mobile to your Materials.
Open up the Materials folder found under Models. Here you can find the materials for each model. Select each Material in this list and change the Shader from Diffuse to Mobile/Diffuse.
If your texture hasn’t been associated with the material, then you’ll see a blank gray spot in the box where the image should be (there’s a “Select” button in the bottom right here). To associate the correct texture, you can click the Select button to choose a texture, or simply drag the texture onto this spot.
For the player, the material should look something like the following:
For the HoopTex Material, you’ll require transparency to be set. Select this material and choose the Transparent/VertexLit Shader.
There’s just a few things left to do in this section before you wrap things up. There is no standardized scaling between 3D modeling tools, so to get the models to a reasonable size, select each of them and update their scale factor from 0.01 to 1 as shown below:
Finally, open up the Player model and you’ll notice a few child elements, as below:
Some of these child elements will differ depending on what 3D modeling tool you are using. In Blender, the BPlayer and BPlayerSkeleton are the objects, the BPlayer (under BPlayerSkeleton) is the mesh data that describes the geometry of the player, and finally the items below that are animation frames, which will be described in further detail once you start wiring up your player!
Setting up the Scene
In this section you will visually setup the scene of your game. The goal here is to get some hands on experience working with the Unity scene environment, discover some more Components that Unity offers, and finally end up with a scene ready for your game.
Before you start visually designing your scene, consider the requirements from the design stage. You’ll have the camera facing side on to the court and the player, and positioned so that one of the hoops on the court can be seen.
Your goal is to arrange the scene so it looks somewhat like the following:
However, this is easier said than done!
This is your first chance to start playing around with the Scene, Camera, and Hierarchy panels in Unity. Perform the following steps:
Select the Main Camera in the Hierarchy folder, and set X=6.5, Y=7, Z=14, and the Y-Rotation to -180.
Drag a scene model into the Hierarchy panel, and set X=0, Y=0, and Z=0. You should see it appear in the Camera window!
Drag a player model into the Hierarchy panel, and the Y-rotation to 90.
Now that you have some basic objects appearing, experiment moving the player around the scene using the Scene panel. Select the player, and drag it around the scene using the X, Y, and Z arrows that appear next to the player when it’s selected. You can also change the perspective of how you’re looking at the scene using the perspective switcher in the upper right of the scene panel.
At this point add the remaining objects – the basketball and the hoop. See if you can arrange them into roughly the right spot yourself using the Scene and Hierarchy panels – if you get stuck, you can always set their position back to the center (X=0, Y=0, Z=0).
While you’re playing around with this, you might notice that whatever you click on in Hierarchy is highlighted in the Scene. You can also easily zoom in on an object in the scene view – for example, try double clicking on the Player to center it.
If it isn’t centered the way you want it, use your mouse wheel to zoom in or out, drag the view in the window with the mouse, or hold down the Alt/Option key to rotate around and see things from another angle.
Note that none of these operations affect the actual position of objects, it’s just to help you get a better view.
Now that you have your scene roughly set up, time to configure the scoreboard!
Separating the Scoreboard from the Scene
Currently, the scoreboard is a child of the background, but you want it as a separate object. So in the Hierarchy view, drag it from a child of the scene into the root of the Hierarchy. The following dialog will appear – click Continue.
Note: GameObjects can have children and those children can have children, and so on and so forth. Children of a GameObject don’t directly inherit functionality of their parent (unless explicitly scripted), but rather use their parent’s scene space to position themselves. For instance, if the parent was moved along the x-axis, then all the children of the parent would also be moved e.g. if you held a basketball (your child) and walked forward, the basketball would move forward with you.
To make a child independent so that it doesn’t inherit the translation, orientation, and scale of its parent (also known as the object’s “pose”), then simply drag it out of its parent folder as you did here.
The reason you split out the Scoreboard like this was so you could add some 3D Text objects to it, to show the earned points and remaining time. This is not mandatory but rather an choice for aesthetics and organisation. Doing so helps (visually) de-couple it from the rest of the scene and gives you the choice of creating a prefab (which we will talk about later) that you would use if you were to create multiple levels.
The 3D Text object is — surprise! — an object that renders text in a 3D environment.
Add a 3D Text object to the scene by selecting the Menu GameObject -> Create Other -> 3D Text. This will place a new GameObject called New Text into your scene.
Rename this 3D Text object to Points and drag it into your Scoreboard object. Next, associate the scoreboard font with the 3D text by performing the following steps:
Drag the Project\NothingButNet\Fonts\Scoreboard font to the Hierarchy\Scoreboard\Points\Text Mesh\Font property
Drag the Project\NothingButNet\Fonts\Scoreboard\Font Material material to the Hierarchy\Scoreboard\Points\Mesh Renderer\Materials\Element 0 property
In the inspector for the 3D Text, set the default text to “0000″ and the alignment to right middle aligned. Then use the Scene panel to position the font on the right spot on the Scoreboard. Note you may have to rotate the text to get it to show up right – for me, my settings were X=0, Y=0, Z=2.8, Rotation X=270, Y=180, Z=0.
Now perform the same step for the Time text by duplicating the Points text using Cmd-D and positioning it slightly below. Name the duplicated object Time and set the default text to 00:00.
In the end you should have something that looks like the following:
Turn the Lights On
Have you noticed that the scene appears pretty dark? That’s because you haven’t added any lights to the scene, so let’s light it up!
Note: There are some considerations to be made when adding lighting to a scene. Adding lighting to a scene comes at a rendering cost. If you have done any Shader programming in the past, then you understand the additional effort to support the rendering of dynamic lighting. Each light requires each rendered object to calculate the final lighting effect depending on the Shader/Material being used, and has a high computational cost.
If at all possible, “bake” all the lighting details into the texture of the object before rendering. Baking is a way of rendering the textures with a static lighting effect applied, so that no additional computation is required to get the same visual effect. Also, use the scene’s ambient light to control the lighting intensity; this can be accessed via the Edit -> Render Settings panel.
In your simple scene, you will add a light. Select GameObject -> Create Other -> Directional Light to add a new directional light GameObject to your scene that will brighten everything up.
A full discussion about lighting is out of scope for this tutorial, but a directional light influences the whole scene depending on where you direct of the light by rotating the Directional Light
GameObject. Select the light and use the move and rotate tools in the Scene panel to experiment moving it in different positions.
Camera Position
Now turn your focus (pun fully intended!) to the correct positioning of the camera. Camera positioning is not a science, but rather more of an art. Play the part of the director, and drag the camera into place using the movement and rotation tools in the Scene panel.
You can use the preview available in the Game panel directly below the Scene panel where you’re doing your scene building. As well, you can make use of the little preview window that pops up when the camera is selected in the Hierarchy view.
Next, in the you should update your Game screen dimensions to iPhone Wide 480×320, via the dropdown in the upper right of the Game panel. If you do not see this, go to Unity\Build Settings, and switch your platform to iOS. At this point, you should have a view similar to the one below:
Your scene is looking pretty good, isn’t it? Feel like a real director yet?
Unity Physics: Colliders and Bodies
It’s time to add Components to your Scene’s GameObjects so that they can react to each other!
Your goal is to have your objects react to each other when they collide. Luckily, Unity contains a fully-integrated physics engine and has packaged it up into a suite of Components that can easily dock onto your GameObjects.
Before you add ‘physics’ capabilities to your objects, you’ll need to first take a look into what ‘Physics’ means in Unity.
Click on the Components -> Physics menu (top toolbar) and have a quick look through the types of components readily available to you.
Colliders define the physical dimensions of your object, which can be independent of the visual shape of the object. In general, the colliders are ordered by complexity, and the more complex the object, the performance cost of using these objects rises.
Where possible, use Box/Sphere to encapsulate your objects, as these Colliders have the least computational load for your application. The other common Collider you’ll use frequently is the Mesh Collider. This uses the 3D model’s mesh to define the boundary of your object. In this case, the visual dimensions will equal the physical dimensions.
In addition to physically colliding with other objects, a Collider can be set up as a trigger that can detect collisions (so you can make something happen programmatically), but not actually cause any collision responses. This will be useful so you can detect when the ball goes through the basketball net.
In order for objects to react, each object must have some form of body in addition to a collider. This is done by either adding a Rigidbody or CharacterController to the GameObject.
The best way to get comfortable with Physics is to play around – let’s make that basketball bounce!
Bounce that Basketball!
Select the basketball, and add a Rigidbody onto it by selecting Component > Physics > Rigidbody. Then hit the Play button in the upper center of Unity to preview the gameplay – you’ll see the basketball fall below the floor.
If your basketball “warps” to the middle of the scene when you click play, select the basketball and unclick the Animation checkbox in the properties and try again. It should stay in the right spot now.
But it wouldn’t be much of a game if the ball was allowed to fly out of the scene! :] You’ll need to create a set of boundaries that will constrains the ball to the playing area.
To do this, select the scene.Wall object and select Component > Physics > Mesh Collider. Repeat for the scene.Ground and scene.Background objects. Then select the scene.court object and select Component > Physics > Box Collider.
If you play the scene again, you’ll see that it still falls through the floor. This is because you still haven’t set up a collider for the basketball!
So select the basketball and go to Component > Physics > Sphere Collider to set up a sphere collider for your basketball. It will default to the right size, but you can change the radius if you want in the Inspector’s Sphere Collider section.
Along with the ball reacting to the environment, you’ll also want it to bounce when it collides with an object. To do this, you’ll need to assign a special type of Material that Unity provides called a Physic Material.
Where Materials affect how objects look, Physic Materials determine how the object behaves when a collision occurs. This is associated with the Material property of the GameObjects Collider component.
The following image shows the properties of the Rigidbody attached to the basketball:
On the Project panel, select the Create dropdown menu and then select Physic Material to create a Physic Material , and name it BallPhyMat.
Now set the properties of the Physic Material as shown below. Details on the function of each of the properties shown below is out of scope for this tutorial, but further information can be found at http://docs.unity3d.com/Documentation/ScriptReference/PhysicMaterial.html.
In order to allow the ball to bounce, friction is set fairly low.
To associate the newly created Physic Material to the basketball, select the Physic Material you just created and drag it to the to the basketball’s Collider material property.
Click the play button again, and this time it falls to the floor and bounces, w00t!
As for the hoop, you want it to react to the ball as well as detect when the ball goes through the net. Add a Mesh Collider to the hoop mesh (hoop.LeftHoop).
Also, you want to set up a sensor or “trigger” to detect when the ball goes through the hoop. To do this, add a Box Collider to hoop.LeftHoop_001, but shorten the box and position it so it’s just below the net (you can do this by tweaking the values in the Inspector – I changed Center Z to -1.4 and Size Z to 0.2). Also, click the checkbox to set the trigger property to true.
Note: to visually resize colliders using the mouse, select the collider’s object and hold down Shift. This will show the handles of the collider, allowing you to resize it using the mouse.
Okay! That takes care of the ball — time to take a look at the Player object!
Meeting the Team
In this game, we want the player to bounce the ball and for the ball to not roll through him. Stopping the ball rolling through the Player is easy enough; go ahead and add a Capsule Collider to the player GameObject.
You’ll then need to position and size the capsule – I changed the height to 3.8 and the Center Y to 1.8.
Note: Colliders are shown in the Scene panel in a green outline — unless they are Mesh Colliders , in which case it’s the mesh that shows the collision boundaries.
The approach used to bounce the ball requires that the game can detect when the ball collides with the player’s hand. When this occurs, you will push the ball back down to the ground, just like it happens in real life! To attach the collider at the correct position, you’ll drill down to the player’s skeleton and add the collider to the hand which will be used to bounce the ball.
The above screenshot shows you the children of the player GameObject. Where do these children come from? Good question!
These children form the skeleton built to animate the player – the parent is the pelvis which also has the Skeleton Mesh Renderer component attached to it, which is responsible for rendering the mesh,. The children are the bones of the skeleton which were built in Blender. ArmIK_L, ArmIK_R, LegIK_L, LegIK_R are just handles used in Blender and have no function in your app.
Now add a Box Collider to player\BPlayerSkeleton\Pelvis\Hip\Spine\Shoulder_R\UpperArm_R\LowerArm_R\Hand_R and resize the Collider similar to what is shown below, and set the trigger flag to true.
Prefabs — and how to Take Advantage of Them
This section is just an optional note that may be useful for you later – feel free to skip if you need a break!
A game app normally consists of a lot of objects that are identical but are used multiple times. For instance, you may have created a city using the same building over and over again. An efficient way to do this is to create a master template which you can reuse over and over again. As well, it gives you the advantage of being able to update all of the objects by simply updating the template.
Unity provides the ability to do this through the use of Prefabs. Prefabs allow you to create one master copy of an object and create multiple identical copies of it. However, even if you don’t want to create multiple copies of your object, it still provides an efficient way of creating and managing a setup for each of your game objects.
To create a Prefab, you can either just drag over an object from your Hierarchy panel to your Project panel, or you can explicitly create a Prefab via the Project dropdown and then drag the object(s) from your Hierarchy panel into this object.
Now each time you want to create another object from this template, you just need to drag the Prefab over to the scene. Very easy — and very useful!
Note: to make an update to your Prefab, just grab any Prefab of the type you’re interested in, make your updates, and then select the Game Object -> Apply Changes To Prefab option from the toolbar menu. The changes will automagicall propagate to all associated objects!
Where To Go From Here?
Congratulations, you made it! You’ve gotten through the hardest part – getting used to the Unity GUI as a complete beginner – from here on out it will be smooth sailing.
Here is a sample project where we have left it off in the tutorial so far. To open it in Unity, go to File\Open Project, click Open Other, and browse to the folder. Note that the scene won’t load by default – to open it, select Scenes\GameScene.
So far, you have explored how GameObjects can contain children and their children live in their space (in terms of pose). You looked at Lighting concepts and Colliders , and associated Physics concepts with your objects. You also added a Physic Material to the ball to influence how it reacts when a collision occurs, as well as seeing how Colliders can be used as triggers or by the physics engine.
And that’s it for the first part! In the next section of this tutorial, you’ll bring your scene to life with interactivity and animation. That will happen when you’re introduced to Scripting.
Until next time!(source:raywenderlich)


