以好莱坞式剧本方法解析游戏关卡设计(2)
作者:Babak Kaveh
在这系列文章的第一部分我讨论了好莱坞式故事原则,以及如何将这些原则用于关卡设计中。接下来让我们移向下一环节:
《TF2》的玩家职业
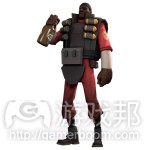
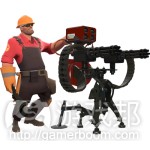
在开始设计地图前,我们需要清楚设计对象,也就是《TF2》中的玩家类别。每种类别都有其优势与劣势,同时他们还必须同时扮演好攻击者与防御者的角色。即使玩家不得已改变类别,他们也必然拥有自己最喜欢且表现最出色的类别,而如果我们所设计的地图能够在各种不同阶段帮助所有类别的玩家,它必然会大受欢迎。
以下是《TF2》中的一些玩家类别,以及这些类别对我们关卡设计的影响:
喷火兵:擅于近距离埋伏敌人,在狭窄的隧道以及封闭和开放领域的转化过程中找到/杀死间谍。但如果出现在开放领域时他们便很容易被杀死。(环境=狭窄的走廊/隧道)
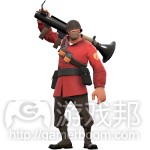
士兵:擅于攻击上方的目标,特别是那些难以触及的目标。在中距离进攻(即位于开放领域并面对着敌人的退出点)时,他们总能发挥出最强大的攻击力。但是在近距离范围或远距离范围(游戏邦注:即在一个没有任何障碍的开放领域与敌人进行一对一较量时)时,他们的攻击力就会变得较弱。当医师隐藏在士兵周围时将对敌人造成致命的伤害。(环境=面对敌人的退出点的开放领域,或者是在高地)
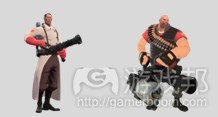
医师/保镖:擅于通过隐藏而近距离杀死敌人,同时也能够治疗保镖。是狙击兵和火箭的主要目标,并且因为速度较慢所以很难躲避各种攻击。因为总能够吸引间谍的注意,所以在一些潜行区域非常不利。而比起攻击,保镖更擅于防守(因为移动性较不足)。(环境=医师的保护区靠近敌人所在领域)
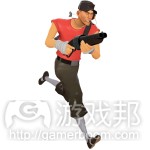
侦查员:当他们在空中巡视敌人时擅于采取侧面攻击和快速捕获方式——这也能够帮助他们快速攻击与撤退。同时侦查员还擅于在全方位领域行动,因为在此他们总是能够快速追上敌人。但如果他们必须在普通路线上执行任务,或被敌人保镖和喷火兵所包围时,其优势便不复存在。(环境:能够在各种不同的高度平台上自由行动)
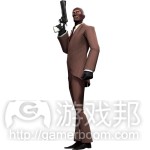
间谍:通常都因此在开放领域的角落或间隙中。擅于深入敌后,或面对一个单独的炮塔。但是如果面前出现2个以上的炮塔,或者不存在隐蔽处的开放领域,他们也就没辙了。(环境:拥有许多可躲藏空间的开放领域)
爆破兵:擅于在出口/入口处设置陷阱杀死单位。当他们成功躲避敌人并获得分数后,陷阱便能派上用场。除此之外还擅于将手榴弹投进窗户里或防御处的角落,从而成功防御敌人的进攻。但是在开放领域,爆破兵便不是狙击兵的对手,并不能像在近距离进攻,或像侦查员那样击退单位。
狙击兵:总是隐藏在窗户或障碍后面而面向更广泛领域或远处的敌人出口。但是狙击兵不善于近距离战斗。(环境:带有窗户的房子,并且能够看到开放领域)
技师/哨兵:为了躲避手榴弹而隐藏在道路的90度角方向中。但是如果在没有弯道的开放领域或狭窄的隧道内,他们的行踪便会被藏在房间里的间谍所捕获。(环境:可防御的90度角弯道内)
现在我们便清楚每种类型的角色所适合的环境。我们同样也会使用这些分类去增强或削弱攻击者或防御者的位置(即当我们想要优化叙述层面时)。
综述
我们的叙述将被用于单一的《TF2》关卡vs.包含相关关卡的地图(就像在最初的“淘金热”地图那样能让玩家循环通过)。每个转折点都将标记一个“检查点”。每个检查点将在旅程初始时告诉他们新阶段的开始,因为我们的叙述转折点是等间隔的,所以很容易将其均衡地用于检查点中。除此之外,阶段一(背景)和阶段六(结果)将分别发生在友好的一方(攻击者)和敌对一方(防御者)基础上,并且游戏规则也明确定义了这一点,所以我们只要遵循一些简单的实践便可,而无需花太多时间为它们设计关卡。以下我将分别描述各个叙述阶段。
阶段1:背景
这时候攻击者还未开始战斗。他们能够选择类别,加载弹药,并了解场地等等,就好像英雄的日常生活。唯一需要记住的规则便是为攻击者提供多个出口,帮助不同类别的攻击者进行快速分组。就像在我们的例子中,攻击者便拥有3个出口。主要出口(B)便很宽广,不存在防御物——对于驾驭重型车辆的攻击者来说这也是最近的出口。而出口(A)设有突出物能够掩护攻击者顺利离开。出口(C)是一个受保护的出口,远离可能出现在出口(A)后面的哨兵。而(D)出口将引导着攻击者前往瞭望塔,让他们能够透过窗户观察狙击手的位置。但是当(D)出口的大门敞开时,敌方士兵将很容易进入其中。
在倒计时后,当大门敞开时转折点便会出现,就好似英雄的生活突然发生改变,而战斗也紧接着爆发了。
阶段2:新形势
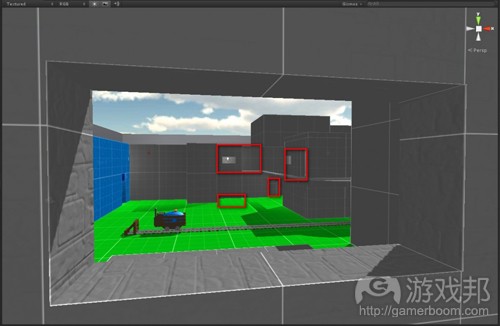
当玩家进入一个新形势时,我们想要创造敌人与环境的互动。这一阶段将为之后的几幕场景确定基调。为了让攻击者能在这一领域中探索,我们需要创造一些隐蔽处让敌人能够躲藏——但是我们不能让敌人完全控制整片领域。所以我们最终决定让敌人从(E)点前进到(H)点,因为这是最佳开火和伏击位置。这些点是专门用于引诱敌人,并且这里已经埋伏了哨兵,但是攻击者也很容易征服这些敌人——因为它们刚好是面向于攻击者的射击线上。就像我们所看到的,攻击者可以从(A)点看到所有敌人的设置点。
因为新形势是很好理解且很容易克服的挑战,因此我们拥有一个直线领域,并且攻击者可以在此轻松穿越至第一个检查点(=转折点),这便是所谓的“计划变更”。
“计划变更”转折点便是英雄做出选择或受驱动而转向可行目标的时刻。因此我们可以在此做出首个关卡决策,所以现在形势将从有趣的阶段2转向充满挑战且需要做出艰难决策的阶段3。
阶段3:前进
这一阶段是关于起起落落。我们的英雄遭遇了挑战,他们正面临着最激烈的时刻。在面对新形势的冲击后,他们为自己的未来制定了计划,并开始朝着这一计划前进。为了推动玩家去制定计划,我们需要提供给他们一些重要的选择。
以下是我们的做法:
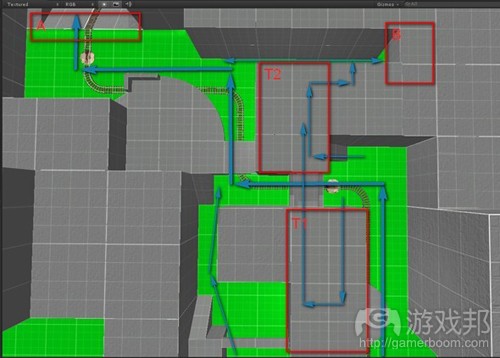
*路径的选择:攻击者将选择是否待在主线上,清除建筑(T1)或移到建筑(T2)。如果他们在(T2)便能够选择是否离开并进入隧道(B)或直接离开凸起的地道而转向(T2)的左边位置上。
*职业的选择:该领域是为了转折点(游戏邦注:即标志着英雄前进道路上的起起落落),首次埋伏点(T1,T2以及角落)以及为敌人而设置的防御点所设计的。攻击者在此遇到他们的首次挑战,并且如果他们是狙击手或保镖,便需要在此转换职业,因为他们的“视距”优势已不存在了。
我让敌人能够穿越隧道(B)快速到达冲突点(PoC),并在此铲平团队。这一设置能够让攻击团队意识到是时候制定防御计划了。
阶段3以“只能进不能退”的(A)点结束,我们希望能够让英雄(攻击者)感受到他们已经离开基地并将进入一个全新背景,他们需要在此做出艰难的决策。在战争电影中,英雄将会与敌人同归于尽。而在好莱坞电影模式中,没有回头路便意味着必须做出两个完全不同的决定(游戏邦注:如射击罪犯或拨打911,迎面扑向敌人或逃走,对爱人撒谎或保持忠诚)。为了创造这种差别,我将发生地点从一栋建筑转向阶段2中发生战斗的建筑,再转向另一个环境,让玩家可以选择是穿越隧道(B)而攻击敌人还是通过斜坡(A)而冲向狙击兵。每个玩家都必须在此做出选择,并且他们的选择都具有很大区别,如作为待在广泛领域的英雄vs.待在黑暗隧道中的阴谋者。
阶段4:复杂化
除了改变发生地点,无掩蔽的斜坡和领域将会让攻击者有种“哦,天哪!”的感觉。阶段4将突出孤注一掷的战斗类型。
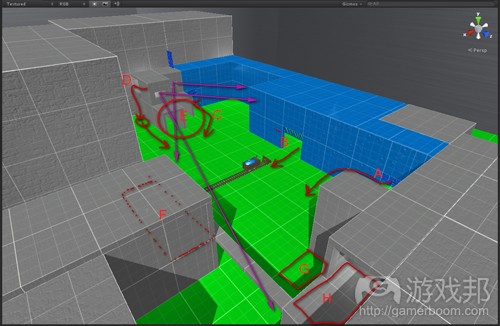
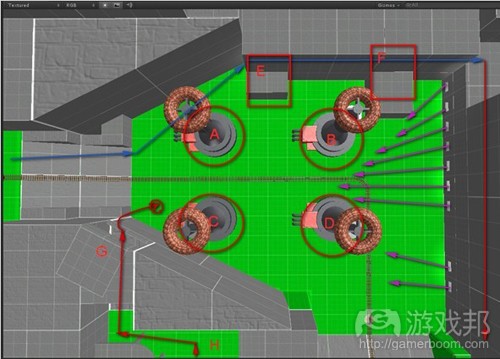
如果玩家选择斜坡,他们的行踪将完全暴露在狙击兵面前。如果他设法到达隧道(E)下方,他将遭遇敌人的埋伏攻击,在此期间敌人将从(G)下方跳出,狙击兵也将通过窗户去射击攻击者的同伴。
就像你所看到的,狙击兵将瞄准斜坡(A)与这条路线沿途的对象。在第一次测试中,我发现攻击者很难在此进行防御,所以我决定添加障碍物让他们能够在此隐藏。线圈也意味着能够让玩家产生“哦,天哪”的感觉的区域。
另一方面,如果攻击者选择隧道,即从(A)到(B),他们必须克服这里存在的一大劣势,即一出去就会遇上敌人的枪口,并且可防御的位置靠近防御者的基地。这两种情况都创造出了“机不可失”的形势。
这一幕结束于转折点4,即“主要的退步”。这一幕的标志性路径便是向上引导的斜坡,即敌人位于更高的位置,能够从侧面进攻英雄。对于那些能够离开隧道并朝着敌人基地前进的人来说,他们前方的建筑物便是最难克服的挑战。就像好莱坞电影所做的那样,我也需要在此添加一些希望,这也是我为何会将狙击兵地道设置在开放领域前面的主要原因。
阶段5:最后出击
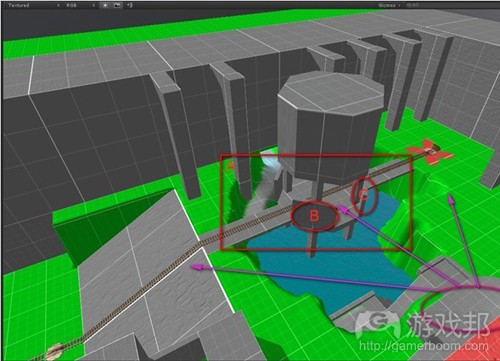
最能代表最后出击的便是桥,因此我便在这一阶段设置了一座桥。我同样也喜欢多层次的战斗战术,让两边的玩家能够通向水里,桥上,更高的建筑以及阳台。在这一幕,敌人非常接近于自己的基地,并且我唯一能够带给攻击者宽慰的便是桥上的防御物(B)与(C),实际上他们已经穿越隧道,并得到桥后面的高塔掩护。而水能够缓解那些被喷火兵烧杀的角色的伤痛,我们同样也需要设置斜坡让攻击者能够离开桥而获得第二次机会。
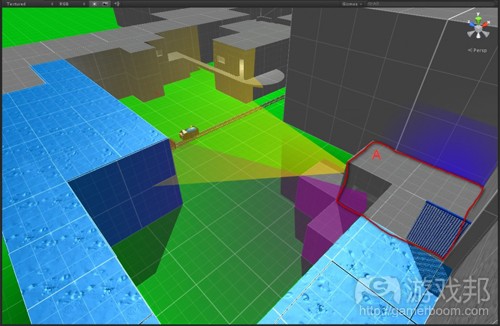
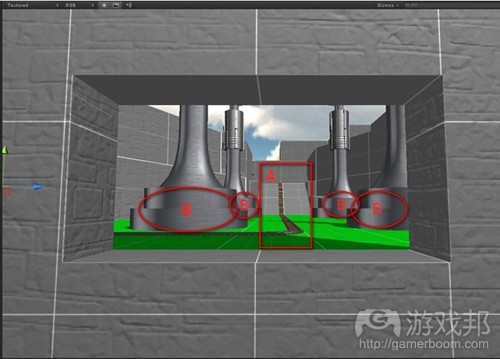
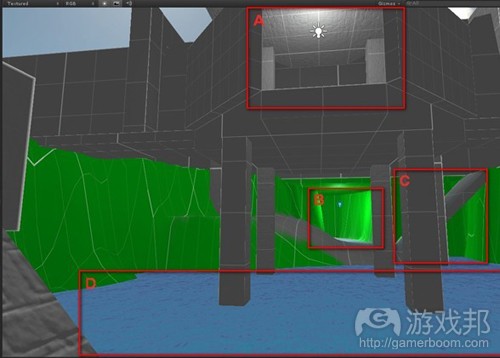
在下图我们可以看到桥的起点(A)是位于敌人基地的视线内;而隧道出口(B)则是源自狙击兵的地道,如此便能让攻击者在此对那些离开基地的敌人发起攻击;斜坡(C)将连接着隧道与高塔,提供给攻击者掩蔽物,水(D)是在桥下。
如果主要攻击者决定穿越隧道而发出最后一击(能让他们快速进入最后的PoC),他们就需要控制(B),(C)和(D)点,并让驱车的伙伴能够爬上桥。
这一阶段是在转折点5“高潮”结束,即靠近我们叙述的结尾。这时候敌人拥有所有优势,而攻击者将做出各种牺牲去击退敌人。而当攻击者顺利过桥后,我们便来到了阶段6。
阶段6:结果
在桥的中间点,攻击者需要一些掩护,并且他们离最后的检查点只有几步之遥了。我尽量确保这一距离较短,从而不会夺去他们在中间点战斗的光彩。如果攻击者能够成功走到最后检查点,他们便能够炸毁后退的敌人并获得最后的胜利。
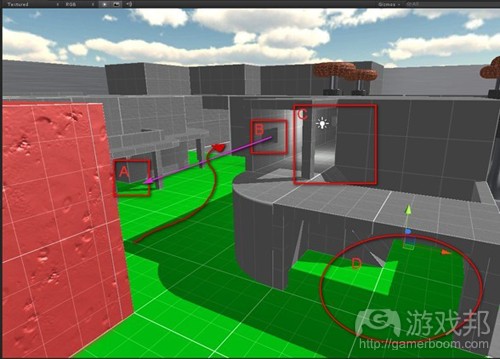
最后我还想提醒你们的是,与攻击者基地一样,防御者的基地也需要多重出口,而因为防御者基地非常靠近PoC,所以我让攻击者能够在桥的中间点(B)看到领域(D)和(C),并通过主要保护出口(A)快速进入这两个领域。
结论
正如你们所看到的,我便是通过使用容易理解的象征物(游戏邦注:弯曲的路径,暴露的领域,上下斜坡,桥,秘密隧道等),控制攻击者团队的挑战/缓解关卡,在特定点上提供各种选择类型,并控制攻击者经历每个关卡与到达转折点的时间而呈现出了好莱坞式电影所具备的6个阶段叙述过程。
游戏邦注:原文发表于2012年11月8日,所涉事件和数据均以当时为准。(本文为游戏邦/gamerboom.com编译,拒绝任何不保留版权的转载,如需转载请联系:游戏邦)
The Hollywood Screenplay Approach to Designing Game Levels: Part II
By Babak Kaveh
In part I of this article I discussed the six-stage Hollywood storytelling formula and how it can be applied to level design. I also promised to show you a practical example in the form of a TF2 Level. If you want to play the level before accompanying me through the design process go ahead and have a look.
If you can’t play the level you might have to get the latest Unity 4 web player plugin for Mac or PC. You will need at least version 4.0.0f5.
Zzzzz…
Glad to see you are back! Now the boring/educational part:
TF2 Class Rundown for Level Designers*
Before we start designing the map, we need to remember who we are designing it for, namely the player classes in TF2. Each of these classes has their strengths and weaknesses, and they all must be catered to both as attackers and defenders. Even though players do switch classes when they have to, they also have favorite classes that they play well (or think they play well) and a map that allows all classes to be utilized in interesting ways at different stages will be popular with players.
Here is a quick rundown of the classes in TF2 and how they affect the design of our level:
Pyro: excels at ambushing groups of enemies at close range and finding/killing spies in narrow tunnels and in closed to open area transitions. They are easily killed in wide open areas. (Element = Narrow Corridor/tunnel)
Soldier: excels when above target especially when hard-to reach or see perches are available. Most powerful at medium ranges and when standing in an open area that faces an enemy exit point. Is weak at close ranges or very long ranges and when fighting one on one in open areas without obstructions. When a medic can hide nearby the soldier can cause havoc on enemies with splash damage (Element = open area facing an enemy exit or when on high-ground)
Medic/heavy: excels in killing enemies at close range when medic can hide while healing heavy or if close to a cart and where the heavy faces a narrowly spaced group of enemies. Is a large target for snipers and rockets, and is slow so cannot really duck. Also draws spies like dung draws flies so is very weak in tight sneaky areas. Heavies are generally better for defense (due to low mobility) than attacks, unless they are ubercharged of course) (Enemy funnel next to protected area for medic)
Scout: excels at flanking and fast surprise captures when aerial access exists to go around enemy defenses – this also enables them to do quick hit and runs. Scouts do well in multi-level areas and places where they can outrun enemies around corners. When they have to take the common routes or when enemy heavies and pyros are around scouts are easy canon-fodder. (Element: exploitable height-differences and bends that allow loss of LoS)
Spy: excel in open areas with nooks and crannies they can regenerate in. Excel at getting behind enemy lines or to where only one turret can stand. Very weak against two or more turrets, tight spaces, and open areas with no hidden nooks. (Element: areas with lots of rooms)
Demoman: excels at killing units at entrance/exits (especially exists) with sticky traps. Traps also come in handy when defending enemy gather points. Excels at lobbing grenades into windows or around corners of defensive positions which makes him excellent at defending choke points. Demos fail in wide open areas against sniping and are weak against fast units like scouts or at very close range. (Element: Mazes/Corridors/cave funnel exits)
Sniper: excels when hiding behind windows or obstructions, and facing a wide open area or an enemy exit at large ranges (Generally you should not give them LoS towards narrow exits). Spies are weak in close combat or when spies have alternate access to their perches. (Element: windowed rooms with good LoS on open area)
Engineer/sentry: Dominate area when hidden behind 90 degree angle in path and if defended against grenades. Defenseless in open areas or narrow tunnels when there is no bend or in areas that are easily accessible by spies (backdoors). (Element: defensible 90 degree bends)
Now that we know which elements each class excels at we will give them access to ample opportunities to use those elements. We will also use this knowledge to weaken or strengthen the positions of attackers or defenders when needed to drive our six-stage Hollywood inspired narrative.
Overview
Our narrative will be applied to a single TF2 level vs. a map consisting of related levels that players cycle through as in the original ”Goldrush” map. Each turning point will be marked by a “checkpoint”. Checkpoints provide a perfect symbol to signal to the players that a new stage in their journey has begun, and since our narrative turning points are evenly spaced, it is easy enough to adapt them to be equivalent to checkpoints. Additionally, Stage one and six which are the setup and the aftermath will happen inside the friendly (attacker) and enemy (defender) bases, respectively, and they are clearly defined by the game rules, so we will not spend too much time designing the level for them, other than following simple best-practices. So here is the breakdown into narrative stages
Stage 1 – The setup
Here the attackers haven’t started the fight yet. They are allowed to pick classes, load their ubercharges, overcharge, get acquainted, taunt, and generally be silly. This is the perfect analogue to the every-day life of a hero. The only rule to remember is to provide multiple exits for the attacker base that provide quick break-out opportunities for the different classes. In our case our attackers have three exits. The main exit (B) s wide and provides no protection – it is also the closest exit meant for heavies and ubercharged attackers. It is also the closest point to the cart. Exit (A) allows for support classes to exit somewhat protected by the protrusion. Exit (C) provides a protected exit further away from the possible sentry gun that might be behind the protrusion at (A). There is also a protected exit that leads to the watchtower at D which also provides a good overview of the field to snipers via windows. Though enemy soldiers can rocket-jump into (D) they won’t stand much of a chance when the gates open.
Turning point 1 “the opportunity” happens when the gates open after the count-down. Again a perfect metaphor, as the life of our heros now suddenly changes and battle ensues.
Stage 2 – The New Situation
As soon as players break out into the new situation we want to create a complex interactions with enemies and the environment. This area will set the tone for the future stages. In order to allow attackers to explore the area above all we need nooks and crannies where enemies can hide – yet we cannot give the enemies full territorial control. To this end, we will give enemies points (E) through (H) which with seemingly good firing and ambush positions. These points are designed to tempt the enemy to set ambushes and sentries, and yet they are easy enough to overcome because they are open to attacker firing lines. As you can see, from Point (A) attackers will have a great view towards all enemy setup points.
The new situation is generally an understandable and easily overcome challenge, therefore we have a straight track out of the area, and it should be easy enough for the attackers to break through to the first checkpoint (= turning point) which is the “change of plans”.
The “change of plans” turning point is where the hero makes a choice or is driven to the visible goal of story. Therefore we place our first decision point of the level here and now things go from interesting and fun in stage 2 to challenging and requiring tough decision in stage 3.
Stage 3 – Progress
This stage is all about ups and downs. Our heroes are challenged, and they are in the thick of things. This is where, after the initial shock of the new situation, they create a plan for their future and start to work towards it. In order to force players to make a plan we need to provide them with important choices.
Here is how we do it:
Choice of path: Attackers get to choose if they will stay on the main track, clear out building (T1) or move on to building (T2). If they are in (T2) they can choose if they want to exit on the top and enter the tunnel (B) or exit right unto the raised gallery to the left of (T2).
Choice of class: the area is designed to be full of twists and turns (which symbolize the ups and downs of the hero’s progress), and for the first time “real” ambush points (T1 and T2 and around corners) and defendable sentry points for the enemy are introduced. This is where the attackers meet their first challenge and will be forced to switch classes if they were snipers or heavies, etc. as most of their Line of Sight benefits are lost.
I provided the enemy with a quick path to the point of conflict (PoC) through tunnel (B) to even out the teams at this point. This equality will give the attacker team a sense that they have now entered the stage where they need to start coming up with a plan.
Stage 3 ends with the “point of no return” (A) above – we want to make the heroes (attackers) feel that they have left their base behind and are now entering a whole new setting – where they are required to make painful decisions. In a war movie, this would be where the heroes chopper crashes behind enemy lines. In the Hollywood formula the point of no return always poses a painful decision between two contrasting things (e.g. shoot the criminal or call 911, Charge head-on or escape, cheat on a loved one or stay loyal). In order to create this stark contrast I implemented a huge change of venue from the building to building combat in Stage 2 to an environment that gives players a choice of backstabbing the enemy (via tunnel (B) above or charging ahead into sniper territory via ramp (A) above. Each player has to make a choice here and the difference between the choices is a big as it gets, i.e. being a hero in a wide open area vs. a backstabber in a dark tunnel.
Stage 4 – Complications
Besides providing a change of venue, the exposed ramp and area beyond creates a delightful sense of “Oh crap!” in the attackers. Stage 4 forces an all-or-nothing combat style.
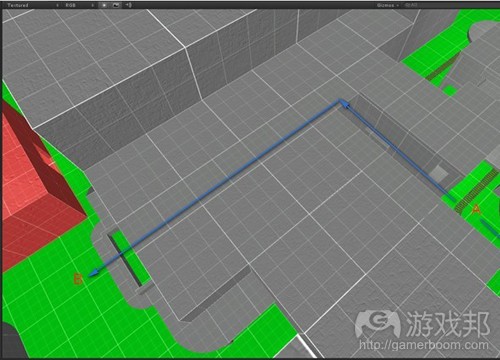
If the player has taken the ramp he will be fully exposed to sniper fire from the end of the field. If he manages to get to the entrance to the tunnel at (E) below he will have to face enemy ambushes to fight his way into the tunnel and to silence the snipers, and during all that time his team mates pushing the cart will be completely exposed to enemies jumping down from (G) below, and snipers through the windows.
As you can see in the image above the snipers in the sniper gallery could be duck-hunting on the ramp (A) and along the track. In my first tests this was just too easy to defend– so I added obstructions (the Tesla coils) where attackers can hide, even if for a short while before pushing the cart forwards. The coils are also meant to add to the “Oh crap!” feeling!
On the other hand if the attackers had taken the tunnel (from (A) to (B) below) they would have had to overcome an extreme disadvantage at the tunnel exit when they faced the enemy machicolations first, and an easily defendable position close to the defender base thereafter. Both cases offer a “now or never” situation.
This stage ends in turning point 4, “the major setback”. For the cart pushers this is symbolized by a ramp that leads upwards and where the enemy has the higher ground and a path to flank them (by jumping down the ledge to the open area. For anyone being able to exit the sneaky tunnels towards the enemy base, the building in front of them will be very hard to surmount. I did need to inject a glimmer of hope as in any good Hollywood movie, and that’s why I connected the sniper gallery in front of the open area via a secret tunnel to an area close to the enemy base.
Stage 5 – The final push
Nothing symbolizes a final push as a bridge does; hence, I went all-out Jungian and jammed a bridge in there. I also liked the multi-level combat tactics that the exit into the water, the bridge, and the higher up buildings and balconies surrounding it allow players on both sides. Here the enemy is very close to his base, and the only comfort, albeit a small one, I could offer the attackers was the shielding (B) and (C) on the bridge and the fact that they have access through the tunnel and further protection from the high columns behind the bridge. The water needs to be there to provide people burned by pyros with some relief and we needed the ramps so attackers blown off the bridge get a second chance.
In the image below you can see the bridge opening (A) which is totally in LoS from the enemy base, the tunnel exit (B) from the sniping gallery which will give attackers relief and a chance to attack the enemies exiting their base, the ramp (C) out of the tunnel that leads behind the large columns that offer cover to attackers, and water (D) under the bridge.
If the major attacker force decided to make the final push through the tunnel (which also provides them with a quick access to the final PoC, the will need to take control of points (B), (C) and (D) below and give their cart-pushing buddies a chance to get on the bridge.
This stage ends in turning point 5 “the climax” which needs to be very close to the end of our narrative. It is where the enemy has all advantages and the attackers by extreme measures and personal sacrifice overcome the enemy. In our level this is the exposed mid-point of the bridge. Once attackers are past it, we get to stage 6.
Stage 6 – The aftermath
After the bridge mid-point the attackers get some cover, and from there it is only a few meters to the final checkpoint. I kept this distance really short, so that the battle for the mid-point is not overshadowed. If the attackers have gotten this far they get to enjoy the fruits of their labor by blasting away at cowering enemies!
Before I finish, I do want to remind you that just like the attacker base, the defender base needs multiple exits, and in this case, since the defender base is so close to the PoC, I also gave it good LoS over the bridge mid-point (B) and quick access to other areas (D) and (C) from their main protected exit (A) as you can see below.
Conclusion
As you see it is entirely possible to lay out the six stage narrative of Hollywood writers by using well-understood symbology (twisting alleys, exposed areas, down/up ramps, bridges, secret tunnels, etc.), controlling the level of challenge/relief for the attacker team, by allowing for multiple types of choices at specific points, and by controlling the duration it will take the attackers to go through each stage and reach the turning points. If you have more ideas on how to control and shape the narrative, without taking away control from the players, or a critique of how the level was lain out I would love to hear from you.(source:gamedesignideas)


