使用Source引擎自制RPG游戏的教程
作者:Ben Evans
如果你想深入了解游戏开发,模仿现成的游戏是一个好办法,可以帮助你了解设计思路和原型制作。在本教程中,我们将利用Valve Software公司的Source引擎(游戏邦注:《传送门》、《Left 4 Dead》、《半条命》和《军团要塞2》使用的也是这个引擎),以《半条命2:插曲2》中的RPG任务作为样板,制作一个PRG模块。
注意,本教程要求你对Source SDK的Hammer Editor和Face Poser工具有基本的了解,所以,这显然是一个中级工程。在学习本教程以前,你应该能够熟练地创建和编译地图、放置实体和设置触发器。如果你想增加自定义对话,你还必须知道如何在Face Poser中创建和保存你自己的场景。如果你从来没有使用过Source SDK工具也没关系,网上有许多免费资源可以教你如何使用。运行这些工具的最低配置要求和玩《半条命2:插曲2》的一样: 1.7 GHz 处理器, 512MB RAM, DirectX 8.1 显卡和 Windows XP系统或以上。你还需要一个可接通电脑的麦克风。
准备工作
在我们开始以前,我们先检查一下必须的东西是否已经齐全。首先,你的电脑上应该安装了《半条命2:插曲2》。我们要利用这款游戏,因为它是最新、最灵活的、使用Source引擎的单机游戏。如果你没有《半条命2:插曲2》,《半条命2》也可以。
如果你想在你的RPG中添加自定义对话,你必须有一些音频编辑软件。Audacity是免费、开放源代码的音频编辑软件,我们将使用它来为我们的模块记录对话。
我们还需要Phoneme Extractor补丁,可以帮助Face Poser在Windows 7/Vista系统下更好地工作。下载补丁后根据安装说明安装好。没有这个补丁的话,组合对话文本串和声音文件的工具将无法工作。
下一步,安装GCFScape。我们可以打开Steam游戏附带的cache文件,这样我们就可以查看并提取其中的文件。我们将使用它提取所需的声音。
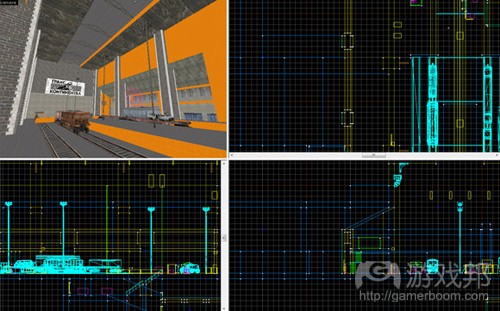
你必须安装Source SDK,打开Steam Client,找到工具选项卡,然后安装。你要有自己的地图;我们将它定为“主地图”。这张地图可以只几间视野宽广的简单的房间。图1是我在教程中使用的关卡的截图,如果你也喜欢,可以自己下载来用。
现在,我们的关卡只是一个粗糙的原型,还没有添加纹理和细节。当你完善关卡时,最好从粗糙的部分开始,慢慢修饰细节。所以,先为你自己的RPG构思一个基本的关卡结构。另外,记住经常保存!Hammer不完全支持某些出现在《插曲2》中的新特征,可能会使你的编辑器崩溃。
概括任务结构
本教程的重点是RPG游戏的任务方面,与经验值有关的角色养成系统完全是另外一回事。我们的游戏关卡中有三个非玩家角色(NPC),每个NPC发放两个任务。我们可以用NPC发放任务、提供信息、与玩家对抗或只是给场景增加“人气”。
为了保证关卡有条理,我们给实体的独立群组使用命名约定前缀,如图2所示。
这样比较方便我们寻找实体,特别是制作单个任务时。例如,给只影响关卡的实体添加Level_prefix,可以让实体固定在某个位置上,不挡任务实体的道。
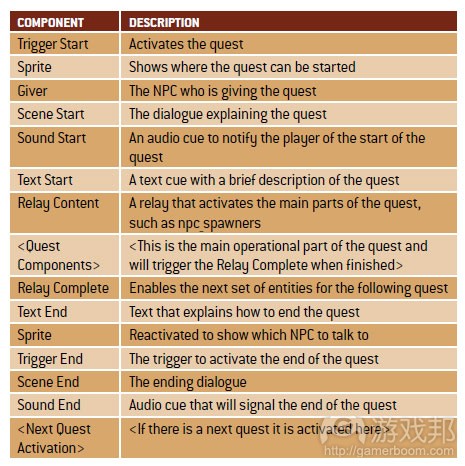
在我们开始制作任务以前,我们得把任务分成更小的部件。图3中的表格按顺序列出了各个任务使用到的部件。注意,列表指的是任务内的实际游戏逻辑和激活任务(如果有)的触发器。
不要担心怎么制作出这么多东西,我们只是列出了我们现在需要的东西。这只是一个任务的列表,所以到我们完成时会有很多实体要记录。为了保证我们的视图(和心思)不凌乱,我们将使用Visible Groups(VisGroups)分隔和隐藏各个任务。你可以用VisGroups定义画笔和实体的群组,快速隐藏或显示群组。当编译地图时,如果VisGroups是隐藏的,那么在群组中的所有东西都会跳过这个编译过程,不会出现在游戏中。这一个用法非常好,因为你可以选择性地查看,这样你就可以专注于选定的对象,而不必受其他东西的干扰。我们在下一步就要用到。
用实例创建任务模板
我们将使用Hammer Editor中的一种叫作实例的工具。使用实例,可以让你的主地图在创建时引用或包含其他地图。我们将制作一个“任务实例”,它将作为其他任务的模板。一旦我们制作好第一个实例,我们就可以很快地复制它,把它放在地图上,调整它的设置作为新任务。我们可以多次使用实例,改变属性后做成其他任务,这样可以节省不少开发时间。这些实例会控制我们的RPG的玩法和逻辑,因为它们会包含游戏中的对话和角色活动。不幸的是,《插曲2》不完全支持实例,所以我们得在编译以前把实例转换成关卡。
为了创建我们的任务实例,我们还要有一个新地图文件。在Hammer中,打开File,创建新地图,然后将其保存为“quest_instance”并放在名为“instances”的文件夹中。这也是你的主地图的保存位置。
图4显示了增加所有必要的实体后的情况。我们会在下面提到各个必要实体。
最好把实现放在尽量接近原始坐标的位置(0,0,0)。我们还要把们放在X或Y轴的顶端,因为当实体导入主地图时,它会跟着func_instance实体,这意味着你可能会看不到地面以下的实体,如果它们的位置太低的话。你可以用顶视图或侧视图查看和确定实体的位置。如果有必要,可以使用Selection工具把它们放置在X或Y轴之上。实例中的所有实体都带有实例的前缀。我们要把触发器留到最后,直到放置好所有实体并赋好值,所以不要担心我们是不是漏了什么东西。
我们需要所有图3中列出的实体。我们从放置NPC开始吧。用Entity Tool选择,从下拉列表中找到npc_citizen,将其放在原始坐标处。这就是我们的任务发放者。点击Alt + Enter打开他的属性,命名为“giver”。另外,将“禁止捡起武器? ”设为Yes。点击Apply然后找到他的Flags面板,确认Not Commandable,否则任务发放者会跟着玩家到处跑。我们还要启用“禁止丢弃武器和忽略玩家的推动”(不要给玩家让路)。
下一步,我们需要一个告诉我们玩家什么时候接近任务发放者的触发器。创建一个笔刷,规格为64单位高、32单位宽、4单位高,然后把它放在NPC前面。我们要将它的纹理改成“nodraw”,这样它就会在游戏出渲染出来了。改变纹理,只要选择笔刷,切换到Toggle纹理应用工具,点击Browse按钮,过滤,双击nodraw纹理,最后点击Apply。然后将触发器绑定到实体上,方法是键入Ctrl + T并从类列表中选择func_button。我们将其命名为“trigger_start”,然后将其速度变为0。最后点击Apply,保存刚才做的调整。
再接着,增加提醒玩家NPC有任务的精灵。将env_sprite实体放在NPC的头部上方,键入Alt + Enter打开对象属性窗口,命名为“Sprite”。我们还要改变渲染模式,这样精灵才能在游戏中正确地渲染。在对象属性窗口中,找到Render Mode选项框,从下拉菜单中选择World Space Glow。你可以在这个菜单中改变精灵的形像,如果你自己有一个想添加到游戏中的精灵形象的话。但现在,标准的精灵形象就可以了。另外,确保Flags选项卡上的Start on已查看。
现在,我们将添加一些对白。在实体列表中找到logic_choreographed_scene,然后将它放在NPC旁边。每个NPC至少需要两个,一个用于开始对白,另一个用于结束对白,所以用第一个复制粘贴出第二个就可以了。命名其中一个为scene_start,另一个为 scene_end。我们现在还不添加真正的对白。这部分内容之后再说。
我们还需要用声音通告玩家已接受任务以及任务开始。创建一个ambient_generic实体,放在NPC附近,命名为sound_start。如果你没有其他的选择,就使用elevbell1.wav,方法是将“plats\elevbell1.wav”输入声音名称字段。然后找开Flags选项卡,确保所有的三个选择都查看了。
之后,我们要添加向实例解释任务的文本。添加两个独立的game_text实体,然后分别命名为“text_start”和“text_end”。要把Hold Time的值设置得高一点,如99999,这样信息不会消失,除非实体死亡。我们还希望文本出现在屏幕的旁边,这样才会阻挡玩家的视线,所以要将两个game_text实体的X和Y字段者设为0.1。Text_start是在任务期间显示的信息,text_end则是在告诉玩家返回任务发放者处或某个区域的信息。
我们需要一些回复使触发器更加有条理。当回复被触发时,它就会激活其他实体。关卡设计师用它来保存在同一个地方同时发生的触发事件,可以把它设置为开启或关闭。创建两个logic_relay实体,放在NPC旁边。将它们分别命名为“relay_content”和“relay_complete”。这两个回复会激活这个任务中的所有实体。任务的细节需要你自行补充完整。你必须设置一个可满足的条件,如“到达某地点”或“收集某个数目的某物品。”你可以用实体如math_counters或笔刷实体如trigger_once来检验条件是否满足。如果这些实体发现条件已满足,它们就会激活我们已经设置好的relay_complete实体。relay_complete实体之后会激活任务的最后需要运转的所有实体。请确保当你的任务环节完成时,“relay_complete”被触发。
现在我们需要给关卡添加声音通告。添加另一个ambient_generic实体,命名为“sound_complete”,为它设置能指示任务完成的声音,如铃声或收银机声。为了方便,我们再次使用“plats\elevbell1.wav”。
我们还要在NPC前面再添加一个触发器,跟我们刚刚完成的那个开始触发器一样。所以只要复制粘贴 trigger_start,重新命名为“trigger_end”,记得查看Flags选项卡中的Starts locked。确保一个触发器不会将另一个覆盖掉,在顶视图和侧视图中将trigger_start放在前面。另外,请确保两上触发器都在NPC的点击框的前面,否则游戏将不能分辨你选择的是触发器还是按钮。检查点击框的位置,选择NPC时,应该出现一个黄色边框的边界框。
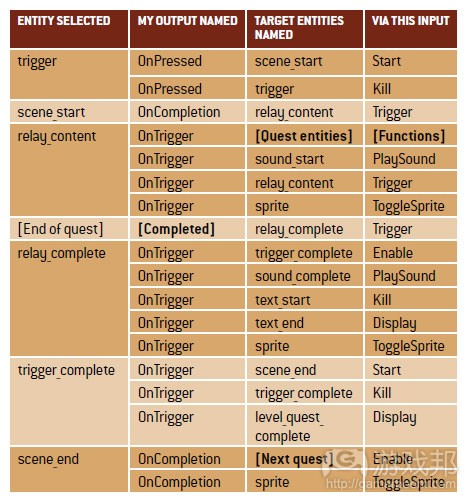
我们要设置图5中的所有触发器。你现在不必担心方括号中的触发器,因为我们之后才会添加它们。选择列出来的实体,打开它们的对象属性,找到输出选项卡,将已设置好的输出添加到各个实体中,请参考下图。记得点击Apply保存各个输出!
这就是设置任务实例的方法。现在我们可以把这个实例放进在地图上的不同地方。基本上,我们的实体就是一个基本的任务模板,我们可以轻松地修改和添加新的元素。
放置实例
现在我们已经设置好实例,在主地图的不同地点上添加实例的复制版后,我们就可以开始设置实际的任务了。将一个func_instance放在第一个任务开始的地方。打开它的对象属性窗口,在VMF Filename下找到quest_instance地图文件(注意查找起来可能有些麻烦,所以你可能得自己在相对文件路径中输入“quest_instance”)。你现在可以复制粘贴这些实体。需要多少任务就复制多少次实例。
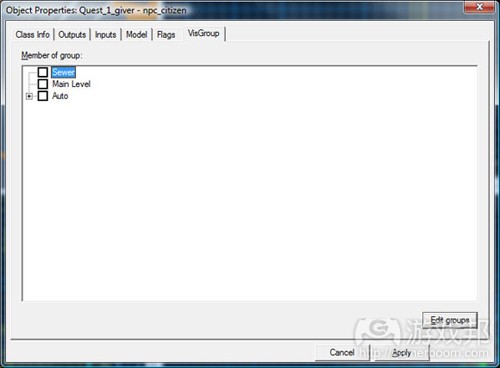
选择第一个任务实例,进行Instancing、Collapse、Selection。之后Hammer会导入所有实体,并给它们添加一个前缀,一般来说是“AutoInstance-”。当一个对象进行Collapse处理后,它就会被选定,所以我们将它们组合进VisGroup中,这样会使任务设置的过程更简单一些。调出对象属性窗口,点击VisGroup选项卡。如图6所示。
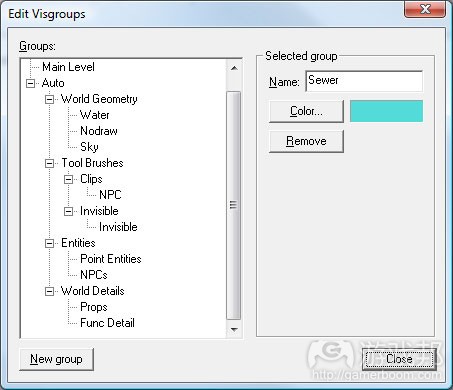
不要担心“sewer”和”main level”实体——我只是在我自己的地图上使用,是为了中断空间,但你不必在你的地图中设置这些。点击Edit groups按钮,如图7所示。
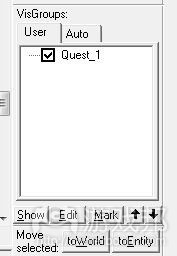
现在,你可以创建新的VisGroup。点击New group按钮,你会看到列表上有一个新的入口。点击并将其重新命名为“Quest_n”,“n”是指任务的编号。完成之后点击Close,你应该能看到新VisGroup的选项出现在主列表中。查看对话框,在那个组中添加实体,点击Apply和Close。你可以点击或不查看VisGroup控制面板,这样就可以隐藏或显示这个群组了。如图8所示。其他任务也按这个步骤完成。
导入声音
我们的RPG如果没有对话叙述剧情将会非常无聊,所以我们要使用Audacity记录你自己的对话。你必须有麦克风。因为Face Poser程序的工作方式,每次只能记录一条名子。用Audacity录音是很简单的。你要做的就是将麦正确设置,点击红色按钮开始录音,结束然后将你的声音保存成.wav文件。如果你有任何问题,请查看Audacity的帮助菜单。当你完成录音后,创建新的文件夹命为“RPG”,并将各条保存成.wav文件的句子放入其中。移动RPG文件夹至C:/Program Files/Steam/steamapps//half-life episode two/ep2/sounds/。将声音保存到声音文件夹上一级的关卡文件夹中是非常重要的,因为不这么做的话,引擎将不能正确读取声音。
接着,我们可以开始创建sound_script文件,这样引擎就能够在编辑器和游戏中引用我们的声音。启动GCFScape,找到File,打开,查找流程序文件夹,打开“episode two content.gcf”。GCFScape载入文件后,我们要找到名称为“game_sounds_manifest.txt”的文件,它在/steamapps//ep2/scripts/ folder中。右击文件,点击Extract,将目录放在 /steamapps//half-life 2 episode two/ep2/scripts中。完成后就可以关闭GCFScape了。
找到脚本文件夹,打开我们刚刚提取的game_sounds_manifest.txt 文件。在这个文本文件中,我们可以看到所有游戏中将会用到的声音脚本,我们得将自己的那份声音脚本放进列表中。在代码的最后一行,在最后一个括号中,添加你自己的条目,如图所示。
现在我们要创建我们将引用的“rpg_sounds.txt”文件,保存目录文件然后关闭。
在脚本文件夹中,右击然后选择New、Text Document。将其重命名为“rpg_sounds.txt”。重命名后,打开并添加如图10所示的代码。
最后一行是将出现在Face Poser中的声音的名称,“rpg _sounds”是前缀,第二部分是名称。你可以按自己的喜好改变命名约定。接下来四行告诉引擎如何处理这些声音,我们不用管这些。最后一行是引擎将载入的 .wav 文件,包含“sound”文件夹的相对路径,位于 /steamapps//half-life 2 episode two/ep2/sound/。你要做的就是将你自己的声音文件放在这个文件夹中,确保文件名称和扩展名与脚本文件中的相匹配。保存后关闭你完成的文本文件。
如果你的系统是Windows Vista或Windows 7,我们还要对Face Poser做一点手脚。正如之前提到的,你必须下载并安装Phoneme Extractor补丁。按照说明重新放置必要的文件。有了这个补丁,Face Poser才能将声音文件和声音脚本正确地匹配到角色动画化之后的音位表情中。注意,Source SDK每一次启动后都会自己更新,所以每一次都要重新安装补丁。是的,这个有点烦人,但总比手动排列音位来得简单快捷。
打开Face Poser后,我们创建一个新场景。在Choreography菜单选项卡下点击“New”,这样就创建了一个新场景。程序会提醒你保存场景,将其命名为你能记得住的名称,然后将它放在/steamapps//half-life episode two/ep2/Scenes/RPG_MOD/中。如果你给它场景加上一个前缀,如“RPG_”,之后会更容易找到。接着,Face Poser会要求你命名你的第一个Actor,将其命名为“!_target”,数字范围是1到8,因为我们在各个场景中只能放置8个NPC。Hammer会用根据这个名称使用你在编辑器中选择的任何一个NPC。我们现在只有一个角色,所以将其命名为“!_target1”。右击出现在Choreography窗口中的Actor名称,然后找到 New、Channel,调出 Create Channel对话框。将这个通道命名为“Audio”。我们需要添加两个通道,所以重复最后一步,然后命名为“Anim”。
现在我们要将这些声音排列出来。在Face Poser屏幕底部的最后一列选项卡中,双击Phoneme Editor后会弹出一个新窗口。点击Load,选择你要给角色添加的.wav文件。载入,文件会在Phoneme Editor中以波形图显示出来。点击Re-extract按钮, Face Poser会提醒我们写出我们选定的声音片段的句子文本。写出文字并点击OK。你输入的文字现在应该被放在波形图的适当位置,所以右击波形图,然后点击Commit extraction,将音位应用到波形图中。如果你点击空格键播放,你应该看到窗口中的Actor的嘴巴活动了。点击Phoneme Editor窗口中的Save并关闭。
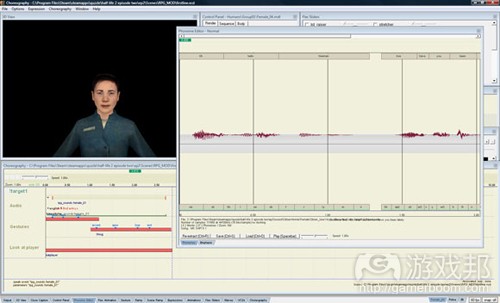
现在我们需要将那个.wav文件应用到角色上,右击Audio channel,然后点击WAV File,查看Show All Sounds。我们需要定位在声音脚本文件中的 .wav文件的声音名称;在例子中,它的名称是“CitizenHomie/FemaleCitizen_Line1-try2 – Processed.wav”,但你应该找到你自己添加的那一个名称。你可以使用文件字段来帮助你找到它。找到后选择并点击OK。这就将它放在声音通道上了。当你播放声音时,角色的嘴巴应该会活动,“说”出对话内容。如图11所示。
如果你想添加动作、表情或其他动画,你现在就可以做了。在教程中,我们不会谈到这些,网上有大量资源可以教你怎么做。注意回到Choreography,点击Save。保存场景后,我们可以将它与NPC组合在一起了。
给NPC添加自定义声音
现在我们在关卡中开启对话。我们要给场景添加在制作实例时创建的scene_start和scene_end实体。点击Alt + Enter打开scene_start实体的对象属性窗口,你会看到一个名为“Scene file”的选项。选择这个选项,然后浏览找到在“scenes”文件之下的场景。我们要将NPC指定到这个场景中,选择Target 1选项,选择在Face Poser中命名好的NPC。点击Apply保存。然后对scene_end实体重复相同的步骤。
我们现在要做的就是触发场景开始游戏。我们要从另一个实体触发场景,例如,你可以使用trigger_once笔刷“On trigger, entities named scene_start, Start”。我们之前设置好的任务实例有两个按钮笔刷,所以只要双击笔刷打开属性面板,然后将Scene File的字段改成你想让NPC演出的场景。
触发事件
为了让RPG运行,我们需要一个允许各个任务知道玩家已经完成某个任务的系统。这样,游戏才可以进展,不会停在半中间。最好的是有一个单一的实体能够在任务完成时执行所有必要的输出。我们用relay_complete实体完成这项任务。
这是任务的例子:
-玩家必须杀死5个敌人。
-每杀死一个敌人,math_counter实体+1。
-当达到最大值5,给logic_relay输出一个触发器。
- logic_relay执行所有必要的输出,如停止敌人刷出、激活任务发放者、激活精灵等。
如果输出多个实体,就会使复杂的地图更令人感到混乱,而使用回复一次性输出,使输出数目少就很清楚了。
设置自动保存
一点小故障就删掉了一个小时的游戏记录,谁都讨厌这样,所以设置一个自动保存功能可以防范于未然。自动保存很容易制作。我们需要的是一个logic_autosave实体。在实体列表中找到它,将它放在地图上靠近另一个逻辑实体的旁边,如环境光照或 auto_logic。放在哪里不是很重要,但最好能和类似的实体放在一起,这样比较好找。我们将它命名为“Global_autosave”。自动保存实体清除来自其他实体的输入,所以我们要将各个任务的最终回复输出成一个触发器,这样自动保存才会保存游戏。在relay_complete中打开Outputs选项卡,添加输出“On Trigger”:通过“Save”这个输入“触发”命名为”Global_autosave”的实体。这就大功告成了!现在,每一次完成任务,游戏都会保存玩家的进度。
游戏结尾
我们的游戏应该有一个结尾。如果只是切换回主菜单,那就太难看了,所以我们要用另一类实体来完成这个任务。创建如图12所示的实体,将其放在关卡中的适当位置,最好是容易找到和记住的位置。
当你完成结尾的核心实体,剩下要做的就是将它们连接到触发器上。打开end_relay 上的output选项卡,创建新输出:On trigger, env_fade, fade, 0 seconds On trigger, end_text, display, 1 seconds, On trigger, point_clientcommand, disconnect, 5 seconds。这会让屏幕渐变为黑色,你的制作组名单会渐入,然后持续几秒后,游戏会用客户端指令使游戏结束。
现在你只需要编译你的地图。编译的过程就是打包所有东西然后制作成游戏可以读取的 .BSP文件。编译时,只要执行File、Run Map。这样Run Map选项窗口就会弹出来,上面有一些不同的编译选项,如编译完成后启动游戏之类的。编译完地图后点击OK就可以了。
任务完成
现在你应该你了基本的工具来完成你自己的RPG原型了。我们已经告诉你如何制作任务、导入自己的对话和使用逻辑增加游戏,所以现在你的工作就是继续测试,完善这些任务、关卡和对话。你可以做出任何你想象得出来的任务,或添加多人合作部分,如协同模式,或者甚至使用其他Valve游戏中的元素制作模型。(本文为游戏邦/gamerboom.com编译,拒绝任何不保留版权的转载,如需转载请联系:游戏邦)
DIY RPG: Make Your Own RPG With The Source Engine
by Ben Evans
If you want to get into game development, modding an existing game is a good way to start exploring design ideas and building prototypes without reinventing the wheel. In this tutorial, we’re going to use Valve Software’s Source Engine (the same game engine that powers Portal, Left 4 Dead, Half-Life, and Team Fortress 2) to prototype a mod with RPG-esque quests within Half-Life 2: Episode 2.
Note that this tutorial assumes you have a basic knowledge of Source SDK’s Hammer Editor and Face Poser tools, so it’s definitely an intermediate-level project. You should be comfortable with building and compiling maps, placing entities, and setting up triggers before following this tutorial, and if you want to add custom dialogue, you’ll also need to know how build and save your own scenes in Face Poser. It’s okay if you’ve never used the Source SDK tools before-there are a ton of free resources online that you can use to learn how to use them. Start with the Valve Developer Wiki which hosts a lot of very useful tutorials and references, and then check out design3 (disclaimer: I am a design3 contributor) for step-by-step instructional videos on the Source Engine. The minimum requirements to run these tools are the same as the requirements for Half-Life 2: Episode Two: a 1.7 GHz processor, 512MB RAM, DirectX 8.1 level graphics card, and Windows XP or newer. You will also need a microphone that plugs into your PC.
Gearing up
Before we get started, let’s make sure we have everything we need. First, you’ll need a copy of Half-Life 2: Episode Two installed. We’re going to use this game because it’s the most up-to-date and flexible Source engine single-player game available for modding. If you don’t have Episode Two, Half-Life 2 will be compatible with most of the elements in this tutorial as well.
If you want to add custom dialogue to your RPG, you’ll need some audio editing software. Audacity is a free, open-source audio-editing application that we’re going to use to record your own dialogue for your mod.
We’ll also need a Phoneme Extractor patch that will help make Face Poser work better with Windows 7/Vista. Download it and follow the installation instructions. Without that patch, the tool that associates dialogue text strings with sound files won’t work.
Next, grab GCFScape. GCFScape allows us to open up the cache files that come with Steam games so we can view and extract the files within them. We’ll be using it to extract audio for our mod.
If you haven’t already, you’ll need to install the Source SDK, so open up the Steam Client, go to the Tools tab, and install it. You will need your own map to work with; we’ll refer to it as “main map.” It can be anything from just a few simple rooms up to a wide-open landscape. Figure 1 is a screenshot of the level I use in this tutorial-if you’d like to use this level for the tutorial, go ahead and download it here.
Figure 1: Our sample level in the Hammer Editor
Right now our level is just a rough prototype that hasn’t been fully textured or detailed yet. It’s always best to start rough and refine the details as you finalize the level, so just come up with a basic level structure to start with for your own RPG. Also, remember to save regularly! Some of the new features in Hammer are not fully supported in the Episode Two version and may crash your editor.
Outlining the quest structure
For this tutorial, let’s focus on the questing aspect of a role-playing game-building a character-progression system with experience points would have to be a completely separate guide. Our game level will have three non-player characters (NPCs) giving two quests each. We can use them to give quests, provide information, fight against the player, or just add life to the environment.
To keep our levels organized, let’s use a naming convention prefix for our separate groups of entities, as explained in Figure 2.
Figure 2: This naming convention will make it easier for you to stay organized.
This will make finding the entities much easier, especially when working on individual quests. For example, adding the Level_prefix to entities that only affect the level keeps them all in one location in the list and out of the way of the quest entities.
Before we start making quests, we need to break them down into smaller components. Figure 3 is a table that lists the order in which the components are used in each quest. Note that “” and “” listings refer to the actual game logic within the quests and the trigger to activate the following quest (if there is one).
Figure 3: The anatomy of a quest.
Don’t worry about figuring out all of this yet-we’re only making a list of what we need right now. This is a list for just one quest, so you can tell we’ll have a lot of entities to keep track of by the time we’re done. To keep our viewports (and minds) uncluttered, we’re going to use Visible Groups (VisGroups) to separate and hide each quest. VisGroups let you define groups of brushes and entities and hide/show them quickly. If the VisGroup is hidden when the map is compiled, everything in that group will be skipped in the process and won’t appear in the game. This is very useful because it allows you to selectively view individual groups of objects by themselves so that you can focus on them without all the other stuff getting in the way. We’ll start using them in the next section.
Build a quest template with instances
We’re going to use a helpful tool known as instancing within the Hammer Editor. Instancing allows your main map to reference other maps and includes them in the build. We’ll be making a “quest instance,” which will be the template for every other quest we add later. Once we have our first instance, we can quickly duplicate it, place it in the map, and tweak its settings for each new quest. We can use an instance many times and change properties to make each one unique in order to save a lot of time during development. These instances will control the gameplay and logic of our RPG because they will contain the dialogue and character actions in the game. Unfortunately, Episode Two doesn’t fully support instances, so we have to convert them into the level before compiling (which we’ll cover when we’re ready to compile at the end of this tutorial).
In order to set up our quest instance, we’re going to need a new map file. Within Hammer, go to File, New to create a new map, and then save the map as “quest_instance” in a folder named “instances” within the same location as your main map.
Figure 4 shows how our quest_instance should look after we add all the necessary entities. We’ll cover those necessary entities next.
Figure 4: Our basic quest instance template.
It’s best to place your entities as close to the origin coordinates (0,0,0) as possible. We also want to have them sitting on top of the X/Y axis because when the instance is imported into the main map it will be oriented around the func_instance entity, which means you might lose sight of entities under the world if they are too low. You can check the location of your entities by using the top and side viewports to determine where they are. If needed, use the Selection Tool to place them above the X/Y axis. Our instance also gives all the entities inside it a prefix of our choice.
We’ll leave the triggers until the end of placing all the entities and leave some values out until later, so don’t worry if it looks like we missed something.
We’re going to need all of the entities mentioned in the list in Figure 3. Let’s start by placing a NPC. With the Entity Tool selected, find npc_citizen on the drop-down list and place it at the origin coordinates. This will be our quest giver. Hit Alt + Enter to open his properties and make his name “giver.” Also change Prevent picking up weapons? to Yes. Hit Apply and then go into his Flags panel and check Not Commandable, or else the quest giver will follow your player around the map. We’ll also want to enable Don’t drop weapons and Ignore player push (don’t give way to player).
Next we’re going to need a trigger that tells us when the player has approached our quest giver. Create a brush that is 64 units tall, 32 units wide, and 4 units thick, and then place it just in front of our NPC. We’ll change its texture to “nodraw” so that it doesn’t get rendered in the game. To change the texture, just select the brush, switch to the Toggle texture application tool, click the Browse button, filter for nodraw, double-click the nodraw texture, and click Apply. Then tie the trigger to an entity by pressing Ctrl + T and selecting func_button from the class list.
Let’s name it “trigger_start” and change the speed to 0. Hit Apply to save the changes we’ve just made.
Next, add a sprite that will alert the player that the NPC has a quest. Place an env_sprite entity above your NPC’s head and open up the Object Properties window by hitting Alt + Enter. Name it “Sprite.” We’re also going to need to change the render mode so that the sprite renders properly in the game. Within the Object Properties window, locate the Render Mode option box and select World Space Glow from the drop-down menu. You can change the sprite image in this menu if you have one that you want to add to your game, but for now the standard sprite will do. Also, make sure that Start on is checked in the Flags tab.
Now we’re going to add some dialogue. Find logic_choreographed_scene in the entity list and place it next to our NPC. We’re going to need at least two of these for each quest, one for the start dialogue and one for the end dialogue, so copy and paste a second one above the first. Name one scene_start and the other scene_end. We won’t add the actual dialogue just yet, but we’ll cover that soon.
We will also need an audio notification that the player has accepted the quest and that it’s begun. Create an ambient_generic entity, place it near your NPC, and name it sound_start. If you don’t already have one you want to use, try using elevbell1.wav by typing “plats\elevbell1.wav” into the Sound Name field. Then go to the Flags tab and make sure all three options are checked.
After that we’re going to add the text that explains the quest to the instance. Add two separate game_text entities and name them “text_start” and “text_end.” The Hold Time for both will need to be a high value, like 99999, so that the message won’t disappear until we kill that entity. We also want the text to be off to the side of the screen where it won’t obstruct the player’s view, so set the X and Y fields to 0.1 for both game_text entities. Text_start will be the message that displays during the quest and text_end will be the message that tells the player to return to the quest giver or a certain area.
We’re going to need some relays to keep our triggers organized. A relay is an entity that activates other entities when it gets triggered. They’re used by level designers to keep triggered events that occur at the same time together in one place, and they can easily be enabled and disabled. Create two logic_relay entities and place them near your NPC. Name them “relay_content” and “relay_complete.” These will be the relays that activate all of the entities in the quest. The specifics of the actual quest are up to you to create for the player to complete. You’ll need to set up a condition for the player to meet, like “get to a specific location” or “collect a certain number of objects.” You can use entities such as math_counters, or brush entities such as trigger_once to check whether the condition has been met. If those entities find that the condition has been met, they will then trigger the relay_complete entity that we’ve set up. The relay_complete will then trigger all the entities needed to run the end of the quest. Make sure that “relay_complete” is triggered when your quest section is completed.
Now we need the audio notification for the end of the level. Add another ambient_generic entity and name it “sound_complete.” Set it to a sound that indicates the quest has been completed, such as a bell or cash register. To keep it simple we’ll use “plats\elevbell1.wav” again for now.
We’ll need to add one more trigger in front of the NPC. This will be the same as the starting trigger we made earlier, so just copy and paste trigger_start. Name this new trigger “trigger_end” and make sure that Starts locked is checked in the Flags tab. Make sure both triggers are not overlapping each other at all and that trigger_start is in front by using your top and side viewports to place them. Also, make sure that they are in front of the NPC’s hitbox, or else the game cannot tell if you are selecting the trigger or button. To check the hitbox location, just select your NPC and a yellow wireframe bounding box should appear around it.
Let’s set up all of the triggers listed in Figure 5. For now, you don’t have to worry about the triggers in [brackets] because we’ll add them later. Select the listed entities, open their Object Properties, go to the Outputs tab, and add the designated outputs to each entity using the table below for reference. Be sure to hit Apply to save each output!
Figure 5: Our trigger listing.
That’s how we set up our quest instance. Now we can take that instance and put it into different places around our map. Right now, our instance is essentially a basic quest template that we can easily modify and add new elements to.
Placing instances
Now that we have our instance set up, let’s add copies of it at different points in our main map so we can start making our actual quests. Place a func_instance where you want your first quest to start. Open up its Object Properties window and under VMF Filename browse for your quest_instance map file. (Note that browsing can be a bit buggy, so you may have to type in the relative file path to “quest_instance” yourself.) You can now copy and paste these entities around your level. Go ahead and duplicate the instance until you’ve got as many quests as you want.
Select your first quest instance and collapse it by going to Instancing, Collapse, Selection. Hammer will then import all the entities and give them a prefix, normally “AutoInstance-”. Everything will be selected when it has been collapsed, so we’re going to organize them into VisGroups to make the quest-building process easier. Bring up the Object Properties window and click on the VisGroup tab. You should see something like Figure 6.
Figure 6: Organize Visible Groups in the Object Properties window.
Don’t worry about the “sewer” and “main level” entries-I’m using them in my own map to break up the space, but you don’t have to have them in yours. Hit the Edit groups button and you’ll see the window shown in Figure 7.
Figure 7: Assign brushes and entities to Visible Groups.
From here you can create new VisGroups to use in your own map. Press the New group button and you’ll see a new entry on the list. Click on it and then rename it using the name field to Quest_n, where n is the number of your quest. Click Close after you’ve done that and you should see the new VisGroup appear as a new option on the main list. Check the box to add entities to that group, hit Apply, and click Close. You can now hide/unhide that group by checking or unchecking it in the VisGroup control panel, as seen in Figure 8. Do this for the rest of your quests as well.
Figure 8: Toggling Visible Groups.
Importing your own audio
Our RPG is going to be extremely boring without any recorded dialogue to convey the story, so we’re going to use Audacity to record your own dialogue. You must have a microphone for this part. Due to the way the Face Poser application works, you’re going to want to record one sentence at a time. Recording audio in Audacity is easy. All you need to do is get your mic set up correctly, hit the red button to record, and save your audio as a .wav file when you’re finished. If you have any problems, Audacity’s help menus have lots of useful information. When you’re done recording your dialogue, create a folder named “RPG” and save each sentence as a .wav file into it. Move that RPG folder to C:/Program Files/Steam/steamapps//half-life episode two/ep2/sounds/. It’s important to save the audio into a folder one level above the sounds folder because the engine will not read the sound file otherwise.
Next, let’s create a sound_script file so that the engine will be able to reference our sounds in the editors and the game. Launch GCFScape, go to File, Open, go over to your steamapps folder, and open up the “episode two content.gcf” file. After GCFScape has loaded that file, we’ll need to find a file named “game_sounds_manifest.txt,” which is located in the /steamapps//ep2/scripts/ folder.
Right-click on the file and click Extract, and place the manifest within /steamapps//half-life 2 episode two/ep2/scripts. We’re done with GCFScape, so you can close it now.
Go to the scripts folder and open up the game_sounds_manifest.txt file we just extracted. In this text file we can see all of the sound scripts that the game will use when it loads, and we need to add our own to this list. Under the last line of code, within the last bracket, add your own entry like Listing 1.
Now we’re going to create the “rpg_sounds.txt” file that we are referencing, so save the manifest file and close it now.
In the scripts folder, right-click and select New, Text Document. Rename this new text file to “rpg_sounds.txt.” After you rename the text file, open it up and add the code in Listing 2.
The first line is the name of the sound that will appear in Face Poser: “rpg _sounds” is the prefix, and the second part is the name. You can change this naming convention to whatever you like. The next four lines tell the engine how to deal with the sounds, and we’ll leave them as they are for now. The last line is the .wav file it will load and contains a relative path to the “sound” folder, located in /steamapps//half-life 2 episode two/ep2/sound/. All you need to do is put the folder with your audio files into that “sound” folder and make sure the file names and extensions match what it says in the script file. Save and close the text file when you are done.
If you’re running Windows Vista or Windows 7, we’ll need to help Face Poser out a little bit. As mentioned earlier, you’ll need to download and install the Phoneme Extractor patch in order to do this. Follow the instructions and replace the necessary files. This patch will allow Face Poser to correctly translate the audio files and sound scripts into the phoneme facial expressions that will be animated on the characters. It’s important to note that Source SDK refreshes itself each time it is launched, so this patch fix needs to be done each time Source SDK is opened. Yes, it is a bit of a pain, but it’s way easier and faster than trying to line up phonemes to the audio manually.
With Face Poser open, we’re going to start a new scene. Under the Choreography menu tab click “New,” which will create a new scene to work with. It’ll prompt you to save the scene, so name it something you can remember, and then place it in /steamapps//half-life episode two/ep2/Scenes/RPG_MOD/. It’ll make it easier to find later on if you give the scene name a prefix, such as “RPG_”.
Next, Face Poser will ask you to name your first Actor. Name your actor “!_target” where is a number between 1 and 8, because we can have up to eight individual NPCs in each scene. Hammer will use whichever NPC you select in the editor based on this name. We currently only have one character, so name the actor “!_target1.” Right-click on the Actor name that has appeared in the Choreography window and then go to New, Channel to bring up the Create Channel box. Name this channel “Audio.” We’ll need to make a second channel for animations, so repeat the last step and name it “Anim.”
Now we’re going to sort out the audio. In the list of tabs at the bottom of the Face Poser screen, double-click Phoneme Editor and it will bring up a new window. Click on Load and select the .wav file you want to add to the character. The file will be displayed as a waveform diagram in the Phoneme Editor window after it is loaded. Press the Re-extract button, and Face Poser will prompt us to write out the sentence text of the same dialogue audio clip we selected. Write out the line and then press OK. The words you entered should now be placed at the appropriate points over the waveform, so right-click on the waveform and hit Commit extraction to apply the phonemes to your waveform. If you play it by pressing your space bar you should see the Actor in the window move their mouth. Hit Save on the Phoneme Editor window and then close it.
We need to add that .wav file to our actor, so right-click on the Audio channel and click WAV File, and then check Show All Sounds. We need to locate the sound name that we gave our .wav file in the sound script file; in our example it will be named “CitizenHomie/FemaleCitizen_Line1-try2 – Processed.wav,” but you should look for whatever name you added into your own sound script. You can use the filter field to help you find it. Once you find it, select it and hit OK. This will place it on your Audio channel. When you play through the sound, it should make your actor’s mouth animate to speak the dialogue. Look at Figure 9 for an example of what everything should look like once you’re done.
Figure 9: Once your dialogue animation is set up in Choreography, it will look like this.
If you wanted to add gestures, facial expressions, and other animations, you’d do that now. We won’t cover that in this tutorial, but there are plenty of resources online that explain how to do those things, such as design3′s Source Engine section. Next save your scene by going to Choreography, Save. Now that we have our scene saved, we’re ready to attach it to our NPC.
Applying custom audio to NPCs
Now we need to set our dialogue up in our level. We’re going to add our scene to the scene_start and scene_end entities we created while building our instance earlier. Hit Alt + Enter to open up the Object Properties window of the scene_start entity and you’ll see an option named “Scene file.” Select this option and then browse for your scene under the “scenes” folder. We’ll need to assign an NPC to use the scene, so select the Target 1 option and choose the NPC with the name of your actor in Face Poser. Hit Apply to save these changes. Then repeat that same process for the scene_end entity.
All we need to do now is trigger the scene to start playing. We’ll need to trigger the scene from another entity at the point where we want the scene to be acted out. For example, you can use a trigger_once brush with the output of “On trigger, entities named scene_start, Start.” Our quest instance that we set up earlier has two button brushes that should already start our scenes, so just double-click on the brush to open up the Properties panel and change the Scene File field to the scene you want your NPC to act out.
Triggering events
In order for this RPG to work, we need a system that allows each quest to know when the player has completed a specified task. This is so the game can progress and won’t just stop dead in its tracks. The best thing to do is have a single entity that performs all the necessary outputs once the quest is completed. We’ll use our relay_complete entity for this task.
Here’s an example of a quest:
- Player needs to kill five enemies.
- On each kill, a math_counter entity increases by one.
- When it hits its max limit, five in this example, it outputs a trigger to our logic_relay.
- logic_relay runs all necessary outputs like stopping enemies spawning, activating the quest giver, activating sprites, and so on.
Using relays keeps the number of outputs low and in one place instead of spread across multiple entities, which can get very confusing on complex maps.
Setting up autosave
Everybody hates it when a single crash erases their last hour of gameplay, so it’s vital to have an autosave feature just in case it happens to our players. Fortunately, autosave is easy to implement. All we need is a logic_autosave entity. Find it on the entity list and place it in your map near any other logic entities you have, such as environmental lighting or auto_logic. The placement isn’t too important, but it’s good to have similar entities located close to together to make them easier to find. Let’s name it “Global_autosave.” The autosave entity works off inputs from other entities, so we’re going to make our end relays for each quest output a trigger to our autosave in order to save the game. Open up the Outputs tab on our relay_complete and add this output: “On Trigger” the entities named “Global_autosave” via this input “Save.” And that’s all there is to it! Now the game should save the player’s progress every time we finish a quest.
Game ending
Our game is going to have to end at some point, and it’ll look bad if it just cuts back to the main menu, so we’re going to use another group of entities to roll the credits first. Create the entities shown in Figure 10 and place them in a suitable place in the level, somewhere that is easy to access and remember.
Figure 10: You’ll need to use these entities to make your ending credits sequence.
Once you’ve made the core entities for the ending credits, all you need to do is link them with triggers. Open up the output tab on your end_relay and create these new outputs: On trigger, env_fade, fade, 0 seconds On trigger, end_text, display, 1 seconds, On trigger, point_clientcommand, disconnect, 5 seconds. This will make the screen fade to black, your credits will fade in, and then a few seconds later the game will disconnect the player using the client command.
Now you just need to compile your map. Compiling is the process of packaging everything and making a .BSP file that the game can read. To compile, just go to File, Run Map. This will bring up the Run Map options window with some different compile options, such as launching the game after the compile finishes. Just hit OK to compile the map and you’re good to go!
Quest complete
Now you should have the basic tools you need to build your own RPG prototype. We’ve shown you how to create quests, incorporate your own dialogue, and use logic to enhance your game, so now it’s your job to keep testing and refining those quests, level, and dialogue decisions. You can make any sort of quest you can possibly imagine, or add a multiplayer co-op component like the Synergy mod, or even use elements from other Valve games like Left 4 Dead. Get in there and start modding! (source:gamecareerguide)
上一篇:阐述游戏设计基础之游戏理念和想法
下一篇:设计师需警惕霸权商品破坏游戏体验









 闽公网安备35020302001549号