以Construct 2制作平台游戏的新手指南(1)
作者:Ashley
我们能够使用Construct 2创造任何类型的2D游戏。我们将在本篇文章中阐述如何使用Construct 2制作一款平台游戏。如果你从未使用过Construct 2并希望能够创造一款自上而下的射击游戏,那就更应该好好阅读这篇新手指南。让我们开始吧!(请点击此处阅读第2部分)
当你购买了Construct 2你便能够获得Jungle Platformer精灵,而我们也将在这篇教程中使用这一精灵进行阐述。如果你使用的是免费版本,那你便可以用自己的图像取代或尝试着从新手指南中找到任何你所需要的精灵。
安装Construct 2
如果你还没准备好,请马上获取一份最新的Construct 2。尽管Construct 2编辑器只适用于Windows,但是你制作的游戏却可以运行于任何平台上,如Mac,Linus或者iPad。我们也可以将Construct 2安装在限制性的用户帐号上。这是一种非常便利的工具,就像你可以将其放在USB记忆卡中随身携带。
开始
现在你便拥有Construct 2,打开它并点击文件按钮,然后选择“新建”。
在“新项目”对话框中你不需要改变任何选项,只需要点击“创造”项目便可。Construct 2将始终保持项目作为一个单一的.capx文件。而现在我们需要着眼于空白的布局——这是你所创造的设计视图以及目标位置。布局就像是一个游戏关卡或屏幕上的菜单。而如果你使用的是其它工具,这一布局就是空间,场景或框架一样的存在。
明确布局的规格
首先,我们需要创造一个比系统默认值更大的布局(关卡)。在布局中的空白位置左击鼠标,“属性栏”将呈现出“布局属性”。将布局的规格改为“4000 x 2048”。
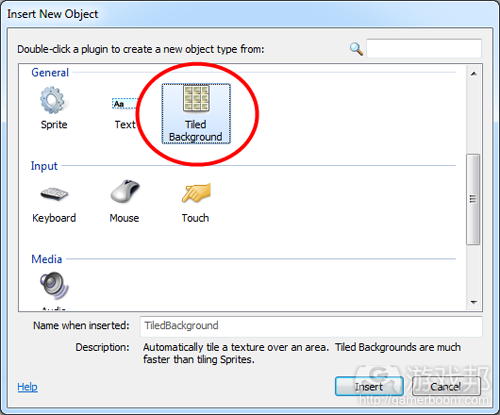
让我们在布局中平铺背景图像。双击布局中的一个空白位置,这时候将出现一个“插入对象”对话框,双击“背景图层”对象以插入对象。
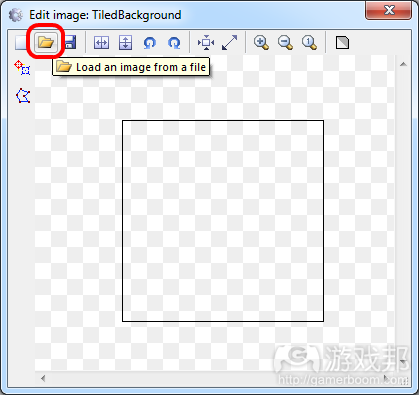
这时候鼠标将变成一个十字光标。不管你最初将鼠标置于何处,这时候的你只要左击布局中的任何位置便可。随后图像编辑器便会打开,然后你便能够选择图像进行平铺。让我们从精灵包中输入Background Image\Background.png文件。点击“打开”图标而输入图像。
选择Background Image\Background.png文件,然后关闭图像编辑器。这时候你将会看到布局中出现了某一部分的背景图像。
我们需要设置背景的大小以覆盖整个布局。所以这时候我们需要左击布局中的空白位置,并确保背景的属性能够呈现在属性栏中。将它的属性设置为“0,0”以及它的规格为“4000,2048”(游戏邦注:与布局一样的规格),从而让背景能够完全覆盖布局。
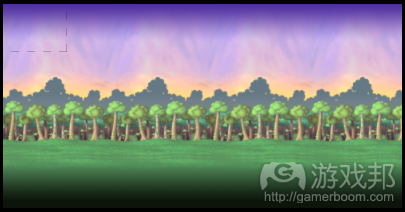
背景的图像非常大,所以我们很难在当前的缩放模式下看到全局。所以我们便需要进一步缩小图像才能看到更多内容。同步调整并滚动鼠标进行缩放;或者我们也能够多次按压“查看——缩放”按钮进行观看。这时候你便能够看到整个布局了,如下所示:
我们将发现布局的左上角有一个虚线框,它便代表着窗口的大小。同时按压Ctrl和0将布局变焦到100%或者点击“查看——变焦100%”按钮进行观看。现在你便能够将布局放大到中间位置。这时候你能够使用滚动条去操纵左上角那个虚线框。同时你也能够点击并拖曳中间的鼠标按钮去调整布局,或者如果你找不到中间鼠标按钮也可以通过控制空间进行布局调整。
添加层面
现在我们便需要添加更多的对象。然而如果我们未能锁定背景,取消它的可选择性,我们便需要继续做出各种选择。让我们使用分层系统来完成这些工作。
布局总是包含多个层面,你可以在此为对象进行分组。图像层面就像是玻璃片一样堆积在每个列表上,并且其表面也附着了各种对象。如此你便能够更轻松地思考该将哪些对象置于上方,该隐藏或锁定哪些对象,并进一步明确视差效果等。举个例子来说吧,在一款游戏中我们希望将所有内容呈现在背景图层之上,所以我们便在其它对象之上创造了另外一个层面。
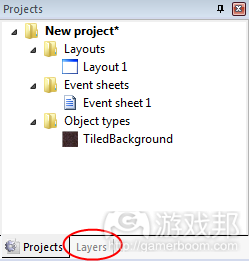
为了管理层面,请点击“层面”标签(游戏邦注:通常都在“项目”标签的旁边):
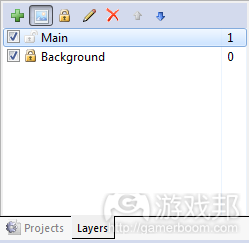
你将在列表中看到“层面0”(Construct 2的计数是从0开始,因为在编程中这样的设置更合适)。点击铅笔图标,并将其重新命名为“背景”,因为这正是我们的背景层面。然后点击绿色的“添加”图标在我们的其它对象上添加一个新的层面。让我们将其称为“主层面”。最后,如果你点击“背景”旁边小小的挂锁图标,你就锁定了这一层面;这也就意味着你将不能够做出其它选择。这对于我们的背景图层来说非常有帮助——既容易选择也不需要我们多次进行操作。而如果你想做出改变,你也只需要点击“挂锁”图标解锁便可。
复选框允许你能够在编辑器中隐藏图层,但是现在的我们还不需要这一功能。你的层面栏应该如下:
现在,你需要确保在层面栏中选中“主”层面。这一点非常重要,因为只有选中层面你才能激活它。所有插入对象将被插入激活层面中,所以如果我们未选中该层面,我们可能会将对象插入一些错误的层面。我们能够在状态栏中看到被激活的层面,同时当我们放置了一个新的对象时这一激活层面也会出现在工具提示中——所以我们必须留意这点。
添加图层
Jungle Platformer在Tiles\Tiles.png文件中拥有一个图层集。让我们将这些图层整合到精灵对象中并将其作为一个图层对象进行使用。
就像你在背景图层中所做的那样,你也需要双击布局中的空白位置然后插入一个新的对象。但是这时候你需要选择的是“精灵”。鼠标将再次变成一个十字光标。然后点击屏幕中间的任何一个位置。
这时候你将再次看到图像编辑器以及一些其它窗口,因为精灵能够以动画形式进行呈现。但是我们现在并不需要播放动画——其速度设为0。我们将在动画中的每个框架插入图层。然后我们便能够通过改变动画帧架而调整图层了。
右击最底断动画帧中的空白位置,然后选择“输入精灵条”选项。如此我们便能够将网格图像分割为动画——这对于贴图图层同样有效。
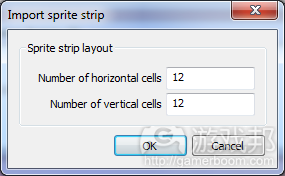
这时将出现一个打开文件对话框。在精灵包中选择Tiles\Tiles.png文件。随后Construct 2将要求你明确图像中有多少图层。这时候你将注意到Tiles.png是一个12×12网格大小的图层。你只需要分别在两个输入框中输入12和12并点击“OK”便可。
Construct 2将花费一点时间去分割图层。现在你共拥有144个图层能够作为动画帧了!因为我们不再需要之前的空白帧,所以我们可以右击它并选择删除。
你必须扩大动画帧窗口的规格,让这些图层能够更加清晰地呈现出来。如果你想要呈现一个更大的缩略图,你便需要右击空白位置并选择“放大”缩略图的规格。
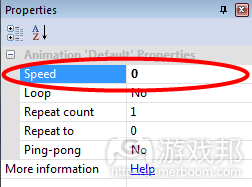
将动画速度默认为5也就意味着图层的图像将会不断发生改变。因为我们希望图层能够保持当前的帧,所以我们需要将动画的速度调为0。在动画窗口中选择默认动画。
现在属性栏中便会出现动画属性。让我们将其速度属性设为0。
这时候图层便不会再改变图像——也就是它们将保持相同的帧了。通过点击一个浮动窗口中的(共有三个)X而关闭图像编辑器。现在你便能够在布局中看到精灵图层了!
选中它,并在属性栏中将其名字从“精灵”改为“瓷砖”。这种方法能够帮助我们为对象明确一个合适的名字。
基于图层创造场景
我们需要注意的是精灵对象拥有一个初始帧属性,我们可以使用这一属性去调整当前的图层。选择图层对象并将其初始帧改为1:
图像的变化也就反应了图层的动画帧为1。如此我们便能够在不同关卡中设置不同的图层了。
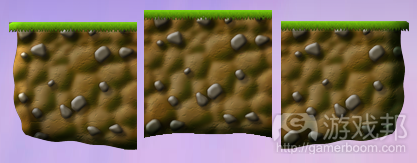
同步调整并点击和拖动图层。这时候你将创造另一图层对象。重复这一行动你便能够在同一行中创造出3个图层。选择中间的图层并将其初始帧设置为10。然后将其右侧的图层初始帧设置为13。现在你便创造出如下的场景:
只要双击图层对象你便能够清楚帧数是否与图层相一致了。这时候图像编辑器和动画窗口将再次出现,而你可以在此进行检查。你一定要记住你能够拖曳图层,并且它也将影响着相同类型的图层,所以你不需要反复输入初始帧。
对齐网格
如果我们必须手动去排列这些图层那真是太可怕了!幸运的是你可以让网格去执行这一任务。在功能区中点击“查看”并选择“对齐网格”。默认网格的规格是32 x 32,而我们图层的规格是128 x 128——正是网格规格的倍数。所以我们既能够轻松地将图层组合在一起也能够更加自由地进行定位。
现在请尝试着去拖曳图层。你将会发现它们有序地与32 x 32网格对齐在一起。所以我们便能够更容易地把三个图层对应起来了。
添加玩家精灵
让我们开始添加玩家精灵。跟之前一样双击布局中的空白位置然后插入新的对象,选择“精灵”。当鼠标再次变成十字光标时点击图层上的某个位置。图像编辑器将会再次出现。
右击动画帧窗口并选择“输入精灵条”选项。选择Player\Idle\Idle.png文件。注意这是一个完整的精灵条,并不是任何一个动画帧。你可以选择“输入帧”选择并输入文件序列,但是此时请先使用前一种方法。
因为精灵条并不是方形的,所以Construct 2需要明确帧的数量。最终它将能准确地定义帧数为11。然后我们只需要点击“OK”便能够输入帧。
需要注意的是我们在一开始也拥有一个默认的空白帧,现在我们可以右击并删除它了。所以最终你的玩家闲置动画便拥有11个连续的动画帧。
裁剪
你也许会注意到玩家周围存在一些空白处。这种情况很常见,但是这却不是一件好事。因为留有过多空白只会浪费内存并不利于碰撞。
有一种方法能够帮助我们快速解决这个问题,即按住shift键并点击图像编辑器工具栏上的“裁剪”按钮。
如果你未按住shift键而直接裁剪,那你便只能够处理帧,所以请确保按住shift键你才能裁剪整个动画。现在玩家的图像便得到适当的处理了,我们也不会再看到其它多余的空间了。
设置起点
起点就是对象的中心点或“热点”。在平台游戏中,我们最好将起点设置在玩家的脚上。如此当玩家动画随着游戏的发展而改变高度时,我们便能确保这种改变是往上的而不是向下。
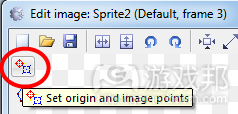
为了明确起点,我们需要点击图像编辑器中的“设置起点和图像点”选项。
你将会注意到玩家身上会出现一个红点,这便是起点。你可以通过点击去改变它的位置。但是你需要确保它的底端和中部相互对齐。我们可以通过点击数字区(如果数字锁定键是打开的)而快速做到这一点。如果你未拥有数字区(游戏邦注:就像很多笔记本电脑上就没有),你也可以右击图像点窗口中的“起点”并选择“快速分配”中的“底端”、
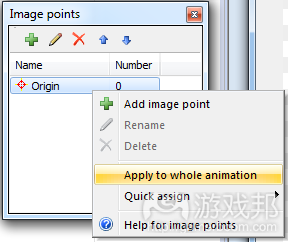
如果逐步为每一帧设置起点还真的有够呛。不过幸运的是我们拥有另外一条捷径,即在弹出来的图像点窗口中右击“起点”并点击“应用到所有动画中”。
我们应为每个动画帧设置起点。
循环动画
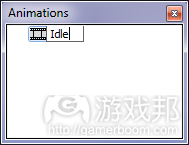
点击动画窗口中的默认动画,将其重命名为“闲置”。
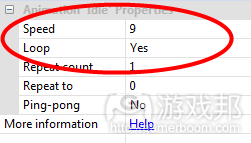
在属性栏中将动画的速度改为9,并设置“循环”为“Yes”。
右击动画窗口中的闲置动画并选择预览。这时候你将能够看到玩家平缓地上下漂浮着。也就是我们完成了这项任务!关闭动画预览与图像编辑器,你将能够在布局中看到玩家。
在属性栏中将对象重命名为“玩家”。
添加行为
Construct 2中总是会伴随着各种行为,这将让你能够以一种预定义的方式去创造对象,也因此为你节省了不少时间。你当然也能够在事件系统中重新塑造行为,但是这却需要你耗费更多精力和时间。这也解释了为何行为能够帮助你更快速地创造并运行游戏。
平台行为将帮助我们更好地处理平台移动的复杂性。但是使用这种行为还有一个重要的诀窍:我们应该在一个不可见的矩形对象中使用这种行为,并将玩家置于该对象顶部。如果对象行为不够生动,平台行为便能够帮助我们更好地改善这一情况——因为如果只是改变动画帧则会混淆平台行为。这么做也能够避免一些愚蠢的碰撞情境,如你的玩家放开了他所紧握住的架子。
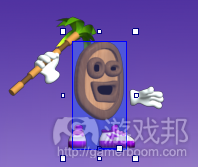
所以我们首先必须为平台移动创造一个不可见的方形区域。再次双击布局并添加新的精灵,并输入如下的方形。(右击并将其“另存为”。)
我们仍然需要将起点置于底端。再次点击“设置起点图像点”,并按压2(或者使用快速分配菜单)将起点设置在底端。
关闭图像编辑器,现在你便能够在布局中看到这一方形了。然后将它设置为与玩家同等大小的规格(如下图)——53 x 107。
将这一对象重新命名为“玩家盒子”,因为这是一个可移动的盒子并且将对玩家进行碰撞测试。然后在属性栏中将初始可见性设置为“不可见”,因为我们并不想要看到这一方形。
我们同样也希望能够为“玩家盒子”的平台移动实行更多可行的碰撞检测。所以我们便需要在玩家盒子属性栏的编辑行为中点击“添加/编辑”。当对话框出现时点击绿色加号按钮。
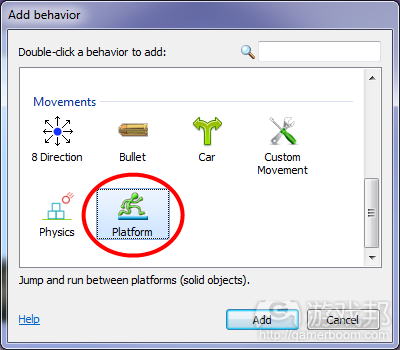
双击平台行为。
你将能够看到属性栏中出现了一些关于平台移动的新属性。你可以调整移动设置,如速度和加速。让我们让跳跃变得更加有活力,即将跳跃力度设置为1100而重力设置为2500。
我们同样也希望屏幕能够跟随着玩家而移动,所以请再次点击绿色加号然后在行为中添加“滚动”。
当你添加了这两种行为后关闭玩家行为对话框。
平台移动需要清楚自己能够“着陆”于何种对象上。玩家将降落在任何未拥有“固体”行为的对象上。所以这时候我们应该选择图层精灵并为其添加行为,即选择“固体”行为。
现在我们只需要将玩家定位在“玩家盒子”之上便可。切换到事件列表1中——我们正是在此利用Construct 2的事件系统去定义游戏的逻辑。(本文为游戏邦/gamerboom.com编译,拒绝任何不保留版权的转载,如需转载请联系:游戏邦)
How to make a Platform game
Construct 2 can make all kinds of 2D games. In this tutorial, you’ll be taken through the basics of making a platform game in Construct 2. If you’re new to Construct 2 and would prefer to make a top-down shooter style game, check out this alternative beginner’s guide. Ready to make a platformer? Let’s get going!
Note: please don’t ask for help in the comments of this tutorial! Instead, head over to our forum to get the best possible response to any questions you may have.
This tutorial uses the Jungle Platformer sprites from the bundle you get when you purchase Construct 2. (The link should have been emailed to you.) If you’re using the free edition, you can substitute your own graphics, or try the alternative beginner’s guide which provides all the sprites you need.
Installing Construct 2
If you haven’t already, grab a copy of the latest release of Construct 2 here. The Construct 2 editor is for Windows only, but the games you make can run anywhere, such as Mac, Linux or iPad. Construct 2 can also be installed on limited user accounts. It’s also portable, so you can install to a USB memory stick for example, and take it with you!
Getting started
Now you’re set up, launch Construct 2. Click the File button, and select New.
In the New Project dialog, you don’t need to change anything. Just click Create project. Construct 2 will keep the entire project in a single .capx file for us. You should now be looking at an empty layout – the design view where you create and position objects. Think of a layout like a game level or menu screen. In other tools, this might have been called a room, scene or frame.
Size the layout
First of all, we need the layout (level) to be a bit bigger than the default. Left-click a space in the layout and the Properties Bar will display Layout Properties. Change the size of the level to 4000 x 2048.
Let’s tile the background image across the layout. Double-click a space in the layout. This will bring up the Insert Object dialog. Double click the Tiled Background object to insert it.
The mouse turns in to a crosshair. It doesn’t matter where you place it initially, so just left click somewhere in the layout. The Image editor opens so you can enter the image to tile. Let’s import the Background Image\Background.png file from the sprite pack. Click the Open icon to import an image.
Select the Background Image\Background.png file, then close the image editor. You should see part of the background image in the layout.
We need to size the background to cover the entire layout. Make sure it is selected (left click it in the layout) and its properties should appear in the Properties Bar. To make it cover the entire layout, set its Position to 0, 0 and its Size to 4000, 2048 (the same size as the layout).
The background image is pretty big, so it’s hard to see it all at once at the current zoom level. Let’s try zooming out to preview more of it.Hold Control and scroll the mouse wheel down to zoom out. Alternatively, press View – Zoom out in the ribbon a couple of times. You should be able to see the entire layout, a bit like this:
Note the dashed outline in the top left is the size of the window compared to the rest of the layout. Press Ctrl 0 to zoom back to 100%, or View – Zoom to 100% in the ribbon. You’re probably zoomed in to the middle of the layout now. Use the scrollbars to navigate back to the top left corner of the layout. You can also click and drag the middle mouse button to ‘pan’ around the layout, or hold space to do the same if you don’t have a middle mouse button.
Adding a layer
Okay, now we want to add some more objects. However, we’re going to keep accidentally selecting the tiled background unless we lock it, making it unselectable. Let’s use the layering system to do this.
Layouts can consist of multiple layers, which you can use to group objects. Imagine layers like sheets of glass stacked on top of each other, with objects painted on each sheet. It allows you to easily arrange which objects appear on top of others, and layers can be hidden, locked, have parallax effects applied, and more. For example, in this game, we want everything to display above the tiled background, so we can make another layer on top for our other objects.
To manage layers, click the Layers tab, which usually is next to the Project bar:
You should see Layer 0 in the list (Construct 2 counts starting from zero, since it works better like that in programming). Click the pencil icon and rename it to Background, since it’s our background layer. Now click the green ‘add’ icon to add a new layer for our other objects. Let’s call that one Main. Finally, if you click the little padlock icon next to Background, it will become locked. That means you won’t be able to select anything on it. That’s quite convenient for our tiled background, which is easy to accidentally select and won’t need to be touched again. However, if you need to make changes, you can just click the padlock again to unlock.
The checkboxes also allow you to hide layers in the editor, but we don’t need that right now. Your layers bar should now look like this:
Now, make sure the ‘Main’ layer is selected in the layers bar. This is important – the selected layer is the active layer. All new inserted objects are inserted to the active layer, so if it’s not selected, we’ll be accidentally inserting to the wrong layer. The active layer is shown in the status bar, and also appears in a tooltip when placing a new object – it’s worth keeping an eye on.
Adding tiles
The Jungle Platformer has a tileset in the file Tiles\Tiles.png. Let’s import these to a Sprite object and use it as a tile object.
Like you did for Tiled Background, double-click a space in the layout to insert a new object. This time, choose Sprite. The mouse turns to a crosshair again. Click somewhere in the middle of the screen.
The Image Editor opens up, but with some extra windows, because Sprites can be animated. However, we’re not going to have the animation playing – its speed will be 0. We’ll have a tile in each frame of the animation. Then, we can switch which tile is showing by changing the animation frame.
Right click a space in the Animation Frames pane at the bottom, and pick Import sprite strip…. This lets us cut up grids of images in to animations, which also works with tile maps.
A file open dialog appears. Pick the file Tiles\Tiles.png from the sprite pack. Construct 2 then needs to know how many tiles are in the image. You’ll notice Tiles.png is a 12×12 grid of tiles. Enter 12 and 12 and click OK.
Give Construct 2 a moment to cut up the tiles. Now you should have all 144 tiles imported as animation frames! We don’t need the first blank frame any more though, so right click on it and select delete.
You might want to resize the Animation Frames window bigger to get a better view of your tiles. Also, you can right-click a space and change the thumbnail size to Large if you prefer big thumbnails.
By default the animation speed is 5, which means tiles will keep changing their image. We want tiles to stay on their current frame, so let’s make sure the animation speed is 0. Select the Default animation in the Animations window.
The Properties Bar now shows properties for the animation. Set its Speed property to 0.
Now the tiles won’t keep changing their image – they’ll stay on the same frame. Close the image editor by clicking the X on one of the three floating windows. Your Sprite tile should now be in the layout!
With it selected, change its name from Sprite to Tile in the Properties Bar. It’s always a good idea to give objects an appropriate name.
Creating scenery from tiles
Notice the Sprite object has an Initial frame property. We can use this to switch the current tile. Select the Tile object and change its initial frame to 1:
Notice the image changes to reflect the tile in animation frame 1. This is how we can set up different tiles across the level.
Hold Control and click and drag the tile. You’ll create another tile object. Do this again so we have 3 tiles in a row. Select the middle one and set its initial frame to 10. Do the same for the one on the right, but make its initial frame 13. You should now have something like this:
If you’re wondering how to double-check which frame number corresponds to which tile, just double-click the tile object. The image editor comes up again with the animation windows where you can check. Remember you can control drag a tile and it makes another tile of the same type, so you don’t need to keep typing in initial frames.
Enabling snap to grid
It’s going to be a headache if we have to line up these tiles by hand! You can enable a grid to make this easier. In the ribbon, click View and enable Snap to Grid. The default grid size of 32×32 is fine. Our tiles are 128×128, which is a multiple of 32. This makes it easy to snap together tiles whilst still giving some freedom in positioning.
Try dragging around the tiles now. You should find they snap to a 32×32 grid. Now it should be easy to snap the three tiles together.
Adding the Player sprite
Let’s add a sprite for the player. As before, double-click a space in the layout to insert a new object, and choose Sprite. When the crosshair comes up, click somewhere above the tiles. The Image Editor will appear.
Let’s import the sprite strip for the player’s idle animation. As before, right click the Animation Frames window and select Import sprite strip….
Choose the file Player\Idle\Idle.png. Note that’s the complete sprite strip, not one of the animation frames. You can also import the sequence of files with the Import frames… option, but let’s stick to this way for now.
Because the strip is not square, Construct 2 guesses the number of frames. It should correctly identify that there are 11 frames. Click OK and the frames are imported.
Note we still have the default blank frame at the start. Right click and delete that again. You should now have a sequence of 11 animation frames for the player’s Idle animation.
Cropping
You might notice the player has some empty transparent space around them. This is common after importing images. However, it’s bad practice to leave it there – it wastes memory and can make collisions less reliable.
There’s a quick way to get rid of it, though. Hold shift and press the Crop button on the image editor toolbar.
If you didn’t hold shift, only that frame is cropped, so make sure you have shift down when you click it to crop the entire animation. The player image should now be nicely cropped, with no unnecessary space.
Setting the origin
The origin is the center, or “hot spot”, of the object. In platformers, it’s best to have the origin by the player’s feet. This means if the animation changes height as it plays, they grow upwards, rather than in to the floor.
To set the origin, click the Set origin and image points tool in the image editor.
You should notice a red spot appear on the player. That’s the origin. You can click to change it. However, we want it bottom-middle aligned. We can quickly assign this by hitting 2 on the num pad (if num lock is on). If you don’t have a num pad (e.g. some laptops), you can right click Origin in the Image points window that popped up and choose Quick assign – Bottom.
It’s a hassle to do this for each and every frame, but luckily there’s another short-cut: in the Image points window that popped up, right click Origin and click Apply to whole animation.
Bingo! The origin should be set on every animation frame.
Loop the animation
Click the Default animation in the Animations window. Rename it to Idle.
In the Properties Bar, change the Speed of the animation to 9 and set Loop to Yes.
Right click the Idle animation in the Animations window and select Preview. You should see the player bobbing up and down gently. All done! Close the animation preview and the image editor. You should see your player in the layout.
Rename the object to Player in the Properties bar, since we’re being organised.
Adding behaviors
Construct 2 comes with lots of behaviors. These make your objects work in pre-defined ways, which often saves loads of time. It’s possible to re-do everything the behaviors do in the event system, but it is often difficult and time consuming to do that. That’s why behaviors are really handy to get your game up and running quickly!
The Platform behavior can take care of the complexities of platform movement for us. However, there’s one important tip for using it: the behavior should be applied to an invisible rectangle object, and the player positioned on top. The Platform behavior works much better if the object with the behavior doesn’t animate, since changing animation frame can leave the object partly sticking in to a wall which can confuse the Platform behavior. Also, it avoids silly collision situations like your player hanging off a ledge by their nose or something they’re holding.
So we need to make an invisible square for the movement first. Double-click the layout to add a new sprite again, and this time import a square like below. (Right-click and ‘save as’ if you need it.)
As before, we should have the origin at the bottom. So click Set origin and image points again and press 2 (or use the quick assign menu) to position the origin at the bottom.
Close the image editor. You should now see it in the layout. Resize it to roughly the same size as the player’s body as shown below – this size is 53×107.
Rename this object to PlayerBox since it’s the box for movement and collision testing for the player. Also, in the Properties Bar, set Initial visibility to Invisible since we don’t want to see it.
We also want to give the Platform movement to the PlayerBox object for more reliable collision detection. Still in the PlayerBox’s properties, click Add / Edit by Edit behaviors in the properties bar. In the dialog that appears, click the green plus button.
Double-click the Platform behavior.
You should see that some new properties for the platform movement have appeared in the Properties bar. You can tweak the movement settings like speed and acceleration. Let’s make the jumps a little bit more snappy. Set the Jump strength to 1100 and the Gravity to 2500.
We also want the screen to follow the player, so click the green plus again and add the Scroll To behavior.
Once you’ve added both behaviors, close the Player behaviors dialog.
The platform movement needs to know what objects it can land on. The player will fall through any objects which don’t have the Solid behavior. So this time select the Tile sprite and add a behavior for it, this time choosing the Solid behavior.
We just now need to position the player on top of the PlayerBox. Switch to Event Sheet 1. This is where we define the game’s logic using Construct 2′s event system.(source:scirra)


