


针对iOS平台移植Flash内容的指导教程(4)
作者:Sina Kashanizadeh
这是基于FlashDevelop在PC平台免费制作AIR应用,然后作为原生应用发行至iOS设备制作指南系列的第4部分(请点击此处查看第一、第二、第三部分内容)。
在本部分内容中,我们将对FlashDevelop和AIR绑定文件做出细微调整,让《Hello Planet》应用能够顺利在设备上运作。

iPad AIR from untoldentertainment.com
将FlashDevelop指向合并SDK文件夹
现在你的应用已成功运作,你需要对FlashDevelop做出细微调整。首先你需要向FlashDevelop呈现你在第3部分中创建的所有合并SDK文件夹信息。
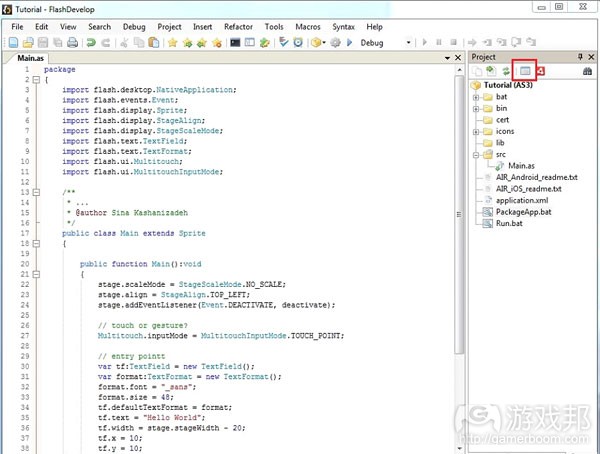
1. 在右边的Project Panel中,你会看到名为AIR_iOS_readme.txt.的文件,通过双击文件将其打开。
此txt文件罗列运作ipa文件所需的若干设置。ipa文件是个必杀技——这是你向测试设备发送、旨在查看所有内容是否顺利运作的原生应用文件。随后系统会弹出包含众多选项的窗口。
2. 点击Properties Panel顶部的Project Properties(游戏邦注:或者你可以通过菜单导入Project>Properties)。
project Properties
3. 将AIR SDK版本由2.7更新至3.0,因为这是截至本文撰写时的最新版本。
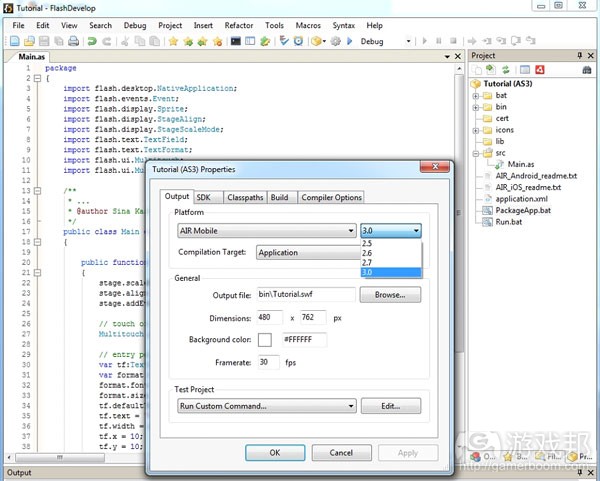
project Properties Options
4. 点击SDK标签,然后接着点击Manage。
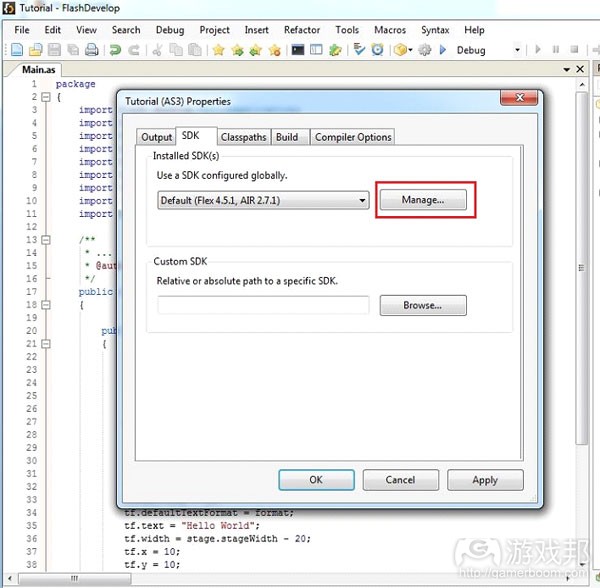
manage
5. 在下个页面中,你将看到系列已安装的Flex SDK。点击文字末尾的省略号按键(…)。页面就会弹出InstalledSDK Collection Editor窗口。
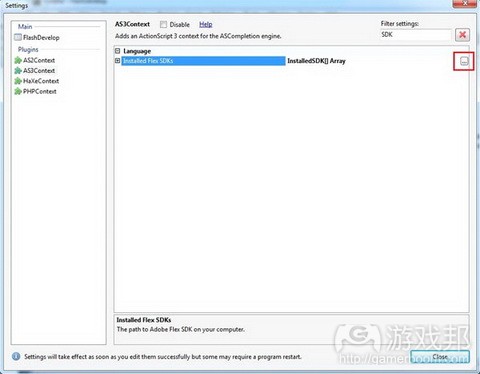
ellipsis
6. 你将FlashDevelop指向最近刚下载的Flex SDK位置(也是存储你此前在本指南中创建的Flex SDK和AIR SDK的文件夹)。首先点击Add按键,再来是Path文字,从中获得另一省略号,然后点击此省略号,浏览自己的电脑。
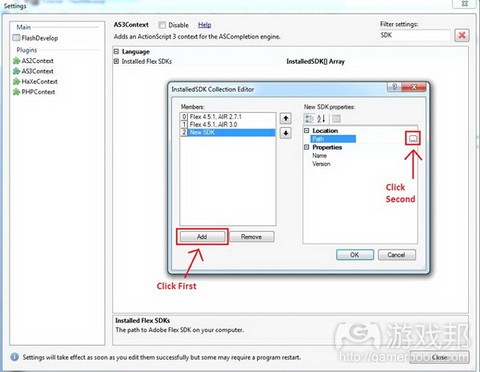
add
7. 点击省略号按键后,屏幕就会出现Windows File Browser。然后切换到合并SDK目录,接着点击此文件夹,最后点击OK。

navigate
8. 再次点击OK按键,以退出此InstalledSDK Collection Editor窗口。
9. 然后点击Close。
10. 在下拉式菜单中,你会看到Default选项。点击此下拉列表,选择你向FlashDevelop描述的SDK位置。
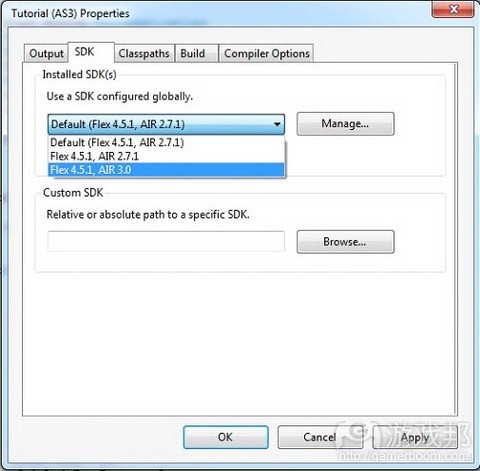
drop Down
11. 点击Apply。
12. 点击OK。现在FlashDevelop Project的SDK就设置完毕。
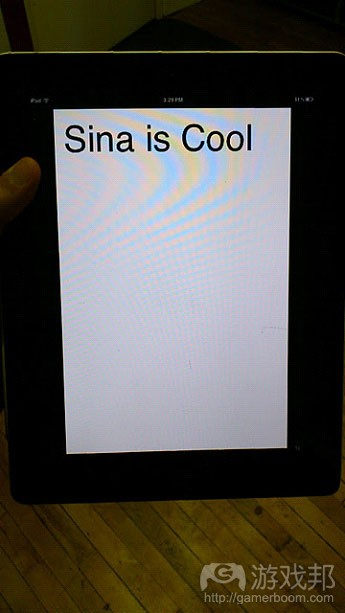
下面就着手进行快速测试,查看这是否可行。你之前在指南中粘帖的代码会在应用中印出“Hello Planet”字样。
你的最终应用应呈现如下样式:
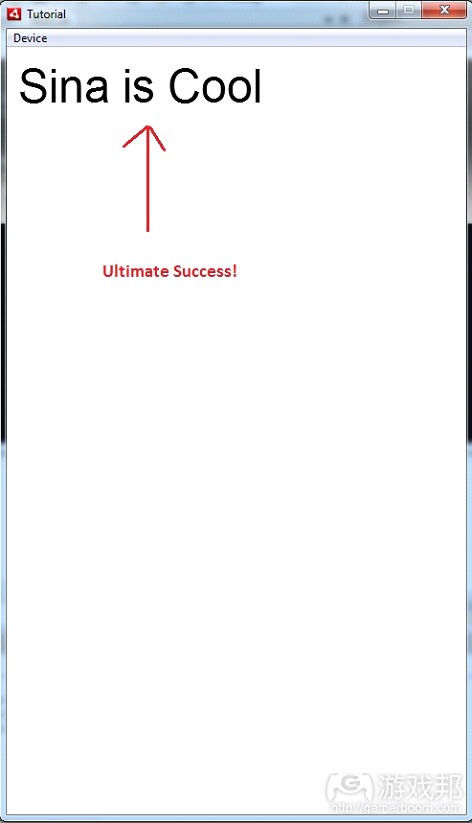
sina Is Cool
很不错,是吧?
删除Extra Icons Folder
现在你已设置好FlashDevelop,旨在配合手机模式的AIR应用创建。应用现已完成编译,你的Mobile Provisioning Profile和.p12 Signing Certificatea也准备就绪。现在你所要进行的操作就是,将这些神奇的文件整合起来,创建Holy Grail.ipa。

holy Grail
.ipa文件就是程序文件——Windows可执行文件(.exe),你需要在设备上测试你的iPhone/iPad应用,然后将其上传到苹果App Store。
FlashDevelop 4的创建者在设计Mobile App模版时犯下一个小错误:模版会生成复制图标文件夹,这会干扰你绑定.ipa文件。你需要摆脱此附加文件夹,以确保.ipa文件能够顺利进行创建。
1. 搜索罗列文件和文件夹的准确工具条。你会看到名为bin的文件夹(游戏邦注:这是FlashDevelop自动为你创建的文件夹)。
2. 点击bin旁边的+符号扩展内容。你将看到名为icons tucked inside的文件夹。右击图标文件夹,点击Delete,然后就大功告成。
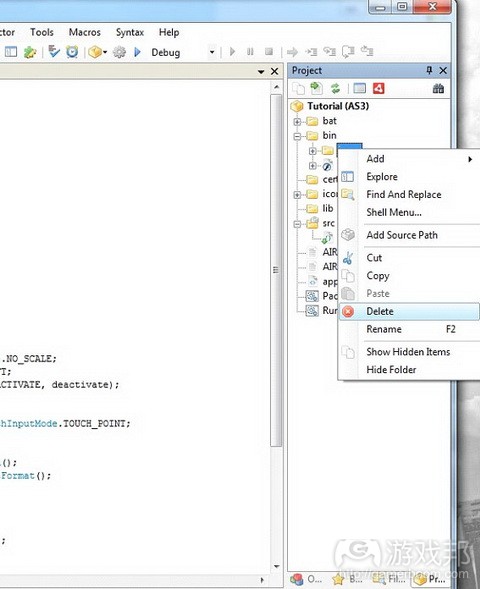
delete
整合你的Cert Files
* 将你的Mobile Provisioning Profile和.p12 Signing Certificate复制到项目的认证文件夹中。若你从头至尾遵照指南进行操作,那么你多半已将这两个文件保存至你OpenSSL的bin文件夹中。
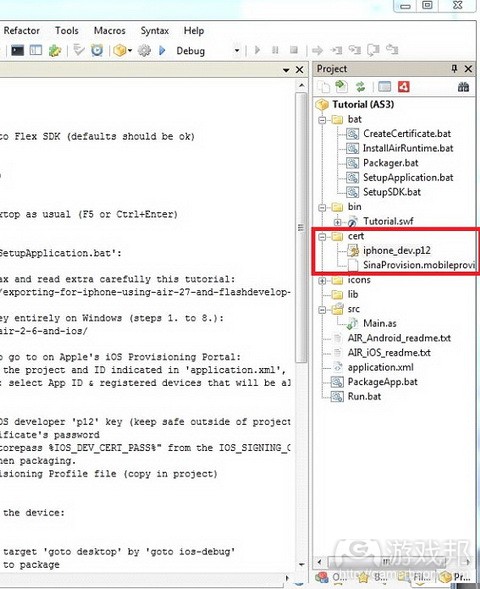
certs
只要文件处于正确位置,它们就会在项目的Project工具条中出现:
要创建.ipa,你需要在批处理文件中编辑几行内容。不要害怕:批处理文件(.bat)不过就是会在你于Windows中对其进行双击时运行脚本的文本文件。你可以通过文本编辑器打开批处理文件。由于你已打开FlashDevelop,所以运用其编辑批处理文件是个合乎情理的操作。
在下列截图中,我已打开描述iOS编辑步骤的ReadMe。步骤5谈论的是编辑批处理文件。

readme
* 在工具条中找出批处理文件夹,然后进行扩展。
* 双击SetupApplication.bat文件。文件应在FlashDevelop中打开。
* 在批处理文件中,你会看到显示iOS包的绿色文本及其下方的若干固定选项。在此你需要添加或调整些许文本内容。在IOS_DEV_CERT_FILE行中,将此路径输入到你的.p12 Signing Certificate文件中。你只需要采用相对路径,所以你只需复制如下内容:
cert\iphone_dev.p12
在IOS_DEV_CERT_PASS行中,你需要输入你制作Signing Certificate时设定的口令。
* 在IOS_PROVISION行中,输入Mobile Provisioning Profile的名称。
总之,你的SetupApplication.bat应该呈现如下样式:
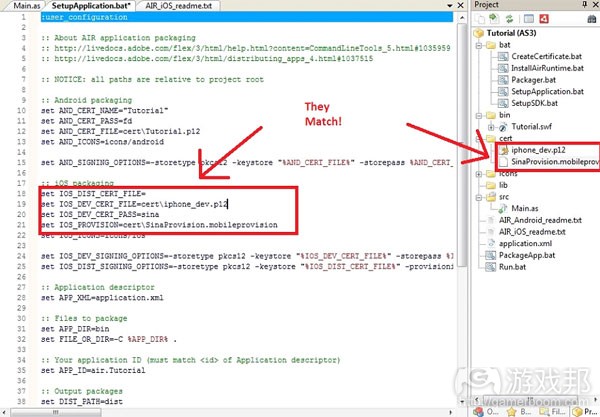
setup Application
注意:你需要正确创建路径,且采用相同文件名。若你出现任何打字错误,这将无法运作。
将工作安排得井井有条
现在你所要进行的操作就是编辑SetupSDK.bat文件。
1. 双击SetupSDK.bat文件,在FlashDevelop中将其打开。
2. 你将在文件顶部看到显示Flex SDK访问路径的绿色文字。文字正下方就是访问SDK的路径。但其没有指示我们之前创建的合并SDK文件夹。将默认路径换成访问合并SDK文件夹的路径,大致呈现如下样式:
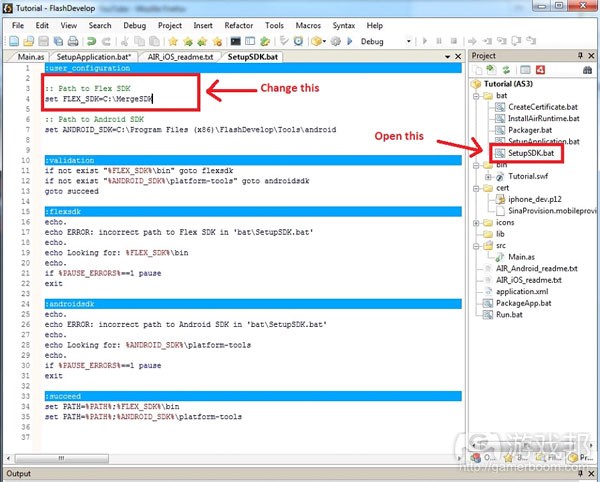
setup SDK
注意:记得要经常进行保存。
3. 打开application.xml文件。此xml文件是应用的描述文件。你需要重新进行检查,确保所有内容正确无误。应用名、应用版本之类的信息都位于此文件夹中。
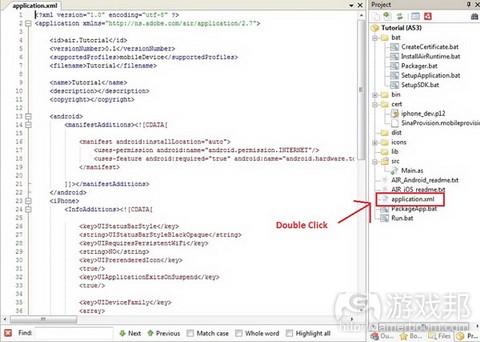
application XML
4. 将基础应用节点xmlns属性末尾的版本编码改成当前运行AIR的编号。这里是3.0。
5. 在id节点中输入你给Mobile Provisioning Profile创建的软件包名称。

application XML Changes
若你忘记自己的Bundle ID,登陆到iOS开发者网站的Provisioning Portal,点击Provisioning。
编译时间
完成上述操作后,你现在要着手编辑你的.ipa文件,在iOS设备上进行测试。
1. 在工具条中右击PackageApp.bat文件,选择Execute。
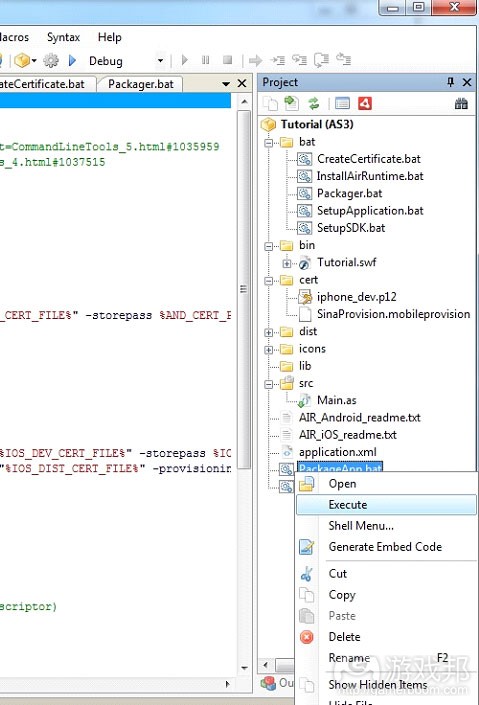
execute
2. 你将看到众多选择。由于这只是个测试,所以你可以选择快速测试选项。这个选项会快速创建一个.ipa文件,方便你将其添加至自己的i设备。选择快速测试后,你就能够坐下来好好放松会儿。
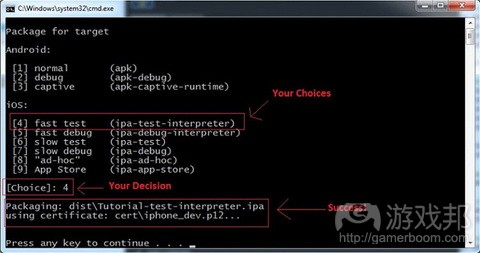
choices
3. 查看工具条中的dist文件夹。现在你就拥有一个.ipa文件。
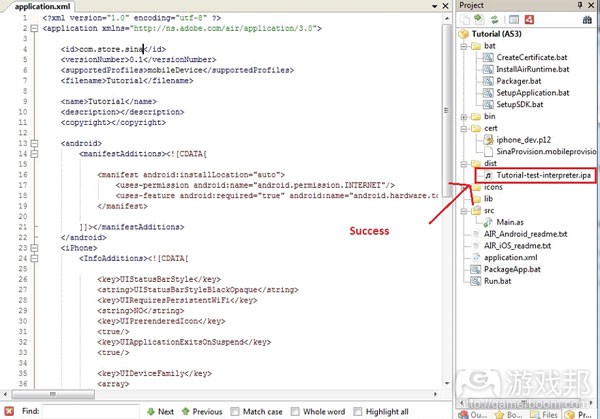
success
测试你的新应用
腾点时间消化你所完成的内容。现在你已进入最后步骤,你所要进行的操作就是将此来之不易的.ipa文件添加至自己的i设备。
我已复制一份自己的Mobile Provisioning Profile和.ipa文件,将其放在独立的文件夹中。我建议你也这么做,进行备份,不要事后追悔莫及。现在让我们把目光转移到你的设备。
1. 插上你的iPhone/iPad/iPod Touch之类的i设备,让他们同iTunes实现同步。
2. 实现同步后就切换到Library -> Apps。

iTunes
3. 添加你的Mobile Provisioning Profile,进行点击,将其从你的文件夹拖到iTunes Library。
4. 基于相同操作完成.ipa文件的添加操作。
注意:你需要先添加Mobile Provisioning Profile,然后才是.ipa文件。若你基于错误顺序添加这些文件,你就会得到错误结果。
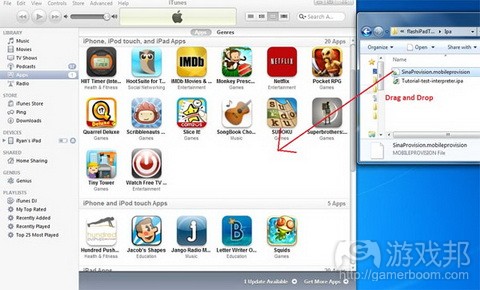
drag And Drop
在将你的.ipa文件拖到iTunes之后,你就会看到由FlashDevelop/AIR生成的普通App图标。
generic Icon
5. 在工具条左侧点击Devices -> Your iPad/iPod/iPhone。
6. 点击iTunes顶部的小型Apps按键。你将看到呈现所有应用的页面。在此页面中你要能够找到自己的应用。
7. 点击Apply按键,将所有内容转移到你的设备上。
iTunes将经历同步过程,会将你的应用添加到设备上。你可以点击同步按键数次,确保所有内容都处于正常状态(游戏邦注:iTunes并不总是能够在PC上顺利运作)。
注意:若你收到应用无法进行安装的错误信息提示,这多半是因为你在Application.xml中的Bundle ID出现问题。仔细检查所有内容。将你的应用从iTunes中删除,然后再次进行转移没有什么坏处。你还可以改写自己的Mobile Provision Profile。
注意:若你改变项目中的内容,你需要重新编辑你的.ipa文件,因为它包含iTunes运行应用时所需的所有新信息。
8. 启动你的iPad/iPhone
beautiful
这棒极了。
投放至App Store及其他平台
在本指南中,你:
* 将FlashDevelop指向你的合并AIR/Flex SDK文件夹。
* 通过删除附加图标文件夹更正Mobile AIR中的错误设置。
* 将你的Mobile Provisioning Profile和.p12 Signing Certificate复制到项目中,同时让FlashDevelop指向它们。
* 将SetupSDK.bat文件指向合并SDK文件夹。
* 修改application.xml描述文件,以匹配你的项目设置。
* 编辑项目,创建一个.ipa文件。
* 将你的.ipa文件和Mobile Provisioning Profile复制到iTunes。
确保应用实现同步,然后在测试设备上运行内容。
完成项目设置,你还可以继续制作应用,直到你创造出能够呈现给消费大众的作品。要将应用投放到活跃的iTunes商店,你还需要注意若干事项。普通AIR图标?是否希望看到更精致的内容?你要如何向苹果应用审核者呈现自己的.ipa文件,令文件最终能够在iTunes中出现?只要完成认证文件和配置文件就足够,还是需要进行其他更多的操作?(本文为游戏邦/gamerboom.com编译,拒绝任何不保留版权的转载,如需转载请联系:游戏邦)
Flash to iOS: A Step-by-Step Tutorial (Part 4)
by Sina Kashanizadeh
This is the fourth part of our tutorial series by Intern Sina on creating an AIR application for free on a PC using FlashDevelop, and deploying it as a native app on an iOS device like the Apple iPad, iPhone or iPod Touch.
In this section of the tutorial, the rubber meets the road. You’ll make all the finicky adjustments to FlashDevelop and the AIR bundling files to get your Hello Planet app up and running on your testing device.
Point FlashDevelop to the Merged SDK Folder
Now that your (cr)app is successfully up and running, you have to make a few tweaks and adjustments to FlashDevelop. You’ll start by telling FlashDevelop all about that merged SDK folder you created in Part 3.
1. In the Project panel on the right, you’ll see a file called AIR_iOS_readme.txt. Double click that file to open it.
This txt file lists a number of settings needed to get your ipa file working. The ipa file is the Holy Grail- the native app file that you’ll send to your testing device to see everything working properly. A window pops up with a bunch of options.
2. Click the Project Properties button at the top of the Properties Panel (alternately, you can use the menus to navigate to Project>Properties).
3. Change the version of your AIR SDK from 2.7 to 3.0 because (at the time of this writing), that is the latest version.
4. Click on the SDK tab, and click Manage.
5. On the next screen you will see list of installed Flex SDKs. Click the ellipsis (…) button at the end of that line. An InstalledSDK Collection Editor window pops up.
6. You’re going to point FlashDevelop to the location of our recently-downloaded Flex SDK (the same folder that contains both the Flex SDK and AIR SDK that you created earlier in this tutorial). First click the Add button, and then click on the Path line to get another ellipsis. Click on THAT ellipsis to browse your computer.
7. Once you have clicked the ellipsis button, a Windows File Browser appears. Navigate to the merged SDK directory. Select that folder and click OK.
8. Click OK again to exit the InstalledSDK Collection Editor window.
9. Click Close.
10. In the drop-down menu, you should see the Default option. Click on the drop-down list and choose the SDK location you just told FlashDevelop about.
11. Click Apply.
12. Click OK. Voila! Your SDK is now setup for your FlashDevelop Project.
Let’s just test it out quickly to see if it works. The code you pasted in the previous tutorial prints out the words “Hello Planet” within your app. Well, I’m going to change mine to say “Sina is Cool”, just because I can, and also because I AM COOL. (You may be tempted to replace “Sina” with your own name. Please don’t, because uh … your code won’t work.)
Your resulting app should look like this:
A beautiful sight, isn’t it?
(At this point, Sina actually is pretty damned cool. – Ed.)
Delete the Extra Icons Folder
Now you have FlashDevelop set up to create mobile-formatted AIR apps. Your app compiles, and you have your Mobile Provisioning Profile and your .p12 Signing Certificate waiting in the wings. All you need to do is combine all these amazing files together to create the Holy Grail .ipa file.
An .ipa file is like the program file – the Windows executable (.exe) – that you need to test your iPhone/iPad App on a device, and ultimately upload it to the Apple App Store.
The creators of FlashDevelop 4 made a minor error when they created the Mobile App template: the template generates a duplicate icons folder that will cause a conflict when you try to bundle your .ipa file. You need to get rid of this extra folder to make sure your .ipa file to builds properly.
1. Look in the right sidebar that lists your files and folders. You’ll see a folder called bin. (This is one of the folders that FlashDevelop created for you automatically when you created your project.)
2. Click on the little plus sign beside the bin folder to expand it. You will see a folder called icons tucked inside. Right-click the icons folder and click Delete. Problem solved.
Integrate Your Cert Files
* Copy your Mobile Provisioning Profile and your .p12 Signing Certificate into the certs folder of your project. If you’ve been following along with this tutorial from the beginning, you probably saved these two files in the bin folder of your OpenSSL install.
Once the files are in the right place, they should show up in your Project sidebar:
To create the .ipa, you have to edit a couple of lines in a batch file so that the app compiles properly. Don’t be scared: a batch file (.bat) is simply a text file that runs a script when you double-click it in Windows. You can open up a batch file by using a text editor of any kind. Since you’ve already got FlashDevelop open, it makes a lot of sense to use it to edit the batch files.
In the following screenshot, I’ve opened up the ReadMe file that describes the iOS compilation steps. Step 5 talks about editing a batch file. Take a read if you’re nervous.
* In the sidebar, find the bat folder and expand it.
* Double-click the SetupApplication.bat file. The file should open in FlashDevelop.
* In the batch file, you should see some green text that says ios packaging, and a bunch of set options beneath it. This is where you have to add or adjust some text. In the IOS_DEV_CERT_FILE line, type the path to your .p12 Signing Certificate file (the one you just copied into the certs folder). You only have to use a relative path (one that describes where the file is in relation to the compilation target), so just copy what I have and you should be fine:
* In the IOS_DEV_CERT_PASS line, you have to enter password that you set when you made your Signing Certificate. (Don’t come crying to me if you don’t remember it – i told you to write it down – Ed.)
* In the IOS_PROVISION line, type the name of your Mobile Provisioning Profile.
All in all your SetupApplication.bat should look like this:
Note: Make sure you have the path properly setup as well as the same exact filename. If you have any sort of typo, it’s not going to work.
Get Your Ducks in a Row
You’re almost there! All you have to do is edit the SetupSDK.bat file.
1. Double-click the SetupSDK.bat file to open it in FlashDevelop.
2. At the top of the file, you’ll see a line that says path to Flex SDK in green. Right under that line is the path to the SDK. However, it’s not pointing to the merged SDK folder that we created earlier. Replace the default path with the path to your merged SDK folder. It might look similar to this:
Note: Remember to save often!
3. Open the application.xml file. This xml file is the descriptor file for your application. You have to double-check to ensure everything in there is correct. Everything from your App name to the version of your App is located in this file.
4. Change the version number at the end of the xmlns parameter of the root application node to the version of AIR you’re running. In this case (and at the time of this writing), it’s 3.0.
5. In the id node, enter the package name that you created for your Mobile Provisioning Profile.
If you don’t remember what your Bundle ID was, go to the Provisioning Portal on the iOS developer website and click on Provisioning.
Compile Time
After all that, you’re finally ready to compile your .ipa file to test on an iOS device.
1. In the sidebar, right-click the PackageApp.bat file and select Execute.
2. You’ll see a bunch of options. Since this is only a test, you can pick the fast test option. This option will quickly create an .ipa file for you to throw onto your iWhatever. Once you choose fast test, sit back and relax.
3. Look in the dist folder in the sidebar. You now have an .ipa file!
Test Your New App
Take a moment and soak in what you’ve accomplished. You’re in the final steps of your epic journey of iEnlightenment. All you have to do now is load the hard-fought .ipa file up on your iWhatever.
I made a copy of my Mobile Provisioning Profile and my .ipa file and put them in a separate folder. I suggest you do the same as a backup measure … better safe than sorry. Now let’s get that sucker onto your device.
1. Plug in your iPhone/iPad/iPod Touch/iEtCetera and let it sync in iTunes.
2. After it’s synced, go to Library -> Apps.
3. To add your Mobile Provisioning Profile, click and drag it from your folder into the iTunes Library.
4. Follow the same process to add your .ipa file.
Note: You have to add your Mobile Provisioning Profile before you add your .ipa file! If you add these files in the wrong order, you may get errors!
After dragging your .ipa file into iTunes, you’ll see a generic App icon that FlashDevelop/AIR generated for you.
5. In the left sidebar, click on Devices -> Your iPad/iPod/iPhone.
6. Click on the little Apps button at the top of iTunes. You’ll see a screen that displays all your Apps. Within that screen, you should be able to find your App (you may have to scroll around a little to find it).
7. Click the Apply button to transfer everything to your device.
iTunes will go through the syncing process, and will add your App to your device. You can click sync a few more times just to make sure everything is good – iTunes doesn’t always behave perfectly on a PC.
Note: If you get an error saying that the App failed to install, your Bundle ID or something within your Application.xml may be wrong. Double-check everything! There is no harm in deleting your App and from iTunes and transferring it again. You can also overwrite your Mobile Provision Profile with a corrected one.
DOUBLE NOTE: If you change anything in your project, you must compile your .ipa file again, because it contains all the new information necessary for iTunes to run your App.
8. Fire up your iPad/iPhone and BAM!
It’s so … beautiful. *sniff*
To the App Store … and Beyond!
In this section of the tutorial, you:
* Pointed FlashDevelop to your merged AIR/Flex SDK folder
* Corrected an error with the Mobile AIR template by deleting an extraneous icons folder
* Copied your Mobile Provisioning Profile and your .p12 Signing Certificate into your project and pointed FlashDevelop to them
* Pointed the SetupSDK.bat file to the merged SDK folder
* Modified the application.xml descriptor file to match your project settings
* Compiled your project and created an .ipa file
* Copied your .ipa file and Mobile Provisioning Profile into iTunes
Synced your app and ran it on your testing device!
With your project set up, you can continue developing your application until you have an amazing thing that you’re ready to foist on the app-buying public. There are still a few more things you need to know to deploy your app to the live iTunes store. What about that generic AIR icon? Wouldn’t you like to see something nicer in its place? And how do you get your .ipa file in front of the app-approvers at Apple to get it to show up in iTunes? And are we finished with certificates and profiles, or is there more to do?(Source:untoldentertainment)

")
")
")
")


 闽公网安备35020302001549号