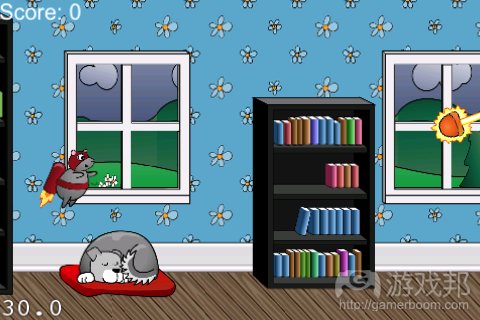
使用Cocos2D和Box2D制作《Jetpack Joyride》(4)
作者:Bogdan Vladu
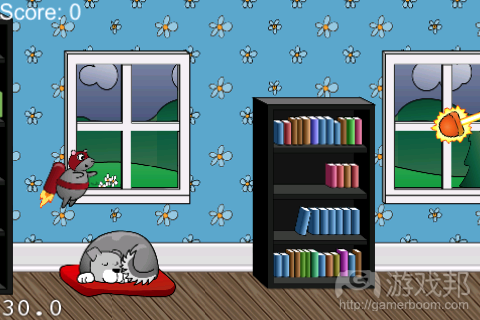
上次在第3部分中,我们已经几乎要完成整个游戏。我们完全执行了玩家和其他游戏元素间的碰撞,使玩家可以死亡和获得分数。我们还让玩家飞行,添加了许多精妙的音效和动画。(请点击此处阅读本系列第1、2、3部)
但是,我们仍然需要对游戏进行些许改进。其一,我们需要有个跟踪得分的方法。其二,我们可能还需要在游戏中添加些许可爱且可以移动的兔子,这些兔子可以奖励更多的分数。
我们的游戏看起来很棒,但是在下文中,我将向你展示通过添加背景层次来产生窗外的场景永无止尽的幻觉。我们会让背景层次移动,这样窗户外的场景就不会一成不变。
而且,如果我们让某些激光器旋转,难道不会让游戏变得更加有趣吗?阅读下面的文章,完成这款游戏的制作!
开始:旋转激光器
现在,我们从第3部分已完成的项目开始。你也可以直接下载项目当前版本。
我们要做的首件事情是让我们的激光器旋转。我们不能让这款游戏太简单!所以,在LevelHelper中打开项目,确保你打开的是最新版本的关卡。
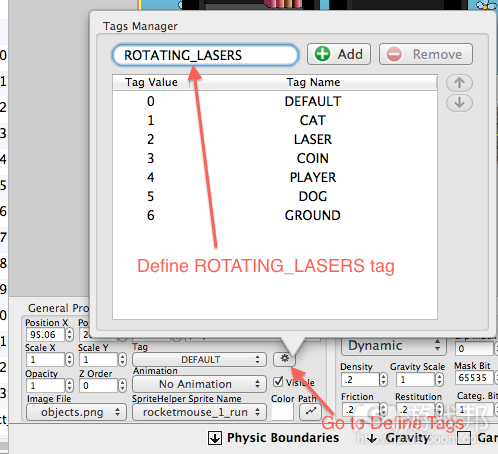
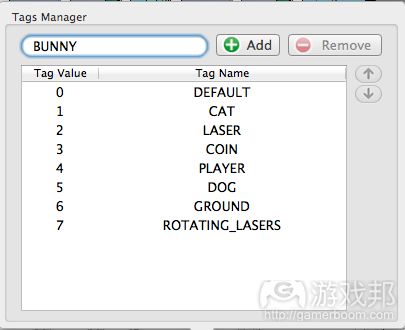
首个步骤是选择“确定标签”来确定一个新的标签。将其命名为“ROTATING_LASERS”。
当我们通过代码执行旋转时,我们将使用这个新标签来指代旋转的激光器(游戏邦注:并非所有的激光器都会设置成旋转)。
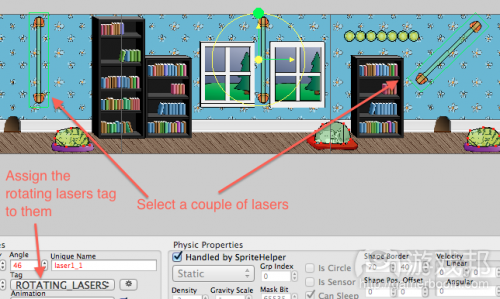
现在,在关卡中选择几个激光器。确保你选择的激光器有旋转的空间。将ROTATING_LASERS标签分配给这些激光器。
完成激光器标签分配后,保存关卡,打开你的Xcode项目。导向HelloWorldScene.h并在类定义中添加下列代码:
NSArray* rotatingLasers;
然后,在HelloWorldScene.mm中retrieveRequiredObjects方法末端添加下列代码:
rotatingLasers = [lh spritesWithTag:ROTATING_LASERS];
[rotatingLasers retain];
这个代码涉及到的是所有带有ROTATING_LASERS标签的精灵。因为这种方法返回的阵是自动释放的,所以我们需要将其保留下来。为了不遗忘释放这个保留阵,转向dealloc函数,在LevelHelperLoader对象释放前添加下列代码:
[rotatingLasers release];
现在,我们已经抓住了我们想要的激光器,让我们来使它们开始旋转!进入tick方法,在末端编写下列代码:
for(LHSprite* laser in rotatingLasers)
{
[laser transformRotation:[laser rotation]+1];
}
如果你现在运行游戏,所旋转的激光器就会旋转,但是当玩家与它接触时并不会死亡。这是因为我们还未给ROTATING_LASERS标签注册碰撞事件。要实现这个目标,在setupCollisionHandling方法中添加下列代码:
[lh registerPreCollisionCallbackBetweenTagA:PLAYER andTagB:ROTATING_LASERS idListener:self selListener:@selector(mouseLaserCollision:)];
现在运行游戏,激光器会旋转,而且会同非旋转激光器一样杀死玩家。祝贺你,你刚刚又让游戏的难度层次获得提升。但是,你可能需要对游戏进行更多次的试玩,确保在修改后玩家仍然可以通过该关卡!
移动的兔子
奔跑和跃过沉睡的猫和狗并躲避旋转的激光器,这些内容都很有趣,但是我们要在游戏中添加其他奖励成分,让其变得更加复杂。我想到了,我们可以添加兔子。玩家可以通过杀死可爱无助的兔子来获得分数。
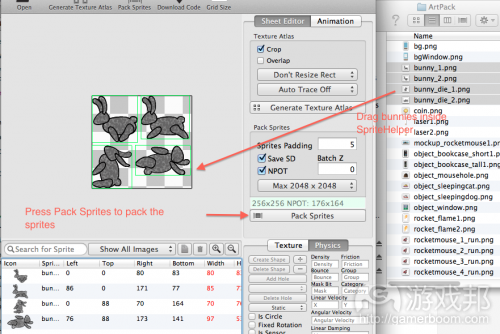
打开SpriteHelper,选择“文件\新建”。然后打开取景器,导向ArtPack文件夹(游戏邦注:如果没有的话可以从第1部分教程中下载),选择兔子图片并将它们拖动到SpriteHelper窗口中。然后点击“打包精灵”按钮。
现在,选择列表中所有的精灵,激活物理资产菜单中的“传感器”选项。应当注意的是,我们的额外奖励成分钱币也是传感器。
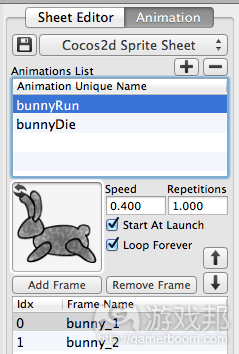
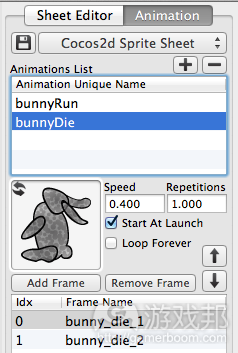
接下来,使用兔子框架创建以下两个动画:
动画名称:BunnyRun;速度:0.400;游戏开启时开始:是;永远循环:是;框架:bunny_1, bunny2
动画名称:BunnyDie;速度:0.400;游戏开启时开始:是;永远循环:是;框架:bunny__die_1, bunny_die_2
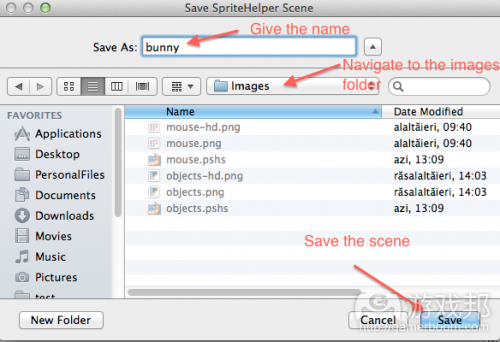
创建完动画后,将场景保存在Xcode项目的“图片”文件夹中。
回到LevelHelper,我们可以在“动画”版块中看到兔子动画。选择BunnyRun动画,将其拖到关卡中。
现在,我们的关卡中有个兔子,但是不可见,因为我们需要令其随“视差”移动。
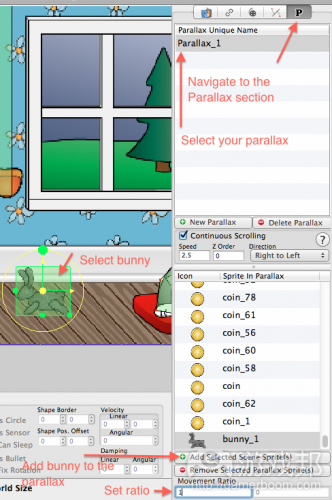
要将兔子添加到视差中,选择“视差”标签,选择我们的视差,添加兔子精灵。将移动比率的X成分设为1,这样兔子就能够以与关卡相同的速度移动。
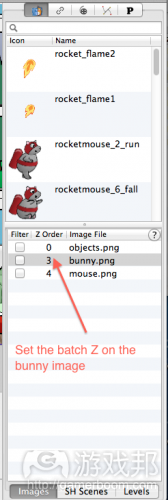
如果我们在“场景测试器”中运行关卡,我们看不到兔子。这是因为,我们还需要在兔子图片上设置批Z坐标。
导向“图片”版块,将兔子图片的批Z值设为3。这样做便会使兔子位于除玩家外的所有内容上。
在“场景测试器”中再次运行关卡,我们会看到兔子随视差移动,但是兔子的位置似乎总是保持不变。我们想要让兔子从右向左和从左向右移动。要实现这个目标,我们必须让它在一条路径上移动。
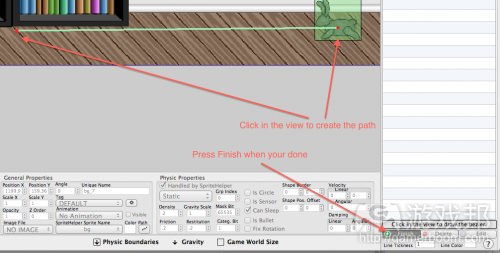
导向“Bezier”版块,点击“新建”来创建描绘兔子路径的新Bezier。
点击关卡视图画出兔子的路径,点击“结束”按钮确认完成Bezier设置。
现在,在Bezier资产中选择“路径”选项,告诉LevelHelper将Bezier视为路径。
注:
1、默认情况下,Bezier是一条简单的线。你可以在资产菜单中取消选定“线性”来让它们成为真正的Bezier。
2、点击“编辑”按钮并拖动点,你可以通过这种方式来编辑Bezier。
3、在编辑Bezier时,按住COMMAND同时点击贝塞尔线可以创建新的点。
4、在编辑Bezier时,按住ALT同时点击点可以移除线上的点。
现在,我们已经确定了路径,但是兔子精灵不知道它应当在这条路径上移动。我们可以通过设置让它明白这一点。
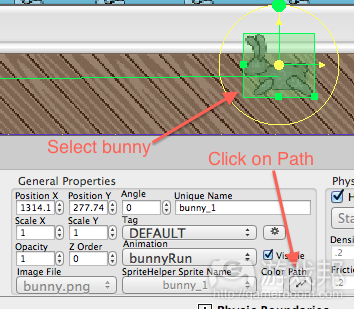
选择兔子,然后在“通用资产”版块中,点击“路径”。
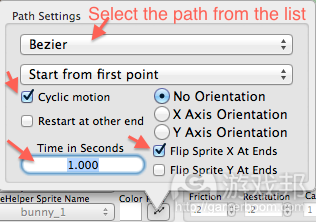
在“路径设置”对话框中,选择描述列表中路径的Bezier,然后选择“循环运动”来让运动得以循环。
设定你希望兔子从Bezier一端移动到另一端所需的时间。然后选择“在末端处翻转精灵X”,这样兔子就会保持面朝移动的方向。否则,兔子在游戏中会出现倒退着移动的情况。
现在,如果你在“场景测试器”中运行关卡,兔子应当会在路径上随视差移动。这看起来很棒,不是吗?LevelHelper是唯一让你可以在路径上移动精灵同时保持持续性视差滚动的编辑器。
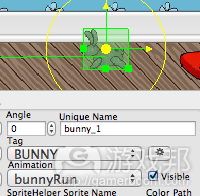
LevelHelper中的最后步骤是确定名为“BUNNY”的新标签,将其分配给兔子精灵。完成后,保存关卡。
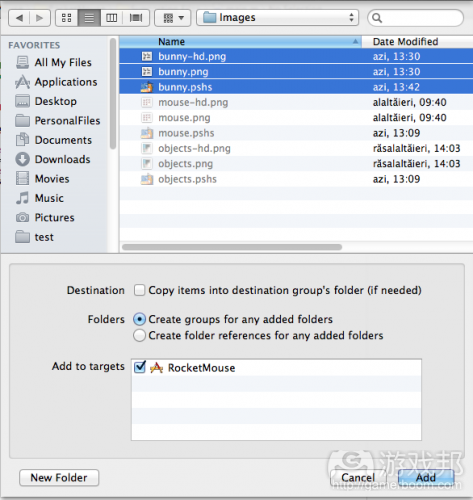
该是转回Xcode项目的时候了。我们已经创建了一个新图片:兔子。所以,我们必须将这个新图片文件添加到Xcode中的“图片”文件夹中。
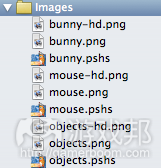
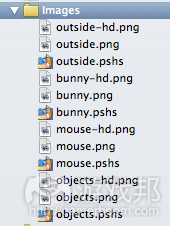
现在,项目的“图片”文件夹中的内容应当如下所示:
现在,让我们编写些许代码,使得兔子会在玩家与之碰撞时死亡。
在setupCollisionHandling方法末端添加下列代码:
[lh registerBeginOrEndCollisionCallbackBetweenTagA:PLAYER andTagB:BUNNY idListener:self selListener:@selector(mouseBunnyCollision:)];
这段代码会将碰撞回叫告知LevelHelper,但是我们也需要为回叫确定方法。在setupCollisionHandling方法前添加下列代码:
-(void)mouseBunnyCollision:(LHContactInfo*)contact
{
if(playerIsDead)
return;LHSprite* bunny = [contact spriteB];
if(nil != bunny)
{
if([[bunny animationName] isEqualToString:@”bunnyRun”])
{
[self scoreHitAtPosition:[bunny position] withPoints:500];
[[SimpleAudioEngine sharedEngine] playEffect:@”bunnyHit.wav”];
}[bunny startAnimationNamed:@"bunnyDie"];
[[bunny pathNode] setPaused:YES];
}
}
在上述代码中,我们测试玩家是否死亡,如果情况属实那么不做出任何响应。随后,我们从接触中提取兔子精灵,测试它是否有效且是否正在运行“bunnyRun”动画。
如果兔子精灵满足以上两个条件,我们会给玩家奖励500点分数,播放兔子碰撞的音效(游戏邦注:音效包可以从第3部分教程中下载)。虽然,我们在兔子精灵上开启bunnyDie动画,并停止精灵在路径上的移动。
现在,如果你运行游戏,你会看到兔子与老鼠碰撞后会死亡。但是,如果你体验整个关卡,你会看到已经杀死的兔子不再出现在关卡中:它会一直保持死亡的状态!所以,让我们采取第3部分中处理钱币的措施,实现兔子的重置。
找到你的spriteInParallaxHasReset方法,将其修改为如下代码:
-(void) spriteInParallaxHasReset:(LHSprite*)sprite
{
if(COIN == [sprite tag]){
[sprite setVisible:YES];
}
else if(BUNNY == [sprite tag]){
[sprite startAnimationNamed:@"bunnyRun"];
[[sprite pathNode] setPaused:false];
}
}
在上述代码中,我们检查了BUNNY标签。当我们发现兔子精灵时,便将其动画设为bunnyRun,继续它的路径移动。
你可以直接下载截止目前已完成的项目版本。
呈现分数
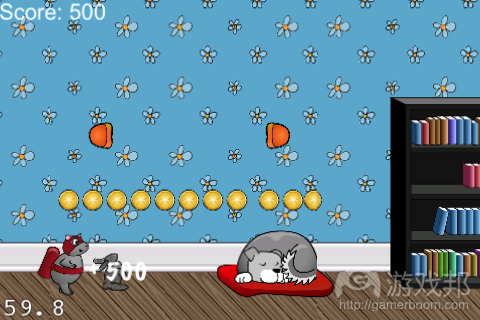
我们将执行的是分数的动态呈现方法。分数除了会固定呈现在屏幕顶部或底部外,游戏还会在每次用户得分时将分数显示在暂时性的弹出窗口中。
首先,将下列代码添加到HelloWorldScene.h中:
CCLabelTTF *scoreText;
现在,在HelloWorldScene.mm中的初始化方法前确定这种新方法:
-(void) setupScore
{
score = 0;CGSize winSize = [[CCDirector sharedDirector] winSize];
scoreText = [CCLabelTTF labelWithString:@"Score: 0" dimensions:CGSizeMake(200, 50) alignment:UITextAlignmentLeft fontName:@"Arial" fontSize:22];
scoreText.color = ccWHITE;
scoreText.position = ccp(100, winSize.height-25);
[self addChild:scoreText z:20];
}
在这段代码中,我们创建了一个新的标签,并将它分配给我们的scoreText变量。随后,我们将这个标签添加到Cocos层次。而且,我们将标签的位置设在屏幕左上角。
现在,在setupAudio调用后的初始化方法中调用这个新的方法:
[self setupScore];
这样做的结果的确很不错,但现在我们向用户展示的并非真实的分数。我们展示的只是文本而已。让我们通过代码使当用户得分时文本发生改变。
将你的scoreHitAtPosition方法修改成如下代码:
-(void)scoreHitAtPosition:(CGPoint)position withPoints:(int)points
{
score += points;
[scoreText setString:[NSString stringWithFormat:@"Score: %d", score]];NSString* curScoreTxt = [NSString stringWithFormat:@"+ %d", points];
CCLabelTTF *curScore = [CCLabelTTF labelWithString:curScoreTxt fontName:@"Marker Felt" fontSize:24];
curScore.color = ccWHITE;
curScore.position = position;
[self addChild:curScore z:20];id opacityAct1 = [CCActionTween actionWithDuration:1 key:@"opacity" from:255 to:0];
id actionCallFunc = [CCCallFuncN actionWithTarget:self selector:@selector(removeScoreText:)];
id seq = [CCSequence actionOne:opacityAct1 two:actionCallFunc];
[curScore runAction:seq];
}
在这段代码中,我们向分数变量添加新的点。随后,我们将分数标签的文本设置为新的已更新分数。
接下来,我们创建一个新的显示在该位置的新标签。正如代码中所展示的那样,这是钱币或兔子触发分数更新的位置。当钱币或兔子与玩家发生碰撞时,分数就会暂时呈现在其所处的位置上。
我们向该层次添加新标签(游戏邦注:也就是“self”层次)。然后,我们创建两个动作。首个动作是让新的分数标签在1秒的时间内消失,方法是将精灵的不透明度资产从255(游戏邦注:即全可视状态)改变为0(游戏邦注:即不可视状态)。第二个动作是调用新方法removeScoreText。
最后,我们使用两个动作创造出系列动作,并在新的标签精灵处运行该系列。
我们仍然需要确定removeScoreText方法被第二个动作调用。在scoreHitAtPosition方法前添加下列代码:
-(void)removeScoreText:(CCLabelTTF*)scoreLabel
{
[scoreLabel removeFromParentAndCleanup:YES];
}
这种新方法只是将分数从层次上移除。
现在运行游戏,你会发现其运转得很不错。玩家每次与钱币或兔子接触时,都会有标签弹出显示更新后的分数,显示时间为1秒钟,随后消失。
添加户外层次
现在,我们要做的最后工作是添加“户外”场景,也就是关卡中窗户处所呈现的场景,由此来提升游戏玩法的深度。
打开SpriteHelper,选择“文件\新建”创建新场景。然后打开取景器,导向“ArtPack”文件夹,选择bgWindow、window_background和window_foreground images,将它们拖到SpriteHelper窗口中。
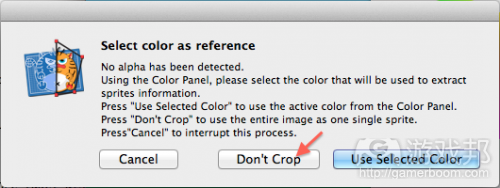
按动“打包精灵”,将新精灵打包。因为有一副图片没有alpha,所以会弹出新窗口询问你是否想要使用选定颜色来剪裁图片。选择“不剪裁”。
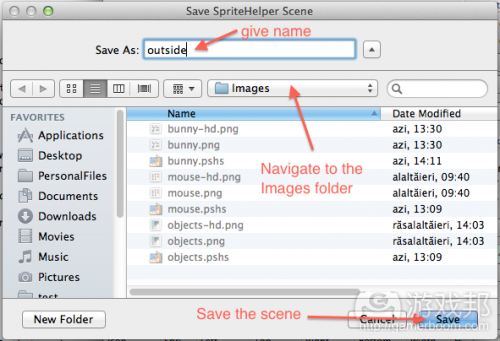
选择所有的精灵,从“物理”标签中设置“非物理”选项。将场景保存为“户外”,放置在“图片”文件夹中。
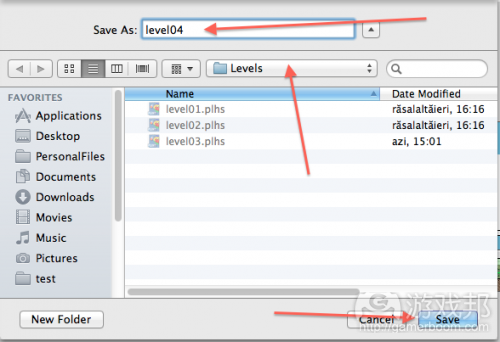
回到LevelHelper,让我们来创建新的关卡。打开level03,按住Command+Shift+S来将其另存为新关卡。将新关卡命名为level04,保存在“关卡”文件夹中。
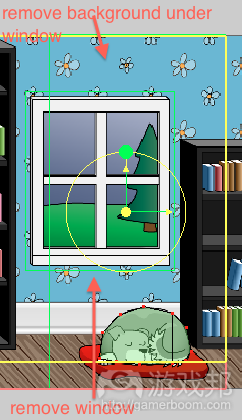
现在,在关卡视图中,选择所有的窗户精灵以及位于窗户下的背景精灵。
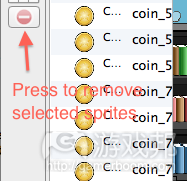
按动“删除”键删去这些精灵,点击左侧的红色减号标志按钮亦可。
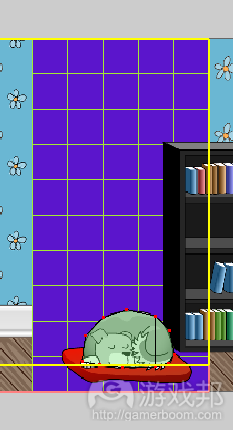
在移除这些精灵后,场景应当如下图所示:
再次确认你已经移除了所有的窗户和窗户下的背景精灵,然后保存场景。
现在,勾选outside.png旁边的“过滤器”选项,由此来过滤户外精灵。这样,我们就只能从以上列表的图片中看到精灵。将outside.png的批Z坐标设为-1,也就是将outside.png中的所有精灵放在关卡最后方。
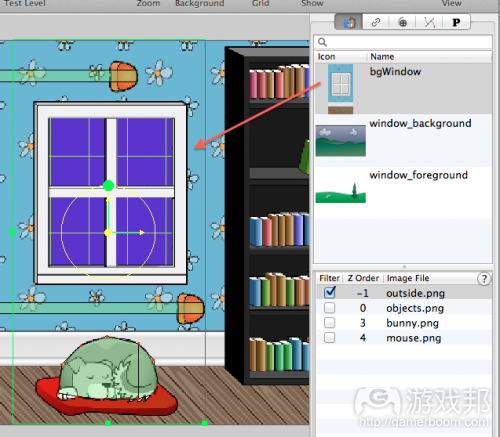
接下来,拖动bgWindow精灵,将其放在你移除窗户和背景精灵后留下的空白区域处。
完成后,选择所有bgWindow精灵,将其Z坐标设为1。
将这些新精灵添加到视差中,将移动比率的X成分设为1。保存关卡。
按动“测试关卡”按钮,在“场景测试器”中运行场景。你可能会注意到,某些新精灵会有偏差。这是因为某些新精灵的位置没有与老精灵准确地排成一线。
可以通过两种方法来改变这个问题:
1、挨个调整所有不恰当的地方。选择每个位置不当的精灵,使用方向键来移动精灵,知道它与其他精灵排成一线。
2、选择所有位置不当的精灵,在“通用资产”菜单中将“范围X”设为1.01,或者其他可将其调整到恰当位置的值。
当你满意精灵的位置时,保存关卡。
现在,所有内容均已就为,让我们在创建背景,背景的移动速度与视差的其他内容有所不同。
首先,让我们锁定已经位于关卡中的精灵,这样我们才不会意外导致他们的移动。要实现这个目标,在左侧列表中选择所有的精灵,然后点击“锁定”按钮。
注:要解锁精灵,可以在列表中选择相应精灵,然后再次点击“锁定”按钮。
锁定精灵后,将window_background精灵拖动到场景中,将其放在主屏幕上。确保window_background精灵的左侧纵向边界与主屏幕的左侧精确地排成一线。
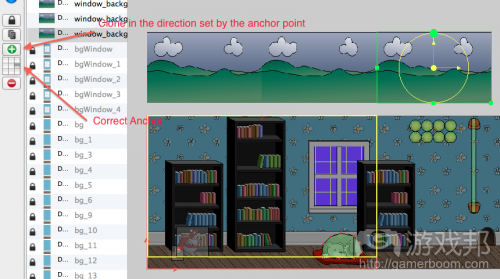
现在,选定window_background精灵,向右侧不断复制直至游戏世界末端,使用绿色的“+”按钮(游戏邦注:或按动Command+D)可以使用复制。确保你选择了正确的定位点。
在你完成后,关卡应当如下所示:
现在,选择所有的新window_background精灵,将它们添加到视差中。将移动比率的X成分设为0.3。
针对window_foreground精灵重复这个过程。
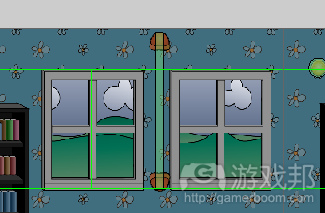
将其拖到场景中,与window_background精灵对齐:
克隆直至游戏世界末端:
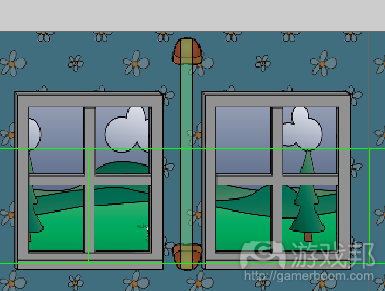
将其添加到视差中,移动比率的X成分设为0.7:
现在,选择所有window_background精灵,将它们拖到主屏幕上,这样你才能通过窗口看到它们。
针对window_foreground精灵重复这个过程。将所有精灵拖下,直到你可以通过窗口看到它们。
完成后保存关卡。
现在,运行“场景测试器”,你应当看到户外的世界以与室内世界不同的速度移动。这使得整个游戏世界的三维性更加逼真。
我们要做的最后一件事情是向我们的Xcode项目添加新的关卡和图片。将新关卡(游戏邦注:也就是“level04”)放入Xcode的“关卡”文件夹中。你的新“关卡”文件夹应当如下图所示:
然后,将新的图片文件(游戏邦注:即outside.png、outside-hd.png和outside.pshs)添加到“图片”文件夹中。Xcode中的新“图片”文件夹应当如下图所示:
在HelloWorldScene.mm中,修改加载关卡代码,这样它才能够加载level04文件:
lh = [[LevelHelperLoader alloc] initWithContentOfFile:@”level04″];
游戏完成,可以运行并享受这款游戏的乐趣了!
结语
祝贺你,你已经完成了这款游戏!这是个漫长的历程。我希望你能够喜欢随我制作这款游戏的过程,并学到有价值的东西。
游戏邦注:本文发稿于2012年1月23日,所涉时间、事件和数据均以此为准。(本文为游戏邦/gamerboom.com编译,拒绝任何不保留版权的转载,如需转载请联系:游戏邦)
How to Make a Game Like Jetpack Joyride using LevelHelper and SpriteHelper [Cocos2D Edition] – Part 4
Bogdan Vladu
Hello again, and welcome to the fourth and final installment of the tutorial series on LevelHelper and SpriteHelper. I said by the end of this series you would have an exciting game to play, and we’re almost there!
Last time, in part three, we came close to completing our game. We fully implemented collisions between the player and the other game elements, enabling the player to die and score points. We also made the player fly and added some nice sounds and animations.
But there are still a few improvements we can make. For one thing, we need a way to keep track of the score, and while we’re doing that we might as well add some cute moving bunnies that will be worth more points.
Our game looks nice, but I’ll take you through adding a background layer to give the illusion of a never-ending outdoor scene visible through the windows. We’ll make the background layer move so that the scene through the windows is always slightly different.
And wouldn’t it be interesting if we made some of our lasers rotate? Keep reading to complete the game!
Getting Started: Rotating Lasers
We’re picking up with the project as we left it at the end of Part Three. You can download that version of the project here.
The first thing we’re going to do is make our lasers rotate. We can’t have this game be too easy! So open up your project in LevelHelper, and make sure you have the latest version of your level open.
The first step is to go to Define Tags and define a new tag. Call it ROTATING_LASERS.
We will use this new tag to reference the lasers we select to rotate (not all of them… we’re not that evil, are we?) when we implement the rotation via code.
Now select a couple of the lasers in the level. Make sure the lasers you select have room to rotate. Assign the ROTATING_LASERS tag to these lasers.
Once you’re done tagging the lasers, save the level and open your Xcode project. Navigate to HelloWorldScene.h and add the following in the class definition:
Then place the following at the end the retrieveRequiredObjects method in HelloWorldScene.mm:
Here we take reference to all the sprites that have the tag ROTATING_LASERS. Because the array returned by this method is autoreleased, we need to retain it. In order to not forget to release this retained array, go to the dealloc function and add the following before the LevelHelperLoader object release:
Now that we’ve grabbed the lasers that we want, let’s make them rotate! Go inside your tick method and write this at the end:
If you run the game now, the chosen lasers will rotate, but the player won’t die when it makes contact with them. This is because we haven’t registered a collision event for the ROTATING_LASERS tag. To do that, add the following inside the setupCollisionHandling method:
Running the game now, the lasers will rotate and kill the player just as the non-rotating lasers do. Congrats, you have just added another layer of difficulty to our game. That said, you may want to play-test the game some more at this point to make sure the player can still get through the level!
Moving Bunnies
Running and flying over sleeping cats and dogs and dodging rotating lasers is all fun, but let’s add another reward component to the game to give it more complexity. I have just the ticket: bunnies. Cute, helpless bunnies that our player can kill for points.
Open SpriteHelper, and go to File\New. Then open Finder and navigate to the ArtPack folder (download it from Part One if you don’t have it), select the bunnies images and drag them into the SpriteHelper window. Then click the “Pack Sprites” button.
Now select all the sprites in the list and enable the “Is Sensor” option from the Physic Properties menu. (Note that our other reward component, coins, are also sensors.)
Next, create the following two animations using the bunny frames:
Animation Name: BunnyRun; Speed: 0.400; StartAtLaunch: YES; LoopForever: YES; Frames: bunny_1, bunny2
Animation Name: BunnyDie; Speed: 0.400; StartAtLaunch: YES; LoopForever: NO; Frames: bunny__die_1, bunny_die_2
When you’re done creating the animations, save the scene inside the Images folder of your Xcode project.
Going back to LevelHelper, we can see the bunny animations inside the Animations section. Select the BunnyRun animation and drag it into your level.
We now have a bunny in the level, but it will not be visible because we need to move him with the Parallax.
To add the bunny to the parallax, go to the Parallax tab, select our parallax and add the bunny sprite to it. Set the x component of the movement ratio to 1 so that the bunny moves at the same
speed as our level.
If we run the level in Scene Tester we cannot see the bunny. This is because we need to set the batch z order on the bunny image.
Navigate the the Images section and set the batch z on the bunny image to 3. This will put the bunny in front of everything except the player.
Running the level again in Scene Tester, we can see the bunny moving with the parallax, but the bunny appears to be moving in place. We want the bunny to move from right to left and from left to right. To do this, we have to make him move on a path.
Navigate to the Beziers section and click NEW to create a new bezier that will describe the path of the bunny.
Click within the level view to draw the bunny’s path, and click the Finish button when you’re happy with the bezier.
Now select the “Path” option in the bezier properties to tell LevelHelper to treat that bezier as a path.
Note:
By default, beziers are a simple line. You can make them true beziers by deselecting “Line” in the properties menu.
You can edit a bezier by pressing the Edit button and then dragging the points.
While editing the bezier, you can create a new point by holding COMMAND and clicking on a line of the bezier.
While editing the bezier you can remove a point by holding ALT (Option) and clicking on a point.
Well, now we have our path defined, but the bunny sprite doesn’t know that it should move on that path. Let’s make the bunny aware of this.
Select the bunny, then in the General Properties section, click on Path.
In the Path Settings dialogue, select the bezier that describes the path from the list, then make the motion cyclic by selecting “Cyclic Motion.”
Set the amount of time you want the bunny to take to move from one end of the bezier to the other. Then select “Flip Sprite X At Ends” so that the bunny is always facing in the direction it is moving. Otherwise, it will appear to be moving backwards half the time.
If you run the level inside Scene Tester now, the bunny should move on the path and also move with the parallax. This is cool, eh? LevelHelper is the only editor that lets you move sprites on a path and with a continuos scrolling parallax at the same time.
The last step in LevelHelper is to define a new tag called “BUNNY” and assign it to the bunny sprite. Once you’ve done this, save the level.
Time to move back to our Xcode project. We have created a new image: the bunny. So we have to add the new image files to the Images folder inside Xcode.
The contents of your project’s Images folder should now look like this:
Now let’s write some code that will make the bunny die when the player collides with it.
Add the following at the end of the setupCollisionHandling method:
This informs LevelHelper of the collision callback, but we also need to define the method for the callback. Add the following before the setupCollisionHandling method:
In the above code, we test for a dead player and do nothing if that’s the case. We then take the bunny sprite from the contact and test if it’s valid and whether it’s running the “bunnyRun” animation.
If the bunny sprite meets both conditions, we give 500 points to the user and play the bunny hit sound (part of the sound pack downloaded in Part Three of this series). We then start the bunnyDie
animation on the bunny sprite and stop the sprite’s movement on the path.
If you run the game now, you’ll see that the bunny dies when he collides with the mouse. But if you loop through the entire level, you’ll see that the bunny you killed doesn’t reappear in the level: it stays dead! So let’s do the same thing we did with the coins in Part Three and reset the bunny.
Find your spriteInParallaxHasReset method and modify it to look like this:
Above, we simply check for the BUNNY tag, and when we find a sprite that is a bunny, we set its animation to bunnyRun and unpause its path movement.
The complete project up to this point can be downloaded here.
Displaying the Score
We’re going to implement a dynamic way of showing the score. Instead of having a fixed display at the top or bottom of the screen, we’re going to show the score in a temporary pop-up window each time the user scores.
Begin by adding the following inside HelloWorldScene.h:
Now define this new method somewhere before the init method inside HelloWorldScene.mm:
Here we create a new label and assign it to our scoreText variable. We then add this label to the Cocos layer, in our case “self.” And we set the label position to be the top left corner.
Now call this new method inside the init method right after the call to setupAudio:
This is good, but right now we’re not showing the actual score to the user. We’re just showing some text. Let’s make the text change when the user gets points.
Modify your scoreHitAtPosition method to look like this:
Here we add the new points to the score variable. Then we set the text of our score label to be the newly updated score.
We then create a new label that will be displayed at the position we get in the attribute of this method. As shown in the code, this is the position of the coin or bunny triggering the score update. The coin or bunny vanishes upon collision with the player, and a score display temporarily appears in its place.
We add the new label to the layer (in this case self). We then create two actions. The first action makes the new score label disappear in one second by changing the opacity property of the sprite from 255 (full visibility) to 0 (not visible). The second action calls a new method, removeScoreText.
Lastly, we create a sequence using the two defined actions and run that sequence on the new label sprite.
We still need to define the removeScoreText method called by the second action. Add the following above the scoreHitAtPosition method:
This new method just removes the score display from the layer.
Run the game now and see how nicely this works. Every time the player makes contact with a coin or a bunny, a label pops up showing the updated score, displays for one second, then disappears.
Adding An Outside Layer
Now for our last tweak: an “outdoor” scene that will be visible scrolling through the windows in the level, adding a nice sense of depth to the gameplay.
Open SpriteHelper and create a new scene with File\New. Then open Finder, navigate to the ArtPack folder, select the bgWindow, window_background, and window_foreground images, and drag then on the SpriteHelper window.
Press Pack Sprites to pack the new sprites. Because one of the images doesn’t have alpha, a new window will ask you if you want to crop the image using a selected color. Choose Don’t Crop.
Select all the sprites and set the “No Physics” option from the Physics tab. Save the scene as “outside” and place it in the Images folder.
Back in LevelHelper, let’s create a new level in order to see the steps. With level03 opened, press Command-Shift-S to save the level as a new level. Give it the name level04 and save it inside the Levels folder.
Now inside the level view, select all the window sprites as well as all the background sprites from under the windows.
Delete the sprite by pressing the Delete key or clicking the red minus sign button on the left.
After the removal of these sprites, the scene should look something like this:
Double-check that you’ve removed all of the window and under-window background sprites, and save the scene.
Now filter the outside sprites by checking the “filter” option next to outside.png. This will make it so that we only see the sprites from that image in the list above. Set the batch z order for
outside.png to -1 to put all the sprites in outside.png behind everything else.
Next, drag the bgWindow sprite and place it in the empty spaces left when you removed the windows and background sprites.
When you’re ready, select all the new sprites with the window cut (all bgWindow sprites) and set their Z Order to 1.
Add these new sprites to the parallax and set the x component of the movement ratio to 1. Save the level.
Press the Test Level button to run the scene in Scene Tester. You may notice some of the new sprites have “noise.” That’s because some of the positions of the new sprites aren’t lining up correctly with the old sprites.
There are two ways to fix this problem:
Adjust every mismatch individually by selecting each sprite and moving the sprite using the arrow keys until it lines up correctly with the other sprites.
Select all of the misaligned sprites and set Scale X in the General Properties menu to 1.01, or a value that cancels the noise.
Save the level when you’re satisfied with how the sprites are positioned.
Now that everything is in place, let’s create a background that will move at a different speed from the rest of the parallax.
First let’s lock the sprites already in the level so that we don’t accidentally move them. To do this, select all the sprites from the list on the left, and click the Lock button.
Note: To unlock sprites, select them in the list and press the Lock button again.
With the sprites locked, drag the window_background sprite into the scene and place it above the main screen. Make sure that the left vertical border of the window_background sprite is lined up exactly with that of the main screen.
Now make sure the window_background sprite is selected, and duplicate it to the right until the end of the game world by using the green + button (or pressing Command-D). Make sure that you have the correct anchor point selected.
The level should look like this when you’re finished:
Now select all the new window_background sprites and add them to the parallax. Set the x component of the movement ratio to 0.3.
Repeat this process for the window_foreground sprite.
Drag it into the scene and position it above and in alignment with the window_background sprites:
Clone it until the end of the game world:
Add it to the parallax and set the x component of the movement ratio to 0.7:
Now select all the window_background sprites and drag them down onto the main scene so that you can see them through the window.
Repeat the process for the window_foreground sprites. Drag all of the sprites down until you can see them through the window.
Save the level when you’re done.
Running Scene Tester now, you should see the outside world moving at a different speed than the inside world. This makes it seem to the user that they are never seeing quite the same outside image through the window, making the game world feel more three-dimensionally “real.”
The last thing we have to do is add the new level and images to our Xcode project. Drop the new level (“level04”) into the Levels folder in Xcode. Your new Levels folder should look like this:
Then add the new image files (outside.png, outside-hd.png, outside.pshs) to the Images folder. Your new Images folder in Xcode should look like this:
Inside HelloWorldScene.mm, change the loading level code so that it loads the level04 file:
There’s nothing left but to run the game and enjoy!
Where to Go From Here?
Congratulations, you’ve finished the game! It’s been a long journey. I hope you enjoyed creating this wonderful game with me, and hardly noticed you were learning in the process. Thanks for reading!
An example project with all of the code from the entire tutorial series can be downloaded here.
As always, I am available to answer questions in the forums for this tutorial series, both here and on the LevelHelper forum. (Source: Ray Wenderlich)


