教程:如何使用Unity制作2.5D游戏(第1部分)
作者:Marin Todorov
2.5D游戏从根本上来说是3D游戏,但是经过开发者的处理后,游戏玩法只停留在2D轴上。(请点击此处查看第2部分)
《超级玛丽兄弟Wii》、《小小大星球》和《Paper Monsters》都是绝妙的2.5D游戏。
制作2.5D游戏(游戏邦注:3D游戏也可以使用)的绝妙方式是使用流行、简单和廉价的游戏开发工具Unity。
所以,在本系列教程中,我将向你展示如何使用Unity来制作简单的2.5D游戏《Shark Bomber!》。
如果你是个Unity新手,而且想要学习这种工具,那么本教程正适合你!你会学到如何从头开始制作出简单的游戏,并在此过程中学到许多东西。
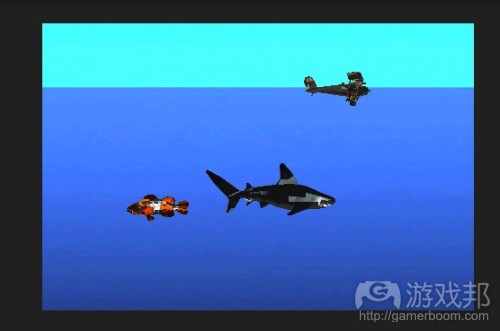
在这款游戏中,你控制的是架小型但装备精良的飞机,你的目标是向邪恶的鲨鱼投炸弹,同时还要保护可爱的小丑鱼。
Unity不使用Objective-C,所以阅读此教程不需要任何Objective-C经验。但是,拥有OO语言经验会使学习更加顺畅,比如C#、Java或Actionscript。
要记住,这是个针对Mac用户的教程,Windows用户可能无法使用。而且还要记住,你只能在iOS设备(游戏邦注:不是模拟器)上进行测试,所以要先确保拥有可使用的设备!
安装Unity
首先,让我们来安装Unity编辑器。如果你的Mac电脑上已经安装了这个工具,可以跳过这个步骤。
从下载页面处下载Unity。获得DMG文件后,打开Unity安装程序,经过标准安装过程后,你会在二进制数据存放点看到/Applications/Unity文件夹。
打开Unity,点击“注册”按钮(游戏邦注:该工具可以先免费试用)。选择“连网激活”,点击“下一步”,填写网页上的表格。
重点:根据本教程需要,你需要选择“激活专业/iOS测试版”选项,这样你才能将游戏发布到iPhone上。
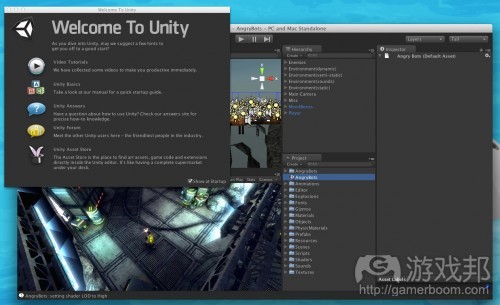
注册完成后,Unity就会开启如下窗口:
关闭弹出窗口“欢迎来到Unity”,选择“文件\新项目”,选择文件夹存放点,将项目命名为“SharkBomber”。确保所有程序包都未被选择,然后点击“创建项目”。
现在,你看到的是个空白窗口。窗口上有许多按钮,我们将在下个部分中挨个解释。
Unity编辑器概述
现在,让我们通过某些额外的调试来实现已知的配置。
在应用窗口右上方,你会看到选择框,从列表中选择“高度”。这会重新分布窗口内容(游戏邦注:默认选择为“宽度”)。
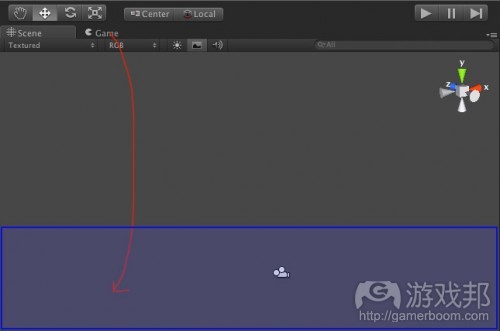
现在,在窗口左上角(游戏邦注:工具栏下方)找到“游戏”标签,将其拖动到窗口底部附近的区域,直到你看到它将融入底部的指示,将其放在底部。
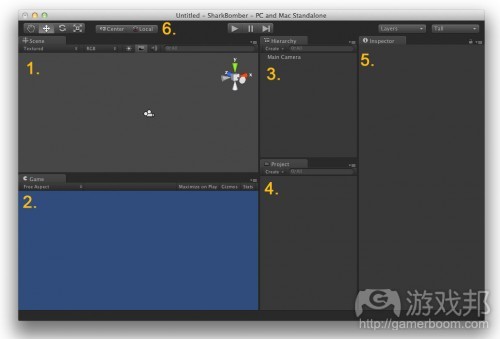
现在,你应当可以看到如下图所示的窗口布局:
让我们花点时间来阐述下这几个不同的面板:
1、场景:你可以在这里移动3D模型,浏览3D世界。
2、游戏:这是你所选择的镜头(游戏邦注:在这款游戏中指主镜头)看到的画面,在你使用编辑器时会即时更新。当你点击“运行”时,你的游戏可在此处运行,你可以测试游戏。
3、等级系统:显示你的对象树(游戏邦注:类似于HTML DOM),目前你只有一个镜头,但是我们随后会添加更多东西。该列表中的对象会呈现在场景中。
4、项目:这里的内容有你的项目、资产、音频文件以及所有你现在或随后将用到的东西。
5、检查器:你可以在这里看到场景中所有选择对象的资产并对它们做出调整。Unity的独特之处在于,当你运行场景时检查器依然保持运转,所以它同样也是你的调试器!
6、工具栏:这里有你可以用来与场景中对象互动的工具和用来测试场景的“运行”和“暂停”按钮。
在你的Unity3D项目中,你可以拥有许多不同的场景,并在它们之间来回切换。现在,你已经在编辑器中设立了一个空白的场景。让我们将其保存。
1、在项目面板中点击右键,选择“创建/文件夹”,新文件夹生成。
2、将其重命名为“场景”,左键单击文件夹名称或选择文件夹后按“回车”都可以重命名文件夹。
3、现在,在主菜单处选择“文件/保存场景”,将保存对话框导航到“(你的项目目录)/资产/场景”,将场景保存为“LevelScene”。
让我们来确认下,在项目面板中打开场景文件夹,你可以看到LevelScene场景。
现在,我们做好了运行游戏的准备,点击上方的播放按钮!虽然画面没有发生改变,但事实上游戏正在游戏面板中运行!不要忘了,再次点击播放按钮来暂停游戏,这一点很重要!
设置iPhone Unity3D项目
Unity的精妙之处在于,它可以用来为iPhone、 Mac、Wii和其他平台构建游戏。在本教程中,我们将构建的是iPhone游戏,所以我们需要先创建某些细节。
从菜单中选择“文件/构建设置”,然后点击“添加当前”按钮将当前选择场景添加到项目中。你可以看到,当它被添加时获得了指数“0”,这意味着它将是游戏开启时首个被加载的场景。这正是我们想要的结果。
从平台列表中选择iOS,点击“转换平台”按钮。现在,Unity的图标显示在iOS列中。
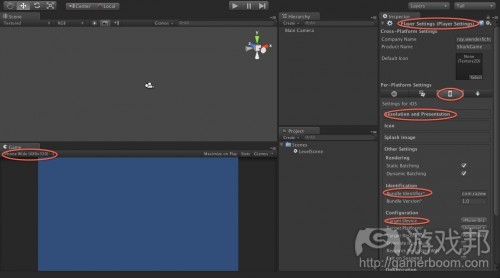
这便是我们现在需要的所有设置,点击“玩家设置”并关闭这个弹出窗口。你会注意到,玩家设置在检查器中开启,我们也需要在这里进行许多设置。
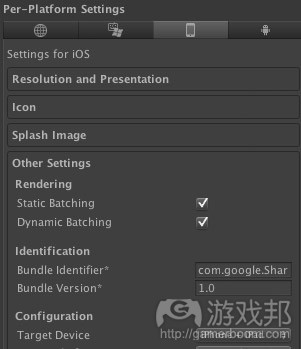
在“呈现平台”中,确保显示iPhone的标签已被选中,如下图所示:
此处可以进行诸多设置,多数内容你已经在Xcode中接触过,你可以随后自行体验和探索。
现在,使用这个检查器进行下列修改:
1、在“分辨率和呈现”选项的“默认方向”中选择“水平左向”。
2、在束检查器的“其他设置”选项中输入所有你想要的内容(游戏邦注:除了默认值)。
3、在“其他设置”选项中,将目标设备选择为“仅限iPhone”。
最后个步骤:左方的“游戏”标签下有许多可用的不同方向和分辨率,选择“iPhone Wide (480×320)”以匹配默认的横向方向。
祝贺你,现在你完成了个基本的“Hello World”项目,你可以尝试将其在iPhone上运行!
在iPhone上运行游戏
为测试之前我们进行的设置,我们准备在Xcode和iPhone上测试项目。
首先从开发者最喜欢的Xcode版本开始,如果有欢迎屏幕的话先将其关闭,转换回Unity。这是种告诉Unity运行何种Xcode版本的技巧,同时运行两者即可。
回到Unity中,从菜单中选择“文件/构建&运行”,构建设置会再次弹出,点击“构建和运行”按钮。
你会被询问要将Xcode保存在何处。在项目目录中创建名为“SharkBomberXcode”的文件夹(游戏邦注:Xcode内容将保存于此文件夹中),在文件名栏中输入“SharkBomber”。
片刻之后,项目构建完成,你会看到Xcode窗口弹出,打开的项目名为Unity-iPhone。Unity已经生成了Xcode项目源代码,现在这个已生成的项目以做好了构建和运行的准备。
你或许想要看下源代码,但是它事实上只是个样板文件,加载包含些许dll文件和资产的单框架。
你有两个目标,所以确保你的iOS设备已插入,选择“Unity-iPhone”目标和你的设备。我无法让模拟器目标运行,如果你可以做到的话,是件很棒的事情,我在下文阐述中使用的都是针对iOS设备。
片刻后,点击“运行”按钮,你的Unity项目现在能够在iPhone上运行了!
你会看到默认的Unity开启屏幕,然后便是场景的蓝色背景(游戏邦注:角落处还有“试用版”字样)。
停止运行任务,切换回Unity,保存项目。
设置场景
首先,让我们来设置场景的主镜头。选择“等级系统”中的“主镜头”,在检查器中找到“投影”并将其设置为“正交”,“大小”设置为“10”,在剪裁平面中将“近端”设置为“0.5”,将“远端”设置为“22”。现在,你可以看到场景中镜头附近有个盒子,这是场景中可视范围的边界。
注意,我们已经将镜头投影设置为“正交”,这意味着深度坐标不会影响到内容在屏幕上的外观,我们可以有效地创建出2D游戏。现在我们先这样来做,直到你熟悉了Unity,我们再转向3D投影。
在检查器中将镜头位置坐标设置为(0,0,0)。注意,从现在开始,当我将位置编写成(x,y,z)的形式时,就是为该资产设定了在3个盒子中的值。
右键点击项目面板,再次选择“创建/文件夹”,将新文件夹命名为“纹理”。然后下载我为该游戏制作的背景图片,将其保存在你的硬盘中。将背景图片从查找器中拖动到你刚刚创建的“纹理”文件夹中。
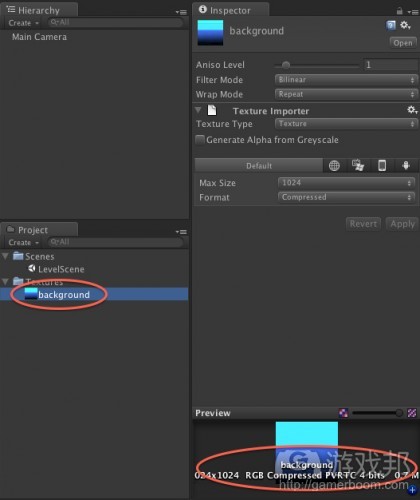
我的iMac完成此次导入耗费了20秒左右的时间,完成后打开文件夹,选择“背景”纹理,然后在检查器中查看纹理资产。在预览面板的低端有行文字,表明Unity已经识别我们正在导入纹理,对其进行压缩处理。
从菜单中选择“游戏对象/创建其他/飞机”,你会看到镜头旁边出现蓝色矩形。这便是我们刚刚添加到场景中的飞机,我们将把已经获得的纹理运用到它身上。
在等级系统面板中选择“飞机”,检查器上方的文本显示“飞机”进入“背景”。这会改变对象的名称,你可以通过这种方式来将对象重命名。从项目面板中拖动“背景”纹理,将其放入等级系统的“背景”对象中。在检查器中将飞机的位置设为(4,0,20),旋转设为(90,180,0),缩放设为(10,1,5)。正如你在“场景”面板中看到的那样,游戏会缩放和旋转飞机,使之面对镜头,这样镜头才会将飞机视为游戏的背景。
现在,为了能清楚地看到场景中的内容,我们需要光照(游戏邦注:这点类似于现实生活),选择“游戏对象/创建其他/方向性光照”,这会给你的场景添加些许光照。在“等级系统”中选择方向性光照,将其坐标设置为(0,0,0)。
现在,我们完成了场景的所有设置和背景,到了添加对象并让它们开始移动的时候了!
向场景添加3D对象
从菜单中选择“游戏对象/创建其他/方块”,这样就像你的场景中添加了一个方块对象。这代表的就是游戏玩家,所以我们将它重命名为“玩家”。
将其位置设置为(-15,5.3,8)。你会看到方框出现在靠近“游戏”面板屏幕左侧的位置上,这便是我们游戏中飞机的起点,它将飞过海面到达屏幕的另一端。
现在,让我们导入飞机模型!我们使用由Reiner “Tiles” Prokein制作的免费3D模型,他将其免费发布到自己的网站上。
要进行上述步骤,先下载他的飞机模型并将内容解档。
在“项目”面板中点击右键,选择“创建/文件夹”,将文件夹重命名为“模型”。你可以在文件夹中解档飞机模型,将文件“airplane_linnen_mesh.obj”拖动到“项目”面板的“模型”文件夹中。
然后右键点击“模型”文件夹,选择“创建/文件夹”,将新的子文件夹重命名为“纹理”,我们将运用到模型中的纹理保存于此处。将“airplane_linnen_tex.bmp”文件拖动到新创建的“纹理”文件夹中。
接下来,在“等级系统”面板中选择“玩家”对象,查看“检查器”,“网状过滤器”选项是设定对象几何的过滤器(游戏邦注:目前其设定的是方块几何)。在“网状-方块”行中寻找中间带点的小圆圈,然后点击它,这样就能打开弹出窗口,你应当在窗口中双击飞机模型,这会将你的对象集合转变为飞机。
现在,有个细节问题,飞机看起来有点糟糕。我不是个3D专家,但我发现Unity中有解决这个问题的方法:在“项目”面板中选择“airplane_linen_mesh”,然后在“检查器”中找到“普通”,然后选择“计算”,接下来向下滑动滚动条,点击“应用”按钮。
现在,你可以看场景中看到平滑的飞机模型!接下来,让我们来应用它的纹理:将“airplane_linnen_tex”纹理从“项目”面板中拖动到“等级系统”面板的“玩家”中。Unity会自动将纹理应用到场景中的飞机模型上。
最后对飞机做些许调整:在“玩家”对象中将旋转设为(0,90,350),缩放设为(0.7,0.7,0.7),这会旋转和缩放飞机,使之看起来在海平面上飞行。
这款游戏还并未完善,在下个版块中我们将让飞机开始飞行!
开始用C#进行Unity3D编程
正如你已经在构建设置对话框中看到的那样,Unity可以将你的项目构建成Wii游戏、iPhone游戏、单机Mac游戏等。正因为Unity如此全能,所以它需要某些跨媒体层次,你可以用来对游戏编程,每个不同的构建都会将其转变为平台专用代码。
所以,你需要使用C#在Unity中编程(游戏邦注:而不是Objective-C)。当Unity生成你的Xcode项目时,它会自动将C#代码转换为平台专用代码!在“项目”面板中点击右键,选择“创建/文件夹”,将新建文件夹重命名为“类”。右键点击“类”文件夹,选择“创建/C#脚本”,将新文件重命名为“玩家类”。在“项目”面板中点击右键,选择“同步MonoDevelop项目”,这样会打开MonoDevelop IDE,在这个IDE中,你可以用C#来编程。
注:MonoDevelop是个移植自Linux的程序,用户界面类似于Gnome,所以程序崩溃是很正常的事情,尤其是在你重新调整窗口大小时。如果发生上述情况,只需要再次点击“同步MonoDevelop项目”即可打开。
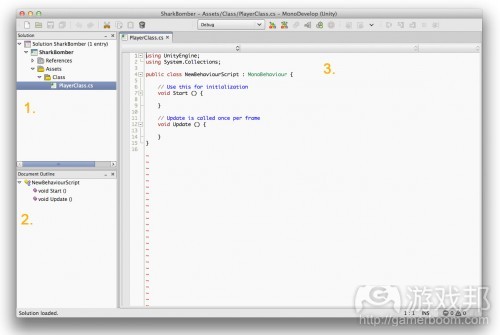
以下是MonoDevelop GUI的3个主要区域:
1、你的MonoDevelop项目浏览器,在资产/类中你可以看到PlayerClass.cs文件
2、当前打开类的概览
3、编辑器区域,句法高亮和自动完成能够为你的编程提供帮助
在项目浏览器中找到你的PlayerClass.cs文件,双击将其在编辑器中打开。确保类如下所示:
using UnityEngine;
using System.Collections;public class PlayerClass : MonoBehaviour {
// Use this for initialization
void Start () {}
// Update is called once per frame
void Update () {}
}
“using”句法包括所提供的库和框架,在UnityEngine这个库中,你可以访问iPhone加速计、键盘输入和其他手持设备功能。
你可以定义新类并继承自MonoBehaviour,这可以让你获得大量的内容:你可以使用当特定事件被触发时会被调用的大量方法。
下面数行就是开始和更新方法,这是两个重要事件。
1、开始在对象显示在屏幕上时调用,这样你才能进行初始化(游戏邦注:很像viewDidAppear: in UIController)。
2、更新在每帧播放时调用(游戏邦注:每秒调用次数可能是30、60或100),以实现移动和游戏逻辑等。
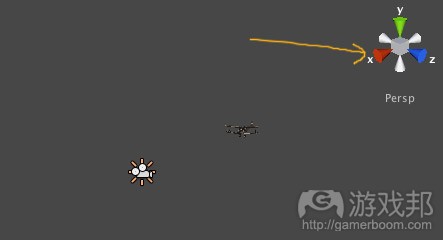
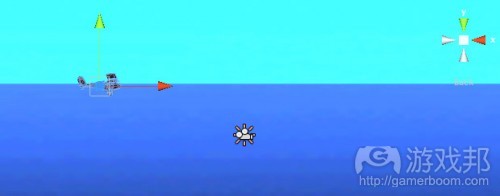
现在,让我们先转回Unity片刻。我们想要让飞机在海面上飞行,而且当它从屏幕右侧移出时能够再次从左侧移入屏幕。让我们来看看要将飞机移动到屏幕左侧的哪个位置。“场景”面板的右上角有个方向部件,点击X柄(游戏邦注:显示是个红色的圆锥体,作者将其称为“柄”):
这可以旋转场景,将其方向调整为水平面对你。再次点击现在位于部件左侧的柄,这会再次使场景旋转,你可能需要多次点击左柄,直到你看到的场景正面如下所示:
现在,你可以使用鼠标滚轴来缩放场景,使其适合“场景”面板的大小。确保上方工具栏的移动工具被选中,在“等级系统”中选择“玩家”。
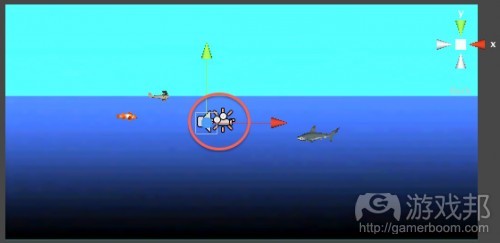
现在,你可以看到有个新部件附在飞机上,带有绿色和红色的箭头。现在,你可以拖动箭头,它们会根据箭头所代表的轴来移动飞机:
我们需要做的就是拖动红色箭头(游戏邦注:代表水平轴),将飞机向右侧拖动,直到它离开下方的“游戏”面板。
在“场景”面板中拖动时,要同时查看“游戏”面板。将飞机放置在可视屏幕之外,在“检查器”中查看它的位置。
现在,X的值应当在17.25左右,这是屏幕的右侧边界,你可以向左拖动飞机,这样便可以看到左侧边界的值为-17.25左右,所以我们将在设定飞机飞行时使用18和-18这两个值。将飞机放回屏幕左侧之前的位置。转换回MonoDevelop,对PlayerClass.cs进行下列修改:
//just after class declaration line
public float speed;//inside the Update method
if (transform.position.x > 18) {
//get new speed
speed = Random.Range(8f,12f);
transform.position = new Vector3( -18f, transform.position.y, transform.position.z );
}
transform.Translate(0, 0, speed * Time.deltaTime);
或许你已经猜到,你刚刚在类上设定了公共资产“速度”,Unity的独特之处就在于,所有的公共类资产都可以通过“检查器”面板访问!
所以,你可以在IDE中设定类资产值,你可以在游戏运行时自由地即时调整资产值,这难道不是件很棒的事情吗?
对每个游戏对象(游戏邦注:屏幕中的所有东西都是游戏对象)来说,“改变”变量是个处理对象空间位置的资产,包括旋转、位置和缩放等。根据每次更新调用来调整对象的位置,这样它才能够移动到屏幕右侧。
我们不能只按照更新的每次调用来将飞机移动特定距离,因为没有人知道该命令每秒的调用次数。事实上,我们以每秒单位数来确定速度,将速度除以最后一次调用更新所经过的时间。这样,对象的移动就会独立于当前帧率,保持以相同的速度移动。
转化调用涉及到3个值,也就是每个轴上面需要做出的转化。你或许已经注意到,我们也在Z轴(游戏邦注:这就是第3个参数)上移动飞机。我们必须这么做,因为我们要在屏幕上旋转飞机,所以转化Z轴从玩家的视角来看就是将其移动到右侧!
看看“if”条件,我们查验transform.position.x是否大于18,如果条件满足,我们会将飞机的位置设置在相同的坐标上,但X轴值改变为“-18”。我们使用新的Vector3(x,y,z)来设定位置,我们将在定位中大量使用这些矢量。你还会看到,我们将速度设定为8到12间的随机值,这只是为了让飞机可以更自由地移动,让游戏更加有趣。
这样,我们便为飞机的移动做好了准备!
转回Unity,将“玩家类”从“项目”面板中拖动到“等级系统”面板的“玩家”上,这样你便将类同游戏对象绑定起来。在“等级系统”中选择“玩家”,查看“检查器”,你会看到出现了名为“玩家类(脚本)”的新带,你还可以看到公共资产。将它的值设定为“12”。
准备好之后,点击播放按钮。你会看到在“场景”和“游戏”面板中,飞机开始移动,当它从右侧移出时会回到屏幕左侧。你还可以在“检查器”中看到飞机位置的X轴数值实时更新,它向你展示的是飞机在特定时刻的位置。而且,飞机每次飞行的速度会随机改变。
享受目前所取得的成果后,不要玩了再次点击播放来暂停游戏。
接下来,我们要为开始为这架飞机制作敌人——一只凶险的鲨鱼!现在,你应当对这个工具的基本使用方法较为熟悉。我们接下来会进展得更快,因为接下来一段时间里我们无需完全重新制作所有东西。
需要休息会儿吗?到目前为止,我们已经教授了许多内容!如果你感到疲惫,可以先休息会儿,只是要注意保存Unity项目。但是,当你再次打开Unity项目时,工具默认会打开空白场景。要加载你正在制作的这个场景,双击“项目”面板中的“LevelScene”,你就可以继续工作了。
添加鲨鱼
下载并解档鲨鱼模型。像你之前处理飞机那样,将文件“shark.obj”拖动到“项目”面板的“模型”文件夹中,将“sharktexture.bmp”放置在“模型/纹理”中。
从菜单上选择“游戏对象/创建其他/胶囊”,将“等级系统”中的“胶囊”对象重命名为“鲨鱼”。在“检查器”中的“网过滤器”带中,点击内部带点的圆圈,在弹出窗口中双击鲨鱼模型。现在,你应当能够在“场景”和“游戏”面板中看到鲨鱼几何。
将“sharktexture”(游戏邦注:位于模型/纹理)从“项目”面板拖动到“等级系统”的“鲨鱼”对象中,这会让你的鲨鱼拥有有力的大嘴和邪恶的眼睛!看到这样的鲨鱼,我已经冒出了炸它的念头!
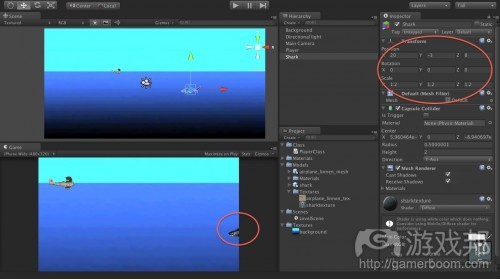
确保“鲨鱼”被选中,在“检查器”中设置如下资产:位置(20,-3,8),范围(1.2,1.2,1.2),这样鲨鱼便被放置在贴近镜头可视范围右侧的位置,它从这里开始向屏幕左侧移动。
现在,因为我们希望鲨鱼能够同我们的炸弹互动,所以我们希望鲨鱼的碰撞器或多或少能同鲨鱼的几何配对。正如你看到的那样,有个绿色的胶囊与屏幕中的鲨鱼粘连。这便是鲨鱼的碰撞器。让我们将其与邪恶的鲨鱼身体配对。
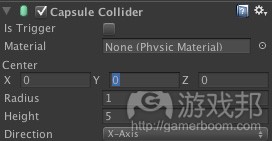
在“检查器”中寻找“胶囊碰撞器”带,设定如下数值:半径设为“1”,高度设为“5”,方向设为“X轴”,中心设为“(0,0,0)”。现在,你会看到胶囊碰撞器已经被调整到与鲨鱼身体相似的样子,比原先好多了!
最后,在“项目”面板“模型”文件夹中选择“鲨鱼”模型,然后在“检查器”中寻找“普通”,选择“计算”,然后下拉点击“应用”按钮。
在“项目”面板“类”文件夹中点击右键,选择“创建/C#脚本”,将新脚本重命名为鱼类。点击右键,选择“同步MonoDevelop项目”。
MonoDevelop将会弹出,打开FishClass.cs文件,输入下列代码:
using UnityEngine;
using System.Collections;public class FishClass : MonoBehaviour {
public float speed = 6f;
// Update is called once per frame
void Update () {
if (transform.position.x < -30 || transform.position.x > 30) {
//turn around
transform.Rotate(new Vector3(0,180,0));
transform.Translate( new Vector3(-10, -transform.position.y + Random.Range(-4,-1),0) );//get new speed
speed = Random.Range(6f,10f);
}
transform.Translate( new Vector3(-speed*Time.deltaTime,0,0) );
}
}
这些代码同我们上文中针对飞机编写的很相似。我们设立速度资产(游戏邦注:以每秒为单位),在更新事件处理器中使用转化。鲨鱼的移动便由此实现。
注意,这次我使用的是:
transform.Translate( new Vector3(x,y,z) );
这样做只是想演示某些使用不同参数的方法,尽管使用独立的3个数值和1个矢量是完全相同的。
现在,让我们看看鲨鱼在到达屏幕边界后会做出何种动作。这次我们设定的鲨鱼移动屏幕边界坐标为-30和30,一段时间内鲨鱼将从屏幕上消失,这样玩家就无法轻易地在其折返时进行伏击。
当鲨鱼到达左右屏幕边界时,它会折返并改变速度,并不断如此往返。
显然,transform.Rotate(new Vector3(x,y,z))的调用可以使对象根据特定坐标值转向,你对transform.Rotate(new Vector3(x,y,z))应当很熟悉了。
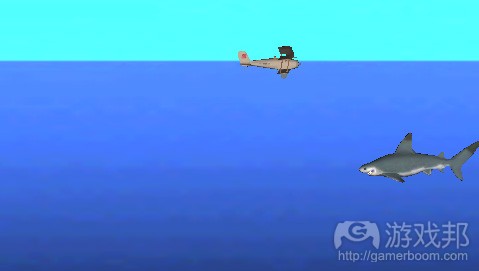
这确实是件很简单的事情!转换回Unity,拖动“鱼类”脚本到“等级系统”的“鲨鱼”对象上。现在点击播放:你可以看到鲨鱼往返游动,直到被炸弹击中。太棒了!
添加小丑鱼
让我们再用同样的做法来添加小丑鱼。步骤如下:
1、下载并解档小丑鱼模型。
2、拖动“mesh_clownfish.obj”到“项目”面板的“模型”文件夹中,将“clownfish.bmp”拖动到“模型/纹理”中。
3、选择“游戏对象/创建其他/胶囊”,将“等级系统”中的“胶囊”对象重命名为“小丑鱼”。
4、点击“网过滤器”带有点的循环按钮,在弹出窗口中点击小丑鱼几何。
5、将“小丑鱼”模型纹理拖动到“等级系统”中的“小丑鱼”对象上。
6、确认“小丑鱼”已选中的情况下在“检查器”中修改下列资产:位置设为(-20,-1,7),旋转设为(0,180,0),缩放设为(0.4,0.3,0.3)。
7、在选中“小丑鱼”的前提下,在胶囊碰撞器带中修改下列资产:半径设为“4”,高度设为“4”,方向设为“Z轴”,中心设为“(0,0,0)”。
8、将“鱼类”从“项目”面板拖动到“等级系统”的“小丑鱼”对象中。这样就把与鲨鱼相同的一般鱼类分配给小丑鱼。
9、在“项目”面板“模型”文件夹中选择“mesh_clownfish”模型,然后在“检查器”中找到“普通”,选择“计算”,然后下拉并点击“应用”按钮。
点击播放,现在你可以看到屏幕上已经有两条移动的鱼,而这次我们完全无需另外编写代码!
鱼可以来回游动,飞机也能够飞行,所有内容都运转良好。现在,我们还需要炸弹。
设置炸弹
下载和解档油桶模型。与之前一样,将“colourcan.obj”文件拖动到“项目”面板“模型”文件夹中,将“cantex.bmp”文件放入“模型/纹理”。
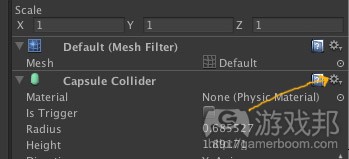
从菜单中选择“游戏对象/创建其他/胶囊”,将对象重命名为“炸弹”。在“网过滤器”弹出窗口中双击油桶几何。将“cantex”纹理拖动到“等级系统”中的“炸弹”对象上。在“检查器”中的“胶囊碰撞器”中点击下图按钮打开弹出菜单:
当弹出菜单出现时,选择“重置”,这样碰撞器自动会接受分配的几何大小!
接下来,在“项目”面板“模型”文件夹中选择“colourcan”模型,然后在“检查器”中找到“普通”,选择“计算”,然后下拉并点击“应用”按钮。
接下来,让我们来接触一项新的内容!再次选择炸弹对象,在胶囊碰撞器带中勾选“Is Trigger”选框!勾选这个选框意味着当炸弹同其他对象碰撞时会触发事件。
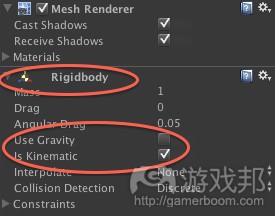
但是,要使上述情况发生,我们还需要为炸弹分配刚体,因为至少要有一个碰撞对象带有刚体。从菜单中选择“组件/物理/刚体”(游戏邦注:此时要确保等级系统中的炸弹被选中)。
完成这个步骤后,“检查器”中应当会显示新带“刚体”。去除“使用万有引力”,然后勾选“Is Kinematic”,这样我们才能程序化地控制刚体。这样,碰撞爆炸实现的所有条件均已达成!
下载炸弹释放的音效,将其保存在硬盘上。
我们要在飞机投放炸弹时播放这个音效,也就是当炸弹首次出现在屏幕上的时候。让我们来实现这个目标!
右键点击“项目”面板,选择“创建/文件夹”,将新文件夹重命名为“音频”。将“bahh1.aif”文件拖动到“音频”文件夹中。接下来,将“bahh1”音效文件从“项目”面板拖动到“等级系统”中的“炸弹”对象上。
无论你是否相信,我们需要做的就只有这么多。音效同炸弹绑定,当炸弹出现在屏幕上时就会播放。现在,你就知道用Unity制作游戏是件很简单的事情。
在“等级系统”中选择“炸弹”对象,在“检查器”中找到“音频来源”带,可以看到“激活时播放”选框已经勾选,这就相当于告诉音频在对象出现在屏幕上时播放。再看看“场景”面板,你会看到现在炸弹上有个扬声器的图标。
预制游戏对象
“等级系统”展示的是当前显示在屏幕上的内容,“项目”包含的是你所拥有的所有对象。这与你在本板块要实现的目标有关,也就是让飞机装载多个炸弹,并根据自己的意愿将其投放到海中。
我们准备要做的事情是,预制游戏对象(游戏邦注:即该对象已准备好出现在屏幕上)但不将其添加到屏幕上。
在“项目”面板中点击右键,选择“创建/文件夹”,将其重命名为“预制”。右键点击“预制”,选择“创建/预制”。将新预制重命名为“炸弹预制”。注意,小方块图标是白色的,这表示这是个空白预制。
现在,从等级系统中将“炸弹”拖动到“项目”中的“炸弹预制”上。注意,现在方块图标变为蓝色,这表示这是个满预制,已经做好克隆的准备。看看现在的“等级系统”面板,“炸弹”字体变为蓝色,这意味着现在对象正处于预制状态。
现在,我们已经设置完成,就不需要原本位于屏幕上的炸弹对象。右键点击“等级系统”中的“炸弹”,选择“删除”。
接下来,让我们来编写代码。转向MonoDevelop,打开PlayerClass.cs,在“速度”资产中添加下列代码:
public GameObject bombPrefab;
在这个资产中,我们涉及到了炸弹预制,我们将实现上述设定的目标。注意,资产类型是“游戏对象”,我之前说过,游戏中的所有东西都是游戏对象(游戏邦注:很像Cocoa中的NSObject),所以对所有对象设定此种类型是比较安全的做法。
现在,转换回Unity,选择“玩家”。正如你所期望的那样,“检查器”中的“脚本”下出现新资产“炸弹预制”。让我们来设定其数值:将“炸弹预制”从“项目”面板拖动到“检查器”中的“无(游戏对象)”上,现在区域显示它已经为炸弹预制分配了数值。
对于游戏中的炸弹,我们还需要有个C#类,右键点击“项目”中的“类”文件夹,选择“创建/C#脚本”,将其重命名为“炸弹类”。右键点击并选择“同步MonoDevelop项目”,MonoDevelop会弹出。打开BombClass.cs并将内容替换为如下代码:
using UnityEngine;
using System.Collections;public class BombClass : MonoBehaviour {
private float ySpeed = -4f;// Update is called once per frame
void Update () {
transform.Translate( new Vector3(0f, ySpeed*Time.deltaTime, 0f) );
if (transform.position.y < -11) {
Destroy(this.gameObject);
}
}
}
这段代码同上文所述代码极为相似,我们每帧转化对象,当移出屏幕边界时做出适当的反应。在炸弹的设置中,我们想要的是炸弹在移除边界后被摧毁,这样我们就能保持从炸弹预制中生成新对象。
在代码中,“this”指C#炸弹类,gameObject资产指屏幕上的对象,代码让我们能够摧毁屏幕上的对象和所有相关组件。有关游戏对象等级系统的内容,我们将在教程的第2部分中讨论。
轰炸鲨鱼
终于到了最后一个部分,轰炸鲨鱼!
打开PlayerClass.cs,在更新方法末端添加:
if (Input.anyKeyDown) {
GameObject bombObject = (GameObject)Instantiate(bombPrefab);
bombObject.transform.position = this.gameObject.transform.position;
}
让我们来依次分析这3行代码:
1、输入是让你可以使用键盘、鼠标、加速计和触摸的类。当按键被按动后,Input.anyKeyDown值变为真,这种情况一次性只能出现一次。比如,按键首次按动过后,Input.anyKeyDown又会变为假,直到另一个按键
被按动。anyKeyDown是手持抽象,当玩家点击鼠标、按动键盘按键或触摸iPhone屏幕的动作被接收到时,它的值会变为真。
2、(GameObject)Instantiate(bombPrefab)用来从预制中创建实例,将其添加到场景中。
3、最后,我们将炸弹的位置设成与飞机相同。
这样,当玩家点击屏幕时,炸弹都会出现,随后开始下落,当离开屏幕时就会自动消失。
让我们来尝试一下!转换回Unity并点击播放,现在如果你在“游戏”面板中点击(游戏邦注:模拟触摸操作),就会看到炸弹在飞机所在点生成。
多次点击就会生成多枚炸弹。你应当还能听到炸弹的音效。但是炸弹不会下落!为什么呢?你能不能自己找到问题所在呢?
我希望你能够自己发现问题,问题就是:你还未给炸弹预制分配炸弹类。从“项目”面板“类”文件夹中将“炸弹类”拖动到同面板“预制”文件夹中的“炸弹预制”上。查看“检查器”,看是否能够看到炸弹类脚本带。现在再次点击播放,效果好多了!
但是,仍然不够完美,那些鲨鱼并没有在被炸弹击中后死亡。因为我们已经配置了碰撞器和炸弹的刚体组件,我们只需要添加代码来对碰撞做出反应。转换回MonoDevelop,将下列新方法添加到炸弹类中:
void OnTriggerEnter(Collider obj) {
if (obj.gameObject.name == “Shark”) {
//reset shark
obj.gameObject.transform.rotation = Quaternion.identity;
obj.gameObject.transform.position = new Vector3(20f, -3f, 8f);
Destroy(this.gameObject);
}
}
让我们来逐行解释上述代码:
1、OnTriggerEnter是当实体同其他实体发生碰撞时被调用的方法,第2个实体被视为参数。
2、在这行中,我们检测炸弹击中的对象是否是“鲨鱼”。
3、如果被击中的确为鲨鱼,那么首先我们会重置对象旋转。
4、其次,我们将鲨鱼重置回其原本的位置。
5、最后,我们调用this.gameObject摧毁来让炸弹从屏幕上消失。
依然很简单,不是吗?你只需要这些代码就足够了。转换回Unity并运行游戏!用炸弹击中鲨鱼后它会消失,然后屏幕中会出现新的鲨鱼。
你还可以从菜单中选择“文件/创建&构建”,当Xcode弹出时点击其中的“运行”,这样你就可以在iPhone上运行游戏了!
在本系列教程的第2部分中,我们将增添游戏趣味性,让游戏变得更富挑战和有趣!
游戏邦注:本文发稿于2011年8月9日,所涉时间、事件和数据均以此为准。(本文为游戏邦/gamerboom.com编译,拒绝任何不保留版权的转载,如需转载请联系:游戏邦)
How To Make a 2.5D Game With Unity Tutorial: Part 1
Marin Todorov
A while back, you guys said you wanted a tutorial on “How To Make a 2.5D game.” You guys wanted it, you got it!
If you don’t know what a 2.5D game is, it’s basically a 3D game that you squish so the gameplay is only along a 2D axis.
Some good examples are Super Mario Brothers Wii, Little Big Planet, or Paper Monsters.
One great way to make 2.5D games (or 3D games too!) is via a popular, easy, and affordable game development tool named Unity.
So in this tutorial series, I’m going to show you how you can use Unity to create a simple 2.5D game called “Shark Bomber!”
If you’re new to Unity but would like to learn it, this tutorial is for you! You’ll learn how to make a simple game from scratch and learn a ton along the way.
In this game, you take control of a small but (well armed) airplane, and your job is to bomb the evil sharks while protecting the lovely clownfishes!
Unity doesn’t use Objective-C, so for this tutorial, you don’t need any Objective-C experience. However, some experience with an OO language is a plus – ideally C#, Java, or Actionscript.
Keep in mind that this is a Mac-users tutorial – Windows users might not find it accurate for their setups. Also, keep in mind you will test on an iOS device only (not the simulator) – so make sure you have a device ready to work with!
OK, so let’s dive into Unity – but be sure to avoid those sharks!
Installing Unity
First let’s install the Unity editor – if you already have it on your mac just skip this step.
Download Unity from its download page. Once you have the DMG file, mount it and start the Unity installer, after a standard installation procedure you will have a /Applications/Unity folder where the binaries are located.
Start Unity, and click the “Register” button (don’t worry, you can try it out for free). Select “Internet activation”, click Next, and fill in the form on the web page that appears.
Important: For this tutorial, you need to choose the “Start Pro / iOS Trial” option so you can publish to the iPhone (not the plain “Free” option!)
After registration completes, Unity should start up and you should see a window that looks something like this:
Close down the “Welcome to Unity” popup, go to File\New Project, choose a folder somewhere on your disk and name the project SharkBomber. Make sure all the packages are unselected, and click Create Project.
Now you’re at a blank slate. Wow there are a lot of buttons, eh? Don’t worry – in the next section we’ll go over it bit by bit.
Unity Editor Overview
Let’s do some additional setup to get things into a known configuration.
In the top right-hand corner of the application window you’ll find a select box – select “Tall” from the list. This will rearrange the window contents (the default was “Wide” FYI).
Now find the tab in the top left corner (just below the tool bar) saying “Game”- drag it near the bottom of the window until you see indication it’ll snap to the bottom and drop it there.
Now you should see the layout from the picture below:
Let’s go quickly over the different panels:
Scene: Here you move your 3D models around and can browse your 3D world.
Game: This is what your selected camera (in this case the main camera) sees – real-time until you use the editor as well; in this strip your game runs when you hit “Run” and you can test your game.
Hierarchy: Your objects’ tree (much like the HTML DOM for example), currently you have only a camera, but we’ll add some stuff here later on; the objects in this list are currently present on the scene.
Project: This is the contents of your project, your assets, audio files, everything you will be using now or later on.
Inspector: Here you see all the properties of the selected object in the scene and you can adjust them; unique about Unity is that the Inspector is alive when you run your scene so it’s your debugger too!
Toolbar: Here you have the tools to interact with the objects in your scene and the Run and Pause buttons to test your scene.
In your Unity3D project you can have many different scenes and you can switch between them. Currently you have one empty scene open in the editor. Let’s save it.
Right-click inside the Project panel and choose “Create/Folder” – a new folder appears.
Rename it to “Scenes” – you can do this by single left click on the folder name, or by selecting the folder and pressing “Enter”.
Now from the main menu choose “File/Save scene” – navigate the save dialogue to [your project directory]/Assets/Scenes and save the scene as “LevelScene”.
Phew! OK – that’s done. Let’s check – in your Project panel open the Scenes folder – there’s your LevelScene scene. Cool!
Now we are ready to run the game – hit the Play button on top! Not much changes – but in fact your game is running inside the Game panel! Don’t forget to stop the game by clicking the Play button again (this is important!)
Setting up an iPhone Unity3D project
One of the nice things about Unity is that it can build games for iPhone, Mac, Wii and other platforms. In this tutorial we’ll be building an iPhone game so we need to setup some details first.
From the menu, choose “File/Build Settings” and click the “Add current” button to add the currently selected scene to the project. You can see when it’s added that it’s got an index of “0”, which means it’ll be the first scene to be loaded when the game starts. This is exactly what we want.
From the Platform list select iOS and click “Switch platform” button. The unity logo appears now in the iOS row.
This is all the setup we need for now, click “Player settings” and close this popup window. You’ll notice the Player settings opened in the Inspector, we need to set couple of things in here too.
In the “Per platform” strip make sure the tab showing an iPhone is selected, like so:
There’s lot of settings here, you know most of them from Xcode, so you can play and explore yourself later on.
Now use this inspector to make the following changes:
In the “Resolution and Presentation” strip for “Default orientation” select “Landscape Left”.
In the “Other settings” strip for Bundle Identifier put in whatever you want (except the default value)
In the “Other settings” strip set the Target device to “iPhone only”.
One final touch: To the left under the “Game” tab now you have available different orientations/resolutions – select “iPhone Wide (480×320)” to match the default landscape orientation.
Congrats – you now have a basic “Hello World” project that you can try out on your iPhone!
Running the Game on Your iPhone
To test everything we did up to now, we’re going to finish by testing the project in Xcode and your iPhone.
Startup your favorite Xcode version – close the welcome screen if there’s one and switch back to Unity. This is a trick how to tell Unity which Xcode version to use – just have it running aside.
Back in Unity, from the menu choose “File\Build&Run”- this will popup again the Build Settings, click “Build and Run” button.
You will be asked where do you want to save your Xcode project (they don’t really say that, but this is what they are asking). Inside your project directory create a folder called “SharkBomberXcode” (this is where your Xcode stuff will reside) and as file name put in “SharkBomber”.
After few moments the project is built and you will have Xcode window popup with a project opened called Unity-iPhone. What happened is that Unity has generated the source code of an Xcode project and you have now this generated project ready to build&run from Xcode.
You might wanna have a look at the source code – but it’s actually a boilerplate which loads the mono framework included as few chunky dll files and some assets, so there’s not much you can play with.
You have 2 targets, so make sure your iOS device is plugged in and select the “Unity-iPhone” target and your device. (I can’t make the Simulator target run, if you do great, but for now I’ll stick to the device).
Moment of truth – hit the Run button, and your Unity project now runs on your iPhone!
Good job, you can see the default Unity start screen and then just the blue background of your scene (and the words “trial version” in a corner).
Stop the Run task, switch back to Unity, and save your project.
Setting up the Scene
First let’s setup the main camera on the scene. Select “Main Camera” in “Hierarchy”, in the Inspector find “Projection” and set it to “Orthographic”, “Size” set to “10”, in Clipping Planes set “Near” to “0.5” and “Far” to “22”. Now you see a box nearby your camera inside the scene – this is the bounds of what will be seen on the screen from your world.
Notice we’ve set the camera projection to “Orthographic” – this means the depth coordinate won’t affect how things look on the screen – we’ll be effectively creating a 2D game. For the moment let’s work like that until you get used to Unity, then we’ll switch to 3D projection.
Set your camera position (in the Inspector) X, Y and Z to [0,0,0]. Note from now on when I write position to [x,y,z], just set the 3 values in the 3 boxes for that property.
Right-click in the Project panel and again choose “Create/Folder”, call the new folder “Textures”. Then download this background image I’ve put together for the game and save it somewhere on your disc. Drag the background image from Finder and drop it onto the “Textures” folder you just created.
It takes good 20 seconds on my iMac to finish the import, but when it’s done do open the folder, select the “background” texture, and in the inspector look at the texture’s properties.
At the very bottom in the preview panel it says “RGB Compressed PVRTC 4bits.” Hmmm, so Unity figured out we’re importing a texture and compressed it on the go – sweet!
From the menu choose “GameObject\Create other\Plane” and you will see a blue rectangle next to the camera. This is the plane we just added to the scene; we’re going to apply the texture we’ve got to it.
Select “Plane” in the Hieararchy panel, in the Inspector in the text field at the top where it says “Plane” enter “Background”. This changes the object’s name, this is how you rename an object. Drag the “background” texture from the Project panel and drop it onto the “Background” object in Hierarchy. Set the position of the plane in the Inspector to [4, 0, 20], the Rotation to [90, 180, 0] and Scale to [10, 1, 5] – this as you see in the “Scene” panel scales and rotates the plane so that it faces the camera – this way the camera will see the plane as the game’s background.
Now in order to see clearly what we have on the scene we’ll need some light (much as in real life) – choose “GameObject\Create other\Directional Light” – this will put some light on your scene. Select Directional Light in “Hierarchy” and set the following Position coordinates [0, 0, 0].
Now we have all the setup and the background of the scene, it’s time to add some objects and make them move around!
Adding 3D Objects to the Scene
From the menu choose “GameObject\Create other\Cube” – this adds a cube object to your scene. This will be the game player, so rename it to “Player”.
Set the following position: [-15, 5.3, 8]. You’ll see the cube appearing near the left side of the screen in the “Game” panel – this is where our plane will start and will move over the sea surface to the other end of the screen.
Now let’s import the plane model! We’ll be using free 3D models produced by Reiner “Tiles” Prokein and released for free on his website (also have a look at his license for the models).
To start, download his airplane model and unarchive the contents.
Right-click inside the “Project” panel and choose “Create/Folder”, rename the folder to “Models”. From the the folder where you unarchived the plane model drag the file “airplane_linnen_mesh.obj” and drop it onto the “Models” folder in the “Project” panel.
Then right-click the “Models” folder and choose “Create/Folder”, rename the new subfolder to “Textures” – here we’ll save the textures applied to models. Drag the file “airplane_linnen_tex.bmp” and drop it onto the newly created “Textures” folder.
Next, select the “Player” object in the “Hierarchy” panel, look in the “Inspector” – the “Mesh Filter” strip is the filter which sets your object’s geometry (right now it sets a cube geometry); on the row saying “Mesh – Cube” find the little circle with a dot in the middle and click it – this opens a popup where you should double click the plane model and this will change your object’s geometry to an airplane.
Now one fine detail – the airplane looks a bit messed up. I’m no 3D expert, but I found what fixes this in Unity: select “airplane_linen_mesh” in “Project” panel then in the “Inspector” find “Normals” and select “Calculate”, then scroll down and click “Apply” button.
Cool – now you see the smooth airplane in the scene! Let’s apply also its texture: Drag “airplane_linnen_tex” texture from your “Project” panel and drop it onto “Player” in the “Hierarchy” panel. Unity automatically applies the texture to the airplane model we have on the scene.
Final touches for the airplane: to the “Player” object set Rotation to [0, 90, 350] and Scale to [0.7, 0.7, 0.7], this will rotate and scale the plane so it looks like flying just over the sea surface.
This game might not be Call of Duty quite yet, but stay tuned, because in the next section we’re going to make our airplane fly! ![]()
Beginning Unity3D programming with C#
As you’ve already seen in the Build Settings dialogue Unity can build your project to a Wii game, an iPhone game, standalone Mac game, and so forth. Because Unity is so omnipotent it needs some kind of intermediate layer where you can program your game once; and each different build translates it to platform specific code.
So oddly enough, to program in Unity you will be using C# (not Objective-C!), and when Unity generates your Xcode project it will translate that C# code to platform specific code automatically!
Right-click inside the “Project” panel and choose “Create/Folder”, rename the new folder to “Class”. Right-click the “Class” folder and choose “Create/C Sharp Script”, rename the new file to “PlayerClass”. Right-click inside the “Project” panel and choose “Sync MonoDevelop Project” – this opens the MonoDevelop IDE – this is the IDE where you can program in C#.
Note: MonoDevelop is a program ported from Linux, as you can see by the user interface skin called Gnome, so it’s normal if it crashes every now and then, especially when you try to resize the window. If that happens, just start it again by clicking “Sync MonoDevelop Project”.
Here are the three major areas in the MonoDevelop GUI:
Your MonoDevelop project browser – in Assets/Class you will find your PlayerClass.cs file.
The currently open class outline
Editor area – there’s some syntax highlighting and some auto-complete which will help you coding.
Find your PlayerClass.cs file in the project browser and double click it to open it in the editor. Make sure that the class looks like the following:
The clause “using” includes the given libraries and frameworks, UnityEngine is the library which gives you access to things like iPhone’s accelerometer, keyboard input and other handy stuff.
You define your new class and inherit from MonoBehaviour – this gives you lots of stuff for free: you can override a long list of methods which are called when given events are triggered.
Just few lines below you have empty Start and Update methods – these are 2 important events.
Start is called when your object appears on the scene so you can make your initialization (much like viewDidAppear: in UIController).
Update is called when every frame is rendered (i.e. could be 30, 60 or 100 times a second, you never know how often) and here’s where you do your movements, game logic, etc.
Now let’s switch back to Unity for a moment. We’ll want to make the airplane fly over the sea and when it goes out of the right side of the screen to appear again from the left side. Let’s measure at what position we need to move the airplane to the left. In the “Scene” panel at the top right corner you see the orientation gizmo – click on the X handle (it’s a kind of red cone, I’ll call it handle):
This will rotate the scene and orient it horizontally towards you. Click again the handle which is now on the left side of the gizmo – this will rotate the scene around, you might need to click the left handle few times until you see the scene frontal like this:
Now you can use the mouse scroll wheel to zoom in/zoom out on the scene and fit it inside the “Scene” panel. Make sure the move tool is selected in the toolbar above and select the “Player” in the “Hierarchy”.
Now you see that a new gizmo appeared attached to the airplane with a green and red arrows. Now, you can drag the arrows and they will move the airplane in the axis the arrows represent:
What you need to do is grab the red arrow (horizontal axis) and drag the airplane to the right until it goes out of the “Game” panel below.
So start dragging inside the “Scene” panel, but while looking at the “Game” panel. Leave the airplane just outside the visible screen and have a look at its position in the “Inspector”.
X should be now around “17.25” – so this is the right bound of the screen, you can drag the plane left and you’ll see the left bound is about “-17.25”, so we’ll use “18” and “-18” to wrap the airplane flight. Bring back the airplane to just about the left side of the screen where it was before.
Switch back to MonoDevelop, and make the following changes to PlayerClass.cs:
As you already guessed, you just declared a public property on your class called “speed”, but what is unique to Unity is that all public class properties are also accessible via… the “Inspector” panel (ta-daaaah)!
So you can set the values of your class properties from the IDE and you can monitor the values of your properties while the game runs in real time – for free – how cool is that?!
The “transform” variable is a property on every game object (and everything inside a scene is a game object) which handles the object’s position in space: rotation, position, scale, etc. So on every Update call to translate the object’s position so that it moves to the right of the screen.
We can’t just move the plane a set amount per call to Update, because nobody knows how many times this will actually be called per second. Instead, we define the speed to be units per second, and divide the speed by the amount of time elapsed since the last call to Update (Time.deltaTime). This way the object moves always with the same speed independently from the current frame rate.
The call to Translate takes 3 values – the translation it has to do on each axis. You probably notice that we are moving the airplane on the Z axis (3rd parameter) – we have to do that because we rotated the plane on the scene, so translating the Z axis moves it to the right from the perspective of the player!
Look at the “if” statement – we check if transform.position.x is bigger than 18 (remember why?) and if so, we set the airplane’s position to same coordinates but “-18” on the X axis.
We use new Vector3(x,y,z) to set the position – we’ll be using a lot of these vectors for all positioning; you notice also we set a random speed between 8 and 12 – this is just to make the plane move more randomly to keep things interesting.
At this point we are ready to see the airplane move!
Switch back to Unity. Drag the “PlayerClass” from “Project” panel onto “Player” in the “Hierarchy” panel – this way you attach the class to a game object. Select “Player” in “Hierarchy” and look in the “Inspector” – you’ll see a new strip appeared called “Player Class (Script)” where you also see your public property! yay! Set a value of “12” for it.
OK. Ready? Hit that Play button! Woot! You can see in both “Scene” and “Game” panels that the airplane flies around and when goes out of the right comes back from the left side. Also notice in the “Inspector” the X value of position is alive as well – it shows you where the plane is at any given moment. Also Speed changes to random values every time the plane flight wraps.
Once you’re done enjoying this coolness, don’t forget to hit Play again to stop the game.
Next up, time to give this plane a formidable foe – a menacing shark! Now that you’re familiar with the basics, things will go faster since we won’t be doing anything new for a while.
Need a break? We’ve covered a lot here! So if you get tired or just need to have a break, no problem – just save your Unity project and you can open it later. But! When you open a Unity project it opens by default an empty scene. To load the scene you are working on – double click “LevelScene” in the “Project” panel – now you can continue working.
Jumping the Shark
Go ahead and download and unarchive the Shark model. As you did before with the airplane, drag the file “shark.obj” onto the “Project” panel inside the “Models” folder and “sharktexture.bmp” inside “Models/Textures”.
From the menu choose “GameObject/Create other/Capsule” – rename the “Capsule” object in “Hierarchy” to “Shark”. In “Inspector” inside the “Mesh Filter” strip click the circle with dot inside and in the popup window double click the Shark model. Now you should see the Shark geometry in the “Scene” and “Game” panels.
Drag “sharktexture” from “Project” panel (it’s inside Models/Textures) onto the “Shark” object in “Hierarchy” – this gives your shark a vigorous mouth and some evil eyes! Pfew – I already want to bomb it!
Make sure “Shark” is selected and set the following properties in the “Inspector”: Position – [20, -3, 8], Scale – [1.2, 1.2, 1.2] – this will put the shark just right off the camera visible box – it’ll start moving from there towards the left side of the screen.
Now since we’d want the shark to interact with our bombs (by exploding, mwhahahahah!) we want the Collider of the shark to match more or less the shark’s geometry. As you see there’s a green capsule attached to the shark inside the scene. This is the shark’s collider. Let’s have it matching this evil predator’s body.
In the “Inspector” find the “Capsule Collider” strip and set the following values: Radius to “1”, Height to “5”, Direction “X-Axis”, Center to [0, 0, 0]. Now you see the capsule collider has rotated and matches more or less the shark’s body – better!
Last – select “shark” model in “Project” panel “Models” folder then in the “Inspector” find “Normals” and select “Calculate”, then scroll down and click “Apply” button.
Right-click inside the “Project” panel in “Class” folder and choose “Create/C Sharp Script”, rename the new script to FishClass. Righ-click and choose “Sync MonoDevelop Project”.
MonoDevelop will pop up. Open the FishClass.cs file and put inside the following code:
It’s pretty similar to what we have already for the airplane. We have a speed property (per second) and in the Update event handler we use transform.Translate to move the shark.
Notice this time I used:
This is just to demo that some of these methods can take different parameters – however passing separately 3 values or 1 vector is pretty much the same.
Now let’s see what the shark does when it reaches the bounds of the screen (-30 and 30 in this case, so there’s is a moment when the shark is offscreen, so you can’t easily ambush it when entering back).
When the shark reaches left or right bound it turns around moves a bit towards the bound and changes speed. This way it just goes back and forth, back and forth continuously.
The call to transform.Rotate(new Vector3(x,y,z)) obviously rotates the object around the axis by the given values, and transform.Translate(new Vector3(x,y,z)) you already know well.
Pretty easy! Switch back to Unity and drag the “FishClass” script onto the “Shark” object in “Hierarchy”. Now hit Play: you can see the huge shark going back and forth waiting to be bombed. Good job!
Adding the Clown Fish
Let’s do the same procedure again for our ClownFish. I’ll put it into a nice list for quick reference:
Download and unarchive the ClownFish model.
Drag “mesh_clownfish.obj” into “Project” panel inside “Models” folder and “clownfish.bmp” inside “Models/Textures”.
Choose “GameObject/Create other/Capsule” and rename the “Capsule” object in “Hierarchy” to “ClownFish”.
Click “Mesh Filter” circle-with-a-dot-button and from the popup double click the clownfish geometry.
Drag the “clownfish” model texture onto “ClownFish” object in “Hierarchy”.
While having “ClownFish” selected change the following properties in the “Inspector”: Position to [-20, -1, 7]; Rotation to [0, 180, 0]; Scale to [0.4, 0.3, 0.3].
With the “ClownFish” still selected, change the following properties in the Capsule Collider strip: Radius to “4”; Height to “4”; Direction to “Z-axis”; Center to [0, 0, 0].
Drag “FishClass” from “Project” panel onto the “ClownFish” object in “Hierarchy”. This will assign the same generic fish class also to the clownfish.
Select “mesh_clownfish” model in “Project” panel “Models” folder then in the “Inspector” find “Normals” and select “Calculate”, then scroll down and click “Apply” button.
Hit Play and see what happens – now you have two moving fish without having to write any extra code!
Everything works perfect – the fish go back and forth, plane is wrapping. We need some boooombs!
Set Us Up The Bomb
Download and unarchive the Can model. As usual, drag the “colourcan.obj” file in “Project” panel “Models” folder and “cantex.bmp” file in “Models/Textures”.
From the menu “GameObject/Create Other/Capsule”, rename the object to “Bomb”. From the Mesh Filter popup double click the can geometry. Drag the “cantex” texture onto the “Bomb” object in “Hierarchy”. In “Inspector” “Capsule collider” click this button to open the popup menu:
When the popup menu appears, choose “Reset” – this way the collider automatically will take the size of the geometry assigned – cool!
Next select the “colourcan” model in “Project” panel “Models” folder then in the “Inspector” find “Normals” and select “Calculate”, then scroll down and click “Apply” button.
Now let’s dive into new stuff! Select the bomb object again, and inside the Capsule Collider strip check the “Is Trigger” checkbox – aha! Check this to make the bomb object will trigger event when it collides with other objects.
But for this to happen we need to also assign a Rigid Body to the bomb (as at least one of the colliding objects needs to have a rigid body). From the menu choose “Component/Physics/Rigidbody” (Bomb should be selected in the Hierarchy!).
Once you do this, a new strip should appear in the “Inspector” called “Rigidbody”. Uncheck “Use gravity” (we won’t use gravity) and check “Is Kinematic” to be able to control the body programatically. This was all we needed to have collisions enabled!
Download and save on your disc this bomb releasing sound (which I made myself, lol!)
We would like to play this sound when the airplane releases a bomb, i.e. when the bomb first appears on the screen. Let’s do that!
Right-click in the “Project” panel and choose “Create/Folder”, rename the new folder to “Audio”. Drag the “bahh1.aif” file onto the “Audio” folder. Next drag the “bahh1” sound file from “Project” panel onto the “Bomb” object in “Hierarchy”.
Believe it or not, that’s all we need to do – the sound is attached to the bomb and will play when the bomb appears on screen. Notice how easy some things are with Unity?
Select the “Bomb” object in “Hierarchy” and in “Inspector” find the “Audio Source” strip: see that “Play On Awake” checkbox is checked – this tells the audio to play when the object appears on the scene. Also look at the “Scene” panel – see the bomb has now a speaker attached?
Prefabricating your Game Objects
Remember that “Hierarchy” shows what’s on the scene currently, and “Project” holds all your object for you? This has to do something with our goal here – have many bombs loaded on the plane and release them at will into the sea.
What we are going to do is – we are going to prefabricate a game object (it will be ready and set to appear on the scene), but we won’t add it to the scene – we are going to instantiate (or clone if you are a sci-fi fan) this “prefab” into a real living game object on the scene.
Right-click inside the “Project” panel and choose “Create/Folder”, rename it to “Prefabs”. Right-click “Prefabs” and choose “Create/Prefab”. Rename the new prefab to “BombPrefab”. Notice the little cube icon is white – this indicates an empty prefab.
Now – drag the “Bomb” from Hierarchy onto the “BombPrefab” in “Project”. Notice the cube icon is now blue – means a full prefab, ready to be cloned. Also important – look at the “Hierarchy” panel now – “Bomb” font changed to blue color – that means this object now is an instance of a prefab.
Now that we have our bomb cookie cutter set, we don’t need the original bomb object on the scene – right-click on “Bomb” in “Hierarchy” and choose “Delete”.
Let’s get coding! Switch to MonoDevelop and open up the PlayerClass.cs. under the “speed” property declaration add:
Have you guessed already? In this property we’ll hold a reference to the BombPrefab and we’ll make instances as we wish. Notice the property type is “GameObject”, as I said earlier everything in the game is a GameObject (much like NSObject in Cocoa), so it’s safe to set that type for just about anything.
Now switch back to Unity and select the “Player”. As you expected in the “Inspector” under “Script” there’s a new property “BombPrefab”. Let’s set its value: drag the “BombPrefab” from “Project” panel onto the “Inspector” where it says “None(GameObject)” and drop – now the field indicates it has BombPrefab prefab attached as value. Cool!
We’re going to need a C# class also for the bomb – right-click inside “Project” in “Class” folder and choose “Create/C Sharp Script”, rename it to “BombClass”. Right-click and “Sync MonoDevelop Project” – MonoDevelop pops up. Open up BombClass.cs and replace the contents with this code:
This is pretty similar to everything we’ve done up to now – we translate the object every frame and when out of the screen bounds we react appropriately. In the bomb case we just want to destroy the object since we can always make new ones from our bomb prefab.
In the code note that “this” refers to the C# bomb class, while the gameObject property refers to the object on the scene – so we destroy the object on the scene and all components attached to it. We’ll have a look at the game object hierarchy in Part 2 when you access components attached to an object programatically.
Bombing that shark!
Finally the part you’ve been waiting for – gratuitous violence! :]
Open up PlayerClass.cs. At the end of the Update method add:
Let’s go over this line by line.
Input is the class giving you access to keyboard, mouse, accelerometer and touches. Input.anyKeyDown is true when a key is pressed, this happens only once – i.e. when the button was first pressed; then Input.anyKeyDown is false again until another key is pressed. anyKeyDown is actually a handy abstraction – it actually is true when a mouse button was clicked, keyboard key was pressed or (!) a tap on the iPhone’s screen was received.
(GameObject)Instantiate(bombPrefab) is the magic line that creates an instance from a prefab and adds it to the scene.
Finally we set the position of the bomb to be same as the airplane’s.
Cool – we have our bomb created when the player taps the screen, it then starts to fall down and when out of the screen destroys itself.
Let’s give it a try! Switch back to Unity and hit Play – now if you click inside the “Game” panel (simulating a tap) you will see a bomb is created where the plane is at that point.
Click many times – many bombs are created. You should also hear the bomb sounds. But the bombs don’t fall down! Why? Can you figure out what’s the problem by yourselves already? Answer after the break.
I hope you figured it out, but here’s what’s the problem: you haven’t yet assigned the BombClass script to the Bomb Prefab – that’s why the bombs don’t fall down. Drag “BombClass” from your “Project” panel “Class” folder onto “BombPrefab” in “Prefabs” folder in the same panel. Check in the “Inspector” if you see the Bomb Class Script strip. Now hit Play again. That’s better!
Still not perfect though – those sharks don’t die when you hit them. Since we already configured the colliders and the rigidbody component of the bomb, we just need to add the code to react to collision. Switch back to MonoDevelop and add this new method to the BombClass:
Let’s go over the code line by line again:
OnTriggerEnter is a method called when the body attached collides with another body, and the 2nd body is passed as a parameter.
Here we check if the object the bomb hits is called “Shark”.
If the shark is hit, then 1st reset the object rotation.
2nd, we reset the shark back to its original position.
Finally, we call destroy this.gameObject to make the bomb disappear from the scene.
Pretty easy again! Isn’t it? That’s about all you need – switch back to Unity, and run your game! Hit sharks disappear and new ones come in.
You can also choose from the menu “File/Build&Run” and when Xcode pops up hit “Run” in Xcode – now you have the game on your iPhone – sweet!
Where To Go From Here?
Here is a sample project with all of the code from the above tutorial.
I hope you amused yourselves and learned a ton of new things – in Part 2 of the series we’re going to spice up things a notch and make this game really challenging and fun!
In the meantime, if you have any questions about this tutorial or Unity in general, please join the forum discussion below! (Source: Ray Wenderlich)













 闽公网安备35020302001549号