论述如何基于3种开发工具制作《Monkey Jump》(三)
作者:Andreas Loew
在本系列教程中,我们使用Cocos2D、TexturePacker和PhysicsEditor来制作一款有趣的横向平台游戏。
在系列教程的第1部分中,我们介绍了这款游戏的设计,制作了精灵层次和我们需要的形状,并开始编写游戏代码。
在系列教程的第2部分中,我们将主角添加到游戏中,让它能够移动和跳跃,并开始添加部分游戏玩法。
而在第3部分,也是这系列文章的最后一部分中,我们将添加一些新能完善,以及一个界面层,并最终杀死猴子。
太多物体!
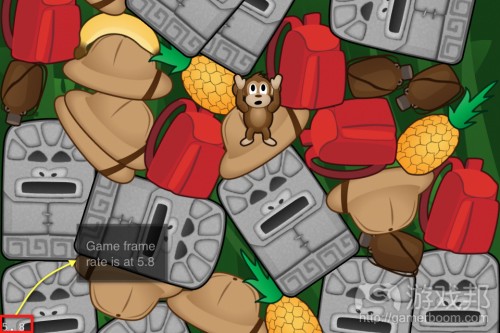
玩了一会游戏后,你将会发现游戏变得越来越慢,并最终失去了可玩性。
出现这一点是因为——各种物体一个接一个从天空中掉落下来,并撞上已经零零散散落满地上的其它物体。而我们必须使用Box2d去处理这种碰撞。也就是如果游戏中有n个物体,该引擎就需要处理n*(n-1)次碰撞。Box2d通过杂凑的方法加速处理各种碰撞的过程,但是事实上,随着掉落物体的增加,碰撞次数也是呈疯狂上升趋势。
如果你看到掉落的是一个雕塑,你将会发现几乎所有底下的堆积物都会随着该雕塑的冲力移动并反弹,而雕塑最终也与它们堆积在了一起。
为了改善这种境况,我们将改变猴子底下较远距离的物体状态,即让它们保持静止。并且仍会有其它物体堆叠在这些静态物体上方,但是它们却不再对此影响做出任何反应。所以,下降的雕塑将只能够影响到堆积于上方的物体而不能影响整体的堆积物。
Box2d允许这些物体在没有任何外界物体碰触的情况下能够进入“休眠”状态。我们也将使用这一功能去完善游戏性能。
GB2Engine拥有一个迭代方法,能够用于迭代一个片区的所有物体。我们将使用这种引擎创造一个程序,以检查所有物体的Y坐标以及判断哪些远离猴子的物体应该进入休眠状态。
将以下代码添加到GameLayer.mm更新选择器的末段:
// 10 – Iterate over objects and turn objects into static objects
// if they are some distance below the monkey
float pruneDistance = 240/PTM_RATIO;
float prune = [monkey physicsPosition].y – pruneDistance;
[[GB2Engine sharedInstance] iterateObjectsWithBlock: ^(GB2Node* n)
{
if([n isKindOfClass:[Object class]])
{
Object *o = (Object*)n;
float y = [o physicsPosition].y;
if(y < prune)
{
// set object to static
// if it is below the monkey
[o setBodyType:b2_staticBody];
}
}
}
];
编译并运行。你需要注意可能会出现不能正常运转的情况。举个例子来说,如果一些掉落的物体堆积成一个宝塔般的形状,而猴子爬上了这些堆积物体上,那么再次掉落的物体可能会到达pruneDistance,直接在半空中转变成静态物体。
解决方法很简单:只要将速度慢的物体转变成静态物体即可。如果出现这种情况,你可以将上述代码中的第2个if条件改成:
if((y < prune) &&
([o linearVelocity].LengthSquared() < 0.1))
{…}
编译和运行。看起来不错不是吗?
猴子被困
还有一个问题——猴子可能会被一大堆物体所掩埋。各种物体围绕着它堆积起来,但是它却不够强壮,不能够突破压在身上的重重物体。
解决这一情况也有一些不同的方法。一个方法便是让猴子在陷入堆积后死去。另外一个方法便是使用“瞬间移动”而让猴子能够重新回到物体之上继续游戏。这听起来不错呢,那就这么做吧!
如此,我们便必须确保能够顺利将猴子瞬间移动到所有物体之上,否则它将再次陷入其它物体而再也不能重获自由!
进入GameLayer.h并添加一组变量:
float highestObjectY; // y position of the highest object
通过在“场景”方法上添加下面一行代码创建属性:
@property (nonatomic, readonly) float highestObjectY;
现在切换到GameLayer.mm,并在“@implementation”下面添加以下代码合成对象:
@synthesize highestObjectY;
然后以下面内容取代更新中的的第10部分内容:
// 10 – Iterate over objects and turn objects into static objects
// if they are some distance below the monkey
float pruneDistance = 240/PTM_RATIO;
float prune = [monkey physicsPosition].y – pruneDistance;
highestObjectY = 0.0f;
[[GB2Engine sharedInstance] iterateObjectsWithBlock: ^(GB2Node* n)
{
if([n isKindOfClass:[Object class]])
{
Object *o = (Object*)n;
float y = [o physicsPosition].y;
// record the highest object
if((y > highestObjectY) && ([o active]))
{
highestObjectY = y;
}
if((y < prune) &&
([o linearVelocity].LengthSquared() < 0.1))
{
// set object to static
// if it is below the monkey
[o setBodyType:b2_staticBody];
}
}
}
];
新代码通过每一次新检查重新设置highestObjectY而明确了最高物体的位置。我们还需要注意,只能检查动态物体,否则最高物体就会成为那些即将落掉的物体。
切换到Monkey.h并添加一行新内容:
int stuckWatchDogFrames; // counter to detect if monkey is stuck
现在,让我们将头顶被一个物体压附了一段时间的猴子转移到最高物体的上方。将如下内容添加到updateCCFromPhysics选择器的末段:
// 8 – Check if monkey is stuck
if(numHeadContacts > 0)
{
stuckWatchDogFrames–;
if(stuckWatchDogFrames == 0)
{
// teleport the monkey above the highest object
[self setPhysicsPosition:b2Vec2([self physicsPosition].x,
gameLayer.highestObjectY+2.0)];
}
}
else
{
// restart watchdog
stuckWatchDogFrames = 120; // 2 seconds at 60fps
}
编译并运行。现在看来好多了。如果猴子再次陷入堆积物中不能脱离,它将会被神奇地释放出去。
还有其它方法能够察觉猴子是否陷入堆积物中。例如,我们可以通过观查物体堆积起来的高度,或者猴子在某个特定时间段的速度是否较慢等。你可以尝试不同的方法,看看哪一个更适合自己。
让主角受点伤
玩了一会游戏后你会意识到游戏中缺乏足够的挑战性——尽管猴子一直在往上爬,但是却不会受到任何伤害。让我们改变这种设置。
打开Monkey.h,并在猴子类中添加一些称作生命值的变量:
float health;
同样也添加一些属性以观察猴子的生命状况以监测它是否死亡:
@property (readonly) float health;
@property (readonly) bool isDead;
最后,在输入程序下方的文件顶部添加最大生命值的定义:
#define MONKEY_MAX_HEALTH 100.0f
现在切换到Monkey.mm并合成生命属性:
@synthesize health;
在行走方式上添加以下代码以执行isDead属性:
-(bool) isDead
{
return health <= 0.0f;
}
你将会发现,我们最后会让猴子在生命值低于0时死去。
在初始化选择器中,通过在游戏层储存代码下添加以下内容而将生命值初始化到最大值:
// set health
health = MONKEY_MAX_HEALTH;
现在,让我们在beginContactWithObject中用头部碰撞去修改该部分内容,而造成猴子受伤:
else if([fixtureId isEqualToString:@"head"])
{
numHeadContacts++;
float vY = [contact.otherObject linearVelocity].y;if(vY < 0)
{
const float hurtFactor = 1.0;
// reduce health
health += vY*[contact.otherObject mass] * hurtFactor;
if(self.isDead)
{
// set monkey to collide with floor only
[self setCollisionMaskBits:0x0001];
// release rotation lock
[self setFixedRotation:NO];
// change animation phase to dead
[self setDisplayFrameNamed:@"monkey/dead.png"];
}
}
}
实际上,当一个物体砸向猴子的头部时它便会因此而受伤。而通过物体的垂直速度和大小决定猴子的受伤程度,并且可以通过控制这些变量决定猴子的生命状况。快速掉落的物体虽然会对猴子造成伤害,但是如果该物体静静地落在它头上,那也就不会构成较大威胁了。注意我还添加了hurtFactor以便你能够调整猴子的受伤程度。
如果猴子死去了,它必须退出游戏场景。既然如此,我们将删除所有猴子掉落时可能碰撞到的标记而只留下地板,让猴子死在地板上。这时候我们也将释放旋转锁让猴子能够躺在地板上,并将它的子画面改成dead.png格式。
死亡后的猴子就不能够再跳跃了,所以我们必须改变猴子跳跃选择器中的代码以忽略此时的屏幕点触操作:
-(void) jump
{
if((numFloorContacts > 0) && (!self.isDead))
{
…
通过改变第1部分使updateCCFromPhysics中的内容无效:
-(void) updateCCFromPhysics
{
// 1 – Call the super class
[super updateCCFromPhysics];
// he’s dead – so just let him be!
if(self.isDead)
{
return;
}…
编译并运行,现在你便可以杀死猴子了!
重新开始游戏
现在,虽然猴子死了,但是游戏中仍然会有不断掉落的物体,玩家也不能够重新开始游戏。
我建议在猴子死后2秒让玩家重新开始游戏。通常情况下,玩家总是希望在游戏结束后能够挑战更高的分数,但这并非本教程所探讨的内容。让玩家简单地重新开始游戏便足够了。
在GameLayer.h中添加一个新的变量以作为重新开始游戏的计时器:
ccTime gameOverTimer; // timer for restart of the level
在GameLayer.mm的更新开头添加以下内容:
if(monkey.isDead)
{
gameOverTimer += dt;
if(gameOverTimer > 2.0)
{
// delete the physics objects
[[GB2Engine sharedInstance] deleteAllObjects];// restart the level
[[CCDirector sharedDirector] replaceScene:[GameLayer scene]];
return;
}
}
如果真的需要重新开始,我们将从GB2Engine中删除所有物体,并以一个新的GameLayer取代现在的游戏场景。
编译并运行。你将在猴子死后的2秒重新开始游戏。
HUD层次——生命
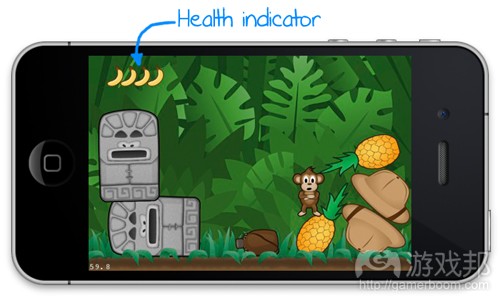
是的,猴子会死去,但是却没人知道它到底什么时候会死去。所以我们便添加了一个生命值显示器,以便我们能够随时追踪猴子的生命状况。
我们将用10个香蕉的标志代表猴子的生命值。每个香蕉代表10个生命点。
创建一份iOS/Cocoa Touch/Objective-C类模板的新文件。将这个类命名为Hud,并将其划入CCSpriteBatchNode;且不要忘记将.m扩展名更改成.mm。用以下代码取代Hud.h文件中的内容:
#pragma once
#import “Cocos2d.h”
#define MAX_HEALTH_TOKENS 10
@interface Hud : CCSpriteBatchNode
{
CCSprite *healthTokens[MAX_HEALTH_TOKENS]; // weak references
float currentHealth;
}-(id) init;
-(void) setHealth:(float) health;@end
HUD显示器将使用丛林子画面表单中的游戏界面,所以为了能够获得这一界面,我们必须从CCSpriteBatchNode中获取HUD。除此之外,HUD还需要追踪猴子当前的生命状况以及代表猴子生命值点数的子画面。我们同样也需要知道如何改变猴子当前的生命状况。
切换到Hud.mm并用以下代码取代原先的内容:
#import “Hud.h”
#import “Monkey.h”
#import “GMath.h”@implementation Hud
-(id) init
{
self = [super initWithFile:@"jungle.pvr.ccz" capacity:20];if(self)
{
// 1 – Create health tokens
for(int i=0; i<MAX_HEALTH_TOKENS; i++)
{
const float ypos = 290.0f;
const float margin = 40.0f;
const float spacing = 20.0f;healthTokens[i] = [CCSprite spriteWithSpriteFrameName:@"hud/banana.png"];
healthTokens[i].position = ccp(margin+i*spacing, ypos);
healthTokens[i].visible = NO;
[self addChild:healthTokens[i]];
}
}return self;
}@end
现在,让我们用子画面表单初始化HUD的CCSpriteBatchNode的超级类。
然后我们便将循环访问代表生命值标志的数量,并为这些香蕉创造游戏界面。我们也将提高每个香蕉的横坐标位置,从而让它们能够紧挨着之前的香蕉。
最后,添加一些方法去更新Hud.mm末段的生命状况:
-(void) setHealth:(float) health
{
// 1 – Change current health
currentHealth = health;// 2 – Get number of bananas to display
int numBananas = round(MAX_HEALTH_TOKENS * currentHealth / MONKEY_MAX_HEALTH);// 3 – Set visible health tokens
int i=0;
for(; i<numBananas; i++)
{
healthTokens[i].visible = YES;
}// 4 – Set invisible health tokens
for(; i<MAX_HEALTH_TOKENS; i++)
{
healthTokens[i].visible = NO;
}
}
在这个方法中,我们需要判断所需展示的香蕉数量,明确哪些是有形的以及哪些又是无形的。第3、4部分来说有可能只执行一次循环,但我们将在之后继续扩展这个代码,从而进行2次分开的循环。
接下来我们将在GameLayer添加新的HUD。切换到GameLayer.h并添加HUD类的预公告:
@class Hud;
然后在GameLayer类别中添加HUD的一个成员变量:
Hud *hud;
切换到GameLayer.mm并在文件的开头输入Hud.h:
#import “Hud.h”
在初始化选择器中初始化HUD:
// add hud
hud = [[[Hud alloc] init] autorelease];
[self addChild:hud z:10000];
最后,通过在更新选择器末尾添加以下代码以更新HUD:
// 11 – Show monkey’s health in bananas
[hud setHealth:monkey.health];
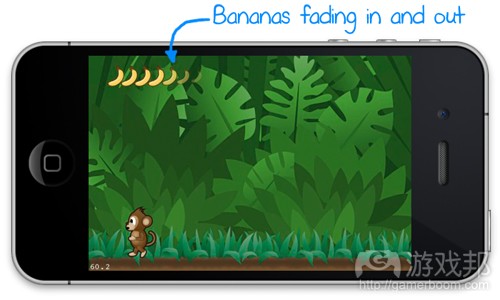
编译并测试。虽然这种方法是有效的,但是我却不是很喜欢现在的界面——我不喜欢香蕉骤然出现并消失的设置。我希望它们能够慢慢出现并渐渐淡出。并且我也希望猴子的生命值能够随着时间的流逝慢慢下降而不是突然骤降。
因为每一帧都会调用setHealth,所以随着时间的发展,我们便能够更加轻松地调整生命值显示画面。
打开Hud.mm,并用下面的代码改变setHealth选择器的第1部分内容:
// 1 – Change current health
float healthChangeRate = 2.0f;
// slowly adjust displayed health to monkey’s real health
if(currentHealth < health-0.01f)
{
// increase health – but limit to maximum
currentHealth = MIN(currentHealth+healthChangeRate, health);
}
else if(currentHealth > health+0.01f)
{
// reduce health – but don’t let it drop below 0
currentHealth = MAX(currentHealth-healthChangeRate, 0.0f);
}
currentHealth = clamp(currentHealth, 0.0f, MONKEY_MAX_HEALTH);
编译并测试。现在的HUD调整变慢了,但是香蕉的消失速度仍然很快。让我们使这些香蕉能够渐进渐出。
用下面代码取代setHealth的第3,4部分内容:
// 3 – Set visible health tokens
int i=0;
for(; i<numBananas; i++)
{
if(!healthTokens[i].visible)
{
healthTokens[i].visible = YES;
healthTokens[i].scale = 0.6f;
healthTokens[i].opacity = 0.0f;
// fade in and scale
[healthTokens[i] runAction:
[CCSpawn actions:
[CCFadeIn actionWithDuration:0.3f],
[CCScaleTo actionWithDuration:0.3f scale:1.0f],
nil]];
}
}// 4 – Set invisible health tokens
for(; i<MAX_HEALTH_TOKENS; i++)
{
if(healthTokens[i].visible && (healthTokens[i].numberOfRunningActions == 0) )
{
// fade out, scale to 0, hide when done
[healthTokens[i] runAction:
[CCSequence actions:
[CCSpawn actions:
[CCFadeOut actionWithDuration:0.3f],
[CCScaleTo actionWithDuration:0.3f scale:0.0f],
nil],
[CCHide action]
, nil]
];
}
}
为了确保香蕉能够渐渐浮现在眼前,我们需要检查是否可以看到香蕉了。如果还看不到,我们要设置香蕉是可见的,并设置其比例小于实际的大小并且不透明度为0,然后再次运行将香蕉比例调整到1.0,并渐渐淡入。当我们能够看到香蕉时,我们便不需要再进行任何动作了,因为原先的动作将继续运行。
而为了淡出香蕉,我们则需要采取一系列的行动:首先设定比例并让香蕉逐渐淡出,然后使用CCHide动作将香蕉设置为不可见。
因为我们不能使用可见的标志去判断香蕉是否真正淡出视线了,所以我们将反复检查香蕉所运行的动画数。如果动画数是0,那就意味着动画已经在运行了,我们就不需要再设置其它动画了。
编译并运行。在一开始等待香蕉慢慢淡入,并在猴子受伤后观察香蕉渐渐淡出。
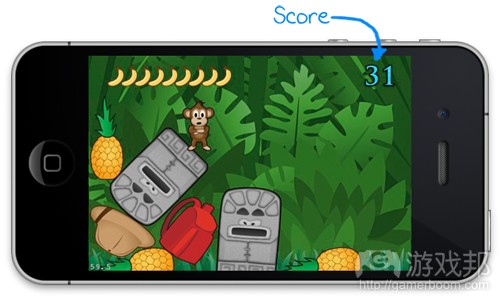
HUD层——分数
现在,让我们在HUD上添加一个分数显示器。对于分数,我建议能够以猴子所到达的物体最高点为基准。
切换到Monkey.h并添加一个新的变量和属性:
float score;
@property (nonatomic, readonly) float score;
切换到Monkey.mm,并在文件开头合成分数属性:
@synthesize score;
将以下代码添加到updateCCFromPhysics尾端:
// 9 – update score
if(numFloorContacts > 0)
{
float s = [self physicsPosition].y * 10;
if(s> score)
{
score = s;
}
}
我们必须在分数高于当前分数时进行更新,因为有时候猴子将会在攀上更高点时突然掉落下来。我们同样也需要将猴子的纵轴值设置为10。否则分数便不可能获得显著的提高,从而不能调动玩家的积极性。
切换到Hud.h。为一些分数数字添加定义:
#define MAX_DIGITS 5
添加一些变量以保持数字精灵,并隐藏CCSpriteFrame的指针:
CCSprite *digits[MAX_DIGITS]; // weak references
CCSpriteFrame *digitFrame[10]; // weak references
添加一个方法定义以设定分数:
-(void) setScore:(float) score;
现在切换到Hud.mm。在此我们首先需要隐藏数字精灵的lookup。在初始化方法的尾端添加以下代码:
// 2 – Cache sprite frames
CCSpriteFrameCache *sfc = [CCSpriteFrameCache sharedSpriteFrameCache];
for(int i=0; i<10; i++)
{
digitFrame[i] = [sfc spriteFrameByName:
[NSString stringWithFormat:@"numbers/%d.png", i]];
}// 3 – Init digit sprites
for(int i=0; i<MAX_DIGITS; i++)
{
digits[i] = [CCSprite spriteWithSpriteFrame:digitFrame[0]];
digits[i].position = ccp(345+i*25, 290);
[self addChild:digits[i]];
}
这时候我们将使用CCSpriteFrameCache并需要每个数字的帧。我们将在digitFrame阵列中储存帧数据。然后为每个数字创建游戏界面并将其初始化到0帧。
将以下代码添加到文件最后——在角色缓存区中的公布当前的分数情况,并根据缓存区中的数字调整所呈现的数字:
-(void) setScore:(float) score
{
char strbuf[MAX_DIGITS+1];
memset(strbuf, 0, MAX_DIGITS+1);snprintf(strbuf, MAX_DIGITS+1, “%*d”, MAX_DIGITS, (int)roundf(score));
int i=0;
for(; i<MAX_DIGITS; i++)
{
if(strbuf[i] != ‘ ‘)
{
[digits[i] setDisplayFrame:digitFrame[strbuf[i]-’0′]];
[digits[i] setVisible:YES];
}
else
{
[digits[i] setVisible:NO];
}
}
}
最后,切换到GameLayer.mm并在更新方法的末尾添加如下代码:
// 12 – Show the score
[hud setScore:monkey.score];
编译并测试。观察当猴子爬到更高处时分数是否更新了。猴子从分数9开始——因为已经添加了一定的基地高度。如果你希望减去9分,那么你就是从0起点开始游戏。
目前为止的所有代码都是包含在文件夹6-Hud中。
恢复体力
现在,猴子可能因为受伤而损失了好几个香蕉,所以我希望能够在它即将耗尽所有香蕉之前恢复它的生命。
如此,我们就需要创建Object的子集,也就是ConsumableObject。这个类中有一个bool变量,能够最终判断物体是否消耗殆尽了。
我总是喜欢针对每一个类使用不同文件,由于这些类却都很小,我可以将其添加如下代码到Object.h尾端:
@interface ConsumableObject : Object
{
@protected
bool consumed;
}
-(void)consume;
@end
同样,通过在ConsumableObject之后添加以下代码而导出Banana和BananaBunch类:
@interface Banana : ConsumableObject
{
}
@end@interface BananaBunch : ConsumableObject
{
}
@end
现在可以在Object.mm中使用ConsumableObject消耗方法。我们必须在@end下方并靠近@implementation之处添加如下代码:
@implementation ConsumableObject
-(void) consume
{
if(!consumed)
{
// set consumed
consumed = YES;// fade & shrink object
// and delete after animation
[self runAction:
[CCSequence actions:
[CCSpawn actions:
[CCFadeOut actionWithDuration:0.1],
[CCScaleTo actionWithDuration:0.2 scale:0.0],
nil],
[CCCallFunc actionWithTarget:self selector:@selector(deleteNow)],
nil]
];// play the item comsumed sound
// pan it depending on the position of the monkey
// add some randomness to the pitch
[[SimpleAudioEngine sharedEngine] playEffect:@”gulp.caf”
pitch:gFloatRand(0.8,1.2)
pan:(self.ccNode.position.x-240.0f) / 240.0f
gain:1.0 ];
}
}@end
消耗方法能够检查物体是否已经耗尽了。如果还未耗尽,可以通过将物体的大小调整为0,并让其渐渐淡出,而最后彻底从游戏场景中消失。
为了做到这点,我们利用CCFadeOut和CCScaleTo的平行动作,并随同CCCallFunction一起创造了一个CCSequence动作。CCCallFunction能够调用deleteNow选择器。而这一选择器能够从游戏世界中删除GB2Node对象(游戏邦注:包括图像和属性)。
现在让我们切换到Monkey.h并添加新的restoreHealth方法:
-(void)restoreHealth:(float)amount;
接下来切换到Monkey.mm并在类最后执行该方法:
-(void) restoreHealth:(float)amount
{
health = MAX(health + amount, MONKEY_MAX_HEALTH);
}
现在,我们便添加了新的生命值,但是你也必须确保它不会超过最高值。因为HUD将维持着生命值的动画,所以我们只要设定好适当的生命就足矣。
在猴子吞下某些物体时我们将播放一个较小的声音。如此,我们需要在Object.mm的开头输入Monkey.h:
#import “Monkey.h”
然后,在Object.mm的ConsumableObject实施阶段下方执行Banana和BananaBunch类的beginContactWithMonkey :
@implementation Banana
-(void) beginContactWithMonkey:(GB2Contact*)contact
{
if(!consumed)
{
Monkey *monkey = (Monkey *)contact.otherObject;
[monkey restoreHealth:20];
[self consume];
}
}
@end@implementation BananaBunch
-(void) beginContactWithMonkey:(GB2Contact*)contact
{
if(!consumed)
{
Monkey *monkey = (Monkey *)contact.otherObject;
[monkey restoreHealth:60];
[self consume];
}
}
@end
我们需要简单地核对物体是否真的耗尽了,如果没有,在物体上使用restoreHealth。香蕉能够储存20点,而香蕉串则能够储存60点。
编译并运行。怎么回事?我们并未看到成效!
客观思考
失败的原因是什么?香蕉和香蕉串仍然作为Object类。而我们在Object.mm中使用的生产模式并不能创造出新的Banana和BananaBunch物体。
重新回到Object.mm并改变randomObject选择器,以创造Banana和BananaBunch物体:
+(Object*) randomObject
{
NSString *objName;
switch(rand() % 18)
{
case 0:
// create own object for bananas – for separate collision detection
return [[[Banana alloc] initWithObject:@”banana”] autorelease];case 1:
// create own object for banana packs – for separate collision detection
return [[[BananaBunch alloc] initWithObject:@”bananabunch”] autorelease];case 2: case 3: case 5:
…
编译并测试。这次就对了!
而这时候唯一让我不满意的便是当猴子撞上香蕉时将会停下来,而香蕉也将从猴子身上弹开。
Box2d在迈向游戏世界过程中共有2个阶段:预先解决阶段以及碰撞阶段。在预先解决阶段中,我们能够消除两个物体之间的碰撞点。而尽管碰撞回调将被召回,但是物体却不再会从猴子身上弹开。
GBox2D将这些内容涵括到选择器presolveContactWith中,而这一选择器能够用于控制碰撞物体。也就是使用这一选择器,你能够禁止猴子与物体之间的碰触。
在Object.mm中将以下选择器添加到ConsumableObject(在@end marker之前),它将能够控制Banana和BananaBunch的碰撞:
-(void) presolveContactWithMonkey:(GB2Contact*)contact
{
[contact setEnabled:NO];
}
编译并测试。检查猴子是否能够不受干扰地吞食香蕉,还是香蕉碰触到猴子仍然会弹开。
最后的完善
现在看来我们的游戏真的好多了!但是我还将进行最后的完善。
现在的游戏还是有点不公平:虽然前一秒你可能看到猴子还活蹦乱跳,但是下一秒,可能一个突然掉落下的雕塑就会使它致命。所以这更像是一款靠运气而不是技巧取胜的游戏。
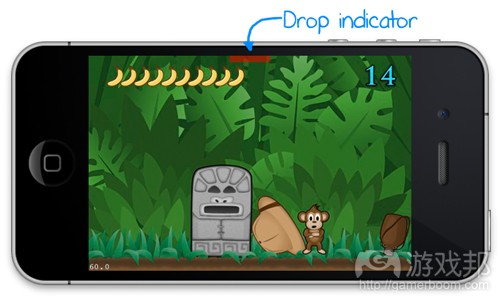
所以,为了增强游戏玩法,我们决定添加一个掉落指示器——也就是一个能够指示下一个物体掉落位置的红条。
打开GameLayer.h并添加以下关于掉落指示器的变量:
CCLayerColor *objectHint; // weak reference
然后在GameLayer.mm的初始方法末尾添加以下初始代码:
// object Hint
objectHint = [CCLayerColor layerWithColor:ccc4(255,0,0,128)
width:10.0f
height:10.0f];
[self addChild:objectHint z:15000];
objectHint.visible=NO;
我们设置了一个半透明的红条做为掉落指示器,并将其尺寸设置为10×10 像素。我们将在后来重新调整该指示器的大小,从而更好地匹配掉落物体的大小。
然后来到更新选择器的第8部分上方,并添加如下代码:
if(nextDrop < dropDelay*0.5)
{
// update object hint
[objectHint setVisible:YES];// get object’s width
float w = nextObject.ccNode.contentSize.width;// and adjust the objectHint according to this
[objectHint changeWidth:w];
objectHint.position = ccp([nextObject physicsPosition].x * PTM_RATIO-w/2, 310);
}
else
{
[objectHint setVisible:NO];
}
如果nextDrop不及dropDelay的一半,我们便会设置objectHint是可见的,并且其宽度也与掉落物体的宽度一样。我们同样也将其位置设定在物体横坐标下方的中间。
编译并运行!检查目标提示是否会出现在下一个物体掉落位置的下方。
最后一个添加——主题音乐!在GameLayer.mm的开头输入SimpleAudioEngine.h:
#import “SimpleAudioEngine.h”
在初始化选择器末尾添加以下代码。音乐资源已经添加到游戏中了:
// music
[[SimpleAudioEngine sharedEngine] playBackgroundMusic:@”tafi-maradi-loop.caf”];
编译并运行。
(本文为游戏邦/gamerboom.com编译,拒绝任何不保留版权的转载,如需转载请联系:游戏邦)
How To Build a Monkey Jump Game Using Cocos2D, PhysicsEditor & TexturePacker Part 3
Andreas Loew
This is a post by special contributor Andreas Loew, the creator of TexturePacker and PhysicsEditor.
Create this vertical scrolling platformer with Cocos2D!
Welcome to the final part of the Monkey Jump tutorial! In this series, we are creating a fun vertical scrolling platformer with Cocos2D, TexturePacker and PhysicsEditor.
In Part One on the tutorial series, we introduced the MonkeyJump! game design, created the sprite sheets and shapes we needed, and began coding the game.
In Part Two, we added our hero to the game, made him move and jump, and added some gameplay.
In this third and final part of the series, we will add some performance improvements, add a HUD Layer, and yes – kill the monkey! :]
We’ll be starting with the project where we left off last time. If you don’t have it already, grab the source code for this tutorial series and open up 5-MonkeyJumpAndRun.
All right, time to stop monkeying around and wrap up this tutorial! :]
Too Many Objects!
Playing our game for a while, you’ll see that it gets slower and slower, until it becomes completely unplayable.
There’s a reason for this – as objects continue to fall from the sky, one after another, they bump into the objects already lying around. All of these collisions have to be handled by Box2d. If there are n objects, there are n*(n-1) possible collisions to handle. Box2d uses hashes to make things faster, but you can imagine how dramatically the number of collisions increases as the number of objects increases.
If you watch a statue drop, you’ll see that nearly the entire stack below moves and bounces from impulses passed from the statue down through the stack from one object to another.
To improve the situation, we’re going to convert objects which are some distance below the monkey into static objects. These static objects will still let other objects pile up above them, but they’ll no longer react to the impact. As a result, a falling statue will only affect the top of the stack instead of the complete pile.
Box2d allows objects to go to sleep when they aren’t touched by other objects for some time. We will use this feature to improve performance.
GB2Engine has an iterate method that can be used to iterate all objects with a block. We will use it to create a routine that checks the y-coordinates of all objects and puts to sleep any that are a certain distance below the monkey.
Add the following code to the end of the update selector in GameLayer.mm:
Compile and test. Note that there are still some situations where things won’t work as expected. For example, if a group of objects pile up like a tower, and the monkey climbs onto the pile, it might happen that a dropping object reaches the pruneDistance and is converted into a static object in mid-air.
The solution is quite simple: only convert objects to static if their speed is low. Change the second if condition in the above code to:
Compile and test. Looks good, doesn’t it?
Caught in a Trap
There’s still an issue though – the monkey might still get caught under a pile of objects. Items pile up around him, and he’s not strong enough to break free if there are too many objects above him.
There are several ways to deal with this situation. One is to simply let him die if he’s stuck. Another solution is to “teleport” the monkey above the objects and let him go on playing. That sounds fun, let’s do that!
To make this work, we must be sure that the monkey teleports above all objects. Otherwise, his position might place him directly inside another object and he’ll never break free!
Go into GameLayer.h and add a member variable:
And make it a property by adding the following line above the “scene” method declaration:
Now switch to GameLayer.mm and synthesize the object by adding this line just below the “@implementation” line:
Then, replace section #10 in update with the following:
The new code determines the highest object location by resetting the highestObjectY with every new check. Note that it only checks active objects. Otherwise, the highest object will always be the object that is waiting to drop.
Switch to Monkey.h and add a new member:
Now let’s teleport the monkey above the highest object’s position if he’s been stuck with an object above his head for a certain amount of time. Aadd the following to the end of the updateCCFromPhysics selector:
Compile and run. That’s much better! Now, if the monkey is caught in a trap and he can’t push his way out, he will be magically freed.
There are other ways to detect if the monkey is caught. For example, we could check how high the objects are piled, or if the monkey’s speed is low for a certain amount of time. Feel free to try out other detection methods to see which one works best for you.
Putting the Pain on Our Hero
Play the game for a bit and you’ll realize that there isn’t much challenge to this game – the monkey climbs but doesn’t take any damage. Let’s change that.
Open Monkey.h and add a new variable called health to the Monkey class.
Also add properties to access the health level and to detect if the monkey is dead:
Finally, add a define for the maximum health, at the top of the file below the import statements:
Now switch to Monkey.mm and synthesize the health property:
Implement the isDead property by adding the following code above the walk method :
As you’ll notice, we decide if the monkey is dead or not based on if his health is less than 0 or not.
In the init selector, initialize the health with the maximum value by adding this below the game layer storage code:
Now let’s put the hurt on the monkey by modifying the section with the head collision in beginContactWithObject:
Basically, the monkey should get hurt when an object collides with his head. Calculate the damage using the object’s vertical velocity and mass, and reduce the monkey’s health by that amount. This causes damage from fast-dropping objects, but doesn’t harm the monkey if an object is resting above his head. Notice that I also added a hurtFactor so that you can adjust how much the monkey is hurt.
If the monkey dies, he should drop from the scene. In this case, we’ll simply delete all the monkey’s collision flags except for the floor. This will make the monkey fall dead on the floor. We’ll release the rotation lock to let him lie on the floor, and change the monkey’s sprite to dead.png.
Dead monkeys can’t jump – so change the code in the monkey’s jump selector to ignore screen taps if the monkey is dead:
Disable the updateCCFromPhysics contents by changing section #1, as well:
Compile and run, and now you can bring out your evil side – kill the monkey! :]
Restarting the Game
Now the monkey dies, but the objects keep falling and there’s no way to restart the game.
I would suggest restarting two seconds after the monkey’s death. Usually, we’d go to a high score table after a game ends, but that’s too much for this tutorial. A simple restart will suffice.
Add a new variable to GameLayer.h to hold the restart timer:
And add these lines to the beginning of update inside GameLayer.mm:
In case of a restart, we simply remove all objects from the GB2Engine and replace the current scene with a new GameLayer.
Compile and run. The level should now restart two seconds after the monkey’s death.
The HUD Layer – Health
Yes, the monkey dies, but no one knows when it’s going to happen! That’s too realistic for me and most other players. Let’s add a health display so that we can keep track of the monkey’s health.
We’re going to represent the monkey’s health with 10 banana icons. Each banana represent 10 points of health.
Create a new file with the iOS\Cocoa Touch\Objective-C class template. Name the class Hud, and make it a subclass of CCSpriteBatchNode. And don’t forget to change the .m extension to .mm. Replace the contents of the Hud.h file with the following:
The HUD display uses the sprites from the jungle sprite sheet, so we have to derive the HUD from CCSpriteBatchNode in order to have access to the jungle sprite sheet sprites. Additionally, the HUD needs to keep track of the current health (which we will need later) and the sprite representing each point of the monkey’s health. We also need a method to change the current health.
Switch to Hud.mm and replace its contents with the following:
Here, we initialize the HUD’s CCSpriteBatchNode super class with the sprite sheet.
Then, we iterate through the number of health tokens and create sprites for each of the bananas. We also increase the x-position of each banana to lay it out next to the previous banana.
Finally, add the method to update the health to the end of Hud.mm:
In this method, we need to determine the number of bananas to display, make the ones to display visible, and clear the invisible ones. It’s possible for sections #3 and #4 to be implemented with only one loop, but we’re going to extend this code later and so will have that as two separate loops.
Next we need to add the new HUD to the GameLayer. Switch to GameLayer.h and add the predeclaration of the HUD class:
Then, add a member variable for the HUD to the GameLayer class:
Switch to GameLayer.mm and import Hud.h at the start of the file:
Init the HUD inside the init selector:
Finally, update the HUD from inside the update selector by adding this code to the very end:
Compile and test. It works, but I don’t quite like the visuals – I don’t think the bananas should appear and disappear so abruptly. I want them to fade in and out. I also think the monkey’s health should drop over time rather than instantly.
Since setHealth gets called every frame, it won’t be hard to adjust the displayed health level over time.
Open Hud.mm and change the setHealth selector’s section #1 with the following:
Compile and test. Now the HUD adjusts more slowly, but the bananas still disappear way too quickly. Let’s make them fade and scale in and out.
Replace sections #3 and #4 in setHealth with the following code:
To fade a banana into view, we check if the banana is already visible. If it’s not, we set it to visible, set the scale to be smaller than the actual size and opacity to 0, and then run an action scaling the banana to 1.0 and fading it in. If the banana is already visible, we’ll do nothing since an action might already be running on it.
To fade a banana out of view, we need a sequence action: first scale and fade out, and then set it to invisible using the CCHide action.
Since we can’t use the visible flag to determine if the banana is fading out, we’ll check the number of animations running on the banana. If the number isn’t zero, that means an animation is already running, so we won’t run another one.
Compile and run. Watch for the bananas to fade in on start and fade out when the monkey gets hurt.
Awesome!
The HUD Layer – the Score
Now let’s add a score display to the HUD. For the score, I suggest using the highest point the monkey has reached while standing on an object.
Switch to Monkey.h and add a new variable and property:
Switch to Monkey.mm and synthesize the score property at the beginning of the file:
Add the following lines to the end of updateCCFromPhysics:
Note that we update the score only if it is higher than the current score because sometimes the monkey might drop down to a lower position after climbing higher. We also scale the monkey’s y-value by 10. Otherwise the score increases are fairly low and not very motivating.
Switch to Hud.h. Add a define for the number of score digits:
Add variables to keep the digit sprites and to cache the CCSpriteFrame pointers:
Add a method definition to set the score:
Now switch to Hud.mm. The first thing to do here is cache the lookup of the digit sprites. Add the following lines to the end of the init method:
Here, we use the CCSpriteFrameCache and request the frame for each digit. We’ll store the frame data in the digitFrame array. Then we create sprites for each digit to display and initialize each one to frame 0.
Add the following method to the end of the file – it prints the current score in a character buffer and adjusts the digits displayed according to the digits in the buffer:
Finally, switch to GameLayer.mm and add this code to the end of the update method:
Compile and test. Check if the score is updated when the monkey climbs higher. The monkey starts with a score of 9 – this is because the floor’s height already adds to the monkey’s score. If you want you can reduce 9 from the score so it starts at 0.
All of the code up to this point is available in the folder 6-Hud.
Getting Hungry
Currently, the monkey gets hurt by the falling bananas but I want them to restore his health when he consumes them.
To enable this, we’ll create a subclass of Object called ConsumableObject. This class gets a bool variable that keeps track as to whether the object was already consumed.
I usually prefer using one file for each class, but since these classes are quite small, I’m going to add it to the end of Object.h (after @end):
Similarly, derive Banana and BananaBunch classes by adding the following code after the definition of ConsumableObject:
Now implement the consume method for ConsumableObject in Object.mm. It’s important to add the code below the @end that closes the @implementation for Object:
The consume method checks to see if the object was already consumed. If it wasn’t consumed, then scale the object to 0 and fade it out, and finally, delete the object from the game.
To do this, we create a CCSequence action with a parallel action of CCFadeOut and CCScaleTo, followed by a CCCallFunction. This CCCallFunction calls the deleteNow selector. This selector removes a GB2Node object from the world, both in graphics and physics.
Now, switch to Monkey.h and add the new restoreHealth method:
Next, switch to Monkey.mm and implement the method at the end of the class:
Here, we simply add the new health value, ensuring that it does not exceed the maximum. Just setting the health is enough as the HUD take care of animating the health bar.
We’ll also play a small gulp sound when the monkey swallows the item. To do this, import Monkey.h at the beginning of Object.mm:
Then, implement the beginContactWithMonkey for the Banana and BananaBunch classes below the implementation for ConsumableObject in Object.mm:
We simply check if the object was already consumed, and if not, call restoreHealth on the Monkey object. The banana restores 20 points, while the banana bunch restores 60 points.
Compile and run. Hey – what’s that? It’s not working!
Objective Thinking
The reason for failure? Bananas and banana bunches are still created as Object classes. The factory method we use in Object.mm does not yet create our new Banana and BananaBunch objects.
Go back to Object.mm and change the randomObject selector to produce Banana and BananaBunch objects:
Compile and test. Nice!
The only thing that bothers me is that the monkey stops when hitting a banana and the bananas bounce off the monkey.
Box2d has two phases during the stepping of its world: a presolve phase and a collision phase. During the presolve phase it is possible to disable collisions between objects. The collision callbacks will get called, but the objects won’t bounce off.
GBox2D wraps this into a selector called presolveContactWith* that can be called on the colliding objects. Within this selector, you can disable the contact.
Add the following selector to ConsumableObject in Object.mm (before the @end marker) – it will fix the collisions for Banana and BananaBunch:
Compile and test. Check if the monkey can eat the banana without getting disturbed or having the banana bounce off him.
Final improvements
Our game is looking awesome! But I still have a few more improvements for you.
The game is a bit unfair right now: the monkey is on the scene and BAM! – a statue kills him instantly. It is a game that can be won more by chance than by skill.
To make the gameplay a bit more even, we’re going to add a drop indicator. It will be a small red bar that shows the position of the next object drop.
Go to GameLayer.h and add the following variable for the drop indicator:
Then, add the following initialization code to the very end of the init method of GameLayer.mm:
We create a semi-transparent red box as the drop indicator and set the box dimensions to 10×10 pixels. We’ll resize it later to match the dropping object’s size.
Next, scroll down to just above section #8 in the update selector and add the following code:
If the nextDrop is less than half of the dropDelay, we set the objectHint to visible and its width to the dropping object’s width. We also set its position centered below the object’s x coordinate.
Compile and run! Check if the object hint appears below the position of the next drop.
One last addition – the theme music! Import SimpleAudioEngine.h at the beginning of GameLayer.mm, if you haven’t done so already:
Add the following lines to the end of the init selector. The music resources have already been added to the project:
Compile and run.
The final version of this project is in the folder called 7-done.(source:raywenderlich)
上一篇:论述第一人称射击游戏的正面效应





 闽公网安备35020302001549号