


分享《愤怒的小鸟》物理元素制作过程(2)
作者:Paul Firth
这是文章的后半部分,文章前半部分详见此处。
游戏
下面是游戏的当前状态;这里存在3个演示关卡,旨在呈现关卡发展机制及若干外观简单的角色和区块。

angry birds from wildbunny.co.uk
后续内容
前面我们已经谈到如何绘制背景图像及从触碰角度初步谈论游戏世界的创建。
这里我们主要谈论物理元素;稳定性和游戏优化。
关卡
关卡被定义成系列静态刚体和动态刚体,及掩盖静止状态的视觉图层——我采用其他图层,否则相邻静态区块间就会出现一定的视觉裂缝,我们不希望出现这种情况,因为图像纹理应具有连贯性。
关卡应延续基础类别Code.Level。我已这么做,因此我就能够预先定义各关卡的某些内容(游戏邦注:例如主角的实际名称及我需要在编码中引用的弹道)。
角色和区块
游戏的两个角色和所有区块都以Flash IDE格式设计,所有这些都是我在代码中定义的基础类别。这样我就能够在执行期间分析关卡的子集,替物理引擎在正确地图位置创造适当刚体。

rigid bodies from wildbunny.co.uk
下面是若干基础类别(石头和木头采用相同基础类别):
* HeroCharacter
* EnemyCharacter
* ProxyRectangleIce
* ProxyRectangle
* ProxyRectangleStatic
* ProxyTriangleStaticDown
* ProxyTriangleStaticUp
这些都在关卡创建期间进行转换,采用下列循环模式:
// create physics objects to go with the render objects in level
for ( var i:int = 0; i<level.numChildren; i++ )
{
	var child:DisplayObject = level.getChildAt( i );
	if ( child is Character )
	{
		...
	}
	else if ( child is ProxyRectangleStatic )
	{
		...
	}
	else if ( child is ProxyRectangle )
	{
		...
	}
	else if ( child is ProxyRectangleIce )
	{
		...
	}
	else if ( child is ProxyTriangleStaticDown )
	{
		...
	}
	else if ( child is ProxyTriangleStaticUp )
	{
		...
	}
	child.cacheAsBitmap = true;
}
在各if-else条件中,我创建适当刚体配合代理内容,这些会添加至物理引擎。
关卡顺序
Flash灵活将各类别模式存储成变量,因此我得以将关卡顺序转换成简单的类阵列:
private var m_currentLevel:int;
private var m_levelSequence:Array =
[
	Level3Fla,
	Level2Fla,
	LevelFla
];
每当有关卡完成时,我就会从阵列中抽取新内容,请看如下示例:
// create new level
m_level = new m_levelSequence[m_currentLevel];
这些随后就被转换到SetupLevel函数,其负责将所有刚体实体化。
物理引擎
现在就出现如下概念:角速度、几何图形接触集的生成、接触组合的生成、物体休眠、触碰回调及持久接触。所有这些都是创建游戏的必要元素。
物理引擎——角速度
角速度的处理方式和线速度类似,区别是角速度是标量,而不是矢量,因为我们采用2D模式,所以整合方式相同,但其在实际冲量方程中的设置更巧妙。
物理引擎——图形接触集的生成
虽然从技术角度看,当两个凸面相互触碰时,只存在两个最近接触点,但物理引擎无法仅凭圆圈生成稳定模拟内容。只要存在矩形或多边形,你就需要把握在物体间的完整接触集。
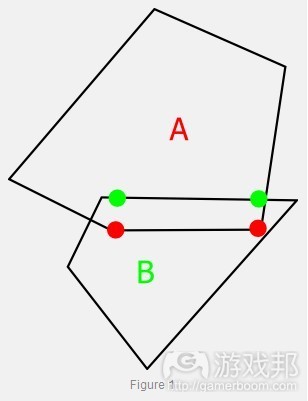
figure1 from wildbunny.co.uk
图1呈现的是多边形A和B间的完整接触集。要生成此内容,我们就需要从碰触机制反馈的功能组合着手。
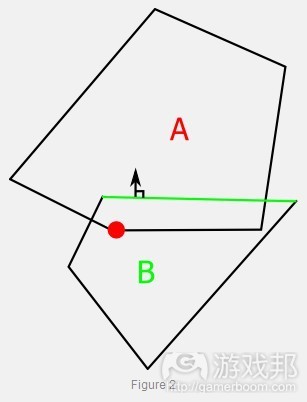
figure2 from wildbunny.co.uk.
图2显示的是一种可能情况:B顶点和A边缘被视作是最靠近的功能。凭此信息,我们能够局部搜索毗邻B红点的顶点,看看哪个边缘存在与我们的触碰惯例相反的情况。

figure3 from wildbunny.co.uk
图3呈现的是正确边缘和B角度的边缘。把握这两个边缘,我们就掌握生成接触集所需的所有信息。我们采用的方式是将各边缘的顶点映射到其他边缘,同时固定投射内容,这样它们就能够完全呈现于边缘界限中。
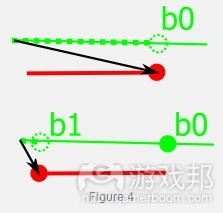
figure4 from wildbunny.co.uk
图4呈现的是,A边缘的红色顶点投射到B的绿色边缘。首个顶点变成投射点b0,第二个则变成b1。
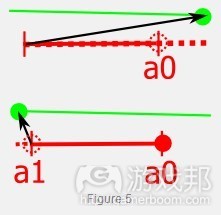
figure5 from wildbunny.co.uk
在图5中,我们发现整个过程在另一边缘中重现;注意判断为什么绿色顶点的投影内容会出现在红色边缘外。这会带来无效接触,所以我们需在红色边缘的界限内固定这些内容。这会产生顶点a0和a1,这就是完整的接触集。
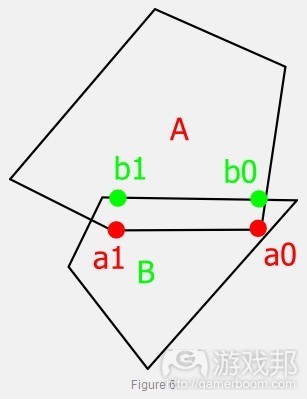
figure6 from wildbunny.co.uk
下面是我将顶点投射到边缘及于界限中固定内容的代码信息:
public function ProjectPointOntoEdge(p:Vector2, e0:Vector2, e1:Vector2):Vector2
{
	// vector from edge to point
	var v:Vector2 = p.Sub(e0);

	// edge vector
	var e:Vector2 = e1.Sub(e0);

	// time along edge
	var t:Number = e.Dot(v) / e.m_LenSqr;

	// clamp to edge bounds
	t = Scalar.Clamp(t, 0, 1);

	// form point and return
	return e0.Add( e.MulScalar(t) );
}
接触组合的生成和物体休眠
《愤怒的小鸟》的游戏逻辑存在于:玩家能够判断关卡中的所有操作何时停止(否则你就无法知晓个别尝试何时结束,因为物体会落下摧毁敌人角色)。
要实现此目标,进一步优化内容,物件休眠机制就必不可少。此机制涉及的内容是让刚体不再活跃或“休眠”(游戏邦注:就是保持静止一段时间),这能够节省CPU循环,同时告知我们游戏所处状态。
要实现此目标,我们首先要能够生成接触组合。接触组合就是各相互接触刚体的集合。
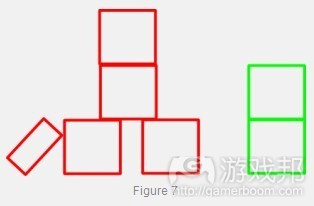
figure7 from wildbunny.co.uk
图7呈现的是两个接触组合。
要生成这些内容,最简单的就是采用递推方式。各物体需要维持同其接触的系列物体。贯穿所有刚体的外部循环会生成个人接触组合容器,然后在同既定接触组合接触的添加物体中进行递推。
静止物体不在其中之列,因为我们不想将它们纳入任何接触组合中——它们会将整个关卡联系起来,变成一个庞大但效率低的接触组合。
其中涉及代码如下:
private function BuildContactGroup( r:RigidBody, cg:ContactGroup, dt:Number ):void
{
	if ( !r.m_visited && !r.m_Static )
	{
		r.m_visited = true;
		r.m_contactGroup = cg;

		// add the object
		cg.Add( r );

		for ( var i:int = 0; i<r.m_rbsTouching.m_Num; i++ )
		{
			BuildContactGroup( r.m_rbsTouching.Get(i), cg, dt );
		}
	}
}

///
/// Go through and build all the contact groups in the world
///
internal function BuildAllContactGroups( dt:Number, rigidBodies:ReferenceArray ):void
{
	Reset( );

	// start with a new group
	var cg:ContactGroup=null;

	for ( var i:int=0; i<rigidBodies.m_Num; i++ )
	{
		var r:RigidBody = rigidBodies.Get(i);

		// if this object isn't static and hasn't yet been visited...
		if ( !r.m_Static && r.m_visited==false )
		{
			if ( cg==null || cg.m_NumRigidBodies>0)
			{
				// get new contact group
				cg = GetNewContactGroup( );
			}

			// go an recursivly add objects to this new contact group
			BuildContactGroup(r, cg, dt);
		}
	}

	// sleep check the contact groups
	SleepCheck( );
}
这其实非常简单,但运作效果突出,占用很少的CPU时间。
为让刚体进入休眠状态,各刚体应融入计时器,用于计算刚体角速度和线速度低于某些界限值的持续时间。然后,只要接触组合的所有刚体的计算数值超越界限值,整体接触组合就会进入休眠状态。同样,若处在睡眠接触组合的刚体醒来,整体接触组合就会跟着醒来。
物理引擎——抵触反应指令
对于某些物体,游戏需知晓其同主角或游戏空间所发生的触碰。要达到此目的,各刚体需要具有会在运行时间里呈现的触碰反应指令。然后,当发现触碰情况时,物理引擎会访问这些指令,跳过有关触碰的回调信息(其中包括击中什么物件,触碰时的相对正常速度)。此信息让用户得以消灭敌人,粉碎结冰区块。

smash from wildbunny.co.uk
物理引擎——持久接触
此物理引擎功能是维持物理元素稳定性的必要条件;缺乏此元素,游戏就无法在关卡设计中大量众多创意自由。
那么什么是持久接触?
常规接触能够有效防止两个刚体互相攻击——它们由触碰探测机制生成,为物理解算器使用,但它们属于临时元素,只存在于当前画面中。
这些由物理解算器生成的冲量让整个模拟内容朝稳定性靠拢,但依然缺乏足够CPU时间,无法在一个画面中完全解决此问题。所以我们不会摒弃前次出现的冲量,相反我们会记住它们,然后将其运用至下个画面中,以“热启动”引擎。这使得内容的稳定性获得极大提高。
持久接触是缓冲画面冲量的方式(游戏邦注:通过辨识在系列画面中逻辑一致的接触)。这里所谓的逻辑是指,所参照的标准不是接触位置之类的粗糙信息,我们希望采用能够清楚辨别接触的信息。这里我们可以采用功能组合索引;例如,物件A定点的索引结合物件B边缘的索引。这些能够结合起来,变成一个散值,供我们查阅及在各画面中进行比较。当标签相匹配时,我们实现缓冲命中,能够交叉复制冲量。
用于缓冲冲量的代码如下:
public class TouchingContact
{
	public var m_featurePairKey:uint;
	public var m_accumulatedNormalImpulse:Number;
	public var m_accumulatedTangentImpulse:Number;

	public function TouchingContact( featurePairKey:int )
	{
		m_featurePairKey = featurePairKey;
		m_accumulatedNormalImpulse = 0;
		m_accumulatedTangentImpulse = 0;
	}

	///
	/// Something to identify this contact uniquely
	///
	static public function GenerateFeaturePairKey( featureToUse:FeaturePair, supportIndex:int ):uint
	{
		return featureToUse.m_fp|( featureToUse.m_face<<2 )|( supportIndex<<16 );
	}
}
当两个物体首次接触时,基于抵触的持久条目就会生成,然后存储在低索引物件中,这样我就无需复制数据。当物体停止接触,这些接触条目就会再次被删除。在它们接触期间,我缓冲4个功能组合,供随后查阅——我选择4组而非2组的原因是某些接触配置中的若干画面存在相当多的问题;一功能组会生成一个画面和两种接触,另一功能组另外生成一个画面和两种接触,周而复始。这能够有效避免丢弃内容,然后重新生成的情况,储存4个各功能组让我得以顺利实现目标,在稳定接触配置中获得100%缓存命中率。
优化
在落实所有功能,将引擎变得足够稳定,足以运行《愤怒的小鸟》后,我发现实际运作速度很缓慢。这令我有些沮丧,但我从动作脚本优化技巧中找到答案。

pile from wildbunny.co.uk
引用
在动作脚本中,所有复杂类型都是通过引用传递,和c#或c++不同,复杂类型无法进行堆叠。通过Vector2类型完成所有几何运算颇令人厌烦,因为这意味着每次你都进行新的(),配置会成堆呈现,显然在进行临时运算时,无用单元收集程序的速度就会放缓。
这无疑是内容运作的硬伤。
解决方案——聚集方式
当然从互联网中我了解到,这里的公认解决方案是在复杂类型中采用聚集方式。通过采用聚集方式,我们能够落实和取消配置,因此避开无用单元收集程序。
这里没有发现满足我期望的执行过程,于是我就自己进行编写:
package Code.System
{
	import Code.Assert;
	import Code.System.UnexpectedCaseException;

	public class Pool
	{
		private var m_counter:int;
		private var m_maxObjects:int;
		private var m_pool:Array;
		private var m_type:Class;

		/// <summary>
		///
		/// </summary>
		public function Pool( maxObjects:int, type:Class )
		{
			m_pool = new Array( maxObjects );

			// construct all objects
			for (var i:int=0; i<maxObjects; i++)
			{
				m_pool[i] = new type();
			}

			m_counter=0;
			m_type=type;
			m_maxObjects=maxObjects;
		}

		/// <summary>
		///
		/// </summary>
		public function Allocate( ...args ):*
		{
			Assert( m_counter<m_maxObjects, "Pool.GetObject(): pool out of space!" );

			var obj:* = m_pool[m_counter++];

			if ( args.length>0 )
			{
				if ( args.length==1 )
				{
					obj.Initialise( args[0] );
				}
				else if ( args.length==2 )
				{
					obj.Initialise( args[0], args[1] );
				}
				else if ( args.length==3 )
				{
					obj.Initialise( args[0], args[1], args[2] );
				}
				else if ( args.length==4 )
				{
					obj.Initialise( args[0], args[1], args[2], args[3] );
				}
				else if ( args.length==5 )
				{
					obj.Initialise( args[0], args[1], args[2], args[3], args[4] );
				}
				else if ( args.length==6 )
				{
					obj.Initialise( args[0], args[1], args[2], args[3], args[4], args[5] );
				}
				else if ( args.length==7 )
				{
					obj.Initialise( args[0], args[1], args[2], args[3], args[4], args[5], args[6] );
				}
				else
				{
					throw new UnexpectedCaseException;
				}
			}

			return obj;
		}

		/// <summary>
		///
		/// </summary>
		public function Deallocate( obj:* ):void
		{
			Assert( typeof( obj )==typeof( m_type ), "Pool.Deallocate(): object doesn't belong to this pool!" );
			Assert( m_counter>0, "Pool.Deallocate(): too many deallocations!");
			m_pool[--m_counter] = obj;
		}

		/// <summary>
		///
		/// </summary>
		public function get m_Num():int
		{
			return m_counter;
		}

		/// <summary>
		///
		/// </summary>
		public function Get(i:int):*
		{
			Assert(i<m_counter, "Pool.Get(): index out of range!");
			return m_pool[i];
		}

		/// <summary>
		///
		/// </summary>
		public function Clear():void
		{
			m_counter=0;
		}
	}
}
这让你顺利创建能够进行运行时类型检查的连接池,同时让你能够访问分配物件的Initialise()功能。我尚未在AS3找到访问物件构造函数的渠道,这是理想模式,和c++中的新配置类似。同样,我无法在没有手动标引的情况下将所有参数直接传递至函数中。但其在实际情况中运作顺利。
关于涉及Vector2的临时运算,我采用许多只存在于一个画面中的Vector2。唯一需要注意的是,避免在某交叉画面中始终采用同个引用,因为这会被覆盖。我非常希望AS3能够拥有类似c#的结构,从而避免此种情况。
在我辨别所有缓慢元素,汇集各种临时物件后,我依然颇为沮丧,因为内容在我陈旧电脑的运作速度不尽人意。我付出很多,但最终得到的回报却呈递减模式。
绝望中,我只好在chrome上运作真正的《愤怒的小鸟》,看看其在我设备的运作速度如何。结果令我既震惊又松口气:它比我的执行方式慢很多。

smash 2 from wildbunny.co.uk
颗粒和闪烁机制
我在游戏中添加的优化小道具是简单的颗粒机制(其将Flash IDE定义中的Sprite当作颗粒)及简单闪烁控制器(其将各角色的命名实例用于睁眼和闭眼中,然后在代码中将它们激活,我们根据随机等候期控制各元素的能见度)。

figure8 from wildbunny.co.uk
图8分别呈现的是眼睛闪烁和张开的角色及其对应的眼睛形状。
(本文为游戏邦/gamerboom.com编译,拒绝任何不保留版权的转载,如需转载请联系:游戏邦)
How to make Angry Birds – part 2
by Paul Firth
This is the 2nd part of my series on how to make a game like Angry Birds by Rovio – and its been a while coming… You can read the first part here.
The Game
Ok, so here is the game so far; there are three demo levels to show the level progress system and some simple looking characters and block types. Apologies for the programmer art
Catch up
Ok, so last time I had covered how to draw the background graphics and made a start on how the world is going to be composed in terms of collision.
What I’m going to cover in this article is the physics part; stability and optimisations.
Level
A level is defined as a bunch of instances of static rigid bodies and dynamic rigid bodies plus a visual layer which covers up the statics – I use this other layer because otherwise there would be a slight visible gap between adjacent static blocks, which we don’t want since the texture is supposed to be continuous.
A level must inherit the base class Code.Level. I’ve done this so I can predefine certain things about each level – such as the instance names for the hero characters, and the sling-shot which I need to reference in code.
Characters and blocks
Each of the two characters and every block used in the game are designed in the Flash IDE, and each of them references a base class that I’ve defined in the code. This is so that I can parse the children of a level at runtime and create the appropriate rigid bodies at the correct mapped locations for the physics engine.
There are the following base classes (stone and wood use the same base class):
* HeroCharacter
* EnemyCharacter
* ProxyRectangleIce
* ProxyRectangle
* ProxyRectangleStatic
* ProxyTriangleStaticDown
* ProxyTriangleStaticUp
These are interpreted at level creation time, using a loop similar to this:
In each part of the if-else ladder I create the appropriate rigid body to match the proxy, and these get added to the physics engine.
Level sequence
Thanks to Flash’s neat way of storing class types as variables, I represent the level sequence as a simple array of class types:
Every time a level is completed, I can pick the new one from the array and instantiate it like this:
It then gets passed to the SetupLevel function which handles all the rigid body instantiation that I talked about above.
Physics engine
The physics engine is similar in design to the one I laid out in Physics engines for dummies, except this one is a lot more advanced.
It now has the concepts of angular-velocity, polygon contact set generation, contact group generation, object sleeping, collision callbacks and persistent contacts. All these components were necessary to create the game.
Physics engine – angular velocity
Angular velocity is handled in a very similar way to linear velocity, except its a scalar and not a vector, since we’re in 2d and it gets integrated the same way. Where it gets more tricky is in the actual impulse equations.
I’m going to refer the reader to the following set of articles by Chris Hecker which describe the impulse equations for angular and linear velocity rather well: http://chrishecker.com/Rigid_Body_Dynamics.
I do intend to write a more in depth follow up on this subject at some point.
Physics engine – polygon contact set generation
Although, technically when two convex shapes collide there are only two closest points (one on each object) this is not enough for the physics engine to produce a stable simulation with anything more than circles. As soon as you have a rectangle or a polygon you need to have the full contact-set between both objects.
Figure 1 shows the full contact set between two polygons A and B. To generate this we need to start with the feature-pair returned by our collision system (vertex and edge, or edge and vertex).
Figure 2 shows one such possible case: a vertex from B and an edge from A were returned as the closest features. Starting with this information we can then do a local search of the the vertices adjacent to the red point on B (one on either side) to find which edge has a normal that is most opposed to our collision normal (the edge normal).
Figure 3 shows the correct edge and the other edge which was considered from B. Once we have these two edges we have all the information we need to generate the contact set. What we do is to project each vertex from each edge onto the other edge, making sure to clamp the projections so they lie wholly within the bounds of the edge.
Figure 4 shows the red vertices of the edge from A being projected onto the green edge of B. The first vertex becomes projected point b0 and the second becomes b1.
In Figure 5 we can see the same process repeated for the other edge; note how both projections of the green vertices would lie outside the bounds of the red edge. Because this would lead to an invalid contact we must clamp these at the bounds of the red edge. Vertices a0 and a1 result and this is the completed contact set!
Here is the code for projecting a point onto an edge and clamping against the edge bounds:
Contact group generation and object sleeping
The game logic for angry birds relies on being able to tell when all the movement in the level is stopped, because otherwise you would never know when an individual try is over since objects may yet fall down crushing an enemy character.
In order to facilitate this and also to act as an optimisation an object sleeping system is required. What this does is to deactivate or ‘sleep’ any rigid bodies which have become sufficiently still for a set period of time, thereby saving CPU cycles and also giving us an indication about the state of the game.
For this to be possible we first have to be able to generate contact groups. A contact group is a collection of rigid bodies which are all touching each other.
In order to generate these, the simplest way is to use recursion. Each object must maintain a list of every object that’s touching it. An outer loop over all rigid bodies generates individual contact group containers and then recurses within adding objects which are touching to the given contact group.
Static objects are not followed because we don’t want to include them in any contact group – they would link the entire level together into one giant, inefficient contact group!
The code looks like this:
Its actually quite simple and works rather well, taking minimal CPU time.
To enable the sleeping of rigid bodies, each rigid body maintains a counter which counts the number of seconds that rigid body has had angular and linear velocities below some threshold values. Then, once all the rigid bodies in a contact group have counter values over a threshold (1 second in this game’s case), the entire contact group is sent to sleep. Likewise, if any rigid body in a sleeping contact group wakes up, the entire contact group must wake up with it.
Physics engine – collision callbacks
For some objects the game needs to know about any collisions that happen between those objects and the hero character, or the world. To facilitate this, each rigid body has a collision callback delegate which can be set at runtime. Then, the physics engine will call this delegate whenever it detects a collision, passing the callback information about the collision including which objects were hit and what the relative normal velocities were at the time of collision. This information allows to game logic to kill enemies and smash blocks of ice.
Physics engine – persistent contacts
This physics engine feature is absolutely essential to the stability of the physics; without it, the game would not be possible with as much creative freedom in level design.
So, what are persistent contacts?
Regular contacts are the things which stop two rigid bodies from falling through each other – they are generated by the collision detection system and used by the physics solver but they are temporary and exist for the current frame only.
The impulses generated by the physics solver converge the entire simulation towards stability, but there are not enough CPU cycles for it to be resolved completely in one frame… So rather than throw away all of last frames impulses we would like to be able to remember them and then apply them next frame in order to ‘warm start’ the engine. This leads to massive stability improvements.
Persistent contacts are a way of caching the impulses between frames by identifying contacts which are logically the same across a series of frames. By logically I mean rather than using something crude like the position of two contacts, we want to use something which identifies contacts uniquely. To do this we can use feature pair indicies; so for example, the index of the vertex from object A combined with the index of the edge from object B. These will be combined together into one uint hash value which can be looked up and compared across frames. When the hash tags match, we have a cache hit and can copy the impulses across.
The code I use for caching the impulses looks like this:
When two objects touch for the first time, a persistent contact entry is generated for the collision and stored on the lower indexed object, so that I avoid duplicating data. When objects stop touching, these contact entries are deleted again. During the time when they are touching, I cache up to 4 feature pairs for later lookup – the reason I chose 4 and not 2 (which would be the logical choice) is that I noticed there was a fair amount of flip-flop over the course of a few frames in certain contact configurations; one frame two contacts would be generated from a certain feature pair, the next frame another two contacts from a different feature pair and then repeat forever. Rather than throw away and regenerating, storing 4 allowed me to catch this case and achieve a 100% cache hit rate for stable contact configurations.
Optimisation
After I had implemented all these features and gotten the engine stable enough to be able to run angry birds, I noticed that it was in fact, far too slow to actually use. This made me sad, but a little digging into action-script optimisation techniques netted me the answer.
References
In action-script, every complex type is passed by reference and there are no complex types which can be put on the stack, unlike c# or c++. This is particularly irksome if you have something like a Vector2 class for doing all your geometric calculations, because it means every time you do a new(), an allocation is made on the heap, which of course means you risk the slowness of the garbage collector when doing temporary calculations.
This is an absolute killer in terms of performance – I found I was doing something on the order of 7k-12k such temporary allocations every single frame!
The solution – pools
Of course, the internet informed me that the accepted solution here is to employ an object pool for complex types – pre-allocated up-front with a known fixed capacity. Allocations can then be made and freed using the pool, thereby avoiding the garbage collector.
I couldn’t find an implementation that did exactly what I wanted, so I wrote my own:
This one allows you to construct a pool with runtime type checking and also allows you to call an Initialise() function on the object being allocated. I couldn’t find a way of calling the object’s constructor in AS3, which would have been the ideal case – something like placement new in c++ would be nice. Equally, I couldn’t find a way of passing all the parameters directly to the function without manually indexing them or calling apply() which I’ve read is very slow. However, it works well in practice.
For the temporary calculations involving Vector2′s I used a large pool of Vector2s which only exists for one frame. The only caveat is that you need to be very careful not to persist a reference to one of these across frames because it will be overwritten. I really wish AS3 had struct like c# does to avoid having to do this.
I used the following profiler (which I highly recommend) to identify the slow parts of the engine: http://manuel.bit-fire.com/2007/10/17/an-as3-profiler/
Once I had identified all the slow parts and made pools for all the temporary objects I was still a little discouraged because it wasn’t running quite as fast as I’d have liked on my old desktop that I have here. I worked hard at it but eventually reached the point of diminishing returns and I was in danger of making the source code too hard to follow.
In desperation I fired up the real angry birds in my chrome browser to see how quickly that would run on my machine. I was shocked and relieved to discover that it actually ran a lot slower than my implementation did! Happy days.
Particles and blinking
Some little items of polish that I added to the game were a simple particle system which used Sprites defined in the Flash IDE as the particles and a simple blink controller that used named instances inside each character for the open eyes and the closed eyes and then animated them in code depending on a random waiting period to judge when to toggle the visibility of each.
Conclusion
Of course the game contains many more little things which I don’t possibly have time to write about now, but if there is enough interest I can write another article of course! In this article I have covered some of the things which are necessary to turn theory into practice when it comes to talking about physics engines in games.
If you would like to do so, please purchase the source code and assets which go with this article; its very close to being a completed game which can be easily used as a template for your own 2d physics game, complete with editor (in the form of flash) which is delightfully easy to use.
This one is a little more expensive than my regular example code, but take into consideration that it took me two solid weeks of work which if I were contracted would be significantly more than this for one days work and also that what you are getting represents 10 years of industry experience and knowledge – if you think of it like that it really is a bargain… Remeber, Roivo spent $120k developing the original angry birds!
The only thing I ask is that no one just releases this as a game as it stands – please use it as a template for your own games! As ever, the licence allows you to use all the code and assets for commercial purposes or otherwise as long as you don’t just release it as it stands and that you don’t simply give the entire thing to anyone else.
Note: requires Flash CS4+ and builds with Amethyst or FlashDevelop.(Source:wildbunny)

")
")
")
")


 闽公网安备35020302001549号