针对iOS平台移植Flash内容的指导教程(3)
作者:Sina Kashanizadeh
本系列教程指导如何使用FlashDevelop在PC上创建AIR应用,并将其作为原生应用投放于苹果iPad、iPhone或iPod Touch等iOS设备上,这是该教程的第三部分内容。(请点击此处查看第一、第二部分内容)
本部分主要是关于在命令行和认证证书的辅助下,使用FlashDevelop创造AS3应用。
安装FlashDevelop
就像我在之前提到过的,FlashDevelop是只能用于PC平台上且深受业内人士欢迎的免费编写代码工具。
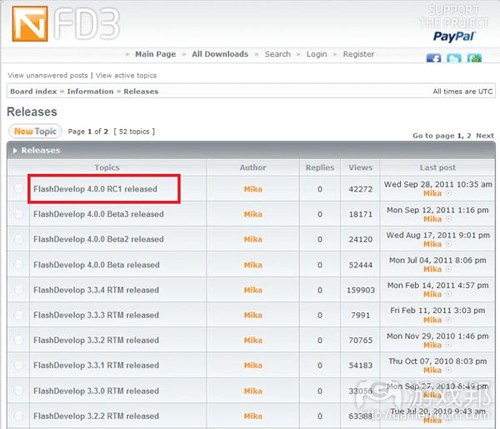
FlashDevelop创造了一个集成开发环境(IDE),让所有人都可以白手起家创造许多不同类型的应用。而且,关于FlashDevelop最让人惊喜的一点是你不需要购买Adobe旗下的Flash Professional软件去创造swf格式的Flash内容。FlashDevelop还有许多强大且省时的功能,如快速导入代码程序库以及拥有多种多样让人惊艳的模版等。如今,最新的FlashDevelop版本是4.0.0,这个版本包含有Mobile AIR应用,即你可以使用它开发iOS和Android系统。而在本篇文章中我们将以iOS版本为例进行说明。
创建一个合并的SDK文件夹
在iOS平台上配置Flash时你将需要使用两个软件开发工具(SDK):Flex和AIR。根据你所安装的FlashDevelop版本,也许这两个SDK已经包含在你的下载软件中了,但是你需要重新下载,并将它们保存在一个单独的文件夹中。按照这种方法,即使你混淆了某些程序,你也可以有序地移除它们而不会影响到你的主要FlashDevelop安装程序。可以说这也是唯一的方式。
1.下载最新的AIR SDK。
2.下载Flex SDK。
3.选择用压缩文件格式下载这两个工具包。并确保你能够随时从电脑中提取它们——即你需要知道自己将其保存在哪里。
4.如果你拥有两个分开的SDK文件夹,那就将AIR SDK中的所有内容复制到Flex SDK文件夹中。期间会弹出一个操作窗口询问你是否覆盖某些文件,你只需要点击“yes”即可。
这时候你的Flex SDK和AIR SDK文件夹便合二为一了。
将FlashDevelop与Flex SDK文件夹搭建在一起
为了编译(创建并执行)你的应用,你必须将FlashDevelop与你刚刚创造的合并SDK文件夹搭建在一起。
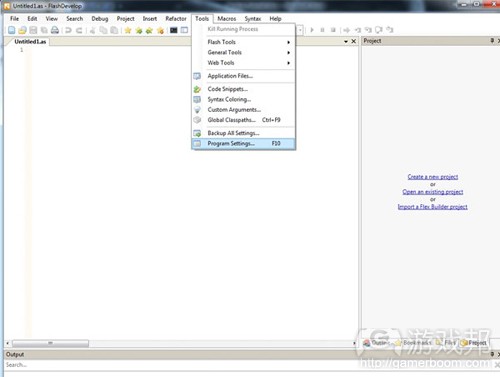
5.打开FlashDevelop并点击“F10”或者在菜单上执行“Tools->Program Settings”。
6.在程序设置菜单中点击“AS3 Context”。
7.找到“Language”部分,然后选择其中的“Flex SDK Location”。
8.点击这一行最后面的“省略”按钮以打开合并的SDK文件夹。
9.点击“Close”提交改变。
创建你的Mobile AIR应用
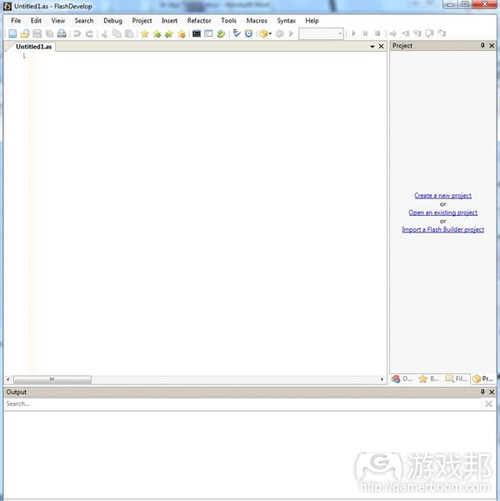
当你下载并安装了FlashDevelop后,打开它你将会发现整个页面还是空白的,如下图:
所以你必须先创建一个新的FlashDevelop项目,即一个由充满项目元数据的文件控制着的一组文件夹。
10.通过在菜单中点击“Project->New Project”创造一个新的项目。
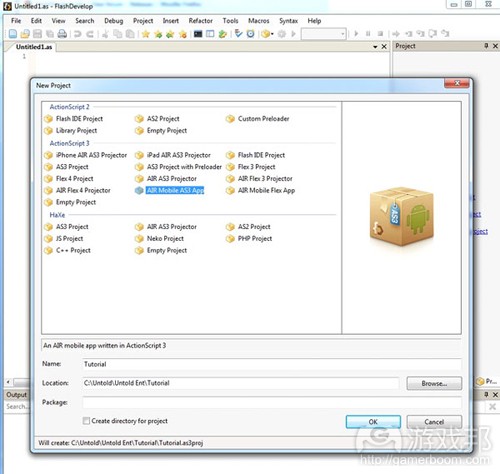
11.随后你便可以看到屏幕中充满许多选项。这是FlashDevelop提供给你的项目起动模版。而你需要的便是“AIR Mobile AS3 App”。选择这个模版并在你的硬盘驱动器中保存这一模版,为其命名,点击“OK”便可。
注释:文件夹的名称并不是那么重要,所以你可以自行选择为其命名。
在你点击“OK”后, FlashDevelop便为你创建了许多文件夹和文件,包括:
* as3proj文件,这是一个FlashDevelop项目文件,文件中有各种元数据能够帮你追踪项目的相关记录。
* bin文件夹。你可以将最终文件储存在此。
* lib文件夹。你可以将“construction”文件和原图存放在此。
* src文件夹。这里包含有你的.as AS3代码文件。
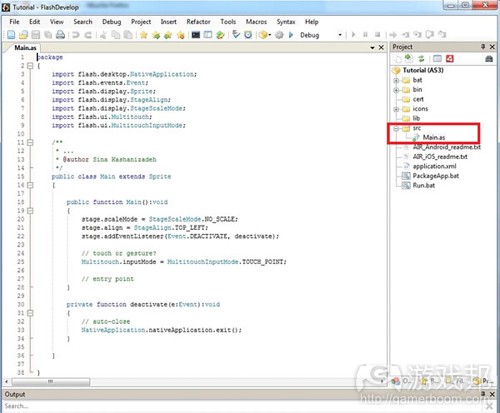
12.当你创造了项目文件后,你只能够看到一个空白的屏幕。为了打开代码,你需要点击项目右边工具条的src文件夹(项目工具条记录了你的电脑的实际目录结构,让你能够在此快速地找到动作脚本文件。)
13.在src文件夹中双击打开Main.as文件。这是你的项目的切入点,以此你便可以开始编写应用代码了。
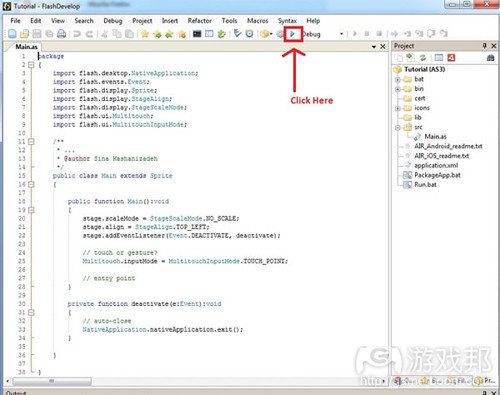
14.在键盘上按压“F5”键,或者点击FlashDevelop上方的“播放”按钮,然后便可以编译并执行你的项目。
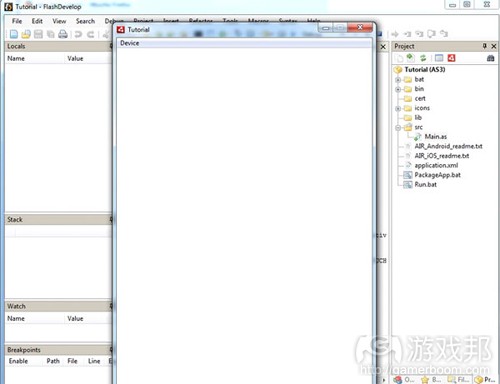
首次编译将会花费你一些时间,但是从这之后你就可以快速进行编译了,因为编译器需要一定的基础,而后来你只需要编译最新的改变即可。一旦你开始运行新的项目,FlashPlayer将会再次出现,你也会再次看到一个完全空白的屏幕。幸运的是,这就是我们想要的结果。
“Hello, Planet”
虽然这种做法很棒,但是如果我们能够在屏幕上编写一些简单的信息,便能在测试的时候了解它是否有成效了。让我们在屏幕上打出“Hello Planet”的字样。
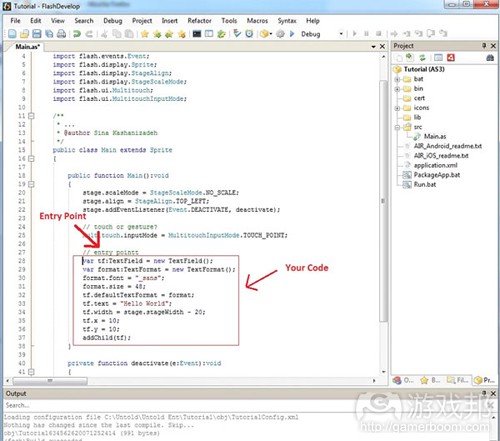
15.在用绿色字体标写着Main.as文件的“entry point”的下方,你可以将这几行内容复制并黏贴到你的代码中:
var tf:TextField = new TextField();
var format:TextFormat = new TextFormat();
format.font = “_sans”;
format.size = 48;
tf.defaultTextFormat = format;
tf.text = “Hello Planet”;
tf.width = stage.stageWidth – 20;
tf.x = 10;
tf.y = 10;
addChild(tf);
16.点击编译按钮(或者按压F5)。是否搞砸了?没关系。因为在你准确无误地准备编译任务之前还需要做一些事。
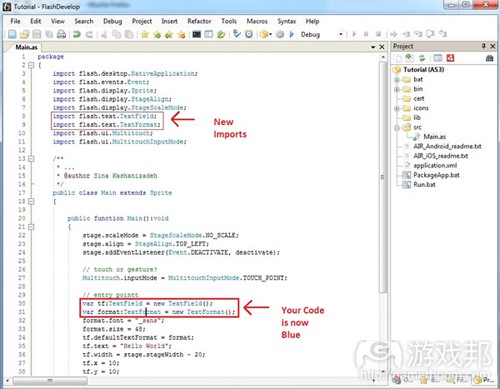
17.在你的代码中,将光标移至单词“Textfield”中,并在键盘上按压“ Ctrl+Shift+1”,然后这个单词就会变成蓝色。如果你将滑块移到最上方,你将会注意到在你的编码上方出现了一个额外的输入行。这种情况下,“CTRL+SHIFT+1”将会自动帮你处理引入语句。而如果你希望TextField能够正常运行,你就需要输入TextField代码与这些引入语句。
18.相同的方法,在单词“TextFormat”中使用“CTRL+SHIFT+1”你将会看到下图:
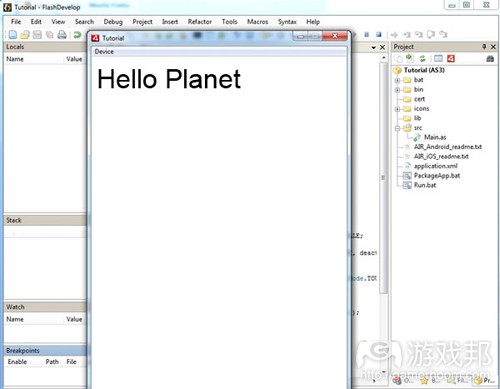
19.然后点击“Compile(或者按压F5)。
结语
如此,一切都进展得很顺利。你只需要:
* 安装FlashDevelop,这个能够创造Flash和AIR内容的免费开放式IDE
* 下载并将最新的AIR SDK和Flex SDK合并在同一个文件夹
* 将FlashDevelop与Flex SDK搭建在一起以发挥其强大的编译器功能
* 使用Mobile AIR应用模版创造一个新的FlashDevelop项目
* 编译一个新的“Hello Planet”AIR应用并利用它测试设备
(本文为游戏邦/gamerboom.com编译,拒绝任何不保留版权的转载,如需转载请联系:游戏邦)
Flash to iOS: A Step-by-Step Tutorial (Part 3)
by Sina Kashanizadeh
This is the third part of our tutorial series by Intern Sina on creating an AIR application for free on a PC using FlashDevelop, and deploying it as a native app on an iOS device like the Apple iPad, iPhone or iPod Touch.
Luke Loses His Hand
Part 2 of this tutorial was like The Empire Strikes Back. It was the crisis moment in the story of deploying a Flash project to the Apple iOS platform. It was dark, it was difficult, and Han Solo wound up frozen in carbonite. Part 3 is redemptive: with all that command line and certificate red tape out of the way, you can finally build our AS3 app using FlashDevelop. Watch closely, friends: you may spot some ewoks.
It’s a trap.
Install Flash Develop
As I mentioned earlier in the series, FlashDevelop is a FREE, PC-only coding environment that is used throughout the industry and loved by many. If you haven’t installed it, head here to download the latest version.
FlashDevelop is an IDE (Integrated Development Environment) where you can create many different types of applications from scratch. The most amazing thing about FlashDevelop is that you don’t actually need to buy Adobe’s Flash Professional software to create Flash (swf) content. FlashDevelop has amazing, time-saving features like importing code libraries on the fly, and numerous awesome templates. At the time of this writing, the latest edition of FlashDevelop is 4.0.0. This version of FlashDevelop contains a template for Mobile AIR applications which you can use for iOS and Android development. In this tutorial, you’ll use the iOS version of the template.
Create a Merged SDK Folder
There are two SDKs (Software Development Kits) you’ll need to deploy Flash content to the iOS platform: Flex and AIR. Depending on the version of FlashDevelop you install, these two SDKs may already be included in the download. You’re going to download them both anew and put them in a single folder. That way, if you mess anything up, you can take off and nuke the site from orbit instead of messing up your main FD install. It’s the only way.
1Download the latest AIR SDK(which, at the time of this writing, was v3.0)
2Download the Flex SDK.
3These two packages download as .zip files. Extract them wherever you like on your computer – just make sure you know where you put them.
4Once you have both SDK’s extracted to separate folders, copy everything in the AIR SDK folder into the Flex SDK folder. Windows will ask you if you want to overwrite certain files. Say “yes” to everything.
You now have a folder with the Flex SDK and the AIR SDK merged into one. This is a Good Thing?.
Point FlashDevelop to the Flex SDK
In order to compile (build and execute) your app, you have to point FlashDevelop to the merged SDK folder that you just created.
5Open up FlashDevelop and hit F10 or go to Tools->Program Settings in the menus.
6In the Program Settings menu, click on AS3 Context.
7Find the Language section, and the Flex SDK Location line within it.
8Click the ellipsis button at the end of that line, and navigate to the merged SDK folder.
9 Click Close to commit the change.
Set Up Your Mobile AIR Application
Once you have downloaded and installed FlashDevelop, open it up and you should see it in all its glory:
To begin with, you’ll need to create a new FlashDevelop project, which is a group of folders governed by a file filled with metadata about your project.
10Create a new project by clicking Project -> New Project in the menu.
11Now you will see a screen with a multitude of options. These are all project starter templates that FlashDevelop has for you to use. The one you want is the AIR Mobile AS3 App. Select this template, choose a location on your hard drive to save it, give a name to your project, and hit OK.
Note: A package name is not required but the option is there if you’d like to use it.
After you hit OK, FlashDevelop creates a number of folders and files for you, including:
oThe .as3proj file, which is a FlashDevelop project file filled with metadata that keeps track of various aspects of your project.
oThe bin folder. This is where your finished files end up.
oThe lib folder, where you can put your “construction” files and artwork.
oThe src folder, which contains your .as AS3 code files.
12Once you’ve created your project file, FlashDevelop starts you off with a blank screen. To open up your code, click on the src folder in the Project sidebar on the right. (The Project sidebar lists your computer’s actual directory structure so that you can access your Actionscript files quickly and easily.)
13Inside the src folder, double click the Main.as file to open it. This is your project’s point of entry, where you can start writing the code for your app.
14Push the F5 key on your keyboard, or the click the little play button at the top-middle of FlashDevelop to compile and run your project.
The first compile will take little bit of time, but any compile after that should be quick, because the compiler builds on an as-needed basis, compiling only your most recent changes (as opposed to Flash Professional, which compiles your ENTIRE project every single time. Bleh!). Once you run your new project, the FlashPlayer should pop up and you should see a blank screen. Luckily, this is exactly what we want. As of right now, this is your App.
Hello, Planet
This is nice and all, but let’s try to the write a simple message on screen so that when we are testing, we know it actually works. Let’s write “Hello Planet” on-screen.
15Just below the green commented line where it says //entry point in your Main.as file, copy and paste these lines into your code:
var tf:TextField = new TextField();
var format:TextFormat = new TextFormat();
format.font = “_sans”;
format.size = 48;
tf.defaultTextFormat = format;
tf.text = “Hello Planet”;
tf.width = stage.stageWidth – 20;
tf.x = 10;
tf.y = 10;
addChild(tf);
16Click the compile button (or press F5). Did it screw up? Good. There are a couple more things you have to do before you are ready to compile without errors.
17In your code, click to place your cursor carat on the word Textfield and hit Ctrl+Shift+1 on your keyboard. The word turns blue. If you scroll to the top of the class, you’ll notice that there is an extra import line at the top of your code. CTRL+SHIFT+1 is a special feature of FlashDevelop that does code completion. In this instance, CTRL+SHIFT+1 automatically handles your import statements for you. You need to import the TextField code with this statement if you want your TextField to work.
18Use CTRL+SHIFT+1 on the TextFormat word and you should see this:
19Now click Compile (or press F5).
Thar she blows!
(It works, but it’s no Angry Birds. – Ed.)
Bust Out the Hardware
This is moving along nicely. You:
?Installed FlashDevelop, a free and open-source IDE for creating Flash and AIR content
?Downloaded and sunk the latest AIR SDK and Flex SDK into a single, merged folder
?Pointed FlashDevelop to the Flex SDK to use its superior compiler
?Created a new FlashDevelop project using the Mobile AIR application template
?Wrote and compiled a new Hello Planet AIR app that you can deploy to a testing device
In the next part of the tutorial, you’ll fine-tune FlashDevelop and modify a number of settings and batch files to create the magical, mystical .ipa file, and you’ll see that file running on your testing device.(source:untoldentertainment)






 闽公网安备35020302001549号