针对iOS平台移植Flash内容的指导教程(2)
作者:Sina Kashanizadeh
本系列教程指导如何在使用FlashDevelop的PC上免费创建AIR应用,并将其作为原生应用投放于苹果iPad、iPhone或iPod Touch等iOS设备上,这是该教程的第二部分内容(请点击此处查看第一部分、第三部分内容)。
你需要使用一个复杂的命令行解释器,你需要解析各种不同的证书和图表。在这个阶段,你甚至完全还没开始创建应用!但处理了这些问题后,接下来的过程将会变得很简单。
本教程的首个目标是创建认证证书。应用的识别方式就是你或所属公司的数字签名。我们需要使用OpenSSL这个程序来创建认证证书。
安装OpenSSL
要将未来的AIR项目转变成原生应用,你需要创建两个重要文件:认证证书和Mobile Provisioning Profile。如果你使用Mac电脑工作,那么你可以使用Keychain程序来获得你所需的证书。我们的工作平台是PC,所以必须要采取更多的步骤才能实现。
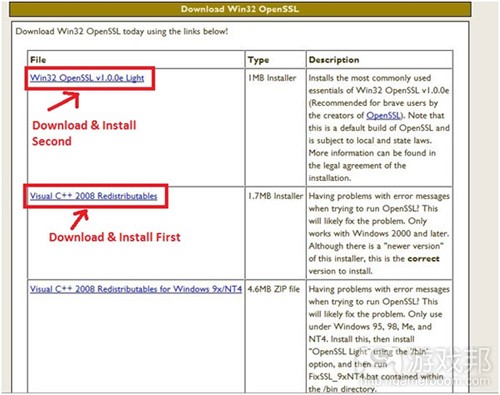
我们必须要做的首件事情是登录http://www.slproweb.com/products/Win32OpenSSL.html。向下滑动然后选择下载Visual C++ 2008 Redistributables并安装文件。接下来,下载Win32 OpenSSL v1.0a Light文件并安装。这两个文件将帮助你创建认证证书任务。
你要记得以上两个文件的安装路径。接下来,访问以下网址:http://help.adobe.com/en_US/as3/iphone/index.html。
这些是Adobe的帮助文件,指导你如何生成认证证书并将证书转变成.P12文件。如果你丢失本教程,这个帮助文件也可以提供适当指导。
在Adobe的支持页面上,你会看到某些Mac电脑的指南。忽略这些内容,向下滑动到Windows指南,浏览下这些内容。
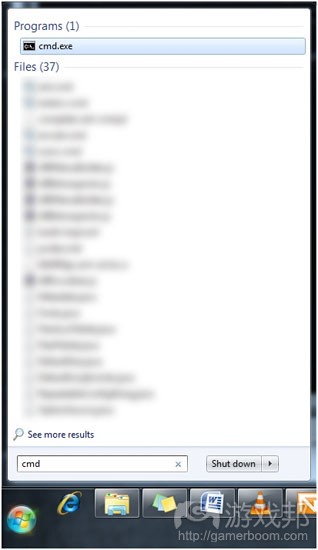
该指南会要求你安装Open SSL。这个步骤你已经完成。打开命令提示符窗口。点击“开始”菜单,在搜索栏中输入cmd即可。(游戏邦注:按住键盘上的Windows键和“R”键,然后输入cmd后回车,也可以调出窗口。)
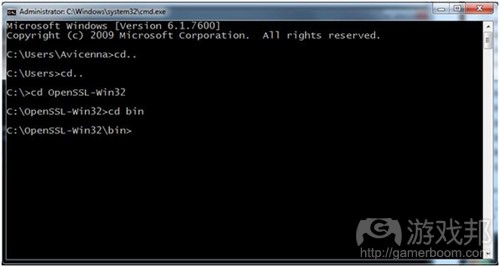
进入命令提示符后,打开Open SSL所存文件夹。你的安装文件夹的位置可能有所不同,所以路径会与本示例不同。
如果你是首次使用命令提示符,以下是部分常用命令的作用:
cd 这个命令的意思是“更改目录”。如果你在某个目录中,然后想要进入子目录,可以使用这个命令加上目录名称(游戏邦注:比如“cd 目录名称”)
cd.. 这个命令可以让你在目录结构中向上返回一层
dir 输入该命令就可以看到当前目录下所有文件和文件夹列表
dir /w /w转换将目录列表划分成多个栏目。你可以较容易地查看所有文件夹的名称,无需通过长长的滚动列表搜寻。
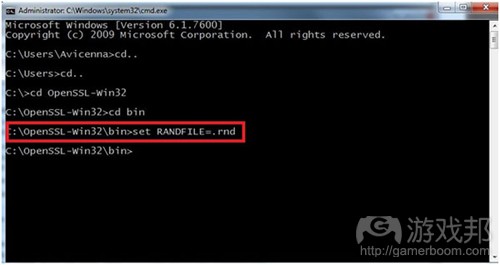
你在运行下文所涉命令时可能会遇到问题。曾有评论者在Adobe指导上的评论版块表示,你可能需要先在命令提示符中输入RANDFILE=.rnd,才能使下列命令正确地运行。
生成认证证书请求文件
做完所有准备工作后,你可以开始输入某些命令来生成认证证书请求文件。拥有这个文件后,你可以使用它来向苹果申请认证证书文件,用来识别你的应用。
1、将以下命令输入命令行解释器,完成后按回车:
openssl genrsa -out mykey.key 2048
你就可以看到以下回应
2、接下来,按回车(游戏邦注:或者选定该行,右击选择“复制”,然后再命令行解释器中右击选择“粘贴”):
openssl req -new -key mykey.key -out CertificateSigningRequest.certSigningRequest -subj “/emailAddress
3、现在,在你按回车之前,你需要做些编辑。首先,将“John Doe”替换成你自己的名字或公司名字。然后将“yourAddress@example.com”替换成你自己的邮箱。然后按回车。
你会得到类似下图的消息:
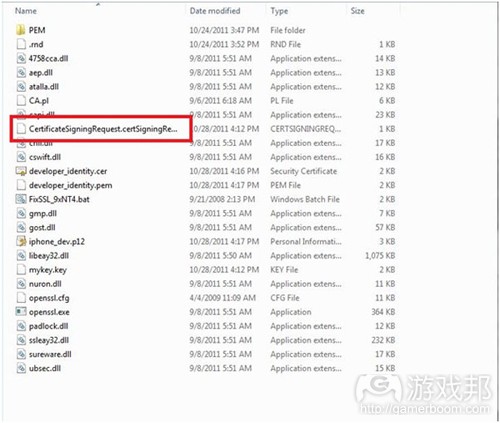
你刚刚生成了你将用来向苹果申请认证证书的请求文件。认证证书请求文件的位置在安装Open SSL的文件夹中。文件扩展名为.certSigningRequest,如下图所示:
获得用于开发的认证证书
你需要将认证证书请求文件上传到Apple Provisioning Portal,获得你的认证证书。
注:有证据表明无法使用Google Chrome上传文件。为确保安全,请使用Firefox等其他浏览器。
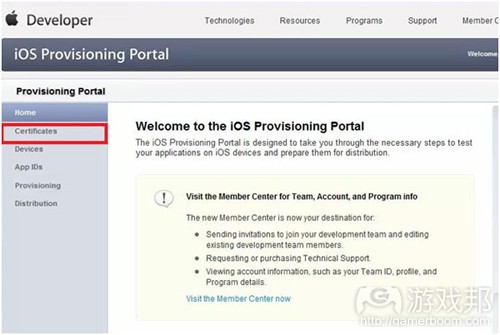
1、输入开发者账号后转向iOS Provisioning Portal,点击“证书”。
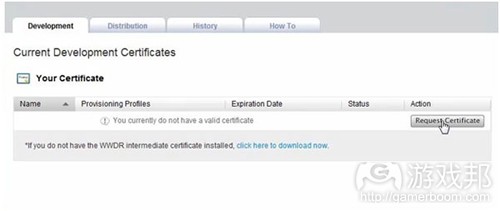
2、点击“请求证书”。
注:如果你是团队会员,或者没有支付99美元的开发者年费,那么你无法请求认证证书。只有团队管理者,也就是那个支付开发费用的人,才能够发出请求。
在下个屏幕中,你可以上传之前生成的认证证书请求文件。
3、点击“浏览”,从中选择OpenSSL文件夹中存放请求文件的文件夹。
4、选择认证证书请求文件后,点击“提交”。你会看到以下内容:
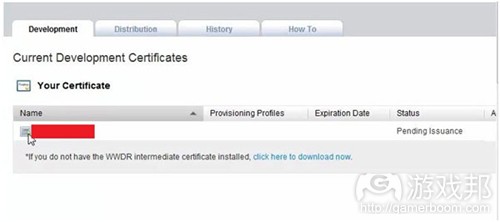
5、在浏览器上点击“刷新”数次,最后你应当会看到:
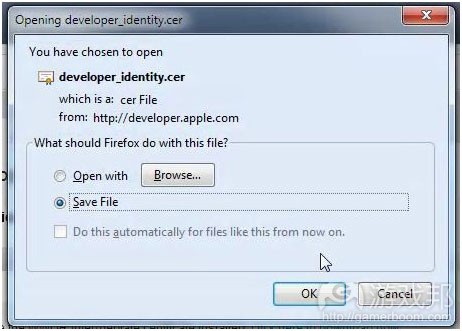
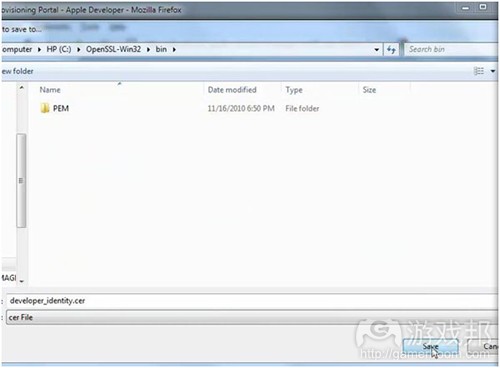
6、这就是你的认证证书!下载证书。为使操作更加简便,你可以将证书保存在Open SSL文件夹的bin文件夹中,也就是你的认证证书请求文件的存放位置。
将认证证书转变为.p12文件
现在,我们已经取得了一定的进展。下个步骤是将认证证书转变为p12证书,因为苹果要求这么做。
1、从Adobe的帮助页面上,访问描述将开发者证书转变成p12文件的过程中所述链接。你会获得更多命令,随后你会将这些命令输入到上文所述的命令提示符中。
2、复制首个命令(游戏邦注:选定文字,右击并从背景菜单中选择“复制”):
openssl x509 -in developer_identity.cer -inform DER -out developer_identity.pem -outform PEM
3、以我上文所述方法打开命令提示符,然后导航至你的Open SSL目录中的bin文件夹。
4、完成后,将首个命令粘贴(游戏邦注:右击并从背景菜单中选择“粘贴”),然后按回车。
5、跳转到Adobe帮助文件中的“第3步”,然后复制那个命令(游戏邦注:第2步中的命令只适用于Mac)。
openssl pkcs12 -export -inkey mykey.key -in developer_identity.pem -out iphone_dev.p12
6、输入命令后,输入密码然后确认密码。设定你自己能记住的密码。当你输入密码时,命令提示符不会显示点或星号来呈现你输入多少个字母。请放心,命令依然接受你输入的内容。
注:你可能会看到所谓的“random state”错误。只需要输入命令RANDFILE=.rnd,应该能够解决这个问题。
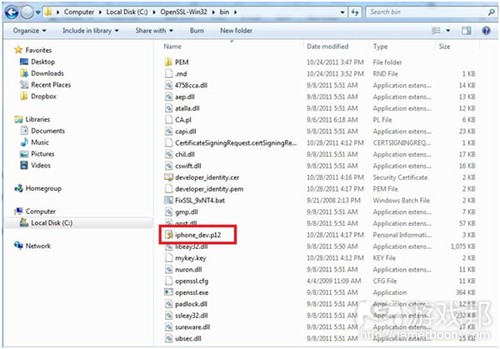
7、进入Open SSL目录的bin文件夹,你应当可以看到.p12文件。
创建应用ID
现在,你拥有了所需的珍贵文件,最后需要创建的是Mobile Provisioning Profile。你开始为创建的应用设置独立的ID。
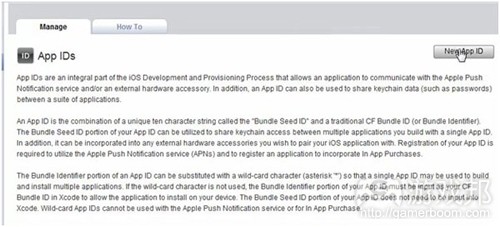
1、在网页浏览器上回访Provisioning Portal,为你的应用创建应用ID。登录,点击Provisioning Portal,然后点击“应用ID”。
2、点击“新建应用ID”。
注:如果你还未支付开发费用,或者你只是团队账户中的普通成员,那么你就看不到这个选项,就要让团队管理者来帮助完成这个步骤。
3、在下个屏幕中,你将开始为应用编写“描述”,你可以输入任何内容。玩家在App Store中查看你的应用时会看到这些描述。很显然,这是营销层面的事情,已经超出本教程的讨论范围。因为我们只是在构建测试应用,所以我建议你先在描述中随便输入一些内容。
根据你的账户情况,Bundle Seed ID 中会有不同的选项。如果你是团队管理员,就会有“生成新ID”的选项。团队成员只能看到“使用团队ID”选项。如果你之前开发过应用,你还可以选择之前项目的Bundle Seed ID。
包标示符让你可以为应用创建独立包。制作这个独立包的标准方法是将你的网站域名倒写。我使用的是com.sina.ipadtest。
你也可以使用一般包标示符,在栏内输入“*”。
注:此前出现过某些人无法使用星号的情况。
4、点击“提交”。
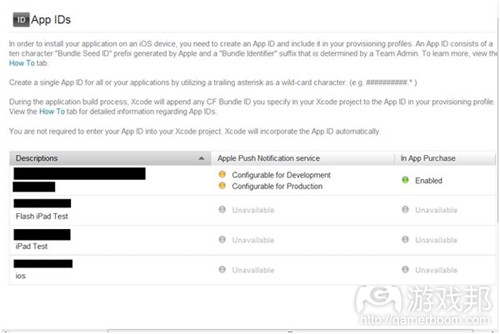
现在,你已经创建了自己的应用ID。在下个画面中,你将会看到你已经创建的所有项目概况。
创建Mobile Provisioning Profile
现在你已经拥有了应用ID,你可以创建Mobile Provisioning Profile。Mobile Provisioning Profile将把开发者、认证证书、应用ID和测试设备绑定起来。拥有这个文件后,你可以在设备上测试应用。
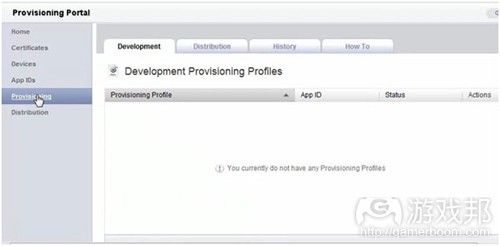
1、在Provisioning Portal网站中,点击侧边栏的“Provisioning”。
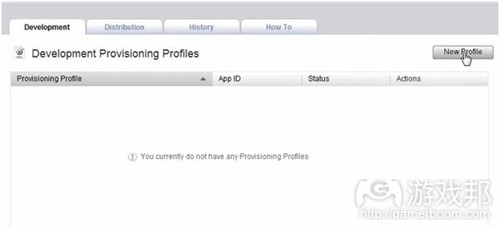
2、点击“新概述”。
注:只有在你是付费团队管理员的情况下,才能看到这个选项。
3、为你的provisioning profile设置“概述名称”。
4、选择你想要与这个概述配合使用的认证证书。
5、使用下拉菜单制定创建此概述的目标应用。
6、最后,制定你的目标测试设备。
7、点击“提交”。
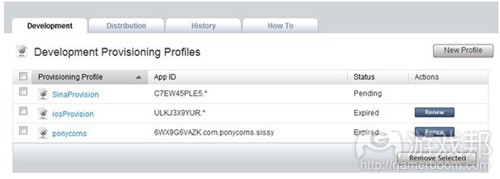
你会看到自己的Mobile Provisioning Profile正在配置中的消息。刷新浏览器,直到出现下载键,然后将这份宝贵的概述下载下来。确保将其保存在你熟悉的地方。
总结
光是设定在设备上测试应用就需要如此多的步骤,我们甚至还未开始构建应用的工作!以下是你刚刚完成的内容:
1、使用命令行和OpenSSL来创建证书认证请求文件。
2、将这个文件发送给苹果。苹果做出回复,允许你下载认证证书文件。这个文件可以表明你就是应用的开发者。
3、将自己的认证证书转变为.p12格式。
4、为应用创建ID。
5、创建了Mobile Provisioning Profile,这将之前所有的元素结合起来,可以让你在iOS设备上测试应用。
但好处在于,如果想要制作更多的应用,你无需重复这些步骤来创建认证证书。现在你已经拥有了这个文件,你可以用此来认证所有的iOS应用。同样,在未来的项目中,你也不需要再次输入开发者ID或设备ID(游戏邦注:除非你获得了新的团队账户或设备)。应用ID和Mobile Provisioning Profile是该应用独有的两个部分,对于其他的项目,你需要重复这两个部分的创建步骤。
本系列教程的下个部分将阐述使用FlashDevelop创建Adobe AIR应用的过程,结合你已经创建的证书和概述,将应用放到你的测试设备上。(本文为游戏邦/gamerboom.com编译,拒绝任何不保留版权的转载,如需转载请联系:游戏邦)
Flash to iOS: A Step-by-Step Tutorial (Part 2)
Sina Kashanizadeh
This is the second part of our tutorial series by Intern Sina on creating an AIR application for free on a PC using FlashDevelop, and deploying it as a native app on an iOS device like the Apple iPad, iPhone or iPod Touch.
Drudgery
Without a doubt, this section of our tutorial series on bundling your Adobe AIR App for Apple’s iOS platform is the pits. You have to use a complicated command line interpreter, you have to juggle what may feel like a million different certificates and profiles, and you have to jump through a dizzying array of hoops just to get everything set up … and you’re not even going to start building your app at all! But trust me: once you’ve cleared these hurdles, the rest of the process is gravy.
The first goal of this tutorial is to create a signing certificate, which is used very much like a hot brand on cattle. It’s the digital signature of you or your company that identifies an app as your own. We need to use a program called OpenSSL to create this signing certificate.
Install Open SSL
In order to turn your future AIR project into a native app, you need to create two important files: a Signing Certificate and a Mobile Provisioning Profile. If you are working on a Mac, you actually use a program called Keychain to do some fancy voodoo magic and get the certificate you need. We are working on a PC and we do not have that luxury, so there are a couple of confusing steps that we must go through.
The first thing you have to do is go to http://www.slproweb.com/products/Win32OpenSSL.html. Scroll down, and then download the Visual C++ 2008 Redistributables and install the resulting file. Next, download the Win32 OpenSSL v1.0a Light file and install that after you have installed the first package. These two files will help you create the Signing Certificate Request you so richly deserve.
Be sure to keep track of where you installed those last two elements. Next, visit this site: http://help.adobe.com/en_US/as3/iphone/index.html.
These are Adobe’s help files for generating your signing certificate and then converting that certificate into a .P12 file. If you get lost in this tutorial, that page will be your safety net.
On that Adobe support page, you will see some instructions for Mac machines. Ignore them. Scroll down to the Windows instructions and give them a once-over.
The instructions say that you have to install Open SSL. You’ve already done that. Open a command prompt window. You can do this by going to your Start button and typing in cmd in the search field. (You can also hold the Windows key on your keyboard and hit the “R” key (for “Run”), then type cmd and hit Enter.)
Once you are in the command prompt, travel your way to your Open SSL bin folder. Depending on where you installed it you will have to travel to a different path than in this example. (For your sake, i hope you installed Open SSL in a location that you can remember!)
If this is your first time using the command prompt, here’s a quick primer on the commands that will help you get around:
cd This command means “Change Directory”. If you are in a directory and you want to go into one of its sub-directories, use this command plus the directory name (example: cd directoryName)
cd.. This command will pull you up one level in your directory structure
dir Type this command to see a list of all of the files and folders within your current directory
dir /w The /w (wide) switch spreads a directory listing across multiple columns. This is useful for seeing all the folder names at a glance, instead of in one big long scrolling list.
You may have some problems getting some of the following commands to work. A fine commenter (and Ontario resident!) named Dan Zen mentioned on the Adobe guide’s comments section that you may need to input set RANDFILE=.rnd in your command prompt before the following commands will work properly.
Generate a Signing Certificate Request File
With all of that taken care of, you can start inputting some commands to create your Signing Certificate Request file. Once you have that file, you’ll use it to ask Apple for your proper Signing Certificate file that you’ll use to identify your app.
1. Punch this command into your command line interpreter and hit the ENTER key when you’re finished:
You should see this response:
2. Next, type (or highlight the line, right-click, choose “Copy”, and right-click/”Paste” in the command line interpreter):
3. Now, before you hit ENTER you’ll want to edit a couple of things. First, replace “John Doe” with your own name or company name. Then replace the “yourAddress@example.com” email with your own email. Then press ENTER.
You should get a message similar to this:
You just generated the Signing Certificate Request file that you’ll use to ask Apple for your Signing Certificate. The Signing Certificate Request file is located in the bin folder of your Open SSL install. It has a .certSigningRequest file extension and should look like this:
Obtain a Signing Certificate for Development
You have to upload your Signing Certificate Request file to the Apple Provisioning Portal to get your signing certificate.
Note: There have been instances where this upload does not work with Google Chrome. Just to be safe, use another browser like Firefox.
1. Navigate to the iOS Provisioning Portal after logging in with your developer account and click on Certificates.
2. Click Request Certificate.
Note: If you are a team member and/or you have not paid the annual developer fee of $99 dollars, then you cannot request a Signing Certificate. Only the Team Admin – the person who has paid the development fee – will be able make this request.
On the next screen, you will upload the Signing Certificate Request file that you generated in the previous section.
3. Click the Browse button and navigate to the bin folder located within your OpenSSL folder.
4. Once you have selected the Signing Certificate Request file, click Submit. Your next screen should show this:
5. Just hit Refresh a couple of times on your browser and you should eventually see this:
6. It’s your Signing Certificate! Go ahead and download it. Just to make things easier, you can save that certificate in the bin folder in the Open SSL folder, where your Certificate Signing Request file is sitting.
Convert the Signing Certificate to a .p12 File
Are you having fun yet? Yeah, me neither. We are making good progress though. The next step is converting that Signing Certificate to a p12 certificate, because Apple loves certificates.
1. From the Adobe help page, visit the link describing the process of converting a developer certificate to a p12 file. You get a list of more commands that you’ll have to punch into your trusty old command prompt.
2. Copy the first command (highlight the text, right-click and select “Copy” from the context menu):
3. Open up your command prompt as I showed earlier, and navigate to the bin folder of your Open SSL directory.
4. Once you’re there, paste in the first command (right-click and select “Paste” from the context menu), and press ENTER.
5. Skip ahead to Step 3 of the Adobe help guide and copy that command. (The command in Step 2 is for Macs only.)
6. Once you punch in the command, enter a password and then verify that password. Make sure the password is something that you will remember. (Save it in a .txt file in that folder if you’ve got a lousy memory like me – Ed.) When you are typing in your password, the command prompt does not give you the luxury of seeing dots or asterisks to indicate how many letters you are typing in. Rest assured that the command is accepting your input.
Note: You may get an error mentioning a “random state”. Just type in the command set RANDFILE=.rnd and it should fix the problem for you.
7. Go into the bin folder in your Open SSL directory and you should see your .p12 file. Hooray!
Create an App ID
Now that you have the precious file you need, it’s finally time to create your Mobile Provisioning Profile. You’ll start by setting up a unique ID for the app you’re creating.
1. Navigate back to the Provisioning Portal in your web browser to create an App ID for your app. Log in, click on Provisioning Portal, and click on App IDs.
2. Click New App ID.
Note: If you have not paid the developer fee, or if you are just a team member of the Team Admin, you will not see this option. Ask your Team Admin to complete this step.
3. On the next screen you’ll start by writing a Description for your app, which can be anything you want. (This is what the player will see when he sees your app in the App Store. Obviously, there’s a whole marketing concern here that’s outside the scope of this tutorial. Since we’re just building a test app, I recommend you punch SOME CRAZY NONSENSE in there for your description. Take THAT, marketing. -Ed)
Within the Bundle Seed ID (App ID Prefix) you will have various options, depending on your account status. If you are the Team Admin, you’ll have a “Generate New” option. Team Members will only see a “Use Team ID” option. (If this is not your first App, you could also choose the Bundle Seed IDs for previous project). Either way, leave it at the default.
The Bundle Identifier lets you create a specific package for your App. The standard way to make this package is to reverse the name of your website domain. I used com.sina.ipadtest. (Our team uses com.untoldentertainment.whatever – Ed.)
Alternately, you can use a generic Bundle Identifier by just putting an “*” in the field.
Note: There have been cases where the asterisk does not work for some people. It is a safe bet you make a specific namespace like the examples above.
4. Click Submit.
Voila – you have now created your App ID! On the next screen you will see all of the app profiles you’ve created.
Create a Mobile Provisioning Profile
Now that you have an App ID, you can now create your Mobile Provisioning Profile. This is the crowning touch to everything we’ve done in this tutorial so far. The Mobile Provisioning Profile glues your developer(s), your Signing Certificate, your app ID and your testing device together. Once you have this file, you’ll be able to test an app on your device.
1. Within the Provisioning Portal website, click Provisioning in the sidebar.
2. Click on New Profile.
Note: You only see this option if you are the fee-paying Team Admin.
3. Give your provisioning profile a Profile Name.
4. Choose the Signing Certificate(s) that you want to use with this profile.
5. Use the drop-down list to indicate the app for which you’re creating this profile.
6. Finally, indicate the testing device you want to test it on.
7. Click Submit.
You’ll be taken to a screen that says your Mobile Provisioning Profile is pending. Just click your browser’s refresh button a couple of times until the Downloadbutton appears, and download your precious, hard-fought profile. Make sure to save it in a location you’re likely to remember.
Are We There Yet?
That was a big pile of hoops to jump through just to test an app on your device, and we haven’t even begun building the app yet! Here’s what you just accomplished:
1. You used the command line and OpenSSL to create a Certificate Signing Request file.
2. You sent that file to Apple. Apple responded by enabling you to download your Signing Certificate file. This file identifies you as the developer of your app.
3. You converted your Signing Certificate to the .p12 format.
4. You created an ID for your app.
5. You created your Mobile Provisioning Profile, the glue that holds all these elements together and enables you to test your app on an iOS device.
The good news is that you DO NOT need to repeat the steps to create your Signing Certificate for additional apps. Now that you have that file, you’ll use it to sign all of your iOS apps from here on in. Similarly, you won’t have to re-enter your developer ID or device ID for future projects (unless, of course, you gain a new team member or device). The App ID and Mobile Provisioning Profile are the two pieces that are unique to your app – you WILL need to repeat those steps for additional projects.
The next part of this tutorial series will cover the process of creating your actual Adobe AIR app using FlashDevelop, bundling it up with this mess of certificates and profiles you just built, and deploying the app to your testing device. (Source: Untold Entertainment)














 闽公网安备35020302001549号